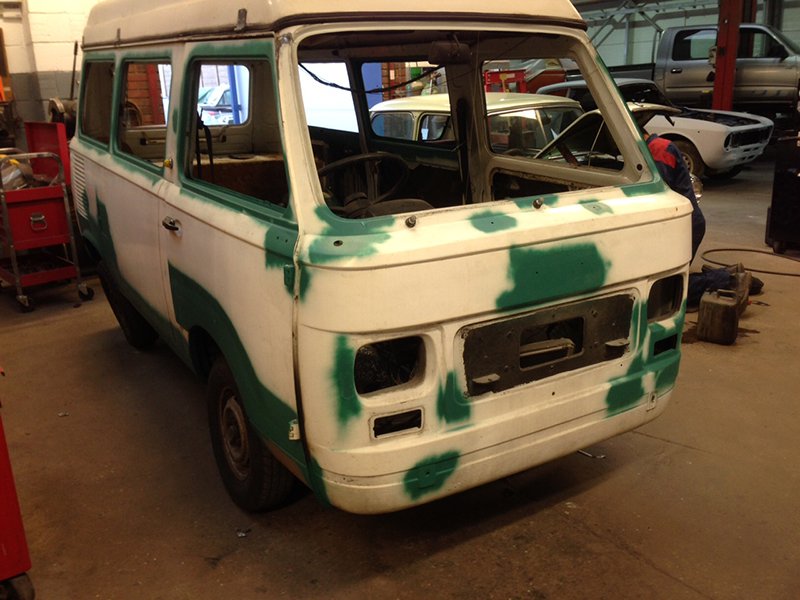
Aug27_front_L.jpg

900 900t Restoration (Connie)

Introduction

Hi

After having our 900T Amigo camper (Connie) for the last 14 years (off road for the last 10) we now have the time to work on the restoration.

Luckily for a 1978 Fiat she is surprisingly good condition, thanks largely to the Ziebart rustproofing.

Current status:

- Interior stripped, salvaged sink & cooker but rest was rotten.
- near side sill removed (practically fell off due to previous botched repair - pop-riveted on).
- Engine and gearbox out, largely out of necessity as rear wishbones had turned to paper. Local engineering firm laser cut the spring seats and rebuilt the damper mountings - now back on 4 wheels.
- Various panels sources many thanks to Ricambio.

Will be off to the welders in a couple of weeks to have all the welding done and generally made structurally sound (not much welding really).

Once back she will be stripped back to bare metal, rust-proofed and resprayed. Not sure what colour yet, probably stick to the original white.

I'll add some pic's to chart the progress soon.

I've posted a separate thread about how to upgrade the suicide brakes and would appreciate any suggestions.

Cheers
Hi
I suspected there would be Fiats around the same age (give or take a few years) that share a common parts bin with parts that can be swapped out - it was just a case of working out which ones. I'll investigate the Cinq/Sei options and report back when I find out more. With a bit of luck I may be able to have discs all-round (rather than just upgrade the front) - although balancing the front/rear braking should prove interesting if I go for all-round discs.

I've just replaced the master cylinder, after a few attempts to get the right one it turns out that I have the later version as fitted to the 900E. As the 900E has front discs therefore I'm assuming that this will be up to the job (at least for the front disc upgrade - discs all-round may require a bit more thought).

I need to swap the current 12" wheels regardless of what brakes I eventually end up with. Two of my wheels require inner tubes to keep them inflated - not good. I'm probably going to go for 14" as this will allow more flexibility on the brake front plus reduce the 'bounce' a little by having lower profile tyres. There is a useful website for comparing rolling circumference and wheel offsets see: https://www.carbibles.com/calculators/ This helps to get the right combination so the speedo doesn't need recalibrating and the wheels don't foul the body.
 
You'll need to watch 14 inch tyre availability, lower profile 14s are very difficult (and usually expensive) if you can find them.

Rear discs are easily do-able using Alfa Handbrake Calipers. I think the Cinq section has a guide for the rear disc conversion. You'd need the same/similar caliper mounts for the front.

D
 
Tyre choice and availability is a big reason for the wheel size choice... irrespective of upgrading the brakes. Getting hold of tyres (155/80) for the 12" wheels is somewhat limited and invariably you have to pre-order them.

I'm most likely to go for either 155/65R14 or 165/60R14 tyres - there is plenty of choice at the main high street tyre depots from around the £30 mark.

Assuming the Carbibles website is correct the with the above tyres fitted the van will be doing 70.55mph when the speedo reads 70mph - one can dream :ROFLMAO::ROFLMAO:

There is also very little chance of the new tyres fouling the arches or making the steering heavier.

In a perfect world I would love a set of period Wolfrace Slots but for now I'll settle for standard steel rims - the new wheel & tyre combo is little more than buying 12" tyres.
 
For the DIY mechanic I think that working on vehicle brakes has got to be the most frustrating and sole destroying job on the planet - add a few expletives and you may get some idea of my frustration following today's efforts.

After weighing up all the brake upgrade suggestions I've decided to put it on hold - it's become far too distracting and is slowing down the overall rebuild. Once Connie is back on the road and useable again I'll return to the brakes.

Biting the bullet and with new (reconditioned) aluminium shoes and correctly sized brake cylinders (I had fitted 850T ones by mistake earlier - these are smaller than the 900T versions), I had hoped the fitting of the new parts would be a doddle and only take a couple of hours (as everything had been stripped down only a few months ago) - how wrong :bang::cry:

6 hours later I now have brakes again - not perfect or MOT ready but they will stop Connie with a couple of pumps on the brake pedal. I need to bleed the brakes again but the bleed nipples are so small trying to keep the bleed pipe on is an art form in itself.

The big problem I've encountered is a seized snail cam adjuster. They are not the easiest to get a spanner on (due to being recessed into the back plates). One of them already had a slightly rounded head - it's now completely round :bang: :mad:

Using a pair of molegrips I managed to turn the snail cam just enough to get clearance to fit the drum back over the shoes. With a bit of trial and error I've managed to adjust the snail cam, drum on and off several times to set the shoe to drum clearance reasonably close to the required tolerance.

However, the snail cam is pretty narled up now (due to the molegrips).

As I've discovered getting hold of any of the brake parts is like searching for a Unicorn.

Has anyone carried out a snail cam replacement before?
And if yes, how did you do it?
 
Has anyone carried out a snail cam replacement before?

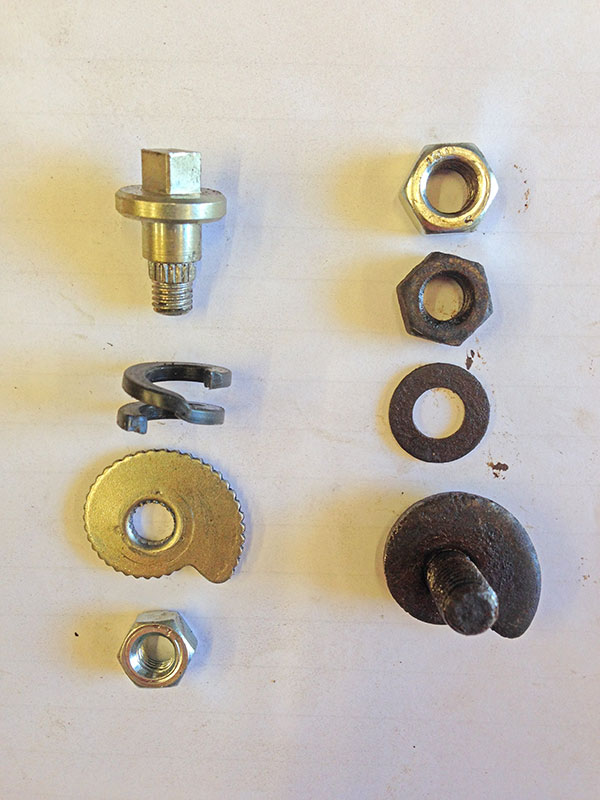
After a bit of searching the web I found a snail-cam repair kit for the Ford 100E see: https://www.smallfordspares.co.uk/products/100e-2041-rk-brake-shoe-snail-adjuster-repair-kit that looked like it will do the job.

As luck would have it when I picked up the spare backplates again to compare the fitting I've found that one of the snail cams has been previously been repaired and replaced - this simply un-bolts (using two nuts to lock in place).

As you can see from the photo, the Ford 100E snail cam is almost a perfect match size wise. The only difference is the hole size required is 9mm - instead of the Fiat 8mm.

Brake-adjuster.jpg


As I have it I'll use the snail cam from the spare back plate but the ones from the 100E will be good to keep as spares - I expect that one or more of the snail cams will go the same way in the future.

All that should be required is to grind off the rivet head of the damaged snail cam and knock out the centre bit. I'm expecting that this can be done in situ without having to remove the back plate etc. I'll post photos when I do the work.

Hopefully, if some else gets the same problem the 100E repair kit will help.
 
I can't find an icon for jealous, so I'll type it instead... jealous :cry:

The 900E has discs up front and self-adjusting drums at the rear. Which means much easier maintenance and steel rear brake shoes at a fraction of the price of the aluminium ones.
 
I've been busy with household DIY and other chores :(

Connie is now back in the garage to keep dry and the damp away, I don't want the new brakes seizing up over winter and generally have the winter undo the work I've done so far this year.

The focus over winter will be to get all the electrics finished (wire everything back up). I've already routed loads of new wires from the engine bay, across the top and down to the front footwell - you can just see the new wiring in the side on photo above (a mixture of 35, 17.5 and 8.75amps).

I've already fitted one auxiliary fuse/relay box near the battery (for the electric fan, fuel pump, and electrics in the back, etc.). I'm aiming to replace the existing front/original very corroded fuse box with a new fuse/relay box.

When Connie was running (15+ years ago) the headlights etc. were very dim and the heater fan really sluggish. I traced this down to the old wiring not being able to carry the current. Rather than trying to fit a new wiring loom, the old wiring will be used to trigger the relays and the load will be taken by the new wiring.
 
Not posted for a while, so here's an update (no photo's, I'll add some another time).

In a bit of a panic in January as we are looking to relocate which means I need to get Connie back on the road ASAP a) to make sure no parts get lost in the house move and b) so Connie can make the move under her own power - however, due to current lockdown the house market has stalled and I've now time to make use of the great weather we are having.

Work complete since last post...

  • All windows back in*
  • Gnarled front brake adjuster replaced
  • Door locks serviced and working

*Unfortunately the windows will need to come out again in the future as I need to strip back quite a bit of the paintwork and re do this (due to top coat reacting, flaking off, with the POR15 rust proofing) :bang:.

The hosepipe test has shown up a few leaks around the doors... a second layer of rubber sealing strip will fix this. However, even with new quarter light rubbers they still leak a little... I'm guessing no worst that when Connie came out of the factory.

At some point I need to drum up the enthusiasm to adjust all the brakes. With manually adjustable drums all round this is a horrible job and somewhat a black art to get them evenly balanced - although should be a bit easier as all the brake parts are either new or serviced (so they do what they are supposed to).

Has anyone fitted an aftermarket brake booster/servo and/or brake balancer system. At first glance this suggests that it should take a lot of pressure off having to get the brakes set up 100% right, making life a little easier.

On to the electrics next, most appear to work but there are a few bad earths/blown bulbs to sort and it looks like the wiper motor/linkage needs to come back out and overhauled, really slow wipers.

On the plus side, the current lockdown means I can get on with the rebuild without any pressure from the family to go out and make the most of the good weather :D
 
I've just replaced the wiper blades and the plastic connector at the end of the wiper arm broke :( and the Bosch blades only came with the 'U' fitting (the Fiat 900T wiper arms use a 7mm push click fitting).

Not so long ago you used to get a small box full of adapters when you bought a new wiper - I used to have a draw full but threw them away when I had a tidy up last year (thinking I wouldn't need them :bang:).

If we weren't in lock down I'd pop along to the local Halfords and have a rummage until I found a blade with a suitable fitting I could use. However, trying to search the internet for the adapter is coming up blank and few blades show the adapters they come with.

Anyone know where you can get hold of the adapter, either on its own or with a blade that I can take it off?

Or, has anyone kept the box of adapters when they have changed blades in the past and has still got them in a draw and is will to part with a couple?
 
It's been a busy weekend on the electrics.

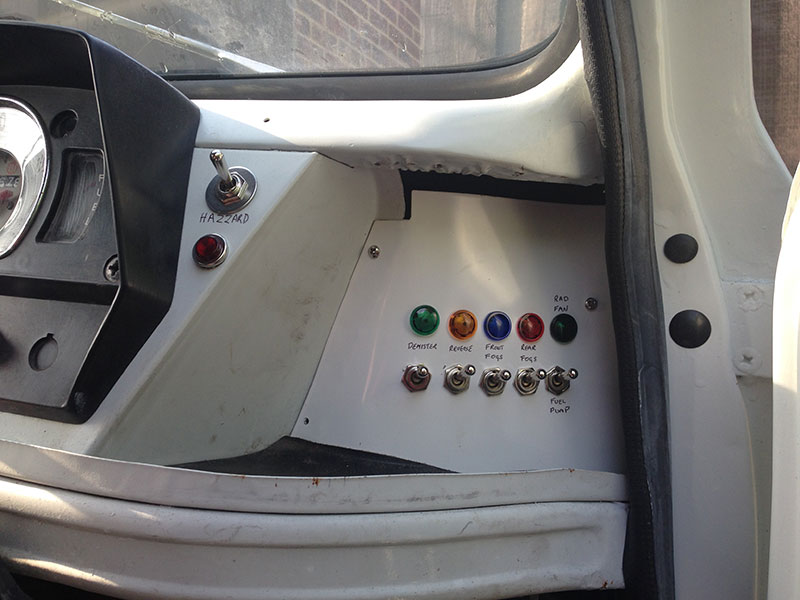
The auxiliary switches have been placed in a bank to the right of the main instrument array (I'll organise some nicer labels and make a piece to fill the gap at the top of the panel later).

The light on the far right indicates when the electric radiator fan is running.

All auxiliaries are centrally fused with relays for any potentially heavy load circuits... including new relays for the dipped and main beams.

aux-switches.jpg


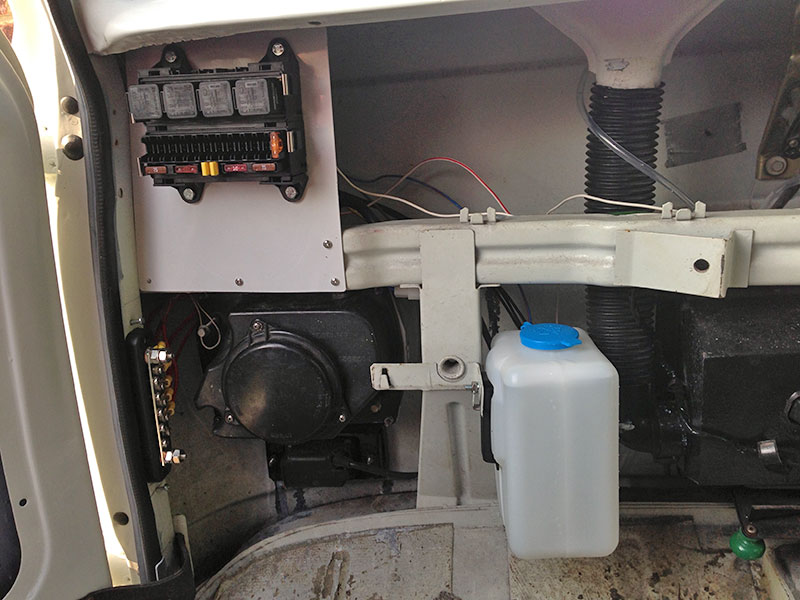
Supply comes via a 35amp (5mm) cable direct from the battery (25amp in-line fuse) to a buzz-bar (shown to the left of the headlight). This makes it much easier to distribute the power - no splicing into cables etc.

Note: The fusebox and buzz-bar are shown without the covers on for clarity.

Reading left-to-right, the fuse positions 1 to 8 have been reserved for the upgrade to the existing fuse box - a future project to swap over from ceramic to blade fuses (and keep them together).

front-fusebox.jpg


Surprisingly, for a 40+ year old vechicle there were very few bulbs to replace and bad earths/connections to fix.

Accessories at the back of van have their own separate fusebox and relays.

I need to get new reversing and rear fog to finish the main wiring - stereo and other nice bits to be added later.
 
Hi Gary
Looks like Connie is really coming along great work. I have been following your progress and have pinched a few of your ideas. I am looking to replace my fuel pump and wanted to copy your system. Do you completely remove the old style fuel pump ? Would you be able to send or post any more in depth details of the work that required It would be a huge help
Cheers
Andy
 
Hi Andy
You could probably leave the old fuel pump in place but I took the view that it was neater to remove it (and removes a weak point for potential leaks).

I used a blanking plate and new gasket from Ricambio https://www.ricambio.co.uk/search?search=Fuel Pump Blanking Plate & Gasket &description=true

You could probably make one but for under a tenner and including a new gasket why make life hard work.

Here it is fitted on Connie

FuelPumpBlankingPlate.jpg


When I fitted the blanking plate I didn't have any shorter bolts to hand so I reused the existing fuel pump bolts with a couple of nuts to set the depth limit - works a treat.

Note: when you take off the old fuel pump make sure that you also remove the spacer and pushrod. From what I can tell the fuel pumps are easy to get hold of but I don't think that they come with the push rod. If they don't these could be quite rare items and worth keeping in case someone needs one in the future.

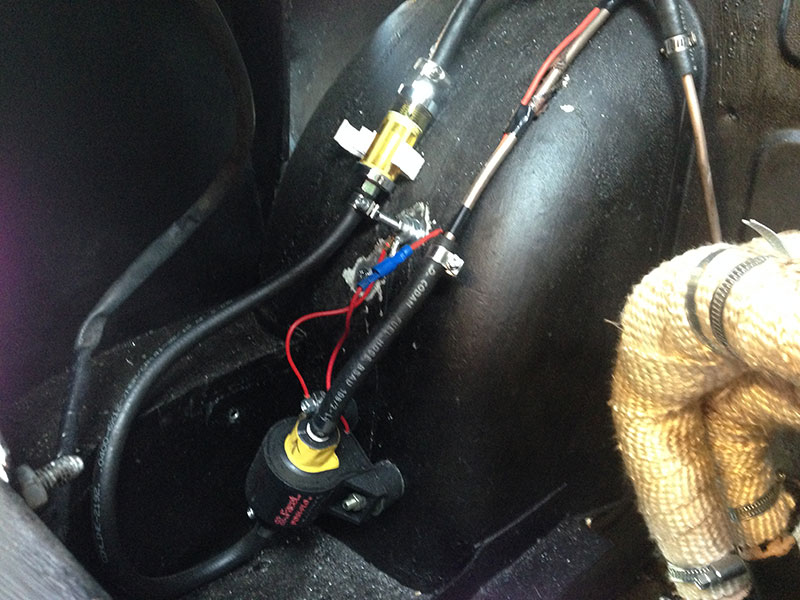
There are quite a few electric fuel pump choices. I'm not sure what the pros and cons are between the pull and push varieties - the one I have pulls (from the fuel tank). The important thing is to check the recommended height the fuel pump should be in relation to the bottom of the fuel tank. On my first attempt I fitted mine too high and it didn't work - fitting it at the bottom of the wheel well works perfectly see pic.

Fuel-Pump.jpg


(I added the yellow tape as the direction arrow is on the blind side and I wanted to make sure I got the pipes the right way round.)

With regard to the fuel pipes. As the old fuel pump has gone I re-routed them around the back of the engine bay (as far away from the exhaust as I could), using flexible hose as needed. This makes life easier for when you need to take the rear section off to clean the oil filter etc.

Other than that the fuel lines follow the original route. I replaced mine as they were badly corroded and fitted a new fuel tank sender unit while the tank was off. The only regret I had was that I didn't put an inspection hatch into the floor of the van above the tank to make access to the sender unit and fuel lines easier in the future.

I opted for a Facet Posi-Flow from Merlin Motorsport - don't bother with the kit option as the pipe connections are the wrong size for the Fiat 900T plumbing (I can't remember what size fittings I bought in the end... the chap there just matched them up to the fuel lines I took with me).

Very importantly, fit a good in-line fuel filter between the fuel tank and pump. The glass one I've fitted has replaceable filters that you can easily inspect to see if they are clogged/

Let me know if you need any further information.

Cheers
Gary
 
Hi Gary
Firstly thanks for taking the time to reply, do you know of any diagrams for the fuel system ? Is it a loop system ? How and where did you connect your new pump in electrically, I am pretty much using your blog/posts to do mine, I have fitted a new starter motor and also sourced an upgraded alternator, I have a Davies Craig electric fan and waterpump, I have machined a pump housing (of sorts) made to bolt to the engine in place of a standard one this enables me remove the whole of the mechanical water pump and replace with an electric version, however I am struggling to even get the van turning over at the moment, which I am thinking (hoping) is fuel related
Grrrrrrrrr


QUOTE=Gary50;4533956]Hi Andy
You could probably leave the old fuel pump in place but I took the view that it was neater to remove it (and removes a weak point for potential leaks).

I used a blanking plate and new gasket from Ricambio https://www.ricambio.co.uk/search?search=Fuel Pump Blanking Plate & Gasket &description=true

You could probably make one but for under a tenner and including a new gasket why make life hard work.

Here it is fitted on Connie

FuelPumpBlankingPlate.jpg


When I fitted the blanking plate I didn't have any shorter bolts to hand so I reused the existing fuel pump bolts with a couple of nuts to set the depth limit - works a treat.

Note: when you take off the old fuel pump make sure that you also remove the spacer and pushrod. From what I can tell the fuel pumps are easy to get hold of but I don't think that they come with the push rod. If they don't these could be quite rare items and worth keeping in case someone needs one in the future.

There are quite a few electric fuel pump choices. I'm not sure what the pros and cons are between the pull and push varieties - the one I have pulls (from the fuel tank). The important thing is to check the recommended height the fuel pump should be in relation to the bottom of the fuel tank. On my first attempt I fitted mine too high and it didn't work - fitting it at the bottom of the wheel well works perfectly see pic.

Fuel-Pump.jpg


(I added the yellow tape as the direction arrow is on the blind side and I wanted to make sure I got the pipes the right way round.)

With regard to the fuel pipes. As the old fuel pump has gone I re-routed them around the back of the engine bay (as far away from the exhaust as I could), using flexible hose as needed. This makes life easier for when you need to take the rear section off to clean the oil filter etc.

Other than that the fuel lines follow the original route. I replaced mine as they were badly corroded and fitted a new fuel tank sender unit while the tank was off. The only regret I had was that I didn't put an inspection hatch into the floor of the van above the tank to make access to the sender unit and fuel lines easier in the future.

I opted for a Facet Posi-Flow from Merlin Motorsport - don't bother with the kit option as the pipe connections are the wrong size for the Fiat 900T plumbing (I can't remember what size fittings I bought in the end... the chap there just matched them up to the fuel lines I took with me).

Very importantly, fit a good in-line fuel filter between the fuel tank and pump. The glass one I've fitted has replaceable filters that you can easily inspect to see if they are clogged/

Let me know if you need any further information.

Cheers
Gary[/QUOTE]
 
Hi Andy

Peter posted a diagram of the fuel system to your other post, I've added a photo which may also help.

For the fuel pump electrics I took a feed from the coil +ive (switched earth). This runs to a relay which in turn runs off to a switch on the dashboard i.e. the pump will only run when the ignition is on plus I can also turn it on/off directly - useful when testing the electrics (as I don't want the pump running unnecessarily).

Please share how you have set up the housing for the electric water pump on the forum, I'd be very interested to see how you have done it.

With regard to starting it sounds like your van engine turns over, therefore if it won't start here's a simple check list.

- if you have removed the distributor make sure its the right way round - there are 2 top dead centres. If you use the wrong one the distributor will be 180 degrees out and the van won't start - I speak from experience :bang:

- If you think fuel isn't getting through to the carb connect up a small container (via a fuel pipe) direct to the carb and let gravity allow the fuel to flow (make sure there is no risk of the fuel/container getting fouled up any anything or starting a fire).

- If it still won't start take the air cleaner off and give a good squirt of easy-start directly into the carb intake. This is what I had to end up doing (after the previous checks above) and Connie and fired up perfectly - albeit with a few clouds coming out of the exhaust for the first few seconds. My wife, daughter and neighbours were amazed Connie started after having had the engine and gearbox sat on the garage floor for over 5 years.

Note: Taking the air cleaner off will also help if you flood the carb - easy done when continuously cranking.

- If still not willing to start check the spark plugs and leads etc. (I'd fitted all new ones in any case) I'm assuming your van turns over so the earth strap should be okay but if not check the strap - usually fitted between the clutch bell housing and the body (just to the side of the radiator).

Cheers
Gary
 
Back
Top