IMG_7594.jpeg

500 (Classic) '65 RHD F Restoration

Introduction

Hi guys :)

My name is Steve, and I'm a rusty-old-car-aholic :p

I've been quietly browsing the forums for a while, and slowing collecting knowledge while looking out for a 500 project. A few weeks ago I took the plunge and bought a project, it's definitely not the best starting point, but it's also far from the worst.

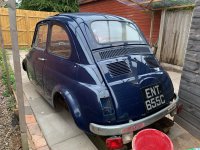
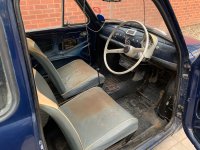
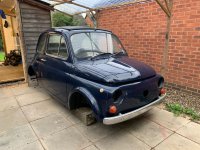
It's a RHD 1965 500F in dark blue. It appears to have been off the road since the mid 80s, and was recently purchased by a trader who was clearly looking to getting running and flip it for a profit before he realised just how much was wrong with it (and there is quite a lot wrong) beneath the surprisingly shiny paint job.

This means it's come to me already mostly disassembled. I'm aware this is a bad idea, especially as this is my first 500 and so I'm not familiar with how it all goes back together... It can't be that complex though can it?! :p

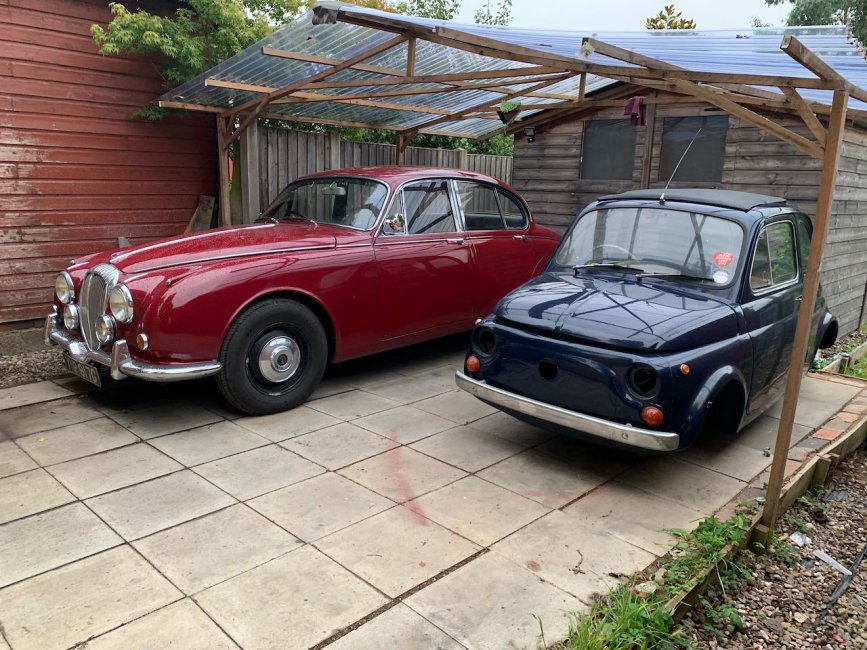
In the photos you can see how it looked as delivered to me, and also how my other classic (also resurrected from a 30+ year lay up period) dwarfs it!

IMG_7589.jpegIMG_7588.jpegIMG_7586.jpeg
  • Like
Reactions: dapedza
I've loved following your journey and you're a more skilled and braver person than I to have undertaken this work.

It's a tough one with regards to upgrades for the bambino. Where do you stop etc. I've done a few bits to mine to make it more driveable and reliable but I took a breath and thought why did I buy this car. It was to enjoy it as it was and not to turn it into a 1000cc racer. But every one is different and your choice.

All part of the charm is the lack of power, timing it at roundabouts so that you don't have to stop and getting a good run up prior to any hills.

Enjoy in good health!
 
Thanks @lazylobster. The idea of some fire breathing racer is definitely appealing to me... haha I love the look of the Italian racers on 10" wheels, and I've got a Speeduino ECU sat collection dust in my shed, so a fuel injection conversion, possibly even with some forced induction, could be on the cards. But I'm aware I'd gone that route before with previous cars with mixed results.

No rush to make a decision though, I'll just keep enjoying driving the car this summer and when the weather turns more inclement, then I'll think about what my plans for the 500 might be. 🙂
 
The rollercoaster of 500 ownership eh?

There’s highs… a beautiful evening drive a couple of nights ago. Can’t beat having the roof open (or down if you own a convertible) with the stars up on a cool summer evening. Possibly my favourite time to drive.

5ED7256E-BA8E-4E35-8372-CC9490C7C77A.jpeg


Followed by the lows… my car has been making a deep rythmic thud at idle sometimes when it’s hot. It goes away with light pressure on the clutch. It’s been there a couple of hundred miles, but it’s getting worse.

I rolled under the car tonight to give the flywheel a prod incase it had come loose, check the clutch pressure plate wasn’t loose that sort of thing.

What I found was if I pushed and pulled on the flywheel, the crank would slide backwards and forwards with a clonk. At a guess I’d say 0.020-0.030” of thrust movement.

I could see the front pulley was moving too, so it wasn’t the flywheel bolts. Then I tried moving the front pulley and it got worse. Not only did I have the same axial thrust movement, but I also had radial play, with a clonk.

No radial play at the flywheel, so I’m thinking my front main bearing has exited the building. 😭

Pulling the oil filter cover off, in the vain hope that the crank nut had come loose, or the pulley itself had the radial movement not the crank, and I think I’ve found where my front main bearing got to…

0B32509F-038D-4DA5-96A2-1B2B2B3A1B29.jpeg


Yup, nice silver metallic paste! Damn, looks like I best get the engine out and inspect the damage properly.

A small high, at least with the 500 being so beautifully simple, it only took me 25mins to get the engine out and on the bench, haha

D183837A-F2D6-438B-8841-37B71B6C74C6.jpeg


I imagine my next update will be the autopsy of this engine to try and work out what has happened.

I do have a spare used engine in bits, so if I can cobble another working engine back together to drive through the autumn, I think that will be plan A.

But if that’s not possible and I’m going to start buying new bits, or having machining work done, then I might have to take a step back and play the longer game. If I’ve got to spend the money, it might as well spend the money making it faster 😛
  • Love
Reactions: fiat500
Right, time for the always interesting but rarely enjoyable engine autopsy! haha

With the tinware and other ancillaries removed from the engine, the first thing I noticed if that my pushrod tubes are looking nice and dry and haven't leaked any oil, but interestingly there is some leakage coming down from the head studs.
IMG_2238.jpeg


Should the washer under the nut for the head studs be a special sealing washer? Should I pop a bit of silicone under the washer when I reassemble the engine? or is this not a common leakage point?

Anyway, moving on, from here it was the work of just a few minutes to pop the engine on its side, pull the sump and get at the crank.

IMG_2243.jpeg


The front main bearing, as expect, is totalled. Lots of deep scratches on the main bearing surface, both the front and rear thrust surfaces, obvious play on the crank. Somehow I managed to not get a picture!

The front main bearing journal on the crank is also fairly scored, I'm sure it could be ground undersize as its not that deep, but can definitely feel it with my finger nail, so this crank wont be going back in an engine without work.

IMG_2265.jpeg


The rod journals have some light scoring, nothing like as bad as the front main journal, but not as clean as when I put the engine together.

IMG_2266.jpeg


The from cam bearing is also heavily scored and the cam bearing surface in the crankcase has suffered too, which is not good news.

IMG_2267.jpeg
IMG_2268.jpeg


The cam lobes look generally ok, theres some minor surface scratches visible on the cylinder 1 intake lifter but the other 3 look ok, and the rear cam bearing has some minor scoring, but like the rod journals, nothing too scary.

There's quite a lot of scoring on the surface where the oil pump pressure release rides against the cam, and more minor scoring on the internal surfaces of the oil pump.

IMG_2284.jpeg
IMG_2285.jpeg
IMG_2286.jpeg


The good news is that the barrels, pistons and cylinder head all look fine.

A possibly interesting find was this damage to one of the oil gallery blanking plugs inside the bell housing.

IMG_2237.jpeg


I had to remove this plug when I helicoiled the oil pressure sensor mounting. I knew I hadn't got it quite as far back in the block as originally installed, the head of the soft aluminium plug was starting to round so I stopped, but I had no idea it wouldn't clear the flywheel. There was a metallic noise when I first started the engine, but it went away after a while and I had presumed (and tired to remedy) misalignment of the fan housing. In hindsight I think that noise was the flywheel rubbing this plug.

This raises an interesting failure scenario. This plug pushing agains the flywheel would be pulling the crank backwards with some reasonable force. The thrust is all controlled by the front main bearing and the thrust surface on the front of the bearing, which is loaded when the crank is pulled backwards, is quite small. Could this excessive and constant thrust force have caused premature wearing that thrust surface, which in turn created a metallic paste of bearing material which then spread across the front main bearing axial surface caused the wear, and then spreading in to the rest of the engine caused the other damage? It seems a likely reading of the failure to me.

Another potential failure is that some debris got inside the oil pump and from where was fed into the oiling system, with the front main bearing and front cam bearing thing the brunt of the damage as they are first to be fed oil from the pump? I did shot blast the front cover, and it did cross my mind the possibility of a stray grain or two of aluminium oxide being stuck inside the oil gallery in the front cover could do some serious damage. The case against this is that I did clean the cover very very thoroughly as I feared this possibility and also while I was able to find plenty of fine smooth metallic bearing paste in the centrifugal filter and sump, there was no sign of anything gritty. I appreciate it may have broken down, or even that a single grain which would be near impossible to find could be the catalyst for this chain of failure events?

My money is on the oil gallery plug being the root cause here. I feel silly for not noticing there was a problem when first assembling the engine. It seemed to turn over just fine, a little tight, but fresh rebuilds often are and I dont remember it becoming noticeably tighter once the flywheel was fitted.

So where to go forward from here, given the damage, I think the best move may be to fit the top half of my original engine, all of which appears unscathed (from what I've seen so far at least!) on to the bottom half of my spare engine. Now I remember that the spare engine wasn't as good as my original engine, the head was worse, the bores were already oversize and worn and it was burning a lot of oil, but I think the bottom end was ok?

I found the box of engine bits in my shed and had a look. The crank will be fine once It's had a light polish. Importantly the case looks ok. It's clearly done more miles than my original engine and there is some wear on the front cam bearing surface, but it looks more like wear and less like damage.


My heart dropped when I looked at the rear main bearing though.

IMG_2289.jpeg


Thats no good. Thankfully the rear main bearing from my original engine seemed to have got away with minimal damage, so will do for now.

So I think I cobble something together and be back on the road in a few weeks, with just the cost of an engine gasket set and a couple of litres of oil. The downside is I now have a mammoth cleaning task ahead of me! I will need to extra carefully clean all of the original engine parts that I will be using to make sure I'm rid of all the bearing material that's floating in the oil and the spare engine parts are still as I purchased them, resplendent in 60 years worth oil and dirt! I shall be sure to stay away from the shot blaster though... just incase!
Last edited:
  • Love
Reactions: fiat500
I had an experience similar to yours when I did a full crankcase up rebuild of a tuned 650 engine. It was my pride and joy for a brief period. From first start up I gradually increased the revs and use of the throttle for the first 750 miles. I enjoyed the power increase from a standard 650 then went on a 40 mile drive down to see a mate and show it off. Took him out for a drive and of course giving it the beans then spotted a puff of smoke from the exhaust followed by the odd flashing of the oil warning light. I drove home carefully not pushing the engine and it was engine out time. I discovered the same sort of damage as you have shown (not the core plug) worn bearings, scored journals etc, a very costly disaster. I was completely baffled for a while as to how it could have happened so I carefully cleaned and inspected every part of the engine. I had had all the tinware blasted and powder coated for the build. I discovered a small amount of grit particles around the rockers and inspecting the rocker cover itself I found blasting grit had packed in behind the two strengthening struts inside the cover and had been washing down into the engine with the oil flow 😳
So a harsh lesson learnt and it was back to another full rebuild.

Admiring your honesty.....both of you ;) Helpful for the rest of us in being wary of the same issues. :)

If I was you (Steve) @Goldnrust, despite me being someone who likes to avoid professional input and expense whenever possible, I would consider doing a proper job and having the best of all the worn components reground/rebored/replaced.

It would also repay you handsomely to measure all the rocker-shaft components against specification, and to end up with a completely refurbished engine.
 
Sorry to hear of your tale of woe also @Toshi 975!

This time is definitely going to be a 'cobble it together' build @fiat500 , haha. I've no interest in putting money into a standard 500cc engine.

My plan is hopefully for this standard 500cc to last me the next few months while I finish my 1934 BSA motorbike build and raise some funds for a tuned 650 engine build. The 650 will be done properly. 🙂
 
Right, time to throw this engine together. The job I wasn't looking forward to was removing 60 years of slime off my spare crank case.

IMG_2387.jpeg


Last weekend, I pulled myself together and got on with it. A couple of hours later I had something looking much more presentable.

IMG_2442.jpeg


Not perfect, but good enough and properly clean in all the right places. Over the course of the week I cleaned up the internal engine parts and reassembled. No point going into detail here as it's just the same as the previous engine build in this thread. Friday night this is where it stood.

IMG_2460.jpeg


And by Saturday lunchtime the neighbourhood resounded to the glorious sound of a parallel twin 'roaring' into life.


I did a test run Saturday night, didn't go too far. Did about 10 miles taking it easy, then just like normal (i.e. flat out!). I'm pleased to report that all was well; no nasty knocking noises upon my return home, oil light not on, no signs of glitter in the oil etc. Ask me in 1000 miles, but so far this appears a success! haha.

I did miss driving the old girl this past month, it was lovely to get out on the road. :)
I'm pleased to report that the new engine has been a success. Several hundred miles in and there's no sign of the bearing issues I was suffering with the old engine.

I've been out driving as and when I can, used it to commute a few times and generally any time I don't need to take the family with me. 🙂

IMG_2501.jpeg
IMG_2502.jpeg


With autumn underway and the nights drawing in, I've got a few things I want to attend to to help get the car ready for the coming months.

Firstly, I need to do something about the lights. I'm perfectly happy driving with the standard lights at night on my own... but as soon as someone is coming the other way in anything modern, especially SUVs, then I'm left blind. So an upgrade is in the works. My Daimler has been upgraded to 60w H4 Halogen bulbs, which is more than adequate, but I'm aware that to do that on the Fiat I'll need to set-up some relays and run new wiring. I can do that easily enough, but in order to keep the original wirings redundancy (with separate circuits and fuses for left and right headlights which seems a sensible idea) then I will need 4 relays, and 4 new fuses and the associated wiring... it starts to add a bit and soon the cost is similar to that of a pair of decent LED headlights bulbs.

I've always avoided LED bulbs due to the horror stories of poor beam pattern and the dubious legally. But I think things have started changing, with better beam patterns now available, along with a range of softer warmer colour tones. Also looking at the MOT manuals, the rules have changed and LED bulbs in cars first used prior to 1986 now appears to be acceptable. I may well order some in the next few days and see how they look.

I also need to investigate the headlight adjusters, mine wont quite adjust to where I need them, they're a touch on the high side at their limit of adjustment. Not a problem with 35w tungsten bulbs but if I upgrade I think other drivers might be happier if I fix the aim! haha.

The other thing I think I should look into is the heater/demisting. I can feel it working, but I can also feel a big draught of hot air escaping round my handbrake and out of various other joins in the system. So I think I will need to investigate sealing things up as best I can, to make the most of the air flow available if I want any chance of the screen clearing on a cold morning!
  • Like
Reactions: smart51
I've installed LED bulbs. Literally night and day in terms of performance and coverage. I've never been flashed by any drivers to inform I'm blinding them.

Very bright compared to the original bulbs and draw less current too. I made a personal choice, some disagree with them them so have a read, do your due diligence etc.

Thread as below.

 
That sounds like you’re still pleased with yours several years later then, which is promising to hear as I was planning to use the same supplier.

A lot of the discussion on your thread was about the legalities, which has changed in the years since : https://www.gov.uk/government/publi...mot-special-notice-01-21-headlamp-conversions

In my driving experience, many new cars that are factory-fitted with LEDs still have a tendency to dazzle. That's despite the fact that they presumably have reflectors and mountings that are designed to work with the special characteristics of LED emitters.
If an opposing driver flashes you, that's enough to know that something is wrong.
 
The LED bulbs are indeed ‘day and night’ for want of a better pun!

13312367-764E-4172-9B46-5595B2F7240F.jpeg

Night driving is much more comfortable now. Likewise with a few of the gaps in my cooling system ducts sealed up with a bit of self adhesive closed cell foam and/or tape, the delisting action is considerably more powerful and the heater seems quiet effective. I was out driving the other night in a T-shirt when it was down to 6-7 degrees outside and was warm enough to not need the heater on full despite also having the window open a little.

On the downside, I’m fairly sure this is not where the starter is meant to be…
77901239-4270-4F68-9A68-A6864720C106.jpeg


Looks like my repair has failed and it’s broken free if it’s mounting. Unfortunately I’d discovered this after I’d parked the car when on a run to pick up sind lunch today…

The weather was on my side at least, and I had lunch to eat while the engine cooled! Once it was cool I managed to hold the starter in place while I manually pushed the solenoid lever. Once the engine fired, I wedged the starter as best I could on top of the gearbox and drove home cautiously.

I made it, but I don’t think the removable starter motor is something I want to continue with, haha. I best break out the credit card!!
 
The LED bulbs are indeed ‘day and night’ for want of a better pun!

View attachment 432488
Night driving is much more comfortable now. Likewise with a few of the gaps in my cooling system ducts sealed up with a bit of self adhesive closed cell foam and/or tape, the delisting action is considerably more powerful and the heater seems quiet effective. I was out driving the other night in a T-shirt when it was down to 6-7 degrees outside and was warm enough to not need the heater on full despite also having the window open a little.

On the downside, I’m fairly sure this is not where the starter is meant to be…
View attachment 432489

Looks like my repair has failed and it’s broken free if it’s mounting. Unfortunately I’d discovered this after I’d parked the car when on a run to pick up sind lunch today…

The weather was on my side at least, and I had lunch to eat while the engine cooled! Once it was cool I managed to hold the starter in place while I manually pushed the solenoid lever. Once the engine fired, I wedged the starter as best I could on top of the gearbox and drove home cautiously.

I made it, but I don’t think the removable starter motor is something I want to continue with, haha. I best break out the credit card!!
The early "2-bolt" starters were very prone to this problem (again, voice of experience!). Being that I couldn't afford a new bell-housing at the time (although Fiat's instructions were that the bell-housing AND the gearbox casing had to be renewed as a pair), I had to come up with a quick solution. As it luckily happened on my friend's garage forecourt, I took the starter off, put a bolt through all the wires (well 2), wrapped it in copious amounts of insulating tape and we then bump-started the car for the next month. Even with snow on the ground, the car 99% of the time started 1st 'bump'---oh,the confidence of youth! As an aside, the girl friend stayed with me and we have been married for just over 50 years now. However, I would NOT recommend having a carthat needs to be continually 'bump-startd' as a romantic ploy!
On a more serious note, a starter brace is available from some of the European suppliers----mainly intended for the "2 bolt" starters, but it might be useable on the "3-bolt" variety.
 
Sorry, @the hobbler didn’t spot you reply till now.

This is a 3 bolt starter, with a 3 bolt gearbox bell housing, and a 3 bolt crank case.

But my original engine was a 2 bolt variety, and the starter had broken and been previously welded twice (once before I got the car and once by me!).

Hopefully, now it’s all fresh 3 bolt, I shall have no more problems. 🙂

I think as long as she didn’t have to do the pushing, my wife would be fine with me bump starting the car, haha.
 
I’m pleased to report that the cheap starter core I picked up on eBay arrived a few days ago. I was able to swap the front aluminium casting with my broken one and I once again have a functioning 500! 🙂

756FCEBF-F253-4EC8-978C-0AB54F12FCC5.jpeg


The starter sounds smoother and better than it ever has, so that’s good news.

I also fitted a hand throttle cable, which is helping to keep it idling when starting on these last few cold nights / mornings. Worth the £20 and 1/2 hour of fiddling to fit it, I think. 🙂
Just dropping a quick update to say 'so far so good' on the Frankenstarter! It's starting better than ever and with the LED headlight bulbs and heater ducting all finessed, as in the past couple of posts, the 500 has surprised me with it's winter usability. 🙂

That said, after some internal debate with myself I have decided to spare the old girl from the salt this winter. I love using my classics all year round, but seeing how my nicely refurbed mechanicals on the (now sold) Daimler had suffered from a few years of that, did give me pause for thought. So I decided to let the 500 rest this winter and have bought a winter hack to knock about in instead. Can confirm that as it's a shade faster than the 17hp of my 500! haha.

IMG_3233.jpeg


I'd toyed with the idea of one for years now, and you only get to live once so whilst had the opportunity I thought I'd go for it. It was only a cheap one and is a bit tired in places, but I'm not scared of taking it out in the salt so I'll have some winter fun with this for now and will worry about then future later, worst case I can sell it in spring when the 500 is ready to come out from hibernation.

In theory I'd like to do a few jobs on the 500 between now and when spring comes round, mostly cosmetic bits and bobs that I didn't do this year as I would always chose to spend my time driving it than working on it... How many of those jobs I get through might be an indicator of how much time I'm out having fun in the Abarth or not! haha.
  • Like
Reactions: lazylobster
Back
Top