20200209_181323.jpg

500 (Classic) Raukstern's 500F -65 rebuild

Introduction

Hi guys,
My first post except for introducing myself in the newbe thread :)

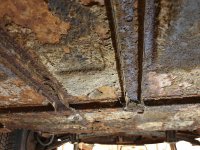
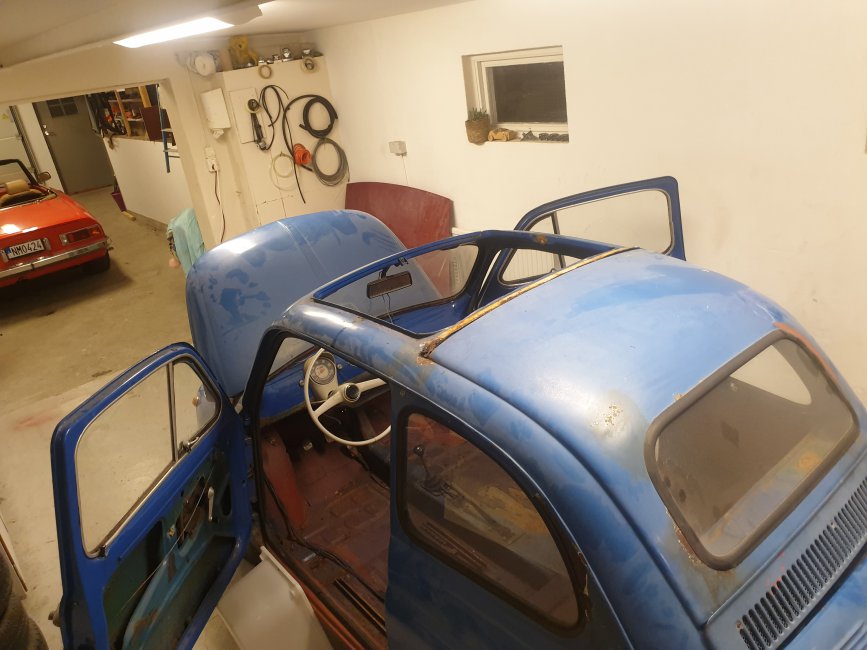
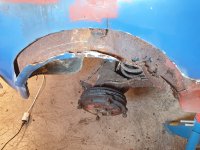
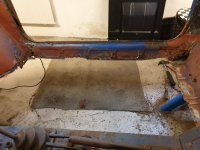
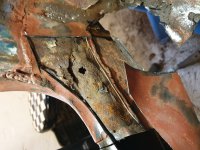
My 500F (my first 500) is in need ofa major restoration/rebuild. I´ve started small, removing doors and interior and cut out the right hand side floor board so far. The rust is far gone :( Some holes, but what is worse is that all the all surrounding sheet metal has serious surface corrosion. So mutch that I fear it´s to thin to be weldable. (Is that a word?) :rolleyes:


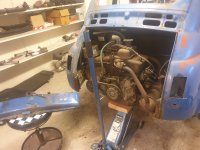
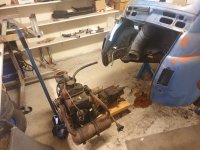
I have borrowed a jigg/cradle (or what it might be called in english) to suspend the car in, so that I can rotate it and don´t have to cut and weld om my back.

Now to my first question:
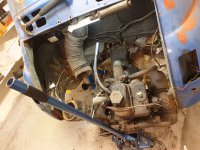
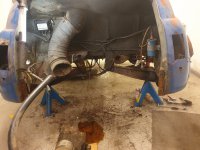
Where do I attatch the mountings in the front?
In the back I´ve seen pic´s online how to mount it. Has anyone here done this and have some pointers?
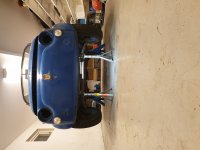
A few pics to lively up the post. (y) (for some reason some pics gets turned, cant figure out why)
  • Like
Reactions: ClassicFiat500
Morning Raukstern (what is your real name?)--the English word for what you are using is a "rotisserie" (which is in reality a French word for a rotating spit that you roast meat on), and yes "weldable" is a proper word. May I suggest that before you go any further, take more panels off and risk losing shape, you put some bracing into the shell--(1in (25mm) square tubing is fine for that job) across the door apertures and across the car. I have never had a 500 on a rotisserie, but i would have thought that you bolt the front onto iether the bumper (fender) mounting points or the front spring mounting points.
 
Hobbler,

No, the name´s Seb, but that user name was allready taken.
Oh yes, I´ll put some bracing in before I put it up.
The bumper mounings in the front (and back) of the 500´s are screwed prutty much in sheet metal, just for show or to avoid scatching the paint. Nothing I would suspend the cars wheight in. I think it looks like the ones I´ve seen, have attached underneith, maybe the leafspring mounts?

If anyone has done this, don´t be shy :)

/Seb
 
Last edited:
Seb, I wouldn't put that on a rotisserie before you have done some repairs where metal has already been removed. And I wouldn't remove any more pieces no matter how rusty they are.

I would get the car as level as you can on the floor and weld in a replacement floor-panel, joining it to any panel which is weldable, even if you plan to remove that panel later. Get some rigidity back in the shell before putting it under the strain of a rotisserie.

When you remove the floor panel the "A"-post will move slightly inwards so already you might have some slight distortion (which is easy to sort out).

Most of us would agree that Tom the hobbler is right about needing some bracing before you do much more, but there is a lot of welding you can easily do on the car where a rotisserie wouldn't help. The floors are straightforward to fit if you mig-weld, because all the spots are put in from above when repairing.

Keep the images coming, it looks like a great project, good luck.
 
Last edited:
After a lot of other things to be done; work, house, RV, summer and so on, I´m now gathering strength an motivation to get this restoration och build thread going again.

Does anyone know of any good, motivational threads or clips of similar work as I have in front of me, don´t be shy. I need all the start juice I can find :)

/Seb
 

Attachments

  • 20200209_190624.jpg
    20200209_190624.jpg
    5.1 MB · Views: 110
Oh well...

I´ve realized that I won´t be able to restore this 500 without going mideval on it´s a**!
So yesterday I started projekt "empty shell". Prep for taking out engine and transmission is first in line. Everything is rusted in place and most screws/nuts break.
Most body panels will have to be replaced and lots of fabricating and metal work will be needed apart from that.

But... I will keep my hopes up that it is restorable, until it isn´t :)
 

Attachments

  • 20200824_194440.jpg
    20200824_194440.jpg
    3.5 MB · Views: 114
Is it possible to buy a new Shell/Body. Like can be done with British heritage and English Cars.
Alan
 
"The shell is part of the journey" :)

If I was to buy a new shell I might aswell buy a new Cinquecento. I´m set on getting this one back on the road, though it might take many years. I´m in no hurry :)

Last night I got the engine and tranny out. Not at all difficult, but allwas interesting to do something for the first time. And allways that last nut that just will not get loose... but finally.


Oh, did I mention the RUST?!
 

Attachments

  • 20200825_213455.jpg
    20200825_213455.jpg
    4 MB · Views: 132
  • 20200825_213856.jpg
    20200825_213856.jpg
    3.7 MB · Views: 105
  • 20200825_213904.jpg
    20200825_213904.jpg
    3.9 MB · Views: 94
I thought you could just remove the Engine with "Tin Snips" or spray with Coke and it would just dessolve away:D
Alan
 
I must admit I like the frame that Sean (Franko500) made that attaches to the underneath as it keeps the lower part of the car square while removing panels...
(Worth a Look through Seans threads - Franko500)
 
Thanks for the tip, I will check it out right away.
Exactly this kind of tips I need (y)

I'm sure Sean made his "on the fly"....

It would be good if anyone dong similar could produce an accurate diagram with measurements, know there may be some degree of difficulty simply making one and hoping it will fit... due to flexing of the shell following panel replacement over the years...
but if a super accurate frame was made then it would not only serve to keep the lower part rigid, but also as Sean dd realign the lower shell if there had been some damage previously....

I'm not sure but 'd swear have seen factory diagrams showing angles and measurements....

It certainly would be a good thing to have for people with very rutsy shells or undertaking a full resto...

I will try to search out my books etc.. but am sure the collective minds on here could all jump n and provide some info....
Sean gave me the basic measurements... but as I said it would be god to have an accurate built one that would also serve to check alignment...

If there was sufficient demand have a mate who runs a specialist welding and fabrication business.. he could even build a jig to make the frames... and could do a short run....
 
It certainly would be a good thing to have for people with very rutsy shells or undertaking a full resto...

.

That's a very good idea; I think I know someone who has a very rusty shell.:D

When I am in my 90's and finally getting around to restoration Mk 2 I had already considered stripping Murf of his supension and fabricating a solid jig like Sean's. Despite the extensive upper rust which had to be dealt with, my car still has all the major structural panels in place (eg. inner sills, all inner wheelarches, jack strengthening panels, bulkheads etc.

It would be good to network this if anyone starts to make a jig so that measurements could be compared.
 
I have a diagram showing all the major chassis measurements. It is a 'paper'copy, but if anybody wants a copy of it, contact me direct, with your address, and I will copy it out and send it to you.
 
"The shell is part of the journey" :)

If I was to buy a new shell I might aswell buy a new Cinquecento.

Hi Seb,
by the time you're finished you will have effectively a new Shell in "Patchwork". With a new Shell such as the Heritage Shells they have been treated correctly and certified as the same as original.
Sorry but It's ok patching in bits what happens to the Anti-rust treatment unless you get the whole Body dipped.
How are you planning to treat the Panels/Body.
I like your project but if it's not treated it will rust the same if not faster.
Alan
 
I have a diagram showing all the major chassis measurements. .......

Is that from a Factory book tom?
If so which one save me trawling through everything I have.....

A long time ago had a mate weld VW Van roll over frames... he got one of hos blokes who was doing very little when work was slack....
He made about 10 and a Jig to make them accurately each time......
unbelievably the cost was only £250 each.. not bad considering his guys were Coded Welders and descent thickness metal...so done right...

We struggled to sell them all... then after he cut up the jig.. everyone seemed to want one having realised it was the best way to keep a shell square when chopping out and welding in new metal...
 
Last edited:
My w/shop manual is a factory publication--"New 500 and 500D" from 1963---page 282 (in the 'body' section) The diagram is 'figure 435' and is titled:--'Floor main checking data'
 
My w/shop manual is a factory publication--"New 500 and 500D" from 1963---page 282 (in the 'body' section) The diagram is 'figure 435' and is titled:--'Floor main checking data'


Who needs Google when we have Tom!!
Many thanks.... think I know where that book is...
 
Back
Top