General Fiat 500F rejuvenation

Currently reading:
General Fiat 500F rejuvenation

Hi Geoff,

Awesome work so far! (y)

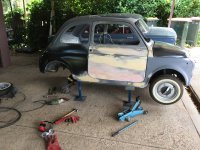
In this picture have you filled the left rear panel yourself? I have a depression (no creases or obvious dents) that looks very similar, between the door aperture and the rear arch, and I'm struggling to achieve the correct contour. I've tried blocking, using a ruler, and also using a flexible pad. I thought it looked OK yesterday until I put a light coat of primer on to protect the bare metal and it looks awful. Do you have any tips for a complete bodywork novice? I have never done any filling (besides walls in my house) :)

Thanks,

Katie

Hi Katie

I too am a novice and learning all the time but I got advice when doing my old Austin7 that The best Method for smoothing out these depressions was a skim of filler over a large area and then the use of a long sanding board in a diagonal motion.

I also looked at various YouTube videos.

I do not have the skills to tackle shrinking and beating all of those type of dents to perfection but did try to get the depressions as shallow as possible.

If anyone else can chip in it would be appreciated

Cheers

Geoff
 
Hey, Katie B, your Flickr link doesn't work.:(
Geoff is right about using a long sanding block or support. I used a selection of different lengths of MDF architrave left from our house build. Cut the full length of a sandpaper sheet of 80 to 120 grit or get a roll of abrasive to make it as long as you wish. I found it useful sometimes to have a backing board which was longer than the abrasive sheet so that I could use a good part of the panel as a guide without removing more filler from it or seriously scratching the steel.
Bu the key thing that helps get these shallow depressions right is to use guide coat; plenty about that on the internet, but basically a speckle of dark aerosol paint blown at the filled area from quite a distance. Then you gently and randomly sand with your board-backed abrasive until you can see the low points where the speckles of paint indicate the need for a bit more filler.
Fill and repeat, possibly several times and using increasingly finer abrasive and eventually it will look right.(y)
You repeat this process when sanding your primer, at which point you will find a few remaining flaws which will need stopper.
 
Last edited:
Hey, Katie B, your Flickr link doesn't work.:(
Geoff is right about using a long sanding block or support. I used a selection of different lengths of MDF architrave left from our house build. Cut the full length of a sandpaper sheet of 80 to 120 grit or get a roll of abrasive to make it as long as you wish. I found it useful sometimes to have a backing board which was longer than the abrasive sheet so that I could use a good part of the panel as a guide without removing more filler from it or seriously scratching the steel.
Bu the key thing that helps get these shallow depressions right is to use guide coat; plenty about that on the internet, but basically a speckle of dark aerosol paint blown at the filled area from quite a distance. Then you gently and randomly sand with your board-backed abrasive until you can see the low points where the speckles of paint indicate the need for a bit more filler.
Fill and repeat, possibly several times and using increasingly finer abrasive and eventually it will look right.(y)
You repeat this process when sanding your primer, at which point you will find a few remaining flaws which will need stopper.

Thanks Peter! It sounds like I am on the right track then, I maybe need to work larger areas rather than doing bits at a time (I think I was being too cautious about using too much filler) and keep at it.
Oh I hadn't noticed my link had stopped working, I'll sort that out and get some recent pics uploaded, thanks! (y)
 
Last edited:
A slight distraction. I decided to try and stop my Austin7 engine from blowing too much smoke. Now another project in the garage...
The weather is warming up so I might get back into the 500

See video of engine disassembly

[ame]https://youtu.be/RNgN50icuH0[/ame]
 
Spent a few hours on the car finally. I think the last time I did any significant work on it was March!

Cleaned up some welds and trial fitted the the rh door with seals.

I used the AG thinner than standard seal. The door shuts well but around the top there is a bit of a gap. Anyone else have this or do I need to bend the door a bit?
 

Attachments

  • A7116CA5-BCB2-4FE1-947F-AF0CF6385630.jpeg
    A7116CA5-BCB2-4FE1-947F-AF0CF6385630.jpeg
    3.3 MB · Views: 65
Looking good Geoff,
The preparation is always the hardest part. Sometimes difficult to see how good it is until you put that first shiny coat of paint on.
Keep up the good work. I bet you are looking forward to getting it painted.
What colour are you going for?
 
Looking good Geoff,
The preparation is always the hardest part. Sometimes difficult to see how good it is until you put that first shiny coat of paint on.
Keep up the good work. I bet you are looking forward to getting it painted.
What colour are you going for?

Thanks. I am looking forward to it having a consistent coat of paint. The old yellow was scratched and touched up with different shades.

I plan to paint it Avorio Chiaro (light ivory) the closest colour to what I found hidden on the car that the paint shop had the codes for. (As long as they can still make it up. It was almost a year ago that I asked about it)
 
Last edited:
Well finally here is the colour. The paint shop had a later avorio chiaro 252. It is nice to be looking at a consistent colour instead of filler and primer.

I think it is still “yellow” enough not to have to change my registration and insurance details., and to keep my youngest daughter happy.
 

Attachments

  • 7DED4D1B-ABCA-456B-AC5A-9FDB9221D358.jpeg
    7DED4D1B-ABCA-456B-AC5A-9FDB9221D358.jpeg
    2.8 MB · Views: 50
And now for the bad news..... Due to a series of unfortunate events the colour coats ended up with pinholes that mean I have to rub back pretty much the whole car and recoat it. All part of the learning experience. A major set back but it will be worth it in the end. I am doing a combination of wet sanding at night on the curved panels and will attack the flatter surfaces with the DA sander on the weekend.
 
. I am doing a combination of wet sanding at night on the curved panels and will attack the flatter surfaces with the DA sander on the weekend.

Geoff, it would be worth considering using the Abranet system. This is an open, dry-sanding system where you get a choice of Velcro sanding blocks with optional extract system. But to keep it cheap I just bought the smallest block and a box of 600 grit, detachable, oblong sheets.
The beauty of this system is that you have no danger that any hidden moisture can get trapped in nooks and crannies, the sheets are very durable, they don't clog so you don't get scratching and the sanding effect seems as good as using wet paper.
Mind you, if you are surrounded by outdoor lizards, moisture retention probably doesn't trouble you.:eek:
 
Thanks for that. It has been quite warm lately so hopefully I will ge the sanding done by the weekend and it will be nice and dry

Wishful thinking I’m sure.

(We also had a Gecko at our front door when we go home this afternoon)

Cheers
 
A little bit of progress... and a lot of sanding at all hours of the day and night.
Still more to do but at least I’m going forward again.

I had one more box of goodies arrive from Axelgerstl the other day. A large box including the weight of two lowered rear springs, the sound mat for behind the back seat and other bits and pieces. Postage was just over $100 to Australia. Not too bad at all.
 

Attachments

  • 757B8785-FC9A-4752-8085-524B3CE8ACE7.jpeg
    757B8785-FC9A-4752-8085-524B3CE8ACE7.jpeg
    1.8 MB · Views: 57
Here is an example of the size of box that can be sent from Axelgerstl (sitting on 850 sedan bonnet)
 

Attachments

  • B31DD9C1-CEF9-40D7-82DC-DD1319BD3114.jpeg
    B31DD9C1-CEF9-40D7-82DC-DD1319BD3114.jpeg
    2.1 MB · Views: 48
Last edited:
I have got the car back to final primer coat again. Now have started the finishing sanding. A few late nights this week and hopefully the colour can go on next weekend
 

Attachments

  • 5F3EE104-698E-4A07-9CF0-1D142D3595A5.jpeg
    5F3EE104-698E-4A07-9CF0-1D142D3595A5.jpeg
    3 MB · Views: 46
Back
Top