Technical 1.2 8V spark plugs are falling out

Currently reading:
Technical 1.2 8V spark plugs are falling out

Joined
Jan 16, 2015
Messages
176
Points
121
Location
Tipperary, Eire
Hey All,

Hope you can help me with a problem we are having with a 1.2 8V engine.
The spark plugs are making their way out over time and now the thread is somewhat damaged and don't thread in properly anymore.
That is 2 of the 4 anyway and someone who looked at it said that all 4 were damaged.
Haven't had a look myself, it is a car I sold my nephew 3 years ago or so and he is 2 hours away.

Is this a common enough problem? Has it happened to anyone on here?
In 35 years of messing about with Fiats and Alfas, I have never had this happen before.

Looking up online, there are multiple tooling options for repairing these threads.
There are Helicoil and brass insert options.

What have people used previously? Any recommendations?

I have used Helicoils on a couple of things previously with great success, so this would be my first direction.

Thanks for any info, help and recommendations you can give.
 
Is it common

No

All 4

Even stranger

Helicoils are fine and will out last the car


How they got damaged is important

If the old plug were seized and forced out
Or
New plug crossed thread and forced in

Both can be re threaded without removing the head

The coil pack takes a hammering if it can’t spark correctly. Touch wood it will have survived.

If the engine been pinking / knocking on acceleration it’s likely there is also internal damage. Borescope or head off would be recommended.

I not had to do one since a Nissan bluebird.
 
Last edited:
Thanks for the replies. As far as I know the car was running fine before it lost a plug. They screwed it back in with a bit of binder and then a few days later another plug cam out. Don't know, will have to actually have a good look at all 4 plugs next weekend.

Wonder what is the cause?
 
Never heard of that in any car
Google

Ford Expedition spark plug blow out

Common design fault on that vehicle

Surprised we don’t get more on the panda. Plugs at the back. Each at an angle. Very easy to cross thread

The main reason is normally either under or over tightening

If it’s loose it vibrates and eventually hammers it’s way out
 
Thanks for the replies. As far as I know the car was running fine before it lost a plug. They screwed it back in with a bit of binder and then a few days later another plug cam out. Don't know, will have to actually have a good look at all 4 plugs next weekend.

Wonder what is the cause?
Plugs been renewed lately ?

Car running okay ?
 
Google

Ford Expedition spark plug blow out

Common design fault on that vehicle

Surprised we don’t get more on the panda. Plugs at the back. Each at an angle. Very easy to cross thread

The main reason is normally either under or over tightening

If it’s loose it vibrates and eventually hammers it’s way out
Learn something new every day 😉
 
The plug threads are steel and the head is alloy, so any over tightening and the steel will trump the alloy.

Wire coil type thread repairs (Helicoils) are ok if you fit them properly though I would perhaps prefer something like a full threaded insert like a Big-Sert for sparkplugs.

With most you need to drill out each hole, straight.
Tap a new larger thread for insert, straight.
Then screw in the insert.
Plus with a wire coil you will need to knock the tab off the end of each coil.

Without removing the head you will end up with combustion chambers full of swarf and the coil tabs.

Due to position of the plugs, getting a drill and tap on straight isn't going to be easy either.

You might find it easier to take it to a local motor engineers/reconditioners.
They will have more thread repair options and might be able to tackle it with the head still on.
 
Hello Diamond. Charlie's suggestion to check the plugs are actually the correct ones for the engine is a good place to start before, as I often do, assuming the worst and carrying out a thread repair which actually isn't needed! I think there's been at least a couple of different plugs recommended for the FIRE engine over the years. If the threads are definitely damaged too much to simply clean up with a tap or modified spark plug - I'll put a bit on the end about this when I've finished this - Then wire wound thread inserts are probably the cheapest and easiest to source. I have a small preference for solid inserts (like Time Sert) where something is going to be periodically dismantled and reassembled as I've experienced wire wound inserts "winding out" - but not often I will admit. However they are considerably more expensive to buy.

As you probably know, the FIRE engine plugs are angled slightly - two one way and two the other - and it's not unusual for someone not aware of this to cross thread them because they assume they should all be going in at the same angle.

Many years ago I "aquired" a 14mm spark plug helicoil kit:
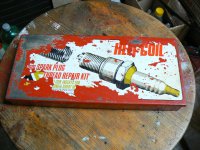
P1100695.JPG

P1100696.JPG


I honestly can't remember where I got it, but likely to have been Musselburgh autojumble. I bought it to do a specific repair on a couple of damaged DAF twin cylinder air cooled engines with stripped plug threads - the smaller inserts were just right as they used short teach plugs. It then went to live in my tool cabinet and I just about forgot I had it until I started messing about with vintage horticultural machinery which use wee engines like the Briggs and Stratton on a lawn mower and also have short reach plugs which "ham fisted" hortuculturalists find nice and easy to over tighten and strip!

For those reading this who have never done a thread repair using this sort of kit, you have to drill out the remains of the thread with the recommended drill - for the 14mm inserts that's a 9/16 drill and you'll find it quite difficult to do this as the drill is quite big (see photo above) and tends to catch and pull. You have to have a very firm grip of the drill and be prepared to get quite "physical" with it to stop it wandering and making an oversize hole. Then you use the two taps - roughing first followed by finishing - to cut a thread into the opened out hole. These taps are very special because they are larger in diameter than the 14mm hole originally was (see the "wee" 14mm plug thread tap to the left of the drill) but their thread pitch is the same as that required for the 14mm plug. Then you load an insert coil into the inserting tool and wind it into the threads you've just cut. once you've fully installed the insert with it's top thread just below the surface of the casting, you have to wiggle and snap the tang off - look at the inserts in the picture, you can see the little stress concentration "nick" which helps it snap off at the right place - using something like a pair of long nose pliers and be prepared to swear mightily when you drop the little sod down inside the cylinder! One of the big problems with this job is to stop swarf from the drill and taps dropping down into the cylinder where it might get trapped down the side of a piston and do no end of mischief! I apply a goodly coating of high melting point grease to the tool tip and only cut a little bit at a time, then remove the tool, clean it's end, apply more grease and cut a little more. The swarf gets held in the grease - as long as you don't try to cut too much at one go - and then removed when you clean the grease off. The inserts are larger in diameter than the hole you're winding them into. The inserting tool compresses them as you wind them in so they are pushing out against the threads in the hole quite strongly once installed, the idea being that this keeps them in place.

If you think the the threads are not actually too damaged - which is unlikely as this engine has blown a plug or two out - you can try cleaning them up with a proper thread tap (the one to the left of the drill in the picture above, By the way the drill and that tap didn't come with the thread kit) or a modified spark plug like this:
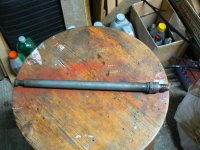
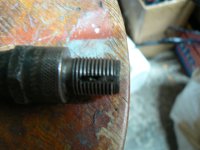
P1100698.JPG

P1100699.JPG

P1100702.JPG


I made this one to clean up the threads in an old Peugeot 504 many years ago - remember how deep the plug recesses were on them folks? - and it's been a very useful tool over the years.

You'll notice i "joked" about dropping the break off tang inside the cylinder? this can be quite a problem in other situations too so it's well wworth considering the slightly more expensive "Tangless" kits now available:


By the way, while we are on this subject, it's well worth knowing about the repair inserts for caliper repairs now available. I had one installed on the Ibiza a couple of years ago and the kits have now come down in price a lot and are so easy to do that I'll be doing the next one myself:


If you're looking at the kit and thinking - What? then look on line for "how to" videos.

I know you "old hands" will know a lot, if not all, of what I've talked about above but for those less well informed I hope the above has not been too boring.
 
Last edited:
This post contains affiliate links which may earn a commission at no additional cost to you.
I've heard of that on vauxhalls too, spark plugs working loose. Pretty sure they weren't tightened right.

My personal choice would be a replacement head if you intend to keep the car.
 
My personal choice would be a replacement head if you intend to keep the car.
Mine too.

I can't see any safe way of fixing this without removing the head.

Any kind of repair involving the plug threads that's done with ther head in-situ carries a risk of something hard/sharp that's not wanted ending up in the combustion chamber. If that happens and the engine is run, you'll be looking for a secondhand engine, not a secondhand head.
 
You might find it easier to take it to a local motor engineers/reconditioners.
They will have more thread repair options and might be able to tackle it with the head still on.
Good idea if you've never done one before. it's quite easy to end up with the insert cross threading into the newly tapped threads. It's one of those jobs which are a lot easier when you've done a few and got the feel for it. Of course, with the head in place and the plug 'oles being to the rear of the head and difficult to see it makes it more difficult than, say, one of my cultivator engines.

If you use plenty of grease and don't go more than about one and a half to two turns of the tap before backing it out, cleaning it off, regreasing it and winding it back in then I find swarf isn't a problem - might chicken out on that if it was a Ferrari, Bentley or something else worth mega bucks though. Not that that's ever going to be the case.

Up here you may find a small independent garage who would take this on although the aggravation factor will probably be a big factor. Something like an old Mini with the plugs on the front of the engine and nothing getting in the way wouldn't be a problem but tucked down the back where you can't see what you're doing with always the chance you might inadvertently break something else? If it was my workshop I'd rather take on something with a more assured outcome where it hasn't been "mucked about" by someone else who has maybe caused "collateral damage" Dedicated engine remanufacturers/engineering workshops won't look at this sort of thing in place on the vehicle, not around here anyway. They want it on the bench and nice and clean.
 
If you're worried about the swarf thing then in addition to using the grease method you could "stuff" the cylinder. I learned to do this when renewing valve stem seals. To do that you need to remove the valve spring retainer and valve spring so you can slide the old seal up the valve stem and slide the new one on. Of course the problem is that once the retainer and spring are removed there's a very real risk of dropping the valve into the cylinder, which would really spoil your day! I was taught to turn the crankshaft until the piston is a couple of inches from reaching TDC on the compression stroke and then, through the plug hole, feed in some stout cord - I have a length of used heavy duty picture cord which works well. Once you've got a goodly amount fed in then turn the crankshaft (DOR of course) until the piston rams the packed cord against the valve faces. I would imagine you could do the same - but leave the valve springs alone of course - and any swarf which wasn't caught by the grease you'd see on the top of the cord and could carefully remove manually. Don't forget to fish the cord out when you've finished, Ha Ha!
 
It seems to have got very complicated

We might even be jumping the gun. We will not know until it’s been inspected.

Aluminium spark plug threads are repair in situ day in day out by the thousands.

Small problems can normally be sorted with a back tap

More serious repair requires a specialised Step tap that are designed just for this job

There’s no drilling

Aluminium swarf isn’t a big issue. First there are ways to stop most of it going into the cylinder, follow the instructions, Second you start the car with the plug out and any odd pieces fly out

If you use an insert with a tang and you drop this that will have to fish it out before you can starting the car.

once repaired it’s better than ther original

Depending on which type of insert is used it might be worth using some high temperature/high strength thread lock so it can’t wind out when you change a plug in future

The only problem is decent tools aren’t cheap.

E454B402-B6A8-4DFC-93C8-CEEB08356369.jpeg
 
If they are the correct size plugs and it's still throwing them out, cleaning whatever threads are left in the head isn't going to help.

I did repair one on a 1.1 Cinq Sporting years ago and did use a wire coil insert but if I knew what I learnt from doing the job I would have taken the head off and used full steel inserts on all 4 holes.

I bought the car used and after the first time I serviced it the number 4 plug hole didn't feel smooth, like it was all gritty and when the new plug went in it waggled about a bit to much until it fully seated.
I knew right away the thread was damaged as there was a silvery, gritty paste of alloy around the hole, but I needed to run my finger around the hole to pick that up. I didn't even try torquing up the plug as I know it would strip straight away.

I seem to remember number 4 was perhaps the easier of all to get to but it was still very tricky to at it.
I gave it a go as I had done a few in the past, but normally on old motorbikes which are far easier to get the head off.

You need a drill bit which is long enough which tends to be harder to line up and keep straight, particulary when you're holding a drill up at the right angle leaning over the engine.

Again, getting the tap straight and keeping it straight is also hard, you really need a guide.
Taps and drill bits are designed to cut into all sorts of metals, they'll have no problem cutting into alloy at a pi**ed angle if you aren't straight.

You probably won't get a fixed T tap handle down the back unless you have an extra long tap and likely really need a ratchet tap handle or a sliding bar handle, which again makes keeping it straight a lot harder than if the head was on a bench.

As you can see from the image of the kit Jock posted, it's specific for this very job.
It has a fairly long drill bit and a specific extended tap driver to reach the hole.
The extended tap driver has an outer fixed case which has a shoulder to line up on the seat of the plug hole to act as a guide and keep it straight while you turn the handle at the end on the long body.
Doing this by hand with a Black and Decker and a general tap and driver is likely to cause bigger problems.

I recommend taking it in to a local automotive engineers while you can.
They will likely have all the kit needed to do this in situ and would have done plenty.
If all doesn't go well, it's in the right place rather than need transporting there if you're dropped a stainless coil tang down the hole that you can't fish out!
 
Last edited:
Something like an old Mini with the plugs on the front of the engine and nothing getting in the way wouldn't be a problem but tucked down the back where you can't see what you're doing with always the chance you might inadvertently break something else?
That, and/or drop something into the cylinder, perhaps without even realising it.

I'll confess to having removed in place what was left of a sheared plug body on a Kent-engined MK1 Ka (better access than even a classic Mini), having first stuffed a greased cloth into the cylinder. Fortunately it worked, but the feeling I had on first restarting the engine wasn't pleasant.

Given the access you haven't got on a Panda/500, the only person I'd allow to attempt this with the engine in situ would be a gynecologist with a second degree in engineering.

The angle of the plugs is deceptively awkward; a socket and straight extension bar won't quite line up, which makes it all too easy to cross thread them in the first place. Putting a universal joint next to the plug socket enables you to get the socket absolutely straight on the plug.

When replacing, always, always only turn the extension bar by hand until the plug is fully seated. Experienced folks will intuitively feel if a thread is not going in square; for the rest, stop and back off if you feel any tightening as the thread is going in. It's hard to describe this; one way to gain the 'feel' is to practice removing and replacing self tapping metal screws into plastic, probably the easiest thing to cross thread.
 
Last edited:
We seem to turn everything into a long winded affair

I have fitted thousands of helicoils threads inserts on industrial machinery as far as I know none have ever failed

But moving back to spark plugs

You asses the problem.

If the plugs came out because they weren’t tighten properly. Just fit them properly

If the plugs aren’t screwing down properly because the top few threads are crossed you use a back tap


If the metal is already gone


If you have access to compressed air make sure the piston is at the bottom of its stroke and blow the glitter out. If you haven’t I would start the engine with the plug removed
 
If they are the correct size plugs and it's still throwing them out, cleaning whatever threads are left in the head isn't going to help.

I did repair one on a 1.1 Cinq Sporting years ago and did use a wire coil insert but if I knew what I learnt from doing the job I would have taken the head off and used full steel inserts on all 4 holes.

I bought the car used and after the first time I serviced it the number 4 plug hole didn't feel smooth, like it was all gritty and when the new plug went in it waggled about a bit to much until it fully seated.
I knew right away the thread was damaged as there was a silvery, gritty paste of alloy around the hole, but I needed to run my finger around the hole to pick that up. I didn't even try torquing up the plug as I know it would strip straight away.

I seem to remember number 4 was perhaps the easier of all to get to but it was still very tricky to at it.
I gave it a go as I had done a few in the past, but normally on old motorbikes which are far easier to get the head off.

You need a drill bit which is long enough which tends to be harder to line up and keep straight, particulary when you're holding a drill up at the right angle leaning over the engine.

Again, getting the tap straight and keeping it straight is also hard, you really need a guide.
Taps and drill bits are designed to cut into all sorts of metals, they'll have no problem cutting into alloy at a pi**ed angle if you aren't straight.

You probably won't get a fixed T tap handle down the back unless you have an extra long tap and likely really need a ratchet tap handle or a sliding bar handle, which again makes keeping it straight a lot harder than if the head was on a bench.

As you can see from the image of the kit Jock posted, it's specific for this very job.
It has a fairly long drill bit and a specific extended tap driver to reach the hole.
The extended tap driver has an outer fixed case which has a shoulder to line up on the seat of the plug hole to act as a guide and keep it straight while you turn the handle at the end on the long body.
Doing this by hand with a Black and Decker and a general tap and driver is likely to cause bigger problems.

I recommend taking it in to a local automotive engineers while you can.
They will likely have all the kit needed to do this in situ and would have done plenty.
If all doesn't go well, it's in the right place rather than need transporting there if you're dropped a stainless coil tang down the hole that you can't fish out!
As we are all saying, this is not a job for the inexperienced and/or faint hearted. Without some considerable experience and all the correct kit, it's very likely to end in tears.

I was also, thinking laterally, that with only 20,000 miles on it and if the rest of the vehicle is in well above average condition, it could be worth spending the money involved in taking the head off. I say this because, although not a big problem, we all know the cylinder head gaskets on these can fail if either the engine has been very hot at some time or they can fail simply due to age deterioration - often blowing on No1 cylinder in my experience. If the rest of the vehicle warrants it you could be killing two birds with one stone by repairing the plug thread (and it will give you the opportunity to closely examine the other 3) and fitting a new head gasket on reassembly. The problem for Diamond will be if he can't do this for himself as labour cost will be considerable. However he says in his first post - at the top of the thread - that he's used helicoils before so if he does all the labour himself I think taking the head off, checking it very carefully, including the flatness of the face, and doing the repair on the bench if it all checks out would be the way to go. Good opportunity to put a new timing belt on during the rebuild too if it needs one.
 
Back
Top