Technical Spark plugs, simple, quick, easy

Currently reading:
Technical Spark plugs, simple, quick, easy

koalar

Distinguished member
Joined
Oct 24, 2016
Messages
9,239
Points
2,101
Location
Cheshire
Unplug the lead
Unscrew the plug
Screw the new ones in
Torque up
Plug the leads back on and drive off

That's how it should go and often does

Most of the problems are avoidable
Don't change the plugs while it's raining
Don't leave the plugs in past 100,000 miles
Don't over torque
Don't under torque
Don't use anti seize
Don't use plugs from unreliable sources
Don't drop or damage you plugs
Don't cross thread
Alway hand tighten first
Always use the proper spark plug socket

Below is some things you may come across

Probably made some mistakes, missed some information,

Also there is always more than one way to skin a cat, different tools and techniques also work
 
Last edited:
Let's start at the unpluging the lead. Never pull the cable, pull at the rubber boot, they pop off and that's great. But what do you do if they are holding on with a grip tighter than Arnold Schwarzenegger. Well there are tools specially designed for the job. Not all will work. Sealey VS867 Spark Plug Pliers, 300mm are know to work, A straight pull is not normally the most efficient, I pull while twisting. Personly If a lead is stuck I would just use normal pliers on the boot.
41XYiJJ9y+L._AC_SL1500_.jpg

Never had to replace a lead even at 200,000 miles or 15 years


If you are changing the plugs due to a misfire it's worth inspecting the leads at night. A slight random sparkling is normal especially if the air is damp. But there shouldn't be any blue arcing, if there is the leads will need changing also
 
Last edited:
Now is a good time to blow the dirt from around the plugs, shop compressed air or canned air both work, nice to do but not essential

Unscrewing the plug does require the right tool. If I was to buy a new one I would be looking at the magnetic ulta thin wall type to future poof it as it can also be used on plugs that are way down narrow tubes.
The plugs should just unscrew, fantastic in fact if they are high quality plugs and changed recently you can almost guarantee this will happen But If the plugs are cheap, clone or fake plugs or have been in for 15 years they are unlikely to come out without a fight. There's three types of seized plugs I have come across, tight to start, squeaky undoing and a combination of both. There isn't one answer, it often requires a combination, the Internet will tell you to spray penetrating oil and wait several hours, in my experience this will do nothing except waste several hours, there's not normally anywhere for the oil to get in and do it's stuff. Counter intuitively try tightening a bit some times works , I personly have had more success by getting the engine very hot and once I have some movement spray penetrating oil and wait for it to cool down before removing. If they are tight or squeeking coming out don't just wind them out, there's no hurry, wind them in and out while applying penetrating oil, changing direction as soon as the treads start to tighten up, Once you have a few degrees of movement it normally just a mattet of patients

Here is an example of a thin walled magnet socket. Yes it 12 point but it will go down some of those deeply buried plugs

612H+IwT9zL._AC_SL1500_.jpg
 
Last edited:
Mind the gap, not strickly necessary, every genuine plug I have bought from a motor factor has alway been bang on. But nice to check, if they are out I would suspect they aren't genuine

As a side note a standard plugs gap increases by around 0.10 for each 6K miles driven. The wider the gap the more pressure is put on the coils, the plug normally starts to misfire at just under 2mm.


Screw the new plug in is normally the simplest part, but care is still needed, There is no need for anti seize from NGK "trivalent plating. This silver or chrome-colored finish on the threads is designed to provide corrosion resistance against moisture and chemicals. The coating also acts as a release agent during spark plug removal" I have received plugs with the end that the lead clips on loose, so I always check they are all finger tight before fitting, The plug is very fragile, any knock or drop has the potential to damage it, this where a good quality plug socket come in to play, but you can do it old school with a rubber hose you need something that holds the plug firmly so it can't fall off. it's also very easy to cross thread the plug on the fiat 1.1 and 1.2 engine, the plug are not straight up but slightly at an angle, it's always best to start them by hand first, if the threads are clear and the plugs are new you can normally wind them in up to the sealing washer by hand
 
Last edited:
Torquing up depends on what engine plug size combination you have, for the majority of engines 18Nm only early engines are different

Fiat eLearn does not list the 12mm plug torque for the 1.1 and 1.2 I have used fiat's other 12mm plugs setting which is within NGK spec for a 12mm plug in an alloy head

1.1 with 14mm plug 37nm
1.1 with 12mm plug 18nm
1.2 with 14mm plug 27nm
1.2 with 12mm plug 18nm
1.4 with 12mm plug 18nm
These are the torque setting for a cold engine. If a torque wrench isn't available and the plugs are new, if you wind down the plug by hand until it stops, then turn a further 1/2 turn will be in the right ball park
 
Last edited:
The HT leads should push back on to the plug with a nice satisfying click It's a good idea to add a little dielectric grease to the spark plug boots this should also help at their next change, you may find wiggling the boot slightly while pushing helps
 
Last edited:
What if the threads are already damaged, first of don't panic it's all fairly simple repairs but will add extra cost to the service.

When working on the cylinder head you want the valves closed and the piston low down

If you put your finger over the hole and turn the engine by hand you can feel when it starts to make comoression


If the first couple of thread that are damage they can normally be repaired with special back tap. The piston has to down the cylinder and the valves closed. The tap is collapsible so it can be inserted into the cylinder first then expanded again. Allowing the tap to start in the undamaged threads and wind out, don't buy cheap eBay tools for this. It will probably make a bad situation worse. Most of the bits will be backed out with the tap.Start the car without fitting the plug will clear most bits out of the cylinder


If the threads have stripped out. They can be repaired without taking the head off. It's been done million of times very common repair on the Triton engine, which was in virtually every ford truck from 1997-2010 You need a special stepped tap and insert again this need a good quality, this is just one example there are other makes out there

Start the car without fitting the plug will clear most bits out of the cylinder But don't over worry about a few bits left in the cylinder they soon get pushed out past the exhaust valve or burnt off

If the top twists off including the insulator you it can still remove with the proper tool (square cut easy out.. extractor), hammer one of these into the hole withe the piston and valve out of the way
s-l1200 (1).jpg

The more comm spiral extractor is unlikely to work, I have a set of spiral extractors, don't follow my mistake, as you wind then in they force the metal outwards if whatever you are trying to undo is already tight they will make it worse. Wish I hadn't bought mine
 
Last edited:
One last thing

It's nice to keep the old plugs in the order they came out cylinder 1,2,3,4.

Inspect them are they all the same colour

One a different colour would be an indication of a problem with a cylinder

Here's one colour chart https://ngksparkplugs.com/en/resources/read-spark-plug

Be careful there several sites the have rich and lean the wrong way round


Also older sites show the plugs run on lead petrol which give different colours to modern petrol
 
Fantastic information.

I would add that the 1.1 and 1.2 FIRE engines can catch people out because the plugs are angled. I use a long thin-walled spark plug socket. It shows me the actual spark plug angle whereas a fancy thing with flexi joint will not. I blow out the plug area with a bicycle tyre pump (you'll get a more than good enough air blast). Unscrew the old plug and fit the new plug immediately. This way you know the angle and will not get the threads crossed. Move to the next one and repeat.
 
Great guide koalar. So much useful stuff here. As both you and Dave mention, the plugs are angled but am I remembering correctly that two are slightly angled one way with the other two being angled the other? - I think Nos 1 & 3 go one way and 2 & 4 the other? Or maybe I'm confusing myself and thinking about another engine altogether? Using a solid extension is also the way I do it and this helps greatly with judging the angle.

Blowing dust and grit out of the hole before you remove the plug is, in my opinion, a must. I slacken the plug by about a half to one turn before doing this as I find it tends to loosen any grit which may have somewhat solidified around the sealing washer. Here's my "solution" for anyone not having a compressed air source, Like you, it's a variation on the pump theme:

P1100877.JPG


I took a length of flexible tube and an old tyre valve, cut all the rubber off the tyre valve and forced it into the end of the tube:
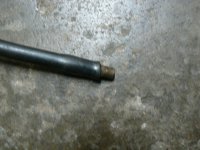
P1100878.JPG

The nozzle end is the spout of an old broken oil can, forced into the other end of the tube:
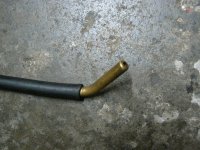
P1100879.JPG

I think it has the advantage over your bike pump in that it leaves both my hands free to hold and direct the nozzle and maybe hold stuff, like leads etc, out of the way at the same time. Being lucky enough to now have a compressor, I tend to use compressed air but this old tool still gets used if I find myself working on one of the family vehicles away from home.

I also agree that it's a very good thing to keep the plugs in order of removal. You can tell a lot about cylinder condition and how fueling is from the look of a plug. However, as you say, many of the illustrations you find on the likes of you tube and google show old images which are useless with modern "super weak mixture" running engines. Probably the best simple thing to look for is that all plugs should look the same.

Like you. I've found the square section type eezi out to be the better option. For those who don't know what these things are here's some images, first off my box of various sizes I've collected over the years:

P1100880.JPG


Here's a picture of the two basic types with a home made one on the left:
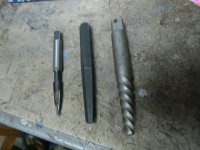
P1100884.JPG

The one's I have are designed to work on normal right hand threads. To use you insert into the broken stud after drilling a hole down the middle of it:
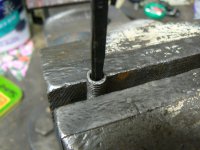
P1100883.JPG

Then give the end a few sharp taps with a hammer to make it bite into the stud. The flutes on the side of the tool bite into the stud so when you rotate the tool - with a tap wrench, spanner or whatever - it grips the stud and lets you wind it out. The problem with the reverse spiral type is that, as they grip, they wind themselves deeper into the hole. this seems a good idea when you first think about it because the more resistance offered by the seized stud, the deeper the tool will bit into the stud. This is good yes? Well, actually, no, because it also expands the thin wall of what remains of the seized stud which further locks it into the hole. The home made one is, as some will recognize, an old tap with the sides ground into a square section. Hammered into the hole it actually grips the stud quite well.

The problem with using these tools is that they are really quite brittle so if you've no experience of using them it's very difficult to judge when to stop applying more turning effort. Generally speaking my advice would be to stop trying to turn it any further if you feel it beginning to act like a spring. I find a sort of "cadence" application of force works well. Apply some force and immediately relax it then do it again and relax and keep repeating applying a little more turning effort each time until either the stud moves or the tool starts to act like a torsion spring. If it's "winding up" the tool then you're getting close to snapping it off - and you really don't want to do that as you're probably not going to deal with the result easily.

Having said all that I now a days prefer to weld a nut to the top of the broken stud if I can and leave the eezi outs in their tin! However, if we are talking specifically about plugs which have snapped off in the head (as we are here) then a square eezi out works.

If you need to clean damaged threads in the head then a back tap sounds a wonderful idea. I didn't even know they existed until very recently. I was taught to do this by applying a liberal coating of high melting point grease to the tap and then winding it in by only a couple of turns before removing it and wiping off the grease and trapped swarf, recoating, winding in a bit further, maybe four turns, and out again. clean off, recoat and back in a bit deeper. and so on and so on until the thread is cleaned up. The grease catches the swarf so really none drops into the cylinder. I've done many like this and never had a problem. Used the same procedure when cutting the threads for a helicoil and never had a problem with it. The secret is to only do a couple of turns each time so the swarf doesn't overwhelm the grease.
 
Last edited:
A great tip for welding broken bolts is to put a wide copper washer under the nut you are about to weld on. That protects the joint face from weld spatter s you fill up the nut with weld. If the bolt has broken below the surface use a pipe of copper tube to line the hole. This stops you welding the stud into its hole. This works best with a MIG welder gas shielded or flux core will do.

You can make a suitable copper washer by cutting a 1 inch piece of 15mm plumbing tube. Cut that, unroll and gently hammer it flat. Drill a suitable hole and you have your protective washer.
 
The last one I did was a stud broken with about 3mm showing. The threads were gone. I welded on a nut with my stick welder not holding out much hope and it worked. It simply screwed out and looked like a normal bolt. I've done a few on Japanese motorbikes often exhaust studs. The external threads rust away and those into the aluminium are seized solid. Welding on a nut shocks the seizure and allows it to unscrew.
 
Last edited:
The last one I did was a stud broken with about 3mm showing. The threads were gone. I welded on a nut with my stick welder not holding out much hope and it worked. It simply screwed out and looked like a normal bolt. I've done a few on Japanese motorbikes often exhaust studs. The external threads rust away and those into the aluminium are seized solid. Welding on a nut shocks the seizure and allows it to unscrew.
Yes, I'm sure the heat of the welding has a great deal to do with it. When i first learned of this technique i thought "how's that going to work? all that'll happen is the stud will snap again" but most I've tried this on actually wound out quite easily. - Just listen to me, sounds like I do this every day when in reality I could count the number on my fingers and toes easily.
 
Spark plugs when they twist off they usually leave a hollow tube of steel in the head

Welding runs the risk of hard weld splatter entering the cylinder

Here's one removed with a spiral extractor, not mine, you can see the extractor marks on the inside
SN851049.jpg


In this case a square cut easy out extractor would be the preferred first move, but great they manged to remove it

It's not a common problem on these engines and would be far more difficult repair if the isolator is also stuck inside


https://www.championautoparts.com/Technical/Tech-Tips/Removing-Broken-Spark-Plug.html love the discamer at the bottom

Studs are a different kettle of fish, the heat cycle from a welder and they often twist out easy
 
Last edited:
I think the welding method would be useless for almost any spark plug. The fragment would be far too deep into the plug hole. And - as said, loose metal spatter would get into the cylinder. Good luck extracting that.
 
I think the worst engine I worked on for snapped plugs ( and so leaving the hollow threaded part in the head) was the old Vauxhall slant 4 OHC engine found in the FD/FE Victors and Bedford CF - to mention just a few. It was a small diameter taper seat plug back in the day when taper seat plugs were quite a novelty. Many people overtightened them because they weren't used to plugs without crush washers. Particularly difficult to do rear cylinders on the CF where the engine half hid behind the bulkhead
 
VVT plugs 1 and 2 go one way and 3 and 4 the other

This is the veiw from the back

Screenshot_20230619_153131.jpg


If you imagine a line down the center of the block the two plugseither side are angled towards it

Fairly sure the older square oil filler are the same

No idea for the early 14mm plugs, never had one
 
Don't leave the plugs in past 100,000 miles
Maybe re-word that, or someone will come on with an engine at 102,000miles saying it wont start with no plugs in.

A few other bit would be to remove the airbox on the 169 engine. And plug leads dont like letting go either taking them off, really felt like something was gong to break first time.
 
A few other bit would be to remove the airbox on the 169 engine.
Good point, I was going include then reliesed there not all the same then forgot

Now you've mentioned it and thinking about it does need adding so everything is in the same place as the car's with the small hose from below the throttle body to the back of the airbox are very easy to brake off if you don't know it's there
 
Last edited:
Back
Top