Technical Death Rattle!!!!!!

Currently reading:
Technical Death Rattle!!!!!!

Thanks for the replies all - appreciated. Al, :)worship::worship:) I'll run through your points one by one if I may as we agree on much. I have been lying abed running the facts through the old grey cells and have a few points of note.(y) I noticed the proximity of the marks to stud location and did wonder, but, have to discount this as I had the stud holes enlarged very slightly and I have a 1mm steel support plate on the spigot to help with location, strengthen the joint and give a better piston to barrel height and C/R. Not sure about the Piston 'expansion-control' all I know is they were very expensive and direct from a top Italian maker!! My engine man is an old hand and was happy with the piston/bore clearance after rebore, he will be checking the pistons/rings and bores anyway.(y) I'm only happy that the damn thing didn't completely seize and grenade on me,:eek::eek: at least the situation is recoverable(y)(y) He was happy with the plugs and the colour of the same, he considers them correct for the application.
NOW :worship::worship: much respect Al, as you have touched on something that I am wondering about and that is the cooling system. On my engine the fan housing is from a 500 modified to fit onto a Panda 30 head on the left side (viewed from the rear) using an alloy fan. The engine fins are all in place, BUT the side plates (front and back) are missing and I wonder if this is causing excessive heat:confused::confused: A standard Panda 30 thermostat housing is fitted to the head on the right. I do have a modified 500 thermostat housing that will be fitted post rebuild - this does have the side plates.(y)(y) Peter, the pistons are in the correct way. I'll leave it all with my man and get back with info when available:cool::cool::cool:

Ian.

Ian,

Your kind words of praise are making me blush :eek::eek: like I haven't done since I was a teenager (a very loonng time ago!). (y) I'm just throwing out ideas for you to consider and maybe discuss with your engine man.

I'm not sure what can be done to improve/uprate the cooling system on an air-cooled Fiat engine.

On a modified water or should I say liquid-cooled engine, it's easy to monitor coolant temperature via a gauge and make changes if excessive temp. becomes a problem, e.g. larger radiator, electric fan, increase system pressure, higher-flow water pump, different coolant etc.

On an air-cooled engine, it's not so easy. In the '70's? Suzuki introduced 'Ram-Air' cooling, basically a slanted cover above the cylinder head fins supposed to scoop and force extra air over the fins and supposedly improve cooling.

On your Fiat engine I suppose it comes down to ensuring that all cowling,
side-plates and baffles are in place to ensure that air is being directed to where it's needed.

I've sometimes wondered about engines that have been converted from a dynamo to alternator and the pulley size has been reduced thereby rotating the generator and cooling fan faster for a given engine speed. I know very little about fan design but wonder if a point is reached where no increase in air movement is achieved beyond a certain speed, similar to what I believe can happen in fluid pumps (air is also a fluid). Perhaps some other members have some knowledge of this subject and could advise us.

Maybe there's a more effective design of fan or fan blades available or a way to get more air in and more air out of the cowling.

I wonder also, what previous tuners (Abarth, etc.) of Fiat air-cooled engines may have done to improve cooling. Maybe check what baffles, refinements etc. are used on other makes of air-cooled car engines - V.W., N.S.U., Citroen
for possible ideas.

What is a little puzzling is that your engine ran quite well for some time after the rebuild. I trust you didn't simply give it too much welly too soon:D. I'm sure you're too experienced to have done this!

As others have said, maybe recheck that the ignition timing is correct on both cylinders. As you no doubt know, retarded ign. timing can cause overheating...

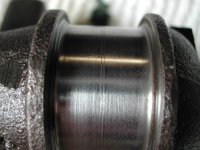
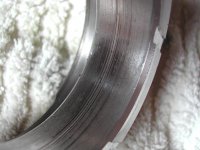
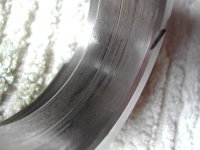
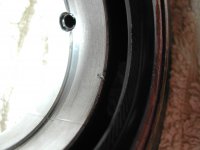
I don't think that the fuel mixture/carb is the problem for the same reason that you stated plus only one cylinder was affected. The difference in appearance between the two cylinder combustion chambers/piston tops might be explained by one cylinder running hotter than the other. It also suggests it had been doing it for some time. You're right in saying that running a richer mixture should reduce running temperature, lawnmowers often use this trick especially side-valve ones, remember them?:D

Best of luck with the (next) rebuild!(y)

Al.
 
Some brilliant thinking (as annoyingly always ?) there from Al. It got me thinking, do the pistons have the proper offset that I believe the gudgeon-pin location should have? If so, unlikely you got it wrong, but are they fitted with the correct side facing the camshaft?

Hi, Peter,

I'm far from brilliant. I guess I just guess convincingly.:D
I'm also desperately trying to correctly remember things I knew back in the day - which is now nearly 40 years ago!!!

Also, please bear in mind that although I worked on these cars in a Main Dealership, at that time the cars were only a few years old so I didn't get to do such involved work as you guys do nowadays on cars that are c. 40 years old and with greater mileage having been covered. I have to take my hat off to such guys and greatly admire all your efforts, persistence and attention to detail, especially those who undertake a restoration- a huge undertaking and often-times a seemingly never-ending trial. :worship::worship: I'm also frequently amazed at what problems you guys encounter, solutions you find out or figure out! and the great enthusiasm that permeates this forum. I particularly like it here because there's no argy-bargy, no keyboard-warriors unlike some other forums I've tried.

Re- Piston (Gudgeon-pin) Offset. Good point. The only engine I've encountered with the pistons fitted the wrong way round had a slight noise, a bit like piston-slap which iirc offset gudgeon pins are supposed to prevent/minimise. No damage was done. Obviously, if domed pistons with different size valve pockets are fitted the wrong way round, then damage is a certainty. I don't know of any modern pistons made without this gudgeon pin offset but don't quote me on this...

Regards,

Al.
 
Al, Peter, Re pistons and offset pins, not with my new ones I'm afraid they are forged with a flat top - very shiny - very expensive:eek::eek: The Italian prices are the same as aircraft parts - think of a silly number and then add a zero or two:eek::eek: My man has suggested that I go up one size on the jetting of the carb to help with the cooling and I shall fit the other thermostat housing as well.
I have been wondering about cooling fans and if they can be obtained with a higher performance than standard, but given that the gearing of the alternator shaft is fixed I'm unaware if any mods can be obtained to raise the rpm, but this will cause extra stress to the fan blades. It's a pity there are so few of these cars racing in the UK as the availability of performance mod's in all areas must be better in Germany and Italy where there is racing series.
Do Any of our Italian members know of cooling mods??? Or can anyone recommend further reading/research???

Ian.
 
Do you run the standard "tin" fan or the cast alloy one? They are quite different - and as the alloy one is suitable for higher revs and is/can be balanced - you can alter performance of the fan with pulley size
 
Do you run the standard "tin" fan or the cast alloy one? They are quite different - and as the alloy one is suitable for higher revs and is/can be balanced - you can alter performance of the fan with pulley size

Hi Andrew, my fan is cast alloy, do you have any idea where the different size pulleys can be obtain from?(y)

Ian.
 
Update, My engine man has been measuring everything and found that the bores of both cylinders are fine and remain parallel, all they need is a light hone. The number one (rear) piston is ok. The number two (front) piston has a measured difference between the crown and skirt of some 12 thou :eek::eek::eek: In his jocular way he said "That's probably what made it rattle" :mad::mad::mad:
So Bummer or what??? With all of Italy on holiday (I wish I was back in Sicily too):cool: there will be a wait until my man can obtain another piston. (n)(n) he remains adamant that the cause is lack of fuel, but I am willing to add timing and fuel quality into the overall mix in varying amounts. I am waiting for larger main jets and pump jet for the carb so that things will run richer (going up one size only) and as I've said before the old bastardised 500 heater housing will go on too. Also, I am going to fit my second Panda 30 head as the capacity is slightly greater giving a lower C/R overall. While I'm waiting I'll finish the spare gearbox and fit my new springs on the rear if only to pass the time:bang::bang::bang:

Ian.
 
Hi, Ian,

With the weather the Italians have been having recently, I don't blame them for taking a month's holidays. :D

Interesting reading on No.2 piston.
Normally the piston crown is slightly bigger than the piston skirt, but are you saying that the skirt is now 12 thou smaller than the crown? Or am I misunderstanding the reason for the :eek::eek::eek:

Has your Man measured the other piston which iirc you said was undamaged?

Has your Man got the measurements of both pistons before they were fitted?

Afaik, used pistons needed to measured in 6 places to check for distortion. -
Piston crown, below bottom ring, bottom of skirt on thrust face and also at 90 degrees to thrust.(gudgeon/piston pin axis).

I mentioned in a previous post the use of (anti-expansion)'struts' cast into some pistons to control the way the piston expands in use. I've heard they can sometimes 'collapse'. I've encountered this on one 4 cylinder Fiat engine with iirc, aftermarket pistons. Engine had been rebuilt, abused, slightly bent 4 exhaust valves and was changed. I got the engine almost f.o.c. and was going to rebuild it. Pistons looked o.k. to re-use. Slight scuff marks on piston skirts.
No.4 piston skirt was 0.001" (1 thou.) smaller than the other 3. Engine rebuild experts told me engine had likely overheated, leading to the piston skirt collapsing slightly, they had seen this before. Also told me they always measure all pistons (even un-opened boxed new sets!) and don't bore/hone cylinders until they have the pistons to be used in their possession and have measured them!!!

Being somewhat impecunious at the time, I fixed the problem with No.4 piston and used it. Worked just fine. Lasted too! :)

{Ancient history:- Did you know there used to be a special hammer used to adjust piston to bore clearance by tapping the inside of the piston skirt to expand it. Iirc this was done by Rolls-Royce or Bentley back in the 1920's?
Idk if the pistons were made from al. alloy or cast iron.}

Regards,

Al.
 
Greetings - Update on the ensuing engine debacle :mad::mad::mad::mad:
Having found scouring on the number 2 big end - caused by the partial seizure I am told (n) I undertook to remove the crank for measurement and regrinding, I was not prepared for the situation found. (pic 1) shows the marks on the number 2 journal. (pic 2/3) shows the wear markings on the rear bearing (timing case end) :eek::eek: (pic 4/5) show the damage to the forward bearing (flywheel end) :eek::eek: in two places! So am I glad that the state of affairs has been revealed (y)(y) I'll replace both the mains and big ends after any work required with top quality kit - after all it's only money :rolleyes::rolleyes:

Ian.
 

Attachments

  • DSCN2607.JPG
    DSCN2607.JPG
    1,011.6 KB · Views: 23
  • DSCN2608.JPG
    DSCN2608.JPG
    953.6 KB · Views: 26
  • DSCN2609.JPG
    DSCN2609.JPG
    1,022 KB · Views: 24
  • DSCN2610.JPG
    DSCN2610.JPG
    818.6 KB · Views: 28
  • DSCN2611.JPG
    DSCN2611.JPG
    1,017.7 KB · Views: 27
To me , Big end; marks on bearing shells and journal look like there were particle/s in the oil.
Looks like Main bearing shell damage was either present on fitting or caused during assembly.
Very thorough job you are doing and nice pictures.
Thanks for updates.
 
To me , Big end; marks on bearing shells and journal look like there were particle/s in the oil.
Looks like Main bearing shell damage was either present on fitting or caused during assembly.
Very thorough job you are doing and nice pictures.
Thanks for updates.

Thanks Jackw, yep, just what I thought, but it must be prior to my ownership as I have changed the oil twice and use an extra spin-on filter, the sump has a magnetic plug fitted too. (y) It just goes to show that unless you strip the complete engine or have it built from new, you are never going to know what is going on inside (n)(n)(n) I will have all the galleries flushed before rebuild (y) If I can help prevent anyone else from taking the same journey that's a plus:D

Ian.
 
Greetings all, quick update, my engine man has ordered new pistons with a 20 working day delivery :eek::eek: we will see if that timescale is achieved or not:mad:
I also found that both the Crank Main and Big end journals need regrinding so it's now a bearing hunt for the correct sizes from a good material mix. I can go to 0.2mm oversize on the mains and to 0.25 over on the big ends. (y)(y) We have discussed tri-metal bearings for the mains as they are more resistant to the loading from tuning, but, more expensive :mad::mad: I have also found that my original flywheel had been lightened to 4.8kg - ish while the 500 flywheel I have is as standard at 5.7kg - ish. The 500 flywheel will be fitted. My man has said that he can balance the whole thing so I need the following for the job -
Flywheel, Clutch pressure plate, Crank pulley, Oil filter cover, Pistons and Rods plus Crank of course. He is also going to have a trial fitting to determine the exact piston to bore deck height so we can arrive at an accurate C/R, more later.

Ian.
 
Thanks Jackw, yep, just what I thought, but it must be prior to my ownership as I have changed the oil twice and use an extra spin-on filter, the sump has a magnetic plug fitted too. (y) It just goes to show that unless you strip the complete engine or have it built from new, you are never going to know what is going on inside (n)(n)(n) I will have all the galleries flushed before rebuild (y) If I can help prevent anyone else from taking the same journey that's a plus:D

Ian.

Update, My engine man has been off sick for a while so little progress until recently :mad::mad: anyway, the bores and pistons are good to go and I'm waiting to speak to another engineer about an accurate C/R figure after a trial fit of all the parts. The full balancing is taking some time to sort as this type of crank is not seen by engineers nowadays - more to follow. Some bad news just discovered - it seems that my crankcase has been SAND BLASTED!!!! at some time in the past and the engineers are washing and re washing to remove it :eek::eek:
This may well be the cause of the bearing damage seen earlier, but again it only goes to show the level of some work :mad::mad:
Ian.
 
My engine component "balancer" had kittens getting the crank balanced. All fine in the end mind.
As you know i built my engine with an Athena 695 kit and they advised a CR of 11.5:1 which was achieved.
I know you wanted less than this Ian....i dont think that CR is what lead to this re- build so what are your thoughts on what CR you are going to build to?

Hi Andrew, The main purpose for the C/R check was to establish that both cylinders are equal with the same deck height so we can discount this as a possible cause of the unequal burn pattern seen when it came apart this time. I have yet to get this info, but with luck will have it tomorrow. initially my engine ran without a cylinder head gasket and rough figures gave a C/R of almost 12:1
:eek::eek: my engine man has stated that something around 10.5:1 is fine for everyday use providing that you don't rev the nut's off of it too often. I have added a 0.5mm head gasket and a 1.0mm base support plate to increase the deck height and will be more than happy with a 10:1 C/R in the end. The basic problem with these engines is to ensure that the bottom end is in the best of condition, otherwise you are looking at frequent rebuilds as you would with a race engine. I am still unsure if the work done on the cylinder head, inlet and exhaust (polish and porting) has affected the burn mixture into the front cylinder and may never know for sure. More to follow !!!!!

Ian.
 
With this in mind I've fitted a spin on oil filter, oil thermostat and oil cooler. Some have accused this of being excessive - but I'm happy! I also run 105 octane fuel to prevent the dreaded detonation.
 
With this in mind I've fitted a spin on oil filter, oil thermostat and oil cooler. Some have accused this of being excessive - but I'm happy! I also run 105 octane fuel to prevent the dreaded detonation.

Andrew, being careful with your hard earned is never excessive :cool::cool:
I too have spin-on filter and use a low profile ducati filter, an oil thermostat and thermostatically controlled oil cooling fan too (y)(y) me excessive - never!!! my fuel is from Tesco (super) plus millers ethanol protective and octane boost :D:D I just wish that the build quality of my engine was better at the start and I would have avoided my problems :mad::mad::mad:

Ian.
 
My engine component "balancer" had kittens getting the crank balanced. All fine in the end mind.
As you know i built my engine with an Athena 695 kit and they advised a CR of 11.5:1 which was achieved.
I know you wanted less than this Ian....i dont think that CR is what lead to this re- build so what are your thoughts on what CR you are going to build to?

Hi Andrew, can you confirm your quoted C/R of 11.5:1 as the Athena data I have states 10.3:1 :confused::confused::confused: Did your engine man recommend the C/R? I'm having to change the base plate on my engine as it gives a 0.5mm deck height which in turn gives an incorrect squish figure :mad::mad: It seems that I may have to accept a higher C/R (to 11:1) to get the squish correct with this head fitted (34.2cc) otherwise I will have to change the head to achieve around 10.6:1 ish. This tuning lark is a right nightmare to get right :eek::eek:

Ian.
 
My data sheet is more comprehensive than the PDF found on line.
It has details regarding flywheel weights, CR, squish and that it all requires balancing.
It's all filed away and can be retrieved tonight if required.
My engine builder agreed with build philosophy and fitted no base plate or HG.
 
My data sheet is more comprehensive than the PDF found on line.
It has details regarding flywheel weights, CR, squish and that it all requires balancing.
It's all filed away and can be retrieved tonight if required.
My engine builder agreed with build philosophy and fitted no base plate or HG.

Hi Andrew, thanks for the reply. I would really appreciate your engine squish figure if at all possible, so I can compare with the info my engine man has (y)

Ian.
 
Back
Top