Technical clutch

Currently reading:
Technical clutch

gr0mit

Member
Joined
Apr 4, 2019
Messages
82
Points
92
Fiat fiorino 1.3 multijet diesel van
2008 registered Jan 09
75000 miles on clock

Hi All Thanks for reading
My van is giving me a problem i cant quite fathom
when i depress clutch it makes a weird whistley sound which has got louder of late
Unfortunately yesterday had a situation where clutch pedal stayed down , i manually lifted it up while engine running and in neutral gear.
drove home (4miles) pulling ok but rattling whistlie all the time more so on clutch pedal depress, when changing gears.
on arriving home kept it running and flipped the bonnet.
Found smoke coming mainly from around the clutch slave cylinder.area (could not see quite where.
No lowering of brake fluid even with lid off
This morning stripped out air intake ,battery and tray .
Wife pressed pedal for me and slave popping in and out ok

However smell of burning .
Question for me is do i try to change say slave and master first. then clutch if necessary.
or is there a test. i dont know about
Many thanks
Gromit
 
It sounds like the clutch release/thrust bearing, at that mileage
and due to the work involved I would think about changing
the complete clutch, see what others think.
 
The whistling sound is very likely to be the release bearing and to change that you need to remove the gearbox and if you're going to all that bother and with 75,000 on the clock it makes no sense at all not to change the clutch itself (you can buy a quality 3 piece kit - driven plate, cover assembly and release bearing - for well under £100) S4P sell the genuine FCA item for the Panda here: https://www.shop4parts.co.uk/?name=store&op=Product&ProdID=3170 I'm guessing your's may be the same clutch?

The non returning pedal is almost certainly down to hydraulics and often a sticky slave. If you're on a very tight budget you could try just the slave on it's own but there shouldn't be smoke coming out of anywhere in that area. If you end up removing the gearbox then check very carefully to see if the input shaft shows any sign of leaking oil. also give it a few turns/spins and check for smooth running and lateral play as it's not unknown for the input shaft bearing to wear/collapse at higher mileages. I'm not all that familiar with the diesels but on the petrols the bearing and it's seal cannot be accessed from inside the bellhousing. The front of the box has to be dismantled. It's not a horrendous job to do but not one for an amateur either. There is a thread on here detailing exactly how to do it but i can't find it right now.
 
Big thanks Jock
Am going to reconnect battery via jump leads so I can see whats happening
Anticipating gearbox off . Does anyone know where I can find instructions . I am retired ,so I am time rich. Have half a set of instructions from a Nemo workshop manual downloaded that I purchased, but the Manual arrived at my end incomplete (another story fiddling internet company). from the bit of info I have it looks a big job.
Any tips from anybody would be gratefully received .thanks all Gromit
My first question would be, have you done a clutch on a FWD before? If you have then you'll not find anything unusual about one of these, in fact on the Panda/Punto (which I have most experience of) the input shaft doesn't have a spigot so doesn't have to be coaxed into the flywheel when refitting. The gearchange linkage just pops off with a screwdriver for leverage too. A Haynes Panda or Punto manual will give you the basics and you may well find one of those in your local library.

If you've never done one before but have good mechanical skills then it's probably not beyond you but you'll need to understand about stuff like aligning the clutch driven plate with the centre of the flywheel and how to remove the driveshafts from the gearbox - although you can drop the thing with the shafts still connected, but I wouldn't - remember too that the oil will leak out when you withdraw either driveshaft. Remember too that it's quite a heavy piece of kit, I would balance it on one of my larger trolley jacks while a friend works the lever - quite a difficult thing to do on your own unless you're built like Charles Atlas (that probably dates me!) you'll need some way of supporting the weight of the engine too as it's going to be left hanging by the O/S engine mount when you pull the 'box off. Go on you tube and type in "Punto Clutch Replacement" there are several excellent videos which will give you a very good idea of what's involved. One in particular is of a chap doing one in a driveway on a white Grande Punto which, although a petrol, gives a good idea of what to expect when not doing it up on a ramp in a workshop.

Hope that helps, For us older chaps could be a bit of a tough job to be undertaking in the depths of winter?
 
Thanks again Jock
I have put a lot of thought into the weight problem.
I have a creeper a standard scissor tyre jack pump jack and 4 cranked loading straps. My intention is to hold both engine and gearbox from above with a piece of wood across the engine bay with straps suspended so i can control lowering and highering from above.
I am retired and time rich. Driveway is a large parking area so hopefully will be ok let you know and I will take some photos. It has rained a lot of late here in sunny Cornwall. So it will be weather permitting .slow and steady wins the race. I did look at lot of vids especially the Punto . Looks easy on there but I am sure it won't be. Got most everything I need and getting on jack stands tomorrow pm.
The fun really starts Thursday. I also intend to do front suspension tops (third time). Possible input bearing and seal + remove clean / replace sump . So may be a while before I post my success.
 
I like your attitude, I think our attitude towards these things is probably similar. Not sure what cranked loading straps are? however if they are ratchet (tie down) straps then supporting the engine from above using a ratchet strap and some 3x2 or 4x2 across the inner wings as a sling might work well enough but I think trying to manage the gearbox in that way may be difficult. My preference would be to use a trolley jack with a large saddle for that. I'm fortunate to have an excess of trolley jack (2 large "garage" and 2 smaller "DIY" types) and I find a flat piece of thick plywood under the sump, to spread the load so the jack saddle can't damage the sump and my other large jack under the gearbox works very well as you can work both jacks whilst still under the vehicle and supporting the gearbox as it comes free from the engine. I'm now 75 and definitely getting rather "creaky" these days but until around 10 years ago I would have happily done this job with just one jack supporting the engine and "wrestled" the gearbox in and out by muscle power alone - Those days are long gone now, I'd need both jacks and one of my boys (now grown men) to help.

A couple of years ago both our Panda and my older boy's Punto needed clutches. The weather was not good and I reluctantly got our local Fiat independent (Harrison Motors) to do them for me. I'm trying to remember the actual prices charged, and both vehicles required attention to the hydraulics - the Punto needed both master and slave replaced whereas the Panda responded well to just a slave - He fitted good quality 3 piece Valeo clutch kits (driven plate, cover assembly and release bearing) and that cost £383 all in (inc Vat) for the Punto and a similar amount (I can't find the invoice just now) for the Panda. The cost of the "shenanigans" with the Hydraulics is not included in that cost. The Punto, being the later model, built after 2012, has a bit of a B****r of a master cylinder to do as the pedal cluster has to be partially dismantled to allow the cylinder to be withdrawn into the footwell whereas the Panda's comes out into the engine bay. I believe the Grande's M/Cyl is more easily done, don't know about the Evo? Having initially felt a very real sense of failure and defeat at my decision to hand the work off to Kenny and his "merry men" I now actually feel it was money well spent and saved me from hours of misery being cold and wet lying on my back in the rain and sleet on my driveway. In fact I think I might still take the same course of action even if the weather was more sunny and enjoy myself working in my garage on my old horticultural machines and motorcycles, in the warm. Which is not to say I won't still be doing my own servicing and less strenuous repairs for many years yet, I hope?

Anyway, good luck with your endeavours. I'll be watching out for any posts and pictures you make about it.
 
Hi all thanks for last post Jock it's driving me on
I currently have a hold up driving me nuts the photo shows ball joint attached to swinging arm attached to chassis .I have spent an awful amount of time trying to part the 2 the photo shows I have raised the lot up by jacking with a piece of timber under the brake disc .so the arm has room to go down . It will only go as far as shown in the photo .any tips much appreciated
 

Attachments

  • IMG_20220116_151412.jpg
    IMG_20220116_151412.jpg
    2.6 MB · Views: 42
Hi all thanks for last post Jock it's driving me on
I currently have a hold up driving me nuts the photo shows ball joint attached to swinging arm attached to chassis .I have spent an awful amount of time trying to part the 2 the photo shows I have raised the lot up by jacking with a piece of timber under the brake disc .so the arm has room to go down . It will only go as far as shown in the photo .any tips much appreciated
Yup, they can be quite hard to do. I have an old half shaft out of a Morris Marina with the end flattened - a bit like a very long tyre lever. I use this, often with a length of scaffold pipe over the end, with the flat end against the chassis and the lever against the arm. I can then apply a great deal of force to the arm to lever it down from the joint. I also have an old cold chisel with the end ground to quite a shallow angle and further up the shank than a chisel would be normally ground which I hammer into the slot to slightly spread it and make it loose it's hold on the ball joint's pin. A spray of Plus Gas (I do like a bit of Plus Gas) and they usually give in. If you do this then be careful not to spread it too far and maybe weaken or even crack the casting. It doesn't need to be spread by very much and I've done this on many cars, mostly VAG (SEAT and Skoda) and Fiats and a few others too and never done any damage. I watched them doing one round at the garage once and they stick the car up on a ramp, remove the pinch bolt - which, by the way I believe should always be replaced and not reused - and then they have what looks like a massive slide hammer which hooks over the bottom arm and allows them to apply a ferocious downward force to it. A couple of very loud bangs and the arm came free. A wonderful tool which is absolutely useless for the likes of us as you'd never get the car up in the air high enough to use it.

From the look of your's it looks almost free and it may be the "wind up" in the rubber bushes which are stopping you from pulling the arm down any further. You just need to lever it down a bit more, I don't jack up the hub as you've done - I understand why you've done it though - you just need a long lever and to get a bit more "physical" with the arm. Good luck. I'll see if I can get a picture to you of my lever and scaffold pole to give you some idea
 
Here's the half shafts and the length of scaffold pole with a 5 litre container of my favourite engine oil brand next to them for a sense of scale. I actually ended up with two from a scrap axle so I made one with a pointed end and one with a flat end. I've had them for years and it's amazing how useful they've been
 

Attachments

  • P1100186.JPG
    P1100186.JPG
    783.7 KB · Views: 31
  • P1100187.JPG
    P1100187.JPG
    822 KB · Views: 29
Hi all thanks for last post Jock it's driving me on
I currently have a hold up driving me nuts the photo shows ball joint attached to swinging arm attached to chassis .I have spent an awful amount of time trying to part the 2 the photo shows I have raised the lot up by jacking with a piece of timber under the brake disc .so the arm has room to go down . It will only go as far as shown in the photo .any tips much appreciated
Looking at your photo it might be useful to know that the pin is "waisted". That is to say that just above the parallel bit you've exposed the pin diameter is reduced so there is a sort of groove around it. This makes it more difficult for the pin to come out of the hub if the bolt slackens off in use as the bolt traps it by this groove. I've found in the past that the pin can get slightly out of line with the bore of the pinch casting and this lets the pin hang up in the hole. I think, from your picture, it looks like your pin is not quite in line with the bore of the pinch hole. To do anything about this you'll need to remove the jack and push or pull on the hub until the pin looks in line then lever down hard on the arm. Good luck, my fingers are crossed for you! Thinking about this some more I think it likely that the jack is probably contributing to your problems by putting a sideways force on the pin?
 
Thanks again Jock I take the point about misaligned pin caught by jack because it will slide up and down quite freely with jack out but only up to the point shown in photo today I will try again .Will let you know.
 
Hi Jock .It was misaligned pin got it out, split the rubber boot sightly . Can always fit a new one of those. Next job is to remove half shaft, engine end. It currently will not budge . I have undone the four bolts on the plate that the shaft goes into . No help. But have devised 2 possible methods to extract it . This is going to be the longest gearbox extraction ever Lucky I am time rich, LOL. Let you know outcome.
Gromit.
Thanks for the update. I've fallen foul of the problems that little groove causes when the pin is not "square" in the bore on more than one occasion!

Good luck with the drive shaft. I'm really only familiar with the later shafts which simple (but sometimes reluctantly) lever out of the 'box - are your's different to this? I'm not familiar with the Fiorino van and don't have much experience of the diesel engine installations.

Looking forward to your continuing story!
 
Hi Jock
Tried to remove using a load strap and ratche . Twisted strap at back of half shaft cup where it goes in
That would not work . So , I got a length of 3 x 2 timber made a loop from the engine end, timber through loop and up against the plate that holds the wheel . Levered it and pop. Only problem was that the pop was the engine end gaiter coming off. So half shaft off with the triple wheel on end but half shaft cup still attached .
It seems like some sort of fork is in order. Try again tomorrow. Hope it's supposed to come off . Would not be able to drop gearbox straight down unless I remove it.
Big thanks gromit
 
Hi jock
Tried wooden wedges, lump hammer and chisel , could not budge it.


The first 2 photos show how I managed to remove drive shaft cup
The photo shows how I used a manual spring compressor, a length of load strap and a big screwdriver. Screwdriver goes down through the bottom arm with one end of spring compressor on screw driver and strap tied round back of cup and attatched to other end of spring compressor, did up bolt on spring compressor and cup popped out.
3rd photo shows shaft on cup . I think the spring clip has a piece missing , any info on this appreciated.
 

Attachments

  • IMG_20220120_131213.jpg
    IMG_20220120_131213.jpg
    1.7 MB · Views: 38
  • IMG_20220120_131241.jpg
    IMG_20220120_131241.jpg
    2.2 MB · Views: 34
  • IMG_20220120_160158.jpg
    IMG_20220120_160158.jpg
    952.4 KB · Views: 38
Oh man, you have been having "fun" haven't you!

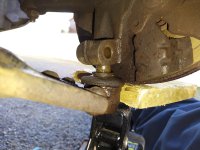
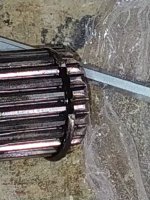
First, and most obvious thing to say is yes, I think a little bit has broken off the end of the circlip on the end at the bottom of the picture - but it's not much so I'm not absolutely certain. Can you see if the end looks as if a bit has been sheared off? The clips I've seen have always had squared off ends - no sign of the dimple effect I can see on yours. A new circlip doesn't cost much so if I were you I'd buy a new genuine Fiat one and compare the two. If a bit has broken off, the question which would then be bothering me, if I were in your place, would be, Has this just happened or has it been done on some previous removal of the shaft? To be frank there's not much you can do except shine a bright light into the "hole" where the shaft came from in the hope you might see the broken bit in the splines of the spider gears. I think this is unlikely but worth a try eh? If you do see the bit don't poke at it with a screwdriver. Sod's law dictates that you'll almost certainly dislodge it so it drops out of sight! Instead get one of those wee magnets on an extending wand (like a car aerial), works a treat. If you can't see it looking in "the hole" you might find it will come out if you pull the drain plug? The drain plug on our Panda and my boy's Punto is located at the back of the diff casing so very near to where the bit might drop down? probably as well to do a complete oil change on the 'box anyway? If you think there is a broken bit and you can't find it then what do you do? I don't think I could face dismantling the box. I might try propping the box up so the drain orifice is at the very bottom and pumping a gallon or so of paraffin or diesel in through the filler hole to try to flush it out? and I would try to get a magnetic drain plug for it - I've seen "universal" ones on ebay - in the hope it would retain the wee bit. In fact I've been thinking of getting magnetic plugs for both of ours anyway.

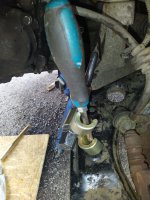
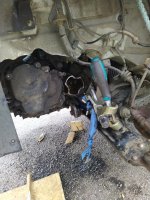
I'm sorry, but it's really easy for me to say now that where you went "wrong" removing that inner joint was in applying a constant gradual force to it. I've removed many of these sort of joints - held in by circlips - on a number of different makes of vehicle during my life and what they need is a very sudden application of force - a "jerk". I have a long tyre lever, it's about 2 ft long, and I get the end of it under the edge of the inner joint with the flat of the lever against one of the gearbox bolt heads - so there's a very considerable mechanical advantage going on here - and give the handle a sudden, sharp and vigorous pull. Usually the joint just pops out but occasionally it doesn't and I think this is because the circlip is not lying evenly in it's groove. If it doesn't pop out after a couple of vigorous snatch jerks then don't persist. Instead give the joint a wee wiggle or tap back into the casing so as to free up the circlip and turn the shaft about a third of a turn then try the tyre lever again. I find often the joint which was previously just not going to move will now almost leap out on it's own. If it still won't budge just repeat the process and try another third of a turn. If you get REALLY VIOLENT with them when they won't move all that happens is the circlip digs into the splines and life gets a whole lot more "messy" - especially if you go really "APE" and crack the gearbox casing! Sometimes using 2 levers, if you can get access, one on each side, works well. The "trick" though is to apply a sudden jerk, not a steady pull and "rocking" it with the two levers sometimes helps too. The big thing is not to allow the splines to dig into the circlip.

You should be able to get a new circlip relatively easily but be careful as they come in different thicknesses. I think a genuine Fiat one obtained from the dealer is unlikely to cause problems but if you source one from an engineering suppliers you'd probably be better to take the old one with you to compare sizes.

You're making progress though which is good! So don't loose heart! I've lost count of the number of times I've found myself lying under a vehicle I really care about, like one of the old Hillman Imps I was so passionate about, thinking to myself "whatever was I thinking, I should never have started on this" whilst perhaps blobs of red hot underseal drip onto my chest from the welding I'm doing or maybe a subframe retaining bolt snaps off inside a captive nut on a box section to which I have no way to access the other side off! Oh the joys, the joys!
 
Hold your horses Jock! I've just been rifling through all the manuals and leaflets I've collected which might show that circlip and I've found just one which shows a replacement circlip being fitted into the groove. The illustration is pretty good and the gap between the ends of the circlip looks very like what I see in your picture above. So I think it may be that the wee dimple in the end of your circlip just might be where it had jammed up and was making it difficult for you to remove? The dimple was literally "stamped" into it as you pulled the shaft out? Comparing with a new circlip before you do any serious worrying would be my advice. Sorry if I've raised your anxiety levels needlessly.

Ps. your image is of quite good definition and I've managed to enlarge it quite a bit so I can really get a look at that "dimple". I've almost convinced myself that it's been formed by a spline "biting" into it? - which would explain a lot?
 
Back
Top