

You are using an out of date browser. It may not display this or other websites correctly.
You should upgrade or use an alternative browser.
You should upgrade or use an alternative browser.
General 100hp rear axle replacement started
- Thread starter MD 100hp
- Start date
Currently reading:
General 100hp rear axle replacement started
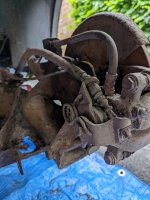
That looks like it hasn't had. A good clean our for years with the mud like substance inside then cups
- Joined
- Sep 14, 2009
- Messages
- 19,962
- Points
- 3,972
If you have the facility locally, look into having the new axle grit blasted and zinc metal sprayed. It's overkill, but mine was such low cost it was silly to not get it done. Mine cost £80. A few cans of zinc primer and finish paint are a big chunk of that.
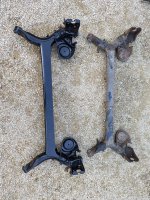
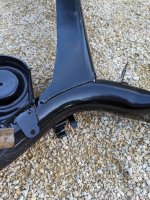
A few frame pics comparing old and new.. differences seem to be
ABS wire routing ( cutout in new axle completed)
Additional Bracket for rear caliper handbrake cable and pipe/hose connection ( already moved to new axle )
Position of handbrake cable bracket ( further back on the replacement axle (trial fit needed)
ABS wire routing ( cutout in new axle completed)
Additional Bracket for rear caliper handbrake cable and pipe/hose connection ( already moved to new axle )
Position of handbrake cable bracket ( further back on the replacement axle (trial fit needed)
Attachments


Dismantling parts from the old frame
Plenty of plusgas on all fixings
Should have cleared some of the rust from exposed threads
Brake pipe spanner was essential
Extension bar on the ratchet really help.
Info on YouTube and this Forum helped
Plenty of plusgas on all fixings
Should have cleared some of the rust from exposed threads
Brake pipe spanner was essential
Extension bar on the ratchet really help.
Info on YouTube and this Forum helped
Attachments
Thanks Dave I'd seen that you zinc plated on other posts.. will check if anywhere local.If you have the facility locally, look into having the new axle grit blasted and zinc metal sprayed. It's overkill, but mine was such low cost it was silly to not get it done. Mine cost £80. A few cans of zinc primer and finish paint are a big chunk of that.
- Joined
- Sep 14, 2009
- Messages
- 19,962
- Points
- 3,972
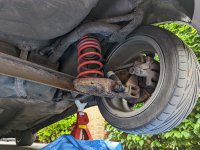
I used a single braided hose on each side from the underbody flare nut through to the caliper. You'll need it to be 650mm long (do check) and get at least four barrel grommets added before the ends are crimped up. I tapped some M6 holes into the swing arm and used P clips to support the hoses. Other parts are done with zip ties as appropriate. Result is a much better setup than OEM metal pipe and two flexible at each side.
If you keep OEM rubber hoses at the front, the brakes will not feel excessively hard. I went braided all the way round and love the hard feel pedal. but as said the mod wont do that if you keep rubbers on the front.
If you keep OEM rubber hoses at the front, the brakes will not feel excessively hard. I went braided all the way round and love the hard feel pedal. but as said the mod wont do that if you keep rubbers on the front.
Hi.. it just an illusion.. I measured the width on both - very similar (2mm difference)Is that just an optical illusion in the photos, or is the new one wider than the old?
- Joined
- Sep 14, 2009
- Messages
- 19,962
- Points
- 3,972
A squint at your wheel mounting flanges shows (despite the new having folded returns and old is flat) the corner relief hole is the same on new and old axles. The later wider axles have the same folded returns but those corners would look considerably different.Hi.. it just an illusion.. I measured the width on both - very similar (2mm difference)
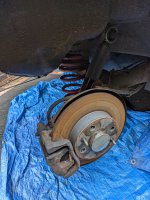
The new axle fits.. so I started to reassemble the rear knuckle brake disc etc.. but one of the studs sheared.. I can't remove it, local garage can't remove, needs drilling out and the threads are probably knackered.
Any pointers on how to fix
I guess it could be the same part on a 500 with rear caliper
Any pointers on how to fix
I guess it could be the same part on a 500 with rear caliper
Attachments

Plenty left there for someone to weld a nut on for you
- Joined
- Sep 14, 2009
- Messages
- 19,962
- Points
- 3,972
Drill a nut to fit the exposed bolt fragment and arc weld it on with lots of heat. The thermal shock will loosen the seized threads. MIG or Stick work equally well.
The same method works with sunken threads, into aluminium or steel. This time, use a short piece of copper tube into the hole to protect the parent metal, clamp a nut over the hole and fill the space with gas shielded MIG weld. This creates a new bit of bolt stem that should unscrew the fragment.
If all that fails, drill it out and tap to a larger size. High tensile socket head bolts might be more accessible than the original studs and nuts. Use RED Loctite and fill the sockets with grease as it might be you needing to remove them one day. 120 degs C softens thread-lock so a heat gun will allow then to come out if you do it right.
- Joined
- Sep 14, 2009
- Messages
- 19,962
- Points
- 3,972
I have not checked if there is adequate space so this is just an idea.
High tensile bolts rather than studs can't get corroded and jam the retaining nuts like the standard setup. There might even be enough space on the wheel side to cut the bolt longer and fit a half nut over the exposed threads. This will help to lock it in place and will keep corrosion out of the threads.
High tensile bolts rather than studs can't get corroded and jam the retaining nuts like the standard setup. There might even be enough space on the wheel side to cut the bolt longer and fit a half nut over the exposed threads. This will help to lock it in place and will keep corrosion out of the threads.
- Joined
- Sep 14, 2009
- Messages
- 19,962
- Points
- 3,972
The stub axle is attached by four high tensile studs which are screwed into the body/flange. The problems are over-long studs which rust and foul the threads. There is no access to clean the threads so all you can do is wind the nuts off and hope the stud doesn't shear or worse the threads dont strip leaving a nut spinning. I replaced mine with replacement studs where necessary but I think high tensile bolts are better option. These better protect the threads, so are less likely to shear off when you remove them.Is it screwed in or pressed from behind?
Similar threads
- Replies
- 74
- Views
- 5K