


Having watched a few YOUTUBE videos.. there were still unanswered questions
This car is a 2018 european 500 -69bhp driven for 3 years.. then traded in
I bought it 6 months later
On its '4th birthday' I decided to fit the modern plugs I had ordered.
This GUIDE should cover the process of accessing the 4 sparkplugs, and safely rebuilding after.
The Start:
Set aside a few hours.. you want a Cold engine.. and a Guarantee you can dedicate 2 hours to get this done
Disconnect battery if you are unsure
Place the vehicle key safely outside the car")
Access:
Remove the 2 x hex bolts either side of the aircleaner box
Then use a flat screwdriver to slacken the clip in the Rubber oil vapour hose
Gently raise the front of airbox ..so you can wriggle out the FreshAir intake hose
Once that corrugated hose is out you can pull off the Black hose from the top of engine ( do not drop that hose clip.. it can be slid along the hose)
AWKWARD PART NEXT..


This car is a 2018 european 500 -69bhp driven for 3 years.. then traded in
I bought it 6 months later
On its '4th birthday' I decided to fit the modern plugs I had ordered.
This GUIDE should cover the process of accessing the 4 sparkplugs, and safely rebuilding after.
The Start:
Set aside a few hours.. you want a Cold engine.. and a Guarantee you can dedicate 2 hours to get this done
Disconnect battery if you are unsure
Place the vehicle key safely outside the car
Access:
Remove the 2 x hex bolts either side of the aircleaner box
Then use a flat screwdriver to slacken the clip in the Rubber oil vapour hose
Gently raise the front of airbox ..so you can wriggle out the FreshAir intake hose
Once that corrugated hose is out you can pull off the Black hose from the top of engine ( do not drop that hose clip.. it can be slid along the hose)
AWKWARD PART NEXT..
The HiddenHose
This is the part Youtube didnt do well..and gets a lot of Forum posts
Removal of small hose..then Airbox
At rear of airbox there is a lightweight rubber hose
It pushes onto a small stub UNDER THE AIRBOX.. out of sight : HIDDEN!
youtube shows that small white clip..bottom right of Hose pic being undone.. no great gain
SO:
Lift the rear of Airbox off its mounting spike (there is a rubber grommet..it will ptobably become displaced) just free of the spike - no further !!
Carefully raise the gearbox side of Airbox
Slide your fingers along that hose..UNDER THE AIRBOX.. you will feel where it ends
Its a push.fit on this small plastic stub. So will wriggle off.. freeing up the Airbox
Which you can then carefully lift away
(Mind that Silver clip.. that is sliding along the Black vapour hose)
The Sparks
Youtube showed the coilpack and leads removed..
I just simplified that:
Undo the 3x bolts holding the coilpack..buys a little free space around plugs
I used tape to mark leads for cylinders 1 and 3 ( to save muddling leads..and having issues)
Pull plug lead #1 ( timing end)
Experiment with your tools here.. you want 'a straight line' from the plug up to 'space' where you can apply the necessary torque
Youtube talked of moving injector wiring.. I didnt need to
Wind out the plug... then carefully remove it
Swap plug.. carefully lowering it into the plug hole
TAKE CARE OF CROSS THREADING!
A tip..
when it has gone Tight.. back it out 6 turns.. if its still in the threads :good
If it has come loose: you were cross threaded
Carefully wind down into its threaded hole
NEW PLUGS.. have a deformable sealing washer.. so feel odd when applying their 1st torque
When torqued Refit the plug lead.. they have resistance from the rubber boot then 'ride over' the electrical contactRepat this procedure for the 3 remaining plugs.
I lined up all 4 Comparing their 'burn colours'
Small tasks
I found that the throttle body was grubby ( oily )
And the camcover breather hole had some 'mayo'
Used the screwdriver to ladel out the Mayo from the metal outlet.. and wiped with paper towel
Also paper towel for the throttlebody
Take 2 minutes to reseat Rubber grommets and seals too


And the camcover breather hole had some 'mayo'
Used the screwdriver to ladel out the Mayo from the metal outlet.. and wiped with paper towel
Also paper towel for the throttlebody
Take 2 minutes to reseat Rubber grommets and seals too
REASSEMBLY
Once youve tidied all you want to
Time to put the mechanical parts back on
Tighten the 3 x bolts for the coilpack ( caution..you are clamping the plastic body.. make sure faces are clean..and dont overtorque)
Slide small hose onto Airbox stub
Slide Airbox boot over the throttlebody
And lower Airbox onto the rear mounting spike
Mount the Fresh air hose into the front of Airbox
Slip Black Breather hose back onto the Camcover stub And position silver clip and Tension : close the clip
(I use pincer tool for that )
Lastly
Once all hoses are back in place
Refit the 2 x Airbox retaining bolts
Retrieve your key
Start car engine
Does it sound Ok ?
Should be perfect.. however issues to consider
Shuddering..a misfire.. poorly fitted HT lead to a plug ( only this if you did 1 plug and Lead in sequence)
Rushing air.. or Roar..
You have left a hose open to atmosphere
If all good.. tidy away your tools
This took me 45 minutes .. job and taking photos ( Guide was written a month later)
I have familiarity with the basic task and tools having owned and maintained many 55/60 bhp FIRE motors
Any comments... please post below
I asked around on here and there isnt much choice with plugs...
BUT.. general concensus = factory issue are poor
And Iridium plugs are recommended
HOWEVER.. there isnt a direct replacement..
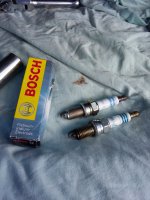
I Fitted the Bosch Iridium in the pics
No obvious difference.. but they should be good for 30k..not the 12k of the basic plugs