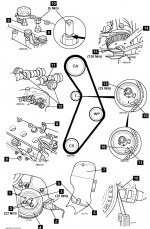
Removal
*I cannot guarantee the accuracy of the information in this document nor do I take any responsibility for damage to any vehicle or person due to the misinterpretation of the information/inadequate skills, any work that you carry out to your own vehicle is entirely at your own risk. These are guidelines only and if in doubt I kindly suggest that you contact a Fiat dealer/relative organisation for clarification/legalities.*

1. Raise and support front of vehicle
2. Remove:
- RH front wheel
- RH wheel arch liner
- Auxiliary drive belts.
4. Remove:
- Crankshaft pulley bolts [3]
- Crankshaft pulley [4]
- Timing belt lower cover bolt [5].
- RH engine mounting and bracket
6. Disconnect vacuum pipes and wiring connections from upper inlet manifold
7. Remove:
- Upper inlet manifold
- Fuel rail.
- lnjectors
- Engine control module (ECM) DO NOT disconnect harness multi-plug.
- Crankshaft position (CKP) sensor [2]
- Timing belt covers [6] & [7]
- HT leads
- Spark plugs
- Blanking plugs [8]
9 Turn crankshaft slightly until notches of both tools aligned with upper surface [10]
NOTE: Dowel pin must remain opposite crankshaft position (CKP) sensor [1111805.] If necessary: Temporarily refit crankshaft pulley. Check alignment.
10. Ensure slots in camshafts are aligned with blanking plug holes [11] If necessary: Remove tools, Turn crankshaft one turn clockwise.
11. Fit locking tool to each camshaft [12] Tool No 1860985000.
12 Slacken tensioner nut [13]
13. Move tensioner away from belt
14. Remove timing belt

