Apart from the visible condition of the belt. which is explained fully later in this section. there are several other factors which must be considered when checking a timing belt:
1. Is the belt an original or a replacement
2. When was the belt last replaced and was it at the correct mileage
3. Is the service history of the vehicle known
4. Has the vehicle been operated under arduous conditions which might warrant a shorter replacement interval
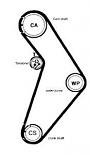
5 Is the general condition of other components in the camshaft drive, such as the tensioner, pulleys, and other ancillary components driven by the timing belt, typically the water pump, sound enough to ensure that the life of the replacement belt will not be affected
6. If the condition of the existing belt appears good. can you be satisfied that the belt will not fail before the next check or service is due
7. If the belt does fail, have you considered the consequences. If the engine is an ‘interference’ type then considerable expensive damage may well be the result.
8. The cost of replacing a belt as part of a routine service could be as little as 5to 10% of the repair cost following a belt failure. Make sure you are aware of the consequences.
9. If in doubt about the condition of the belt - RENEW it.
*Where possible the recommended intervals have been compiled from vehicle manufacturers information. In a few instances no recommendation has been made by the manufacturer and the decision to replace the belt must be made from the evidence of a thorough examination of the condition of the existing belt.*
1. Is the belt an original or a replacement
2. When was the belt last replaced and was it at the correct mileage
3. Is the service history of the vehicle known
4. Has the vehicle been operated under arduous conditions which might warrant a shorter replacement interval
5 Is the general condition of other components in the camshaft drive, such as the tensioner, pulleys, and other ancillary components driven by the timing belt, typically the water pump, sound enough to ensure that the life of the replacement belt will not be affected
6. If the condition of the existing belt appears good. can you be satisfied that the belt will not fail before the next check or service is due
7. If the belt does fail, have you considered the consequences. If the engine is an ‘interference’ type then considerable expensive damage may well be the result.
8. The cost of replacing a belt as part of a routine service could be as little as 5to 10% of the repair cost following a belt failure. Make sure you are aware of the consequences.
9. If in doubt about the condition of the belt - RENEW it.
*Where possible the recommended intervals have been compiled from vehicle manufacturers information. In a few instances no recommendation has been made by the manufacturer and the decision to replace the belt must be made from the evidence of a thorough examination of the condition of the existing belt.*
Check for Engine Damage
This engine is an INTERFERENCE engine in which the possibility of valve-to-piston damage in the event of a timing belt failure is MOST LIKELY to occur.
A compression check of all cylinders should be performed before removing the
cylinder head to confirm.
Special Precautions and Special Tools
Special Precautions
- Disconnect battery earth lead
- DO NOT turn crankshaft or camshaft when timing belt removed
- Remove spark plugs to ease turning engine.
- Turn engine in normal direction of rotation (unless otherwise stated)
- DO NOT turn engine via camshaft or other sprockets
- Observe all tightening torques.
Special Tools
- Piston position tools - Fiat No 1860992000
- Camshaft locking tools - Fiat No 1860985000.
- Camshaft holding tool - Fiat No1860831000
- Tensioner tool - Fiat No 1860987000
Replacement Interval Guide
Fiat recommend:
Engine Code:- 176B9.000:
Check, and replace if necessary, every 36000 miles or 4 years and replacement every 72,000miles or 8 years, whichever occurs first.
Engine Code:- 182B2.000/88A5.000:
-2000: Replacement every 72,000 miles or 6 years
2001- : Check and replacement if necessary every 36,000 miles and replacement every 72,000miles or 5 years.
The previous use and service history of the vehicle must always be taken into account.
Removal
*I cannot guarantee the accuracy of the information in this document nor do I take any responsibility for damage to any vehicle or person due to the misinterpretation of the information/inadequate skills, any work that you carry out to your own vehicle is entirely at your own risk. These are guidelines only and if in doubt I kindly suggest that you contact a Fiat dealer/relative organisation for clarification/legalities.*

1. Raise and support front of vehicle
2. Remove:
- RH front wheel
- RH wheel arch liner
- Auxiliary drive belts.
4. Remove:
- Crankshaft pulley bolts [3]
- Crankshaft pulley [4]
- Timing belt lower cover bolt [5].
- RH engine mounting and bracket
6. Disconnect vacuum pipes and wiring connections from upper inlet manifold
7. Remove:
- Upper inlet manifold
- Fuel rail.
- lnjectors
- Engine control module (ECM) DO NOT disconnect harness multi-plug.
- Crankshaft position (CKP) sensor [2]
- Timing belt covers [6] & [7]
- HT leads
- Spark plugs
- Blanking plugs [8]
9 Turn crankshaft slightly until notches of both tools aligned with upper surface [10]
NOTE: Dowel pin must remain opposite crankshaft position (CKP) sensor [1111805.] If necessary: Temporarily refit crankshaft pulley. Check alignment.
10. Ensure slots in camshafts are aligned with blanking plug holes [11] If necessary: Remove tools, Turn crankshaft one turn clockwise.
11. Fit locking tool to each camshaft [12] Tool No 1860985000.
12 Slacken tensioner nut [13]
13. Move tensioner away from belt
14. Remove timing belt
Installation

1. Hold camshaft sprocket. Use tool No 1860831000 [14].
2. Slacken camshaft sprocket bolt [15]
3. Ensure piston position tools fitted correctly into cylinders No.1 & No.2 [9].
& Ensure locking tools fitted correctly to each camshaft [12].
5 Fit timing belt in anti-clockwise direction, starting at crankshaft sprocket Ensure belt is taut between sprockets on non-tensioned side.
6. Turn tensioner pulley until mark at maximum tension position [16]. Use tool No. 1860987000
7. Tighten tensioner nut to 25 Nm [13]
8. Hold camshaft sprocket. Use tool No 1860831000 [14].
9. Tighten camshaft sprocket bolt to 120 Nm [15j
10. Remove locking tools from camshafts [12] Remove piston position tools [9]
11. Turn crankshaft two turns clockwise to setting position
12. Temporarily refit crankshaft pulley Check alignment of dowel pin opposite crankshaft position (CKP) sensor [1]
13. Slacken tensioner nut [13].
14 Turn tensioner pulley until marks aligned [17] & [18] Use tool No. 1860987000
15 Tighten tensioner nut to 25 Nm [13].
16. Turn crankshaft two turns clockwise to setting position.
17. Screw piston position tools into cylinders No.1 & No.2 [9] Tool No. 1860992000. Tightening torque: 5 Nm.
18. Turn crankshaft slightly until notches of both tools aligned with upper surface [10].
19. Ensure slots in camshafts are aligned with blanking plug holes [11]
20. Ensure locking tools fit easily to each camshaft [12]. If not: Repeat installation and tensioning procedures.
21. Install components in reverse order of removal
22. Tighten crankshaft pulley bolts [3]. Tightening torque: 22 Nm
23. Ensure crankshaft position (CKP) sensor air gap is 0.5-1,5 mm [19].
Stains Addition
24. turn engine 2 complete crank revolutions, in direction of rotation, BY HAND before starting with the key to ensure it will turn 'freely'.
Additional Info
Sometimes the aligning and tensioning tools arent required. This causes a lot of, lets say, 'difference of opinion' between forum members. I'm dealer trained so i know all about special tools and why they are there and how to use them and all this and all that but if another cheaper, easier method is available that works equally as reliably then i don't see the point in spending hundreds of pounds aquiring the 'correct' tools.
Finding Cyl.1 TDC:-
You will require to set the engine to 'Top Dead Centre' on the 'Compression' stroke, to enable you to make your job a hell of a lot easier when fitting the timing belt.
- Remove the spark plug from cyl. 1 (the one nearest the timing belt).
- Shine a torch down the hole and watch for the valves to appear.
- You will each one come into view in turn first the exhaust and then the inlet almost immediately after the exhaust closes. (the valve that appears on the exhaust manifold side is the exhaust valve, the valve that appears on the inlet manifold side is the inlet valve.)
- Now go and watch the crank pulley for the markings as soon as it reaches 0, stop and mark the cam sprocket and head casing with tipex or something that wont rub off and is easy to see. you can mark the crank and block too if you like just to make it easier to see...
Aligning the Cam Sprocket
Sometimes you may find that the cam doesn't fully align with the new belt. this is because your old belt is stretched and as a result the positions between the cam and crank alter ever so slightly usually this will only be about 1/4 of a tooths width or less... to solve this all you have to do for the 1.2 engine is move the cam towards the crank and away from the tensioner by the desired amount to get it to engage on the teeth (twin cams are different you rotate them towards each other, rather than towards the crank, but don't worry about that for the 1.2 as it is a single cam engine)
Timing Belt Tension
This is quite important, too tight and you will end up causing damage to the water pump bearing/tensioner, too loose and the belt may 'jump a tooth' throwing your timing way out and possibly causing damage to valves and/or pistons. i good rule of thumb is to set the tension so that you are able to twist the timing belt between 45 and 90 degrees on its LONGEST run.
Too tight and usually the belt will 'whine' when the RPM increases.
Too loose and you will be able to see it 'flapping' on its longest run.
I think that's everything covered, feel free to message if you have any questions