Parts.jpg

500 (Classic) Project Bambino

Introduction

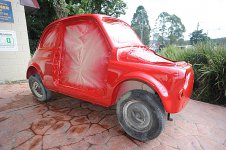
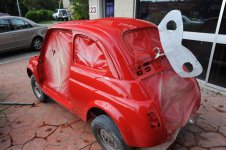
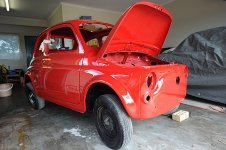
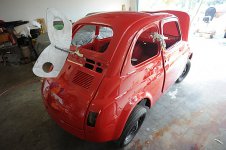
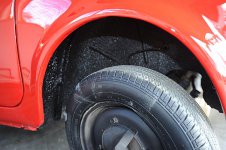
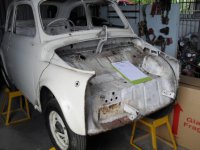
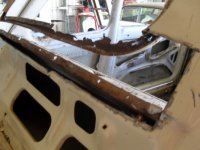
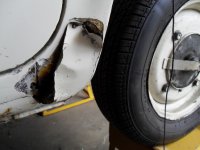
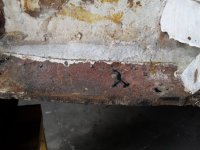
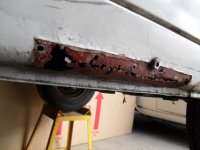
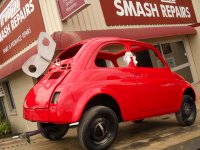
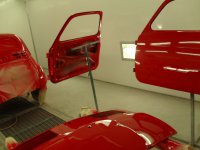
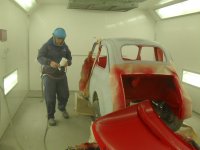
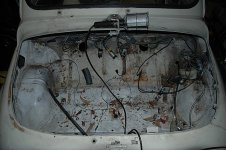
I bought my 1969 500F some time ago and always promised it a rebuild as it was in 'original' condition. I stripped it completely and delivered the body to a mate who specializes in restoration. Over the last couple of months the body was shot blasted, all of the rust removed (and the bits of baked bean tin covering the rust ...) and new panels & sills welded on where required. It is approaching the point where it will be primed and painted bright red. I'll collect photos over the next week or so and post them.

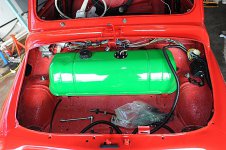
Mechanically the car wasn't too bad. The PO had rebuilt the engine so all I did was remove, clean, rustproof and repaint the cowling and clean the engine and gearbox/diff. I rebuilt the generator - new bearings and brushes and did a similar job on the starter.

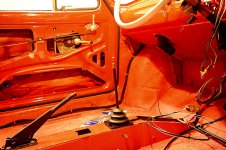
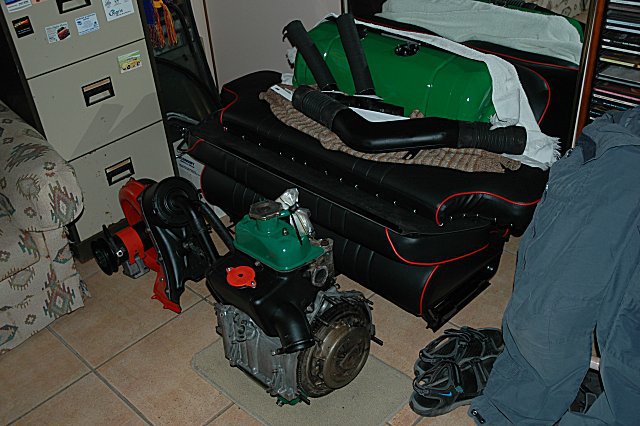
The interior was fairly sad so the upholstery has all been replaced using high quality automotive black vinyl with red piping. Very chic.

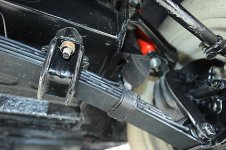
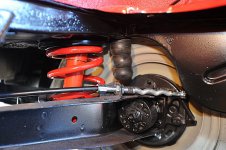
I'll rebuild the suspension and brakes when I get the car back from the body shop. I'm hoping to lower it a little and fit front disc brakes.

I've attached a photo of the bits lying in our spare room - my wife is very tolerant.

Chris
Usual Friday visit revealed a painted car :)

All that is left to do is underseal and polish it. This will happen next week and hopefully I'll pick it up the week after that as I'm away next week.

As promised, I've attached the 'windup' photo. The panel shop has the car parked in their forecourt and it receives a lot of looks and comments from passing traffic. I guess it would make a good promotional vehicle - it is certainly unique enough nowadays. I often wonder how many of the 3.5 million or so are still out there .....

Chris
 

Attachments

  • Little red car.jpg
    Little red car.jpg
    120.5 KB · Views: 1,136
  • Windup car.jpg
    Windup car.jpg
    98.3 KB · Views: 196
Chris,

Doing the same thing as you are and I am also Down Under (and East).

You have progressed more than I have, I have just started on a car I have had for just on 24 years but has been off the road for the last 10.

As everyone else with a Classic 500 I look forward to watching your progress.

Regards

Joe
 
Joe,

Nice to hear from a local kindred spirit. I'm on the Sunshine Coast in Queensland, though with all of the rain we've had this year, that is a bit of a misnomer.

With regard to my progress, I'm no expert by any means, though I've been around cars for a long time and I enjoy the challenge of restoration.

You should start a thread as well and post a few photos.

Chris
 
Chris,

How are you progressing? One bolt at a time will see you done in no time.

Are you replacing your wiring loom? Mine is not the best for a number of reasons but I can only find a RHD replacement for an 'L'. Looks like it will work, the main differece looks like the wire to the instrument cluster via a couple of connectors.

These will have to be split out to go to the dash warning lights (indicators and high beam indicator) instead. Have not looked at the steering column but I would say it would be OK as well.

Wiring colors will be different but I won't tell anyone.

Your two cents please?

Joe R
 
I've had the car back for about a week but haven't done anything yet as I've been tied up with work. I intend to get into it this weekend and I'll post photos as I go along. I'm very happy with the body work and restoration - they did a great job, albiet over a considerable length of time.

My wiring loom was basically OK and all I've done is rerouted some of the wiring that had been cut and poorly repaired with same colour-coded wire and also replaced most of the dodgy connectors. I then tested the loom with a multimeter. I thought about replacing the entire loom, but it is so simple and as I was born with a soldering iron in my hand, this is no big deal for me. I did this some months ago and when I get the loom out on the weekend I'll recheck it. This will be the first job in my rebuild. Once the wiring is in and secured, I'll tackle everything else in sequence.

I've got some wrap around conduit that I'll route the wiring through to offer it better protection. As far as I can see, the factory just laid it along the floor near the LHS door. Also, there was no grommet where the wiring went through the front 'firewall' - maybe it had just rotted away over the years. I've got new grommets for the entire car and wherever wires exit through a hole in metal they will go through a grommet - standard, safe practice.

I'll post some photos as I go.

Chris
 
I've attached a couple of photos of the beast in my garage at home and hopefully over the ensuing months I'll post updates as it gets reassembled. Prepare to get inundated - if it gets too boring, let me know and I'll post some centrefolds instead ;)
Sorry about the quality of the photos, I covered the other car but should have closed the garage door - I'm sure you get the idea though.
Chris
 

Attachments

  • Shell 1.jpg
    Shell 1.jpg
    94 KB · Views: 206
  • Shell 2.jpg
    Shell 2.jpg
    91.8 KB · Views: 199
  • Shell 3.jpg
    Shell 3.jpg
    87.3 KB · Views: 183
Yeah fiatdownunder, you don't see many of these here on the West Island. Hopefully mine will bolster the numbers of an ever dwindling classic.

The paint code was 102 (red coral). I believe that it was one of the original colours for this model and this was one of the reasons I chose it. The other was that red cars go faster, and these little weapons need all the help they can get :D

Tomorrow I'll start on the wiring loom.

I'll post some photos Sunday afternoon.

Best wishes to all and thanks for your ongoing support, encouragement and humour,
Chris
 
I've attached a few photos taken by the guys at the panel shop during the repairs. There was a bit of rust in the body, but not a huge amount.

The last photo shows the car, complete with wind up key, on the flatbed truck that brought it home a couple of weeks ago. It went right through the centre of town like that.

As it left, all of the panelbeaters came out and waved it goodbye - I think that over the seven months that it was there, they all came to love it a little. I've noticed that these cars have that effect on people - they are happy cars and everyone who sees them, smiles. For that reason alone, they are worth restoring.

Chris
 

Attachments

  • 8.jpg
    8.jpg
    72.4 KB · Views: 208
  • 22.jpg
    22.jpg
    72.8 KB · Views: 146
  • 14.jpg
    14.jpg
    70.5 KB · Views: 181
  • 7.jpg
    7.jpg
    62.9 KB · Views: 189
  • 2.jpg
    2.jpg
    68.2 KB · Views: 193
  • 37.jpg
    37.jpg
    333.1 KB · Views: 192
  • 34.jpg
    34.jpg
    330.4 KB · Views: 171
  • 31.jpg
    31.jpg
    329.2 KB · Views: 157
It's been a long weekend here in Oz, with today celebrating the Queen's birthday - there are still some advantages to being a constitutional monarchy. Luckily I didn't have to work today and as a result have had 3 days in the garage assembling the Bambino. My wife even got in on the act yesterday.

So what did I do -

First job was to attach the hand brake cable so at least the car won't roll by accident.

Next, the wiring loom was wrapped in conduit and placed through the car and tested. Interestingly, my wiring uses 500L colours even though the car is a 1969 500F. I noticed this a few months ago when I was repairing the loom.

Sunday saw me fitting the new, lowered suspension. The front reverse eyed spring was a challenge - the car was just not heavy enough to compress the spring. The problem was fixed by placing a couple of bags of concrete in the front compartment which gave me enough weight to double jack the spring and attach it to the chassis. The rear springs are easy. Four new shocks and the suspension is complete.

Today, I assembled one door. Yep, I took me all day. I've discovered that whilst small cars are cute, they can be a pain in the b*m to work on because everything is close together.

Late this afternoon I wired up the headlights, front parking lights and indicators.

I've attached a few photos.

Chris
 

Attachments

  • Rebuild 3.jpg
    Rebuild 3.jpg
    111 KB · Views: 185
  • Rebuild 4.jpg
    Rebuild 4.jpg
    149.5 KB · Views: 203
  • Lowered Front 2.jpg
    Lowered Front 2.jpg
    90.5 KB · Views: 203
  • Lowered Rear.jpg
    Lowered Rear.jpg
    99.6 KB · Views: 232
So jealous...

Looking forward to you finally getting finished because my million-dollar-question is going to be how much does this all cost when you're finished? Seeing as how I need to start looking at a total restoration in a few years and the cost associated with that!
 
Chris,

two weeks ago it was at the panelbeaters. Now you have wiring, suspension, fuel tank, one door, handbrake and some ancillary cables done. I am sure there is more that I can't see. Can't wait for the next update as this looks as though it is just flowing along.

Make sure you make plenty install sequence notes. (I think the door fittings have to go in just the right way otherwise they are a real pain.) There are those amongst us that are going to pick your brains mercilessly.

Thanks. I get fairly focused when I get going - so much so, that I miss meals and forget to come inside when the sun goes down .....

Also, I've had many months to source new parts and prepare (degrease, repair etc.) the rest, so it becomes a relatively straightforward reassembly, though these cars still throw up challenges.

I've tried to remember to take good quality photos as I go along, so I have a pictorial diary of my progress - this helps me and hopefully will help others embarking on a similar project.

As to the cost - I don't even want to think about it. It is usually said that the cheapest labour cost is that of the previous owner. That is, I'll never realise the dollar value of my restoration, but then that is not the point. For me, it's not a commercial exercise and some of the reasons for doing all of this are to have fun, gain skills and achieve a sense of satisfaction in doing a job well. To my mind, these are priceless and if somehow I inspire someone else to tackle a similar project, all the better. If my family go without food for a few weeks, so be it :D

Having said all of that, I will keep a rough inventory of cost, but the financial variation between restorations has to be huge. I was lucky in that I found a car that was relatively straight, with little structural rust and in basic running condition. Some of the others out there must be much, much worse.

And finally to the lurkers out there, please post your comments and critique. Whilst I've done this before, there is still room for improvement and I'm always open to suggestions.

Regards to all,
Chris

PS: I'm still chasing a photo or diagram of the cable positions as they exit the cabin. If anyone has one, or can either take one of describe what they see, I'd be grateful.
 
That is a big ask.

So lets get this straight. You are expecting that someone else who is rebuiding an F has got the motor out, has taken a photo while the cables are still in, created and labelled a document, put a description on it and happens to be following your rebuild at this very moment as well?

Hang on, that's me. Hope this helps.

View attachment 500FCables.doc
 
Back
Top