image0 - Copy.jpeg

500 (Classic) New Canadian Bambino!

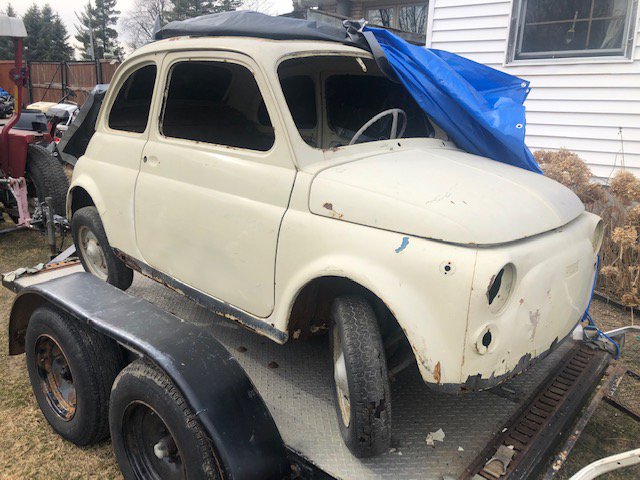
My 1967 500 F which has definitely seen better days. Neglected and stored away, it made its way to Canada, and is undergoing the restoration it deserves.

Introduction

Hi folks,

New member but long time lurker here. I have been on the hunt for a cinquecento for over 3 years now. Ive been a classic car enthusiast since i could remember and it was time to add some Italian flare to my overly German and American garage collection. I got the 500 bug for after servicing and enjoying a 500 that a friend of mine owns. I finally was able to get my hands on a 67 500F, and im overly joyed. I just finished a resto and full rebuild on a 75 911S, and kept on finding myself wanting to drive my friends Fiat over the Porsche. The Porsche is gone, and i needed to fill the empty void.

The car itself needs some TLC, and had been disassembled and partially sandblasted before "supposedly" its previous owner gave up on it. From my recollection, the car had not been on the road at all since it was brought in to Canada, and the engine had work done to it back in 92, more then likely back home in Italy. It is a bit of a basket case, as it has had some hackery done to it in its previous repairs. But its in safe hands now.


I am in the process of tallying all body panels needed (basically all lower panels, all fenders, all inner fenders, floor pans, etc the works. And slowly making a list of parts to order from the UK.

I couldn't wait to dig into the engine, and was able to clear a bench to start the tear-down process. The motor had a 540cc 70mm cylinder upgrade done to it in its past life, but had also seen some abuse. The cyl and pistons are in great shape, but the tappets and case cam holes need R&R, i ordered some C932 bronze stock, and will be machining insert sleeves for the cam. I plan to do some port/polishing and tweaking to this 540. I have forged 118mm connecting rods on their way as a "safety" insurance, for the fun it will see.


In a few years im planning a trip to Italy, family friends have a summer home just a hr away from D'Angelo Motori, and i will definitely be visiting them for some more spice to add. Coupled with a 650 block that im sure is much easier to find overseas then here in Canada. But in the mean time im going to enjoy the original 500/540 block to its full potential.

The car itself is an original F, someone had changed the front sheet metal in its early life. I will be restoring it back to its formal mustache glory. The car was originally "453 Medium Blue". I am leaning more towards keeping a blue, but going with more of an aqua marine shade. I have a paint sample "Frozen Blue K5J " from the 2018-2020 Porsche Taycan. Its a very mild metallic/pearl. So should still keep with the "solid/classic paint style" with some added depth. Again this hasn't been set in stone, and might change as i progress with the resto.
Small update.

Over the past few weeks things have been slow, but steady. Just the small detail stuff. Cleaning up seams and welds in all the hard to reach spots and misc body touch-ups.


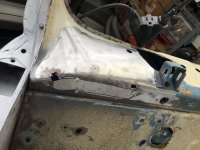
Before i do the final prime of the car, i wanted to ensure i had all the proper fitments done (holes drilled, riv-nuts installed, bolt points and cable support tabs all in) The little tabs for the washer fluid bag, and the attachment clips for the jack strap all need to be installed with the replacement of new inner outer fender arches. lots of little details that are hard to catch or remember. Again nearly the entire lower half of this car has been replaced, and most of the replacements dont have these small tabs and such on them.

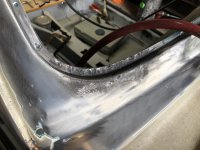
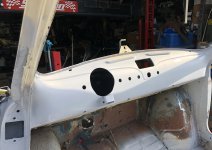
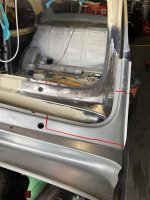
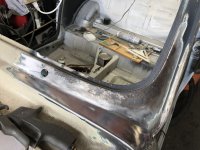
As common with these cars, the bottom of the front windshield frame were significantly pitted, definitely not something to bono over. I had a replacement bottom trim pc, and was hesitant with replacing the whole assembly, so i used it to graft in replacement patches, and overall, got a great result doing both sides. The dash also had a odd rust spot on its bottom edge on the driver side. 3 patches later a great success. It was actually beneficial because the replacement knee pad had a offset mounting hole, and i had to weld up the old hole which happened to be the rust zone. So 2 birds, one stone.

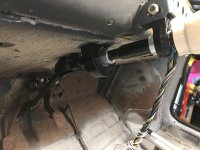
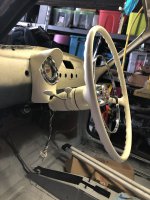
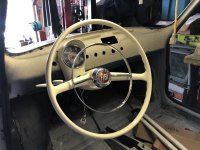
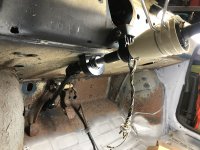
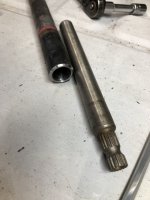
I spent some time sorting out the new steering rack setup. Ive had the rack in and out a few times, but really needed to get my hands on a fiat 126 column spline end (THANK YOU TOM!;)). I had build a digital rotary index for my cnc to cut a new splined shaft for mating with the original wheel, but honestly i was compounding too many things to do. There was no way i was ever going to find a 126 steering shaft here in Canada which would save me alot of headache.
With the column, i spent some time mocking up the wheel and such. I was going to use a off the shelf pillow block for the support. "the 126 rack conversion is not the simplest plug and play setup" But then decided to make a support bearing block from scratch so i could get the best optimal wheel angle. First using a 3d printed prototype block to check for fitment, then making an aluminum block. This being the first time fitting the wheel, i was enthusiastically impressed with the overall outcome. I cant wait to get this car finished. The steering tubes all fitted properly, and i did the critical steering shaft tig weld with the upmost accuracy. The semi gloss powder coated the shaft... Turned out better then i had planned.
The clearance between the clutch pedal and 126 universal joint is a bit too close to comfort, i will slightly adjust the pedal position to clear.

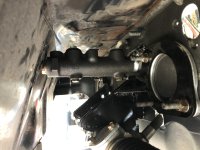
Next on the docket was the master brake cyl. I decided to install a well needed dual master cylinder from the 126. The housing does need some modifications, as the 2 bolts holding the cyl to the pedal assembly is rotated approx 45 deg. Drilling out the original studs, and then adding new studs was a easy task. Using a high grade rated bolt for this just adds additional confidence in the whole assembly. Still allows you to go back to a single original master cyl if needed, but who would ever do that. The "firewall" hole needed to be slightly enlarged to clear the new "wider" master cyl, but everything fit well. In my case, the longer/larger cyl clears the front trunk pan with some space. As long as you dont expect to put the brake light pressure switch on this assembly. Best way is to put in a modern style brake switch on the top of the pedal box housing (TBD)...

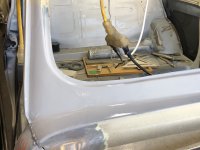
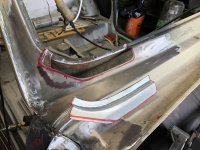
One of the last fab repairs was the rear window inner trim pc. I had mentioned about the poor overpriced aftermarket pc i had purchased and vented about earlier. After running a few scenarios thru my mind. Even contemplating machining a small stamping die to reproduce the original bottom bends.. I decided to give the aftermarket pc another try. Using it as just a "graft in lower", i had some good success with it. Nothing more eventful then that honestly. A day spent mucking about and i got it to fit, and match the factory profile decently. While saving 3/4 of the original upper trim which was perfectly fine.
 

Attachments

  • IMG_8093.JPG
    IMG_8093.JPG
    711.2 KB · Views: 102
  • IMG_8276.JPG
    IMG_8276.JPG
    363 KB · Views: 96
  • IMG_8275.JPG
    IMG_8275.JPG
    729.5 KB · Views: 107
  • IMG_8213.JPG
    IMG_8213.JPG
    531.2 KB · Views: 106
  • IMG_8205.JPG
    IMG_8205.JPG
    550.1 KB · Views: 107
  • IMG_8204.JPG
    IMG_8204.JPG
    556.8 KB · Views: 107
  • IMG_8201.JPG
    IMG_8201.JPG
    640.2 KB · Views: 99
  • IMG_8131.JPG
    IMG_8131.JPG
    625.5 KB · Views: 108
  • IMG_8123.JPG
    IMG_8123.JPG
    468.2 KB · Views: 102
  • IMG_8100.JPG
    IMG_8100.JPG
    484.5 KB · Views: 106
  • IMG_8098.JPG
    IMG_8098.JPG
    728.2 KB · Views: 98
  • IMG_8095.JPG
    IMG_8095.JPG
    482.8 KB · Views: 96
  • IMG_8094.JPG
    IMG_8094.JPG
    612.4 KB · Views: 106
Last off, the front wishbone suspension setup. Im not fully done finalizing it. but heres the jist of it.

Again it is strongly recommended to reinforce the wheel well assembly when fitting front wishbones with coil overs. The entire static and dynamic weight of the car which was originally loaded onto the bottom cross brace via the leaf spring. Is now being transferred to the top of the shock mounts that are part of the inner fender housings. These housings imo are not fully upto the task of supporting the cars weight in more dynamic aspects ( high stress loads during shock/spring compression, aggressive driving, rough roads, etc). And a reinforcement is suggested by many who install, and sell these aftermarket "sport/race" a-arm coil over kits. Adding strength in this area can be a bit tricky. You basically need to try and tie the lower sub-frame in a way to add vertical strength rigidity to the upper wheel housing. Issue is, the fuel tank location can cause some "challenges".

I had been thinking of this for the past 8 months, and came up with a plan. I used 1"od 3/16" wall tubing and using a mandrel bender bent the tube to match the inner fender contour, then sliced the tube in half, and welded it in. I then corresponded this with a similar contour match on the inner trunk side up to the shock perch mount location. This should add some significant reinforcement to the vertical shock loading for the fender.
IMG_8234.JPG
IMG_8236.JPG
IMG_8237.JPG


Due to the fact that the front suspension is basically a double wishbone with the lower "new" a-arms, and upper "factory" a-arms. The upper shock/spring assembly only sees vertical forces (road bumps and weight support). Instead of 3 axis style forces seeing in a strut tower setup. So this should be enough to prevent excess flex in the fender tunnel.

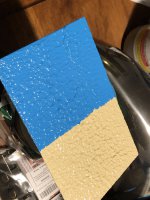
Now the "PIÈCE DE RÉSISTANCE".. with primer being near.. so is colour choice!. Drumroll please....

After narrowing the colour choice down to 5 samples. the jury decided.. PPG Big league blue 17041
Below is it beside the "fiat white" that i used on the wheel and gauge cluster, and the Peacock Red leather.
Out of all of them (which imo were great contenders). Big league blue had that perfect feel of Italian ocean water, and slightly sporty pedigree feel lol. Most importantly, this colour is insanely bright. I could easily see the speed shape 50-100 ft accross the backyard. Which means people will see you on the road regardless how small the car is.


SPVR8791.JPG


The runner up was an absolutely beautiful turquoise, which would of been my choice if i was doing a 100% original style build. PPG Hot Licks Turquoise 17697. One in the middle. Bright, classy, vintage. Obviously colour reproduction is not ideal from these photos.


IMG_8336.JPG
 
Last edited:
  • Like
Reactions: ben
Ok update time, and ive been a busy little beaver over here. :ROFLMAO:

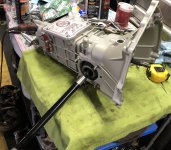
First. I wanted to tackle the transmission. I had blatantly ignored it during the entire project, other then peaking inside to order a few parts. I ended up ordering a spare gear rebuild kit, along with a full bearing and seal kit. Nothing fancy. Ive been on/off the fence about a 5 speed conversion. But its something i can do later down the road without issue.
On the bench it went, and teardown went smoothly. There was some decent wear on the 1st gear teeth and some of the other shifting gear. The rebuild kit i purchased replaced all the necessary parts. Cases tossed in the parts washer then soda blasted the aluminum cases. A quick wash in the sink🤭 to clean out any baking soda residue, then painted in the matching glacier titanium cerikote, same as the engine case. I then powdercoated a few of the external pcs.

IMG_8363.JPG

IMG_8412.JPG

IMG_8435.JPG


Assembly went relatively smoothly, other then a slight issue with the input shaft endplay and bearing retainer, but that was eventually figured out when stumbling upon the nose casing and seeing how it buttoned everything up.

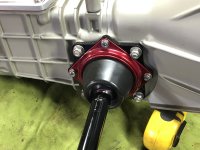
Because i wasn't done yet, i had a 1/2 rainy day to burn, and couldn't make myself put that nasty knackered stamped access cover back on. In the past i had ordered the aftermarket abarth cast cover just to spruce up the trans, but each time it was back ordered and i just gave up on ordering it. So with a mission in mind, off to the shop i went to hunt down some aluminum plate and went wild on an ideal.

IMG_8470.JPG


IMG_8484.JPG


It has a 3 stage powdercoat, silver flake with a candy red inlay, and a high gloss clear. To add some more panache, i engraved a few of the famous race tracks in Italy. Try and guess them all lol. Without a doubt one of the fanciest stock trans ive ever seen.


IMG_8490.JPG

IMG_8492.JPG

IMG_8541.JPG


2nd, back to the car. Getting around to finally priming the car, i did a last minute fitup of the dash bumper trims. I had to drill new holes for the driver side one. And overall, its nice to see things aligning up decently.

IMG_8357.JPG


I spent a good week going around and getting all the painting supplies i would need. A day entailed of sanding the complete car; inside and out.
The 3M stripping disks that fit onto a grinder are an absoulte miracle. Folks you gotta try them when doing any sort of paint/rust stripping.
Into the booth and 2 coats of primer went on.. or so i thought...There was a bit of a mixup with one of the primers, i didnt catch it untill it was too late. Its been a on going joke that the longtime owners of this one paint shop have been sniffing the fumes a bit too long. They sold me the wrong primer which i couldnt live with; not with a restoration to this level. I then had to sand the entire car a 2nd time and prep for the proper 2k epoxy primer. I had asked for a 2k Epoxy primer, and they sold me a DTM Direct to metal high build 2k primer.. Which is definitely not a epoxy primer. I didnt catch it when i left the shop or when i mixed up the batch. Silly me. Proper 2k epoxies provide significantly better corrosion and adherence properties then other types of "quick in/out" bodyshop primers. If your going to do it, do it right with a good 2 part epoxy primer on the bare metal.
IMG_8631.JPG


IMG_8632.JPG


Anyways with the car primed, i was able to seam seal the entire car, and it finally looked like things were coming to a distant finish line. I used the brush on type. Its just easier to apply then the caulk tube ones for a few reasons. These cars being as small as they are, it can and will be nearly impossible to fit the caulking gun into certian places to spread out the schmoo.. 2nd, you need to brush the seam sealer in anyways to get it into all the nook and crannies. Its all going to be behind carpet or panels anyways, if you get the technique down, it can look decently oem.

IMG_8641.JPG


Now the controversy part.:unsure:

Undercoating.

It has been a long going consensus that undercoating is a big no no in the fiat community. Or so i have heard/read over on the Italian forum. I had been contemplating this for the past year as i was doing this resto. And i finally decided upon doing a full coverage oem style undercoating. My general consensus was:
1. adds sound damping and resonance reduction
2. provides some abrasion resistance against chips (especially in wheel wells)
3. if applied properly can provide significant moisture intrusion protection and acts like a massive seam sealer (because it is in theory)
4. its was what the German oems did back in the day (likely still do), my DD 33yr old benz that has seen 33 nasty Canadian winters, and although dirty, has absolutely no corrosion intrusion in any of the areas that have the undercoating from factory.
5. Modern sealers are lightyears ahead in chemical tech then was was commonly used in the 70's and 80's
6. it gives a uniform look to the bottom of the car, and can easily be touched up as the texture masks any paint touchups.

Things to keep in mind that undercoating can be loosely used to imply a massive array of different products:
-a spray on rubber/urethane coating
-a wax/oil based non drying style coating
-a yearly oil spray on coating.

In my situation, im talking about a modern style rubber based type coating. MFG's are pretty hush hush about the composition, so i cant confirm that the type i got was a urethane based one. but its SEM 2-in-1 seam sealer 29482. Seems to be similar to the other types of oem style seam sealers. Using their spray gun it allows you to use the cartridges as a sound damping & chip guard coating.
IMG_8612.JPG

Anyways, there was no looking back and i masked off the upper half of the car then i sprayed the bottom of the car.
Because its a immediately paint able product, i rolled it into the booth, and applied the first few coats of PPG big league blue single stage ontop. Then back into the shop to do a few days of untouched curing.

IMG_8642.JPG


IMG_8655.JPG


IMG_8659.JPG


What a bright blue :)
At first i had immediate second thoughts. then.. After thinking about the car, i think it will look awesome once all said and done. I always second guess sometimes. Everyone i had shown the inital array of 5 colours picked this one first. With that said, i was also going to paint my vespa to match, but im having second thoughts, i might paint it the Turquioise i showed above just to give some contrast, i absoulety love that colour also, and i think both have their applications.

Now the next fun stage, fitting the doors and getting any little body touchups and door gaps as good as i can. I will say, this is not an easy car to paint. due to its small size, and tight spaces, its physically hard to fit the spray gun in certain positions to get proper primer coverage. Thats even with using the 3M PPS system which allows you to spray upside down and sideways. The back half of the interior was not an easy task imo.
 
Last edited:
I cant believe its been nearly 2 months, but its time for a update!


So to say lightly the past bit has not been the most fun experience. Mainly around the door fitment.


I easily had each door on/off at least 15 times to get make adjustments to the hinges, adjust the door hinge pad, striker assembly. You name it.

Even the door gaskets were not the best fit. For some reason the rubber was relatively stiff and would significantly increase the effort to properly latch the door into both striker indents, and get the panel as flush as possible. It seems like if i kept the doors closed on the gaskets after a few weeks, the ease of closing improved. Obviously, this will get better with time as the rubber forms and ages. But still requires a decent slam to get it to fully latch.


With that finally set as close as possible. the final body work commenced. I wanted to get the door gaps as even as possible on this car. The car, although battered and bruised before restoring, it had decent door gap all around and honestly i was impressed with something of that age and in the category of a "60's economy car". The overall factory fit and finish was decently impressive. Having gone over almost ever square inch of this car, I am thoroughly impressed on the design, and overall fit and finish of the original car. Fiat had some decent design and mfg engineers back in the day. I wanted to get as close to or better then a factory panel gap. I made a special air tool that allowed me to shave down any reinforced filler to the correct gap (4mm). and I only used the reinforced filler on the body side of the car (not the door side). Reinforced fillers are designed for impact and abrasion strength, its much more likely for the outer door edge to see an impact then the body door opening edge. Again, it didn't require much, but the aftermarket panels didn't have as strong of a stamped edge as i would of liked compared to the original panels. So just a bit of tidying up and squaring off was needed. For this i used 3M 5877 reinforced filler, top quality stuff, it was easy to work with and the outcome was just as i was hoping. I also rebuilt the hinges before doing any of the final fitments.

IMG_9001.JPG


IMG_9006.JPG


The passenger side door was one of the final elephants in the room. It was severely dented, and had a massive crease along the bottom (all hidden by the Italian bondo gods). Along with that there was some corrosion going on along the bottom seam. It looked like someone tried to ride it down the hill, which is likely lol.

I had been on the hunt for a passenger side door this entire year, but honestly only one came up had the description of "rust free great shape" was not even worth the 3hr drive to go see it. Some peoples’ definition of "good" is extremely skewed, even if it was in rough shape i would of picked it up, but they were off this planet in regards of price for a panel in such poor condition. More recently i met another likeminded 500 enthusiast and by luck had a spare passenger side door. The entire inner frame was completely rotted away, but surprisingly the outer panel was good enough to work with and had only minor dents. It was however a pattern part, so i was taking a chance. Its slim pickings for parts over here.


One day I got the courage, and decided to de-skin the bottom half of the pattern door to see what I was dealing with. Once done, and a few tests fits... I hit the point of no return, and carefully de-skinned the bottom of the original door. With the door apart, I was able to repair any corrosion on the original inner door frame, chemically treat all the metal, and prep it for the merge. Instead of welding, I decided to try out the 3m panel bond. The original frame has a very generous flange lip, and would provide lots of adhesion area for the panel bond to work its magic. The only weld needed would be at the mate seam at the bottom of the window frame area. Everything went better then expected. Once the bond set, the overall strength of the door is impressive. It has a much stouter feel to it, and some significant rigidity. Unfortunately no photos of the final outcome.
IMG_8743.JPG
IMG_8765.JPG


IMG_8872.JPG

IMG_8873.JPG


IMG_8880.JPG


Doors on, I quickly epoxy primed all the exterior parts (doors, rear hatch, front bonnet, rear bumper support). Then finished all the fitment tweaks, ran a thin skim coat of body glaze, and the never ending journey of blocking and sanding commenced.
To prep the interior, i finished all the seam sealing, added the sound damping coat on the back firewall and inside the body panels.
Into the booth it went, interior got 3 coats of colour, masked all the openings then and then 2 coats of a high build primer were done to the exterior body. A quick blocking and sanding was done, then back into the booth for a final sealer coat, then 3 coats of the single stage urethane colour.

IMG_9052.JPG

IMG_9061.JPG


IMG_9075.JPG

IMG_9078.JPG

IMG_9079.JPG


This is definitely a bright blue! photos don't do justice, as the white balance gets all confused with this colour for some reason. Ive been to busy to pull the dslr out and snap some beauty shots. Finally, after a few days of untouched curing, I could finally start to test fit some of the front suspension goodness. Noting too eventful other then the control arms being way too long. I suspect this kit is made for wide body cars. I had to cut and remove 1.5" of length from the lower arms just to get things into order with a proper camber. A quick tig weld, and I was able to exact match the original red powder coat.
IMG_9093.JPG


IMG_9099.JPG


IMG_9118 (13).JPG


IMG_9134.JPG


IMG_9141.JPG


IMG_9142.JPG


Front spindles were rebuilt and on went the 4 piston front disks. Way overkill, but darn sexy.
IMG_9018.JPG


Front 126 steering rack went on without an issue, I previously had to slightly notch the top of the mount to fit the upgraded dual master brake cyl, everything still fit good. Still lots of adjustments to do, but my goal is to get the car on all 4 wheels before winter. I cant have another year of that rotisserie taking up precious real estate in the garage. I should have the rear swing arms blasted and coated in the next few weeks.
 
Last edited:
I cant believe its been nearly 2 months, but its time for a update!


So to say lightly the past bit has not been the most fun experience. Mainly around the door fitment.


I easily had each door on/off at least 15 times to get make adjustments to the hinges, adjust the door hinge pad, striker assembly. You name it.

Even the door gaskets were not the best fit. For some reason the rubber was relatively stiff and would significantly increase the effort to properly latch the door into both striker indents, and get the panel as flush as possible. It seems like if i kept the doors closed on the gaskets after a few weeks, the ease of closing improved. Obviously, this will get better with time as the rubber forms and ages. But still requires a decent slam to get it to fully latch.


With that finally set as close as possible. the final body work commenced. I wanted to get the door gaps as even as possible on this car. The car, although battered and bruised before restoring, it had decent door gap all around and honestly i was impressed with something of that age and in the category of a "60's economy car". The overall factory fit and finish was decently impressive. Having gone over almost ever square inch of this car, I am thoroughly impressed on the design, and overall fit and finish of the original car. Fiat had some decent design and mfg engineers back in the day. I wanted to get as close to or better then a factory panel gap. I made a special air tool that allowed me to shave down any reinforced filler to the correct gap (4mm). and I only used the reinforced filler on the body side of the car (not the door side). Reinforced fillers are designed for impact and abrasion strength, its much more likely for the outer door edge to see an impact then the body door opening edge. Again, it didn't require much, but the aftermarket panels didn't have as strong of a stamped edge as i would of liked compared to the original panels. So just a bit of tidying up and squaring off was needed. For this i used 3M 5877 reinforced filler, top quality stuff, it was easy to work with and the outcome was just as i was hoping. I also rebuilt the hinges before doing any of the final fitments.

View attachment 412979


View attachment 412980


The passenger side door was one of the final elephants in the room. It was severely dented, and had a massive crease along the bottom (all hidden by the Italian bondo gods). Along with that there was some corrosion going on along the bottom seam. It looked like someone tried to ride it down the hill, which is likely lol.

I had been on the hunt for a passenger side door this entire year, but honestly only one came up had the description of "rust free great shape" was not even worth the 3hr drive to go see it. Some peoples’ definition of "good" is extremely skewed, even if it was in rough shape i would of picked it up, but they were off this planet in regards of price for a panel in such poor condition. More recently i met another likeminded 500 enthusiast and by luck had a spare passenger side door. The entire inner frame was completely rotted away, but surprisingly the outer panel was good enough to work with and had only minor dents. It was however a pattern part, so i was taking a chance. Its slim pickings for parts over here.


One day I got the courage, and decided to de-skin the bottom half of the pattern door to see what I was dealing with. Once done, and a few tests fits... I hit the point of no return, and carefully de-skinned the bottom of the original door. With the door apart, I was able to repair any corrosion on the original inner door frame, chemically treat all the metal, and prep it for the merge. Instead of welding, I decided to try out the 3m panel bond. The original frame has a very generous flange lip, and would provide lots of adhesion area for the panel bond to work its magic. The only weld needed would be at the mate seam at the bottom of the window frame area. Everything went better then expected. Once the bond set, the overall strength of the door is impressive. It has a much stouter feel to it, and some significant rigidity. Unfortunately no photos of the final outcome.
View attachment 412974View attachment 412975

View attachment 412976
View attachment 412977

View attachment 412978

Doors on, I quickly epoxy primed all the exterior parts (doors, rear hatch, front bonnet, rear bumper support). Then finished all the fitment tweaks, ran a thin skim coat of body glaze, and the never ending journey of blocking and sanding commenced.
To prep the interior, i finished all the seam sealing, added the sound damping coat on the back firewall and inside the body panels.
Into the booth it went, interior got 3 coats of colour, masked all the openings then and then 2 coats of a high build primer were done to the exterior body. A quick blocking and sanding was done, then back into the booth for a final sealer coat, then 3 coats of the single stage urethane colour.

View attachment 412982
View attachment 412983

View attachment 412984
View attachment 412985
View attachment 412986

This is definitely a bright blue! photos don't do justice, as the white balance gets all confused with this colour for some reason. Ive been to busy to pull the dslr out and snap some beauty shots. Finally, after a few days of untouched curing, I could finally start to test fit some of the front suspension goodness. Noting too eventful other then the control arms being way too long. I suspect this kit is made for wide body cars. I had to cut and remove 1.5" of length from the lower arms just to get things into order with a proper camber. A quick tig weld, and I was able to exact match the original red powder coat.
View attachment 412987

View attachment 412988

View attachment 412989

View attachment 412990

View attachment 412991

View attachment 412992


Front spindles were rebuilt and on went the 4 piston front disks. Way overkill, but darn sexy.
View attachment 412981

Front 126 steering rack went on without an issue, I previously had to slightly notch the top of the mount to fit the upgraded dual master brake cyl, everything still fit good. Still lots of adjustments to do, but my goal is to get the car on all 4 wheels before winter. I cant have another year of that rotisserie taking up precious real estate in the garage. I should have the rear swing arms blasted and coated in the next few weeks.

Fantastic colour. Great progress !
 
Fantastic colour. Great progress !
Well done Jacques---brilliant effort. I wish that i had 1-100th of your skill! I thought initially that your lower wishbones might have been made for a '126'---but there is not that much difference between the 500's front track and that of the 126----I think that somebody needs to re-make his jig!
 
I appreciate the gratitude. (y) Its been a fun and bumpy road getting to this point.

Well done Jacques---brilliant effort. I wish that i had 1-100th of your skill! I thought initially that your lower wishbones might have been made for a '126'---but there is not that much difference between the 500's front track and that of the 126----I think that somebody needs to re-make his jig!
Yes!, that's what i was confused at first. I thought, does the 126 have a wider track. After doing a bit of cross referencing, it looks like the front leaf is the same between the 500 and 126. So i was kinda stumped. They either built it wrong, or its designed for wide body cars; without mention of that in the item description.

I wasnt even able to get the tires on the hubs with the wishbones bolted up. The top of the wheel would hit the coil spring. The camber was something crazy like 10-15 degrees. Cutting it down by 1.5" has it down to near 0. with enough adjustment to likely get me in the 1-2deg range.
 
I appreciate the gratitude. (y) Its been a fun and bumpy road getting to this point.


Yes!, that's what i was confused at first. I thought, does the 126 have a wider track. After doing a bit of cross referencing, it looks like the front leaf is the same between the 500 and 126. So i was kinda stumped. They either built it wrong, or its designed for wide body cars; without mention of that in the item description.

I wasnt even able to get the tires on the hubs with the wishbones bolted up. The top of the wheel would hit the coil spring. The camber was something crazy like 10-15 degrees. Cutting it down by 1.5" has it down to near 0. with enough adjustment to likely get me in the 1-2deg range.
For 'road-use-only' you want to keep the camber on the front wheels at "0" (zero)---it might look very 'racing' to have a noticeable negative caster on the front, but you will not gain much in road holding, you will go through tyres at a much greater rate and possibly , especially in the wet,actually REDUCE the braking efficiency due to the tyre pattern on the road. Just for interest, I run my tyre pressures at 15 psi front and 25psi rear.
 
Build is really coming along fast now Bounding Bambino! Nice to be bolting bits back on to the shell now, I’m sure :)

Regarding the camber, I’ve run all sorts of cars for thousands of miles over the past decade setup with a certain amount of negative camber to help front end grip, with no tyre wear or braking issues. I don’t think -1/-1.5 degrees is likely to cause a problem, especially with tyres with a decent side wall.

I’ve definitely seen camber lead to reduced tyre contact in a straight line and to inside edge tyre wear, but I’m talking -3 to -5 degrees, much more extreme amounts.

Unless this is one of the areas where a 500 is specific? I know every car has its foibles!
 
Small update.

The weather has been super co-operative the past few weeks, double digits almost every day. I have alot on my plate to do before the cold sets in (non fiat related), but i found time to do some of small detail things.

I was having issue with my sandblasting cabinet, and wasn't looking forward to doing the final blasting of the engine tins before powder coating. Im using aluminum oxide abrasive which works great, but the gun kept on clogging. Having nearly thrown the towel in, i had found a new commercial blasting gun that i had forgotten about hidden in one of my boxes of stuff. And it worked 100 fold better, zero effort stripping and was much faster. I blasted the rear control arms, along with all the engine tins and heater box tube.

IMG_9375.JPG


IMG_9376.JPG


IMG_9379.JPG


IMG_9380.JPG


IMG_9383.JPG


The control arms got a satin black powder coat, same black ive been using on all the brake hardware and aux tidbits. The tins got the 3 stage candy red treatment. They turned out pretty good, although i am pushing the limitations of my powder coating gun.

Finally after nearly a year, i could finish the engine. only 2 things left to do (carb adapter, and final mounting for the exhaust).

IMG_9305.JPG


IMG_9785.jpg


The odd day here and there, i began doing the paint correction. Being single stage its relatively simple to do wet sanding and buffing. We all strive to get a perfect paint job, but there will always be the odd little fluff or light orange peel imperfection that gets into the paint.

I still need to finish painting the doors, that will likely happen in the spring. After wet sanding and buffing the front i couldn't resist and installed all the chrome trim along with the bumpers.

Next went in some of the windows a 2 person job. Still need to do the side, that will happen eventually lol.
I spent yesterday night installing the front "L" chrome window trim. I realize that mine is a F, but i like the look of chrome. I have a set of F gaskets if i were to revert to original style.

Leaves are nearly all fallen by now, had to roll the car out of the garage to make space for another repair. Front hood hasnt been sanded or buffed yet, and is just sitting in place. But kinda gives you the finished ideal.

IMG_9355.JPG


IMG_9814.JPG


IMG_9846.JPG
 
Small update.

The weather has been super co-operative the past few weeks, double digits almost every day. I have alot on my plate to do before the cold sets in (non fiat related), but i found time to do some of small detail things.

I was having issue with my sandblasting cabinet, and wasn't looking forward to doing the final blasting of the engine tins before powder coating. Im using aluminum oxide abrasive which works great, but the gun kept on clogging. Having nearly thrown the towel in, i had found a new commercial blasting gun that i had forgotten about hidden in one of my boxes of stuff. And it worked 100 fold better, zero effort stripping and was much faster. I blasted the rear control arms, along with all the engine tins and heater box tube.

View attachment 414601

View attachment 414602

View attachment 414603

View attachment 414604

View attachment 414605


The control arms got a satin black powder coat, same black ive been using on all the brake hardware and aux tidbits. The tins got the 3 stage candy red treatment. They turned out pretty good, although i am pushing the limitations of my powder coating gun.

Finally after nearly a year, i could finish the engine. only 2 things left to do (carb adapter, and final mounting for the exhaust).

View attachment 414606

View attachment 414608


The odd day here and there, i began doing the paint correction. Being single stage its relatively simple to do wet sanding and buffing. We all strive to get a perfect paint job, but there will always be the odd little fluff or light orange peel imperfection that gets into the paint.

I still need to finish painting the doors, that will likely happen in the spring. After wet sanding and buffing the front i couldn't resist and installed all the chrome trim along with the bumpers.

Next went in some of the windows a 2 person job. Still need to do the side, that will happen eventually lol.
I spent yesterday night installing the front "L" chrome window trim. I realize that mine is a F, but i like the look of chrome. I have a set of F gaskets if i were to revert to original style.

Leaves are nearly all fallen by now, had to roll the car out of the garage to make space for another repair. Front hood hasnt been sanded or buffed yet, and is just sitting in place. But kinda gives you the finished ideal.

View attachment 414607

View attachment 414609

View attachment 414610
Very well done Jacques. As well as looking nicer, the 'chrome' inlay in the screen rubber (both front and rear) keeps the screen rubber tighter in the aperture, and therfore less likely to leak---my screens have NEVER leaked. What carb are you going to be using?
 
Very well done Jacques. As well as looking nicer, the 'chrome' inlay in the screen rubber (both front and rear) keeps the screen rubber tighter in the aperture, and therfore less likely to leak---my screens have NEVER leaked. What carb are you going to be using?
Thanks! Yes, i noticed that this Lucas branded glass doesn't fit all that perfect in the opening. And once adding the chrome trim, it helped push the corners out a touch.

I know for certain that i kept the original metal opening dimensions the same during my repairs. verified everything before/after with templates. The corners dont seem to have a full tight corner fit. It could be the gasket thickness, or window shape. Again, the car didnt come with the original front window to compare. And the 2nd spare window i had ordered got damaged during shipping. Its not exactly visible when looking at the car, but i would perfer a snugger gasket fit in the corners. Its highly unlikely this car will see much rain, but none the less it should be sealed.
Im sure a few cycles in the summer sun will cause the gasket to seat & stretch into place, the flange was greased for ease of install.

The rear glass fit like a glove though

Carb wize, its the ICH i got from you this summer. I dont have its specs off the top of my head lol.
 
Small update.

The weather has been super co-operative the past few weeks, double digits almost every day. I have alot on my plate to do before the cold sets in (non fiat related), but i found time to do some of small detail things.

I was having issue with my sandblasting cabinet, and wasn't looking forward to doing the final blasting of the engine tins before powder coating. Im using aluminum oxide abrasive which works great, but the gun kept on clogging. Having nearly thrown the towel in, i had found a new commercial blasting gun that i had forgotten about hidden in one of my boxes of stuff. And it worked 100 fold better, zero effort stripping and was much faster. I blasted the rear control arms, along with all the engine tins and heater box tube.

View attachment 414601

View attachment 414602

View attachment 414603

View attachment 414604

View attachment 414605


The control arms got a satin black powder coat, same black ive been using on all the brake hardware and aux tidbits. The tins got the 3 stage candy red treatment. They turned out pretty good, although i am pushing the limitations of my powder coating gun.

Finally after nearly a year, i could finish the engine. only 2 things left to do (carb adapter, and final mounting for the exhaust).

View attachment 414606

View attachment 414608


The odd day here and there, i began doing the paint correction. Being single stage its relatively simple to do wet sanding and buffing. We all strive to get a perfect paint job, but there will always be the odd little fluff or light orange peel imperfection that gets into the paint.

I still need to finish painting the doors, that will likely happen in the spring. After wet sanding and buffing the front i couldn't resist and installed all the chrome trim along with the bumpers.

Next went in some of the windows a 2 person job. Still need to do the side, that will happen eventually lol.
I spent yesterday night installing the front "L" chrome window trim. I realize that mine is a F, but i like the look of chrome. I have a set of F gaskets if i were to revert to original style.

Leaves are nearly all fallen by now, had to roll the car out of the garage to make space for another repair. Front hood hasnt been sanded or buffed yet, and is just sitting in place. But kinda gives you the finished ideal.

View attachment 414607

View attachment 414609

View attachment 414610
You would think that I would recognise the carb you bought off me!---DOH! I was looking back through some of your photos and comments and suddenly remembered that you mentioned that you had to reduce the track width of the wishbone front suspension that you have fitted by 1/12ins----I wonder if it was made for the 600? The front track of the 600 is wider than that of the 500 by----1-1/2 ins!
 
You would think that I would recognise the carb you bought off me!---DOH! I was looking back through some of your photos and comments and suddenly remembered that you mentioned that you had to reduce the track width of the wishbone front suspension that you have fitted by 1/12ins----I wonder if it was made for the 600? The front track of the 600 is wider than that of the 500 by----1-1/2 ins!
Does a 34 ICH ring a bell iirc? it just hit me now.


If the front spring mounting is the same on the 600, that's entirely a possibility. I did eventually email Axel Gerstl, and did get a response, they measured the other ones they have and they are the same track width as the original dimension of mine (before the required modification).. So either their supplier sent them them a batch of wrong parts/arms, and im the first to find the issue. They likely dont sell too many of these kits, as im sure most opt for the modified front springs for lowering and "sporty" handing of their cars. Regardless, i fixed it (shouldn't of had to, my understanding it was to bolt in and fit stock width cars), but being creative is part of classic car ownership at times.

I still need to do minor adjustments on the tow and camber. Its just set enough so i can roll it around. Just fussing around with the convertible top right now.
I have been very lucky and got know a gent (in the UK) who, among the rebuilding of many 500/126 engines, has had some front wish-bone kits made. The cross member fits quite acurately onto the standard spring mounts (but a bit more difficult on 'pattern' parts) and weighs just about the same as the standard front spring---so no 'lack of weight' problems. Also the olive-joints that he uses have 12mm threaded sections---a lot of the commercial units available use 8mm joints. By carefully measuring the original spring before I took it off, I was able to 'pre-set'nthe wishbone lengths before I fitted them to the car. In the end I was only about 2 threads out. It is a well made unit, jig-welded by a top-class welder.
 
Last off, the front wishbone suspension setup. Im not fully done finalizing it. but heres the jist of it.

Again it is strongly recommended to reinforce the wheel well assembly when fitting front wishbones with coil overs. The entire static and dynamic weight of the car which was originally loaded onto the bottom cross brace via the leaf spring. Is now being transferred to the top of the shock mounts that are part of the inner fender housings. These housings imo are not fully upto the task of supporting the cars weight in more dynamic aspects ( high stress loads during shock/spring compression, aggressive driving, rough roads, etc). And a reinforcement is suggested by many who install, and sell these aftermarket "sport/race" a-arm coil over kits. Adding strength in this area can be a bit tricky. You basically need to try and tie the lower sub-frame in a way to add vertical strength rigidity to the upper wheel housing. Issue is, the fuel tank location can cause some "challenges".

I had been thinking of this for the past 8 months, and came up with a plan. I used 1"od 3/16" wall tubing and using a mandrel bender bent the tube to match the inner fender contour, then sliced the tube in half, and welded it in. I then corresponded this with a similar contour match on the inner trunk side up to the shock perch mount location. This should add some significant reinforcement to the vertical shock loading for the fender.
View attachment 408876View attachment 408877View attachment 408879

Due to the fact that the front suspension is basically a double wishbone with the lower "new" a-arms, and upper "factory" a-arms. The upper shock/spring assembly only sees vertical forces (road bumps and weight support). Instead of 3 axis style forces seeing in a strut tower setup. So this should be enough to prevent excess flex in the fender tunnel.

Now the "PIÈCE DE RÉSISTANCE".. with primer being near.. so is colour choice!. Drumroll please....

After narrowing the colour choice down to 5 samples. the jury decided.. PPG Big league blue 17041
Below is it beside the "fiat white" that i used on the wheel and gauge cluster, and the Peacock Red leather.
Out of all of them (which imo were great contenders). Big league blue had that perfect feel of Italian ocean water, and slightly sporty pedigree feel lol. Most importantly, this colour is insanely bright. I could easily see the speed shape 50-100 ft accross the backyard. Which means people will see you on the road regardless how small the car is.


View attachment 408878


The runner up was an absolutely beautiful turquoise, which would of been my choice if i was doing a 100% original style build. PPG Hot Licks Turquoise 17697. One in the middle. Bright, classy, vintage. Obviously colour reproduction is not ideal from these photos.


View attachment 408880

I'm in love with this build and especially the color!

Do you have any pictures of the finished structure for supporting the front coil overs? Did you end up going through the frunk to give additional lateral support or just relying on the structure inside the wheel well?

I'm looking at a similar conversion but curious to see how yours came out and if you would change anything.
Thanks,

I will try and take some more detailed photos of the how i added reinforcement to the shock mounts. I noticed i didn't have any photos showing the inside reinforcement. its all seam sealed and painted now, but it should give you an ideal. If i need to down the road i can do a bolt on cross brace from mount to mount, but i dont believe it will be necessary.

To simplify, i used the round tubing, sliced it in half, and somewhat sandwiched the original inner fender sheet metal between the 2 half's. Again, this was a decently thick wall tube and needed a mandrel tube bender to shape it. I cant remember the bend degree, but it was something like 15-20deg?. Used a digital protractor to measure it inside, and bandsaw to slice it in half.
 
Back
Top