image0 - Copy.jpeg

500 (Classic) New Canadian Bambino!

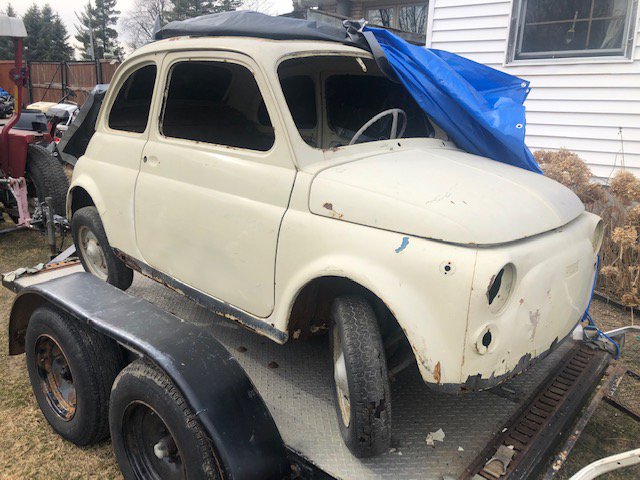
My 1967 500 F which has definitely seen better days. Neglected and stored away, it made its way to Canada, and is undergoing the restoration it deserves.

Introduction

Hi folks,

New member but long time lurker here. I have been on the hunt for a cinquecento for over 3 years now. Ive been a classic car enthusiast since i could remember and it was time to add some Italian flare to my overly German and American garage collection. I got the 500 bug for after servicing and enjoying a 500 that a friend of mine owns. I finally was able to get my hands on a 67 500F, and im overly joyed. I just finished a resto and full rebuild on a 75 911S, and kept on finding myself wanting to drive my friends Fiat over the Porsche. The Porsche is gone, and i needed to fill the empty void.

The car itself needs some TLC, and had been disassembled and partially sandblasted before "supposedly" its previous owner gave up on it. From my recollection, the car had not been on the road at all since it was brought in to Canada, and the engine had work done to it back in 92, more then likely back home in Italy. It is a bit of a basket case, as it has had some hackery done to it in its previous repairs. But its in safe hands now.


I am in the process of tallying all body panels needed (basically all lower panels, all fenders, all inner fenders, floor pans, etc the works. And slowly making a list of parts to order from the UK.

I couldn't wait to dig into the engine, and was able to clear a bench to start the tear-down process. The motor had a 540cc 70mm cylinder upgrade done to it in its past life, but had also seen some abuse. The cyl and pistons are in great shape, but the tappets and case cam holes need R&R, i ordered some C932 bronze stock, and will be machining insert sleeves for the cam. I plan to do some port/polishing and tweaking to this 540. I have forged 118mm connecting rods on their way as a "safety" insurance, for the fun it will see.


In a few years im planning a trip to Italy, family friends have a summer home just a hr away from D'Angelo Motori, and i will definitely be visiting them for some more spice to add. Coupled with a 650 block that im sure is much easier to find overseas then here in Canada. But in the mean time im going to enjoy the original 500/540 block to its full potential.

The car itself is an original F, someone had changed the front sheet metal in its early life. I will be restoring it back to its formal mustache glory. The car was originally "453 Medium Blue". I am leaning more towards keeping a blue, but going with more of an aqua marine shade. I have a paint sample "Frozen Blue K5J " from the 2018-2020 Porsche Taycan. Its a very mild metallic/pearl. So should still keep with the "solid/classic paint style" with some added depth. Again this hasn't been set in stone, and might change as i progress with the resto.
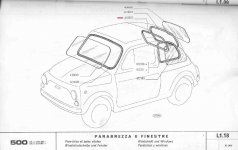
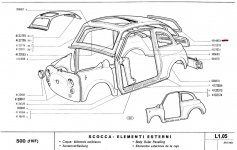
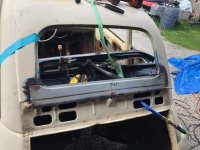
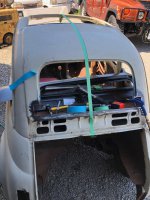
Thought I would throw this out there to the experts, any chance that the rear window inside sheet metal lip still exists or a reproduction exists?

Someone attempted to repair the rear window with a replacement exterior sheet pc, however completely cut the interior rear flange out. so ill either have to make this, or find a replacement for the bottom pc.

It seems to be listed as 2 part numbers. Either 4216073 or 4044963
I would be inclined that this part exists in some way as when if you need to replace the lower exterior window frame, this part is hard to save?

This is my only concerning replacement part on the whole car that i will eventually need. Basically i just need the lower half of the trim/flange, and i can graft it back in.
 

Attachments

  • frame1.JPG
    frame1.JPG
    179.3 KB · Views: 82
  • frame2.JPG
    frame2.JPG
    230.3 KB · Views: 84
Last edited:
I think my coaters probably meant that coating on top of cured coating was not possible. We knew about Lab Metal but the opened cans had a short shelf life so I'd have had to buy a full pack for the job.

A quick look on eBay shows how things have changed. JB Weld, Quick steel, NOVOL, etc do powder coatable fillers costing around £10.
 
Nice road trip for a 500 :slayer:
That would definitely be a heck of a drive. :D

Small update on the engine project so far.
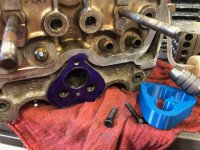
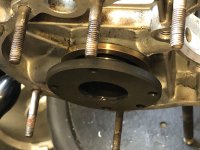
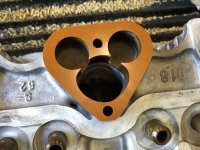
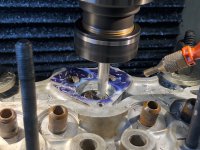
I began planning the intake porting and opening. I have a 28 IMB carb, and to accompany the slight flow improvement, i came up with a oblong intake port profile design that will improve the flow characteristics down the plenums. With it though requires a new spacer. After doing a mock-up in cad with sectional area calculations, I 3d printed a test spacer to see how the ports and spacing line up. I also ordered some phenolic sheets (Phenolic XX grade). I really would of preferred using "Garolite G10" the price is substantially more, so for this prototyping and testing phase Phenolic XX is more then adequate, no doubt as good or better then the factory spacer. In a few days if i find some time, ill be inputting the profile into my Cam software and doing the intake port machining using the cnc.

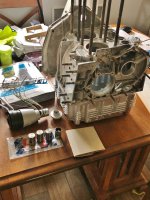
I finally finished doing all the time-serts on the case, and im happy with how it all turned out. Timeserts are for some silly reason very satisfying.

I also pulled out all the oil port plugs. All the heads were previously stripped (soft aluminum plugs, and hacky previous owners probably), and i didn't want to take the chance with any of them leaking. I recall when tearing down, that the flywheel side of the motor was all covered in oil, but the crank seal was nice and dry, i dont doubt that either that oil plug was leaking, or the cam/tappet case plugs were either leaking. I made weldable plugs to go into the 2 case plugs. And ordered all new Stainless threaded plugs for the oil ports. In case any one was wondering the threaded plugs are kinda special. They are a M12x1.5 tapered plug, the case side threads are just a straight M12x1.5 thread. These tapered plugs are super uncommon in North America, but i was able to source them from a industrial supplier.

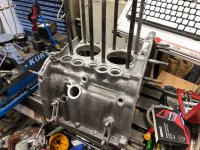
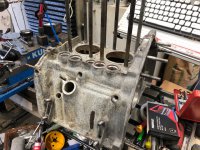
Even though the case itself spent a fair amount of time in the parts washer, i still wasn't satisfied with the aluminum finish. I soda blasted the case and the difference is night and day, what a fantastic process.

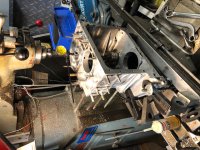
Ive been working on business things for the past 2 weeks straight, and needed a day for myself, so what better thing to do then to hide away in the shop with no distractions and begin the case machining. I was able to setup the case in the manual mill to do the cam bushing boring. I could of done it in the cnc, but i just wanted an excuse to fire up the Bridgeport that had been lonely for a few years lol. I miss manual machining "sometimes".


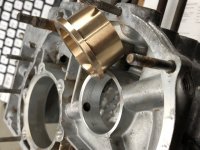
So im sure a few of you are aware of the common bronze bushings available for these cars when there is cam bore damage. And im sure they have worked flawlessly for every install they have been used in. There is IMO always room for improvement. So the cam/cam bore actually has 2 oil film bearing surfaces. The main bore bearing surface that supports the cam, but also the back side of the cam face is also supported by the outer bore face. The oil pump has a spring loaded sealing plate that pushes on the cam face, and it in turn slides/applies a axial load over the front of the cam bore hole. Doing the plain bronze cam bushing insert, can in theory allow the axial load of the cam to slide on 2 dissimilar materials. Does this mean anything, for a 20/40/60hp fiat 500 engine no. lol. But i wanted to do it the technical way.
I designed and machined a full cam bronze bushing that contacts both bearing surfaces with the slick 936 bearing bronze. Because of this, a recess has to be machined into the engine case to allow the bearing to recess and become flush to the proper bearing depth.
I planned for a 0.003" / 0.0762mm interference fit between the bushing and case. 0.0025"-0.003" is the common industry fit for replacement cam bushing and the like. I did a 4mm recess, and a 57.5mm OD axial bearing lip for the cam to float on. I can provide drawings, but there's a lot of room for adjustment to your own liking.
I left the bushing ID undersized, as i wait for the cam to show up, so i can really tune the clearance to spec. I was able to source a 43mm range sunnen honing bar for my machine so i can fine tune the cam fit, with the bushing installed in the case. Sizing the bushing in the lathe, then installing it in a interference bore can cause the bushing bore id to be undersized, and then your up ****s creek lol. Once its installed, i can easily drill out the oiling ports, and we are ready to go.

I wish this was some 800+cc engine build, but this will do for now. Trust me, fun things are in store once i get my hands on a 126 case. This bambino is going to be one hell of a sleeper someday.
 

Attachments

  • IMG_3600.JPG
    IMG_3600.JPG
    91.9 KB · Views: 87
  • IMG_3584.JPG
    IMG_3584.JPG
    142.9 KB · Views: 98
  • IMG_3567.JPG
    IMG_3567.JPG
    162.3 KB · Views: 88
  • IMG_3566.JPG
    IMG_3566.JPG
    144.3 KB · Views: 86
  • IMG_3557.JPG
    IMG_3557.JPG
    144.6 KB · Views: 89
Last edited:
My, my jacques, you have been a busy boy! Your take on the new carb spacer is interesting; it does help when one has a good machine shop to hand. When I ported the head that I have on my own engine (without a handy mahine shop) I compared the carb base with the gasket and the head port and gently enlarged the head port to match the gasket, but still keeping it round---I was able to open up the intake port in the head a good 2-1/2mm extra diameter. When you do port the head, don't forget to soften the ridge in the intake port, just behind the valve seat. Prior to softening this, it feels to be quite an 'edge'. As with all porting, smooth inlet, but polished exhaust
 
When you do port the head, don't forget to soften the ridge in the intake port, just behind the valve seat. Prior to softening this, it feels to be quite an 'edge'.

Thanks for the tip! I will definitely show my results when done. A good friend of my has a Superflow flow bench. I used it when doing the head work on the Porsche.

Unfortunately we are on a lock-down here, so i cant go to his shop and use it and test out the fiat head with before/after results. The head and valve work for the 911 netted us approx a 20-25% increase in flow, and approximately 25-30hp more on the dyno while still using the horrible the Bosch CIS choked fuel injection system.

There will be more fiat heads in the future that I can throw on there and see what tweaks and improvements actually do. For now, it will just be basic smoothing, cleaning up, and the like.


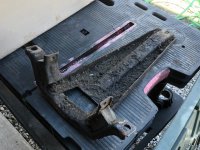
Now i have one question for the parts experts. I have this trans mount from a box of misc parts i picked up. It seems to be special?, as i cant seem to find anything about this "reinforced" type mount. Did this come on a 500R or similar higher powered car? I was told it should bolt onto the 500, but i haven't checked to see on my car yet. Would be nice if it helps at all with rigidity or such.
 

Attachments

  • IMG_3607.JPG
    IMG_3607.JPG
    142.3 KB · Views: 84
Last edited:
Now i have one question for the parts experts. I have this trans mount from a box of misc parts i picked up. It seems to be special?, as i cant seem to find anything about this "reinforced" type mount. Did this come on a 500R or similar higher powered car? I was told it should bolt onto the 500, but i haven't checked to see on my car yet. Would be nice if it helps at all with rigidity or such.

Hi Jacques, It looks like you have a rear gearbox mount fitted with a 126 bracing plate. Probably all from a 126 or fitted as an extra to another 500 car. The plate helps to prevent the gearbox torque twisting everything. You will need to drill a corresponding hole in the underbody for the front bolt.
Ian.
 
If you are planning to drop a tuned engine into your 500 right from the word 'go', I would arrange to fit this plate straight away. You don't need to have the gearbox 'in-situ' to work out the front bolt goes (under the heater-flap cover plate at the rear of your central tunnel) as fitting it 'as it is' will indicate where it fits.
 
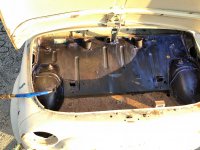
Small update, early this week we had a nice day, and i decided i wanted to begin a bit of the body work on the car. I rolled it out of the shop and enjoyed the spring breeze. At some point in its previous ownership someone tried to do a lackluster attempt at repairing the rear window frame, and left it at that. It was driving me nuts every time i saw it in the garage, and i had to do something about it. Carefully removing it, cleaning up the cutout and alot of fitting, measuring and welding later, it was in (no photos unfortunately yet). So check that off the todo list. I will end up replacing most of the panels on a resto of this caliber, but this was one of the eventual "to do" items.

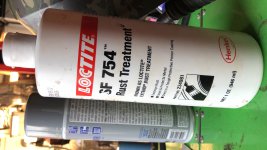
The car itself was unfortunately sandblasted and not immediately primed in its past ownership. So there was alot of exposed sheetmetal that started to gain surface rust. I already know which panels were getting replaced, but the front upper foot-well sheetmetal was staying. I was able to source this fantastic product called SF 754 from Loctite, its a industrial style product and im sure is probably available worldwide as Henkel is a large global company. But i must say it seems to work wonders. I saw it being used on a 500 resto video i watched online, and was also suggested by it from one of my Porsche 911 contacts who religiously just restores 73 and older 911's.

I just wanted to buy myself some time so i can do a nice epoxy prime all in one shot when im done all the panel work. The product goes on like milk, and chemically neutralizes any surface rust turns black and makes it primer ready. Pretty neat IMO. I treated the front footwell sheetmetal with it.

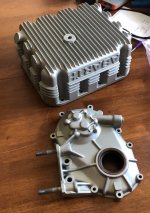
On the engine side of things, some goodies showed up from Italy, i am slowly accepting the fact that to do the engine right its not going to be easy lol. After some back and forth with the help of some google translate. I got myself a large style Abarth sump, oem cam followers, a replacement wheel column, and some pump and copper gasket parts. I realize the "wheel column" is not correct for the F, as the chrome lever version is for the D. But honestly i just prefer the chrome metal levers, the plastic ones were not doing it for me and unfortunately the originals were broken off.
Im still waiting for the cam to show up so i can finish the case work, and start assembling... Italian shipping eh?!

All i need to source engine wise is a nice exhaust system. I might make a stainless one, or buy a pre-made semi-noisy racing style one. Im still on the fence. I want something that resembles shaking a big bee hive.
 

Attachments

  • IMG_3734.JPG
    IMG_3734.JPG
    318.8 KB · Views: 92
  • 204A3C02-10A9-4EDB-9239-F17E683DBA0F.JPG
    204A3C02-10A9-4EDB-9239-F17E683DBA0F.JPG
    583.7 KB · Views: 86
  • IMG_3698.JPG
    IMG_3698.JPG
    300.8 KB · Views: 83
  • IMG_3693.JPG
    IMG_3693.JPG
    326.3 KB · Views: 87
  • IMG_3681.JPG
    IMG_3681.JPG
    339.9 KB · Views: 86
Last edited:
Ive been busy again the past couple of weeks.
The cam finally arrived! (y)
I was able to finally make the correct measurements and finish machining the cam bushing as well as installing it into the case with a final hone.
Its actually somewhat interesting that the bushing ID shrunk 0.002" (0.0508mm) after getting pressed into the case. Luckily i was able to bring it back to correct clearance spec on the honing machine.

I finalized my head porting and begin machining the intake plenum, i also made a new matching phenolic spacer for the carb.


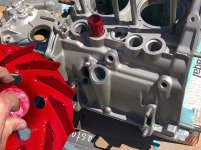
I was eying the engine block, i really didn't want to paint it as i liked the original silver aluminum look, but i also wanted to coat it with something to help protect it from surface corrosion. I had purchased some glacier titanium cerakote for another project and thought the case would be a good place to try it out. After a bit of finessing, i think it turned out great.

I also tried out the candy red powdercoat. Its not as bright red as i was hoping for, but the more i look at it, the dark candy depth does add some style to it. For now i will continue using it, ill have to strip the tins eventually and coat them.

This week, if i get a chance i will begin lower engine assembly.
 

Attachments

  • IMG_3845.jpg
    IMG_3845.jpg
    230.7 KB · Views: 91
  • 0B2B5431-4C63-4D3B-8390-8CC1A45210F4.JPG
    0B2B5431-4C63-4D3B-8390-8CC1A45210F4.JPG
    144.4 KB · Views: 88
  • IMG_3839.JPG
    IMG_3839.JPG
    523.3 KB · Views: 80
  • IMG_3882.JPG
    IMG_3882.JPG
    295.5 KB · Views: 80
  • IMG_3871.JPG
    IMG_3871.JPG
    305.5 KB · Views: 80
Ive been busy again the past couple of weeks.
The cam finally arrived! (y)
I was able to finally make the correct measurements and finish machining the cam bushing as well as installing it into the case with a final hone.
Its actually somewhat interesting that the bushing ID shrunk 0.002" (0.0508mm) after getting pressed into the case. Luckily i was able to bring it back to correct clearance spec on the honing machine.

I finalized my head porting and begin machining the intake plenum, i also made a new matching phenolic spacer for the carb.


I was eying the engine block, i really didn't want to paint it as i liked the original silver aluminum look, but i also wanted to coat it with something to help protect it from surface corrosion. I had purchased some glacier titanium cerakote for another project and thought the case would be a good place to try it out. After a bit of finessing, i think it turned out great.

I also tried out the candy red powdercoat. Its not as bright red as i was hoping for, but the more i look at it, the dark candy depth does add some style to it. For now i will continue using it, ill have to strip the tins eventually and coat them.

This week, if i get a chance i will begin lower engine assembly.

Ohh, check that red out. I really like. But does depend on how much is used on the engine. Some can be a bit over the top.
 
For now, the 28mm weber. But i might experiment down the road

You seem to be a man of my own heart in that the last couple of tuned engines I built I used the Weber 28IMB carb for the start up and running in period. In fact a very talented engineer friend who has developed his engine to 100hp+ said that the original carbs are much underrated by many.
Also interesting is that the most developed and powerful standard two cylinder engines from Fiat , the 126 Bis and Panda 30, made use of a progressive twin choke downdraught carb in the shape of the Weber 30DGF.
 
Abarth used a Solex 34PBIC carb on the 595SS and both of the 695 versions. These carbs are just about impossible to find, but there is a modern equivalent---the Weber 34 ICH. This carb is still available NEW and is used on (among others) Landrovers, Citroen and tuned 1300/1600 VWs (1 carb per side---1/2 of 1300 is---650!). Occasionally, they can be found 2nd hand on e-bay with the choke linkage working the same way as the 28IMB. (normally, they work from behind the carb, whereas the IMB works from alongside the carb). Some versions of this carb have a removable air-filter-fitment 'ring' on the top of the venturi---this is the version to go for as when this 'ring' is removed the diameter of the top of the carb is just about 2 in (50mm)---a short slide-over inlet trumpet can then be fitted.
 
Solex 34PBIC carb .
This is great info! i will definitely keep an eye out.
I might hunt down one, after playing with the 28mm.

Also, for anyone elses reference, Tom was nice enough to send me George MacGruer's tuning and modification notes. I finally had some time to digitize the package for those who can use it. It has a great wealth of knowledge and tips for 500 tuning.
Ive attached the pdf for folks reference.

Ive also spent a bit of time hunting down tuning and tips info over on the Italian 500 sites, but translations don't always carry over easily and honestly, its hard to find anything. Words and sayings don't translate over very well, so any English info we can get our hands on is important to archive.
 

Attachments

  • George MacGruer Tuning notes1.pdf
    1.8 MB · Views: 118
Last edited:
Ok now the engine fun stuff.(y)

Started assembling the engine. A little bit of finesse here and there, but its a super simple engine to work on, and things went as planned. Its actually nice to work on a simple engine like this. When doing the rod bolts, ARP recomends a stretch of approx (0.0056") incase anyone was wondering for reference for the 5/16" 2000 series bolts


Fitted the cam, and started to setup timing. All seems well. This 40/80 cam is a higher lift cam. I haven't run into any clearance issues that i know of yet. Ive measured a 0.303" (7.7mm) lobe lift. with a "approx" 0.449" (11.40mm) valve lift (was having issues getting a accurate measurement). I remember reading somewhere what the stock rocker ratio was for the factory rockers, but darn if i couldn't find it when i needed it for verification.
I might need to slightly shave the intake valve stem guides to fit some modern guide seals on it, but everything looks doable. Ill be checking the clearances later this week. Then i can finalize the head assembly.

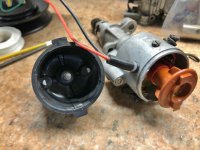
I got a electronic ignition kit for the factory distributor. I know its not the fancier 123 ignition kit that is common. But it will do me fine for now. Again this 540 engine is just a temporary engine until i get all the supplies to build a monster 800+cc 126/650case'ed engine. It might be a few years until i get my hands on a 650 donor case, so this 540 will be a fun little hotrod in the mean time.


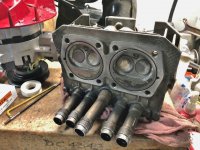
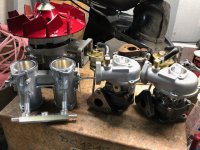
Im sure a few of the car enthusiasts are guilty here with hoarding car goodies "for the future" lol, i don't know if im sitting on horseshoes, but a fiat Panda 30 head has found its way into my parts collection. Im still surprised, i heard these were getting very hard to find?, but voila, it arrived a few days ago, and it was a smokin deal, im definitely saving it for the future big block build. :D A 45mm twin efi Weber retrofit carb body also showed up, twin turbos you say?? Yeah ive lost my mind, cant leave anything "un-modified"...
 

Attachments

  • IMG_3937.JPG
    IMG_3937.JPG
    266.8 KB · Views: 78
  • IMG_3957.JPG
    IMG_3957.JPG
    252.5 KB · Views: 78
  • IMG_3973.JPG
    IMG_3973.JPG
    163.3 KB · Views: 70
  • IMG_3974.JPG
    IMG_3974.JPG
    245.9 KB · Views: 78
  • IMG_3975.JPG
    IMG_3975.JPG
    147.5 KB · Views: 83
Last edited:
Back
Top