Technical Ducato 1.9TD 1999 starting problem

Currently reading:
Technical Ducato 1.9TD 1999 starting problem

Only if you feel safe to do so , I would put battery live power directly to the bus bar terminal at the heater plugs for about 10 seconds and then see if starts straight away. You may want to unplug the heater plug relay to isolate it.
Do not leave on as it will burn out your new heater plugs!!!
If vehicle starts easily then check at relay and wiring etc related to it as has been suggested.
If this test makes no difference to cold starting I would carry out a compression test on engine as I mentioned.
 
Last edited:
So, here it goes what i believe are the correct readings to those bullet points, but before, let me tell you that when reaching the relay to connect the positive of the multimeter, i spotted a box that says Fuse (pic 3), not sure if this is interesting or not, but it's there.

Now the tests:

1. Voltage directly across battery terminal posts, to confirm that battery is OK.
-key off position = 12.87v
-key on position = 12.51v

2. Voltage between glow plug control input from battery, and battery negative, to check for bad connections.

Red wire pic 1
-key off position = 12.73v
-key on position = 12.48v

3. Voltage between glow plug control unit output, and battery negative, to check control unit condition.

Brown wire pic 1
-key off position = 0.02v
-key on position = 12.46v

4. If possible, voltage between glow plugs, and battery negative, to check for any loss in wiring.

From left to right Pic 2 (negative on battery)
1. 9.80v
2. 9.80v
3. 9.70v
4. 9.70v

5. Voltage between engine block, and battery negative. Reading may be (-ve). This to check engine/battery earthing.

If i connect the positive on Pic 2: (with key on)

Spot B i get 0.00v
Spot A i get 10.80v
With key off is 0.00v both places.

After all this, i've tried 3 or 4 cycles of plug heating and crank but not easier than before, had to use the spray again.

Hope this helps you to help me, i find the earthing reading very strange, either engine is not earthing or i used the wrong place in the engine to test.
Sorry for the delay in replying. Comments relate to the numbers as above.

1. The battery is not failing, but if it was the starter would struggle. 12.51V
2. Minimal voltage drop in connection to control unit. 12.48V
3. Suggests that control unit contact is OK. 12.46V
4. About 2.7V lost in vehicle wiring. Not good, but could be normal. 9.75V average
(Modern glow plugs seem to be designed for 11V at the plug.)
5. I would expect a fractional positive voltage with this test, but as
starter functions OK, a poor engine earth is unlikely.

I think that @bugsymike 's suggestion of a direct connection would to the glowplugs for 10 seconds, would be a possible next step. If engine starts OK, then see below, but if not perhaps ignore and focus on fuel issues.

To take the low reading at 4 above a bit further, look at the previously attached diagram, which is in two parts, a schematic on the left, with wiring details on the right. On this side find the rectangle 1160 which represents the glow plugs. On this section of the diagram follow the wire 118 to the left, to a harness connector IC68A. This is the only connector in that part of the circuit. I would expect to find it where the wire from the glow plugs enters the cable loom or harness. Examine connector for signs of overheating or corrosion. This assumes that the drawing is applicable to the vehicle.
Thank you @Communicator @bugsymike for your answers, i will see what i can do to make that direct test. Questions about that:

- connecting battery direct to glow plug wires, does it require me to disconnect the wire somehow?

- after the 10 seconds should i crank and then remove the connection or leave it like that for some time?

Sorry about this dumb questions, but really basic mechanic here 🙂

Not dumb,:) if not sure ask it's the only way to learn. The only thing you know about a person who claims to know everything is that they are liars.;)

Yes only a ten second power to heater plugs, then crank engine over straightaway to hopefully start, if left on even for a few minutes continuous they will get too hot and die!!!! Apart from that the amperage drain would quickly flatten your battery if engine not running. Modern vehicle with computer controlled heater plugs can stay on longer by design but yours isn't that type.
Once you are sure you can make a safe connection, remember if not a good firm connection you will find the end of the wire gets hot and burns your fingers, also don't use thin wire for the same reason.
In the demo I did using my test meter those wires are good for 60 amps plus.
I would say if you have some one ready to crank the engine as soon as the 10 seconds have passed is best, as by the time you have dropped the wire and ran around to turn the ignition the heater plugs will not be glowing anymore.
If you have a jump lead set for jump starting a car with a flat battery and can use one lead to make a safe connection, then it will be easy to hold the other end on the battery.
Remember all this is doing is proving that if vehicle quickly starts then problem is on the heater relay and wiring side which this test bypasses, however if you still get long cranking and loads of white smoke/unburnt fuel smell etc. then I would get a compression test, to see if low compression is the cause.:)
Thanks for the explanation, i will see if this is something i can do and if i have the right materials.
 
So, here it goes what i believe are the correct readings to those bullet points, but before, let me tell you that when reaching the relay to connect the positive of the multimeter, i spotted a box that says Fuse (pic 3), not sure if this is interesting or not, but it's there.

Now the tests:

1. Voltage directly across battery terminal posts, to confirm that battery is OK.
-key off position = 12.87v
-key on position = 12.51v

2. Voltage between glow plug control input from battery, and battery negative, to check for bad connections.

Red wire pic 1
-key off position = 12.73v
-key on position = 12.48v

3. Voltage between glow plug control unit output, and battery negative, to check control unit condition.

Brown wire pic 1
-key off position = 0.02v
-key on position = 12.46v

4. If possible, voltage between glow plugs, and battery negative, to check for any loss in wiring.

From left to right Pic 2 (negative on battery)
1. 9.80v
2. 9.80v
3. 9.70v
4. 9.70v

5. Voltage between engine block, and battery negative. Reading may be (-ve). This to check engine/battery earthing.

If i connect the positive on Pic 2: (with key on)

Spot B i get 0.00v
Spot A i get 10.80v
With key off is 0.00v both places.

After all this, i've tried 3 or 4 cycles of plug heating and crank but not easier than before, had to use the spray again.

Hope this helps you to help me, i find the earthing reading very strange, either engine is not earthing or i used the wrong place in the engine to test.
Due to time constraints, I did not manage to comment on your group of three photos. I can now partially correct this omission.

pic 1. This shows the glow plug control unit connections, which appear healthy but I think that it is included for reference only.

pic 2. Spot A is on the camshaft cover, which may be insulated by the gasket, and seals round the fixing bolts. Not a good test point so ignore associated voltage measurements. Spot B is cylinder head, and will be a good earth point.

pic 3. The fuse is probably a bolt in type, either a strip fuse (bare metal strip) or Midi/Mega fuse. I think that this fuse is part of the campervan conversion, and not part of the base vehicle. My thinking is that it is perhaps a 50A fuse between the starter battery, and the split charge relay, which could be the black relay at the left side of the original photo in post #5.
 
So, here it goes what i believe are the correct readings to those bullet points, but before, let me tell you that when reaching the relay to connect the positive of the multimeter, i spotted a box that says Fuse (pic 3), not sure if this is interesting or not, but it's there.

Now the tests:

1. Voltage directly across battery terminal posts, to confirm that battery is OK.
-key off position = 12.87v
-key on position = 12.51v

2. Voltage between glow plug control input from battery, and battery negative, to check for bad connections.

Red wire pic 1
-key off position = 12.73v
-key on position = 12.48v

3. Voltage between glow plug control unit output, and battery negative, to check control unit condition.

Brown wire pic 1
-key off position = 0.02v
-key on position = 12.46v

4. If possible, voltage between glow plugs, and battery negative, to check for any loss in wiring.

From left to right Pic 2 (negative on battery)
1. 9.80v
2. 9.80v
3. 9.70v
4. 9.70v

5. Voltage between engine block, and battery negative. Reading may be (-ve). This to check engine/battery earthing.

If i connect the positive on Pic 2: (with key on)

Spot B i get 0.00v
Spot A i get 10.80v
With key off is 0.00v both places.

After all this, i've tried 3 or 4 cycles of plug heating and crank but not easier than before, had to use the spray again.

Hope this helps you to help me, i find the earthing reading very strange, either engine is not earthing or i used the wrong place in the engine to test.
It seems to me people are over thinking this? to test a glow plug, take it out, quickly connect 12v to it, it either glows or not, new or old glow plugs can fail? and by the way 8v-9v is too low a voltage to start an diesel, its winter its probably glow plugs or battery
 
It seems to me people are over thinking this? to test a glow plug, take it out, quickly connect 12v to it, it either glows or not, new or old glow plugs can fail? and by the way 8v-9v is too low a voltage to start an diesel, its winter its probably glow plugs or battery

Plenty of modern Diesels employ plugs in the 5 to 9 volt range 🙂. 2 decades ago the glowplugs were easily accessible, so easy to test on the battery terminals

This is often a full day's work, And risking a Snapped off plug

So I can see the benefit of In SITU Testing..
 
It seems to me people are over thinking this? to test a glow plug, take it out, quickly connect 12v to it, it either glows or not, new or old glow plugs can fail? and by the way 8v-9v is too low a voltage to start an diesel, its winter its probably glow plugs or battery
As @varesecrazy mentioned re voltages and accessability.
Some years ago on a Bedford Midi I did your suggestion when fitting new heater plugs, testing first and they all glowed nicely, fitted and van wouldn't start, tested the heater plugs again and all scrap, check the voltages and turned out the first one I had come across with 5vts, so that set came out of my pocket:(. I believe they had an Isuzu engine.
 
Problem Solved!!! 🤩

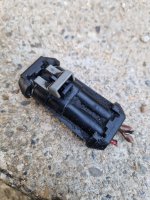
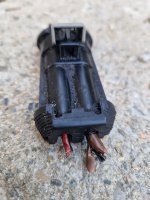
So, i've arrived in France and i had the chance to discuss this problem with my brother in law who is a motorbike mechanic, and he immediatly put himself in the electrical direction and start testing everything.

At some point he followed the glow plug cabling and found something wrong with a small electrical connector (the current wasn't flowing normally there). He just removed it and made a direct connection, et voilá the van starts perfectly now! Pictures attached.

Thank you all for all the help and guidance.
 

Attachments

  • 20240129_112035.jpg
    20240129_112035.jpg
    1.9 MB · Views: 13
  • 20240129_112045.jpg
    20240129_112045.jpg
    1.6 MB · Views: 12
Last edited:
Back
Top