General Broken back axle AGAIN!

Currently reading:
General Broken back axle AGAIN!

Next 5
 

Attachments

  • IMG_20210425_160246_resized_20210425_073558073.jpg
    IMG_20210425_160246_resized_20210425_073558073.jpg
    749.9 KB · Views: 45
  • IMG_20210425_160240_resized_20210425_073557671.jpg
    IMG_20210425_160240_resized_20210425_073557671.jpg
    775.8 KB · Views: 46
  • IMG_20210425_160233_resized_20210425_073557200.jpg
    IMG_20210425_160233_resized_20210425_073557200.jpg
    754.5 KB · Views: 45
  • IMG_20210425_160213_resized_20210425_073559052.jpg
    IMG_20210425_160213_resized_20210425_073559052.jpg
    713.8 KB · Views: 45
  • IMG_20210425_160203_resized_20210425_073559522.jpg
    IMG_20210425_160203_resized_20210425_073559522.jpg
    620.2 KB · Views: 47
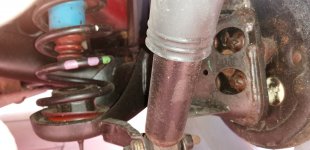
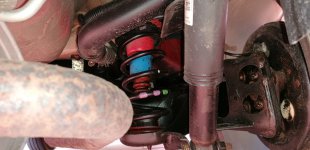
Trevor is that a "squashed" tube? That looks very much like the 500L axle.

Ah.... interesting.
I am sure its thicker metal and in a light car like the Panda I cannot see it "Twisting" like it should do. There is less body roll with this car than there was in my previous Lounge, must be easy to lift the inside wheel in hard cornering.
 
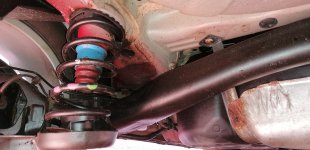
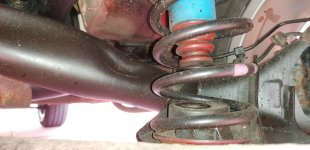
Do these images shed any light on the 4x4/Cross rear beam design? Note that there are also two cross tubes here further towards the rear of the car which are not part of the suspension, but are what the rear diff hangs from:
https://cdn.motor1.com/images/mgl/bMRQ6/s1/baby-allradler.jpg
https://cdn.motor1.com/images/mgl/XyRv2/s1/baby-allradler.jpg

and here: https://www.ebay.co.uk/itm/NEW-SHAP...EMBER-LESS-HUBS-AND-DRIVESHAFTS-/293244565381
or here: https://www.xdalys.lt/en/beam-rear-os-suspension-fiat-panda-3-iii-4x4_rear-beams

I might try and crawl under mine at some point, but away for the next few days...
 
Last edited:
This post contains affiliate links which may earn a commission at no additional cost to you.
Hi.
The two cross beams for the rear diff are not in any way connected to the twist beam. I'm sure my city cross has the mounting points already there for the rear diff on the 4x4.
 
So 1.25 hours to get out, 1.25 hours to get back in including brake bleeding. Time saved mainly due to the correct tools were to hand.
I seam sealed the welding and paint, when it dries I will get the anti rust black paint on. By next Dec (test) it will be well covered in dust and mud, if it ain't...it will be!
it would be interesting to know how it drives on a tarmac/smooth road surface - does it now pull either way compared to before? and what does tyre wear look like after you've got a few miles on it?
 
Funny you should say that Puggit Auld Jock: I noticed there was plenty of mounting tolerance in the 3 mounting holes each side, not exactly precise.
I didn't take it for a trek up the mountain to the tarmac road.
I'll leave that to ErIndoors, it's her car. She is hyper critical of such things.
 

Attachments

  • 20210426_144916.jpg
    20210426_144916.jpg
    3.1 MB · Views: 38
Funny you should say that Puggit Auld Jock: I noticed there was plenty of mounting tolerance in the 3 mounting holes each side, not exactly precise.

Well that's very interesting bimmer because people talk about slackening these bolts on the 169 and jiggling it around if you find the rear wheel alignment to be "less than perfect".
 
bimmer A couple of observations;

  • Weldable Steel
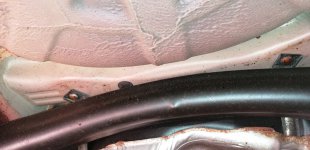
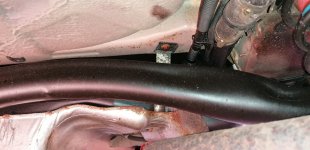
    There's been a couple of comments regarding the weldability of the steel. In your own photos it s clear the material is eminently weldable as there is an original stiffener plate welded where the beam attaches to the swinging arm. It is a continuous weld and most likely performed by a robot using MIG or similar (and a very neat continuousweld it is too) also note it has not been ground... You have stated that the on vehicle fix (that subsequently failed) was a regular arc welder by which I expect you mean "stick welder". Aside from the risk of "hot work" under the car and inevitably close to the fuel tank - no safety lectures from me here! It is going to be pretty difficult to get any consistent penetration and enough heat into the part. MIG and off the car has to be the way to go although should it have failed in the first place is the recurring question?
    [*]Drilled hole (strengthening)
    With the axle off the car there is (was) an opportunity to strengthen the drilled hole. Since it appears that both sides have failed with the crack running up to the hole (and then the axle bending which is probably as well as otherwise things may be rather more catastrophic) then you could either plate over the hole (or perhaps more elegant) retain the hole but insert a tube and weld around it. This may stiffen the axle a little but will also transfer some of the stresses around the hole into the remaining material (the failure has been in this place on both sides since it probably is the smallest section of the material and highest stressed section - stating the bleeding obvious probably!)
    [*]Plating
    Not wishing to be too critical of the local welding shop but tacking that thick plate on to the relatively thin pressing may not have done many favours... As above getting equal amounts of heat into the thicker and thin material will have been tricky; personally I would have gone with similar thickness material and and a continuous (MIG if possible) weld. Oh, and no grinding
    [*]Fatigue crack growth
    The moment has passed but if you could look at the crack surfaces you might get a sense of how quickly the crack has grown (striations across the surface and whether there was any rust in there. Not relevant really -it broke! But interesting


As stated and or implied by a number of folk question is - why did it break?!

These are personal opinions and certainly are not intended as criticism nor recommendations. Drive carefully.

I have a 4x4 TA which has the pressed steel tube version of this cross tube as illustrated in the excellent links provided by Herts Hillhopper above. This would seem to offer a more robust route.

One thing I have learned from this is that the "independent" rear suspension is not quite as "liberated" (independent) as it may seem :confused:

Oh; and all wheel laser alignment would give an insight to wheel alignment, front to rear etc. You may have just created a 21st century land crab... Older Austin Morris owners will know what I mean ;)
 
Last edited:
Panda II S: Thanks for your observations.
The breaks were "rapidly" developed, right hand side first, MIG weld repaired, then the left hand side ARC welded (due to location requiring vehicle recovery to the workshop) so welded on site at home. The welder did say "I dont like using an ARC welder in this circumstance".
The drill holes stopped the welds developing in both cases (IIRC my college days said a drill hole will stop a crack). So they did the job otherwise it would have traveled all the way round.
We selected the 5mm bar because that was the only suitable available. I had considered a bridge from one side to the other but opted for the 200mm versions.
I also remembered a welding technique to weld in "patches" rather than the whole length. For the same reason as the hole. A continuous weld with a crack will go the whole distance where as a "stitch/patch" weld MAY stop at the first crack point.
I DID consider another flitch plate as per original inside of the drilled holes but thought that overkill.
NONE of the MIG welds were ground down. The original weld repairs were ground and then welded each side then "crowned".
If that don't fix it then it's getting another axle then gone!
It broke because we live down a 5km mountainous dirt track with 45deg rain water runs that twist the axle significantly. Twice a day it has to endure them.
Anti Roll bar bushes are a common replacement here. My Volvo V40 suffered a front anti roll bar fracture previously.
BTW the Panda carries NO weight. Once a month the shopping. rest of the time it's either one or two people on board.
I refer again to the 500L with the same problem on a 2km dirt track! I'm not alone!
 
Hi bimmer, yes I saw your previous notes re track and the pictures at least it will deter the door to door sales folk! I'm sure its fabulous there?

I had the anti roll bushes etc on an Alfa just with the so-called sleeping policemen at an earlier place of work so the track you have will be a real killer especially as I can imagine it would be difficult to keep the speed down...

I can see your plates may fix the initial problem but would maybe move it along. If you have to replace it (the axle) it would be interesting (for me as an observer at least!) to try the 4x4 set up but with a genuine 4x4 (without the drive obviously) you may have to adopt the disc brake set up(?) Does the Trekking (or Trek is it?) use drums (the faux 4x4 I mean). You are clearly very proficient at dropping the axle and all that comes with it (brake bleed, hand brake cables etc) very impressive!

Impressed by your persistence - let us know how you get on.
 
Last edited:
This has been a fascinating thread, and I've learned a lot from it, so :worship: to all the contributors.

My location isn't as extreme (nor, I suspect, as picturesque) as bimmer's, but I live at the end of a half-mile unmade farm track which can get very potholed and rutted, depending on the season and the amount of farm traffic using it. My Cross, which was bought new, is now 6 years old, and I estimate that of its 55k miles, at least 5k has been spent belting along this track. Prompted by this thread, I had a good look underneath its rear end this morning, and all looks fine. What surprises me more is that the wee yellow beastie hasn't needed any work on its suspension or steering in that time. My old Panda 4x4 (1986 model) chewed its bushes to bits with depressing regularity, but the Cross seems to be made of stronger stuff.
 
The link appears to have broken due to fatigue failure, ie a crack has initiated and grown with repeated loadings and finally failed catastrophically.
A good weld repair will have less than 10% of the fatigue strength of the parent metal so I’d look on any weld repair as a very temporary measure ie just a get you home remedy.
When body repairs are done by welding these are normally in places which are not too susceptible to fatigue failure, obviously the link is very susceptible to fatigue failure.
 
Does anyone know if the 169 axle is the same as the 312?
My mate has a 169 and he also lives down a 5km track. He reckons the steel work on the 169 is more substantial.
Might pay to go "retro"!
Pretty sure they’re different. The newer car is several cm wider and I’d suggest (but can’t be certain) the suspension must be too.
 
The earlier Panda (169) had a narrower track, methinks 50mm narrower than the 312 and 500.

The difference is in the hub mounting plates/brackets, all the mounting points and spring positions are the same.

Fiat got the extra track by extending the plates/brackets out further.

DaveMct went the other way, a wider 500 rear axle on a 169.

You can see the difference
http://i168.photobucket.com/albums/u187/Divi900/Panda axle/IMG_2688_zpswlhrjhht.jpg

http://i168.photobucket.com/albums/u187/Divi900/Panda axle/IMG_2686_zpsuewu13it.jpg

Though a 169 axle will fit, you get a narrower track which could be sorted with a couple of 25mm spacers or a different offset wheel, but the trouble would be finding a 169 axle that isn't rusty dust and I doubt it's any better anyway as Fiat ditched it for the 169 4x4 and fitted individual swinging arms each side.
 
Last edited:
Back
Top