Technical Becky's timing belt - all done!

Currently reading:
Technical Becky's timing belt - all done!

Joined
Oct 1, 2017
Messages
7,370
Points
2,315
Location
Edinburgh Scotland
As "the ongoing saga" was getting a bit "leggy" and straying off topic (albeit interestingly), I though I'd start this new thread to tidy up the loose ends and finish off.

We take up the story with the belt fitted, engine run briefly (no water in engine so just for a few moments) to check all is OK. Belt guards, engine mount, fan belt, etc, etc all reassembled. Now for the cooling system.

To say I am pleased with the water pipe I bought from Mick at Shop4parts would be an understatement. It looks and feels to be of high quality. It required considerable physical effort to get it entered into the back of the water pump which I had expected as it seals on the fit of the seal alone. Even the bolt hole in the bracket lined up perfectly! So, with hoses all reconnected and new hose clips to hold them in place it's time to fill the system. I drained it by pulling the bottom hose to get as much coolant out as easily possible and collecting it in a clean bucket. This allowed me to examined the old coolant for contamination. It looked pleasingly clean. I forgot to order Paraflu from Mick when I got the pipe but my local factor had a product which was recommended and as the whole system was drained so there would be minimal mixing of old and new, I decided to go with it. I also decided to "treat" her to deionised water (cheap as chips from Halfords with a trade card, so why wouldn't you?)

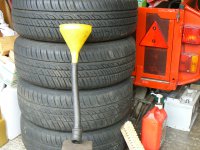
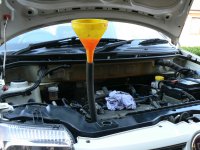
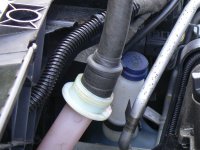
I'd been thinking about the possibility of airlocks when refilling and had read on the forum of others who have experienced this. In my earlier life as a mechanic, I must have filled hundreds of cooling systems and whilst most gave no bother there was the odd one which proved a real headache! Looking at this one the most obvious thing is that the filler is lower than the bleed on the heater pipe! OK maybe the water pump can push it round but perhaps it would appreciate a little help by raising a bit of head? Anyway I came up with this, not very imaginative, contraption. The larger diameter pipe is cut from an old radiator hose (classic mini I think) the longer, smaller diameter, hose is a bit of old heater hose and the two are sealed together with some self amalgamating tape. The yellow funnel is, well, a yellow funnel! chosen just because I had it and it fitted the heater hose!
P1070286.JPG

P1070287.JPG

P1070289.JPG

The large diameter, short length of hose was chosen because it makes a good tight fit into the filler for the radiator. The bleed screws on the radiator and heater hose were opened and coolant (50/50 mix) poured in 'till it started coming out of the rad bleed screw which was then tightened (gently - it's plastic). filling continued till bubbly, then liquid, coolant came out of the heater hose. Next I started up the engine and a small amount of bubbly coolant came out the heater bleed screw but this quickly turned to liquid (no bubbles) so I closed the screw. Ran the engine up, watching the temp gauge which should rise slowly, (if it doesn't lift off the stop after a few minutes you've probably got a BIG air lock and need to stop the engine and clear this before going any further or risk problems like head gasket damage etc) If all is OK keep the engine running, speeding it up a bit from time to time to encourage the water to circulate and chase out air until the top rad hose gets hot (this indicates the thermostat has opened and will need the engine to be run for a while). When the thermostat opens it's not unusual for it to release more trapped air so keep an eye on the header tank coolant level as you do this. Be aware the water is getting quite hot now so be careful not to burn yourself. During the warm up I briefly opened the heater hose bleed a few times in case there was still trapped air but actually only on the first opening did it very briefly spit out a little air. (coolant circulates round the heater system all the time so the heater pipes will start heating up quickly whereas the top rad hose will only get hot once the thermostat opens) When I thought all the air was out and circulation was satisfactory I whipped my cobbled up filler tube off the header tank filler and screwed in the pressure cap. Turning off the engine, it took me about half an hour to do a bit of a clean up (self included) and by the time I got back to her the engine had cooled off quite a bit and the water level had dropped to the bottom of the filler neck of the header tank (still above the full mark though).

So - took a pop bottle full of coolant and the funnel with me and set off on a test drive. Stopped after about 2 miles and checked the coolant level. It was now half way between the max and min marks, obviously some air had been pushed round the system. As it was still within acceptable limits I didn't add coolant at that time. Continued another couple of miles and checked again, no change. Turned round and drove home, checked level again, still half way between max and min. Let her cool for some time whilst clearing up the garage, cleaning and putting away tools and scrubbing the worst of the ground in dirt from myself. Engine now just hand warm. Coolant level just a little above min so added coolant to just below max mark.

I didn't need to take the cap off the header tank when out on my test drive but if the coolant level dropped a lot it would be necessary to top up of course. I have many years experience of doing this and have seen people very badly scalded because they took the cap off a hot engine's cooling system. If you don't have experience of working with hot engines you would be best to let it cool a bit - could take some time, aim for hand hot or cooler - before risking it. You really do need to be careful with this, serious injury can result, the manufacturers don't put warning notices on these filler caps for nothing!

The engine, by the way, is running beautifully. I haven't done a phonic wheel relearn yet as I'm interested to see if the ECU picks up on the belt change. remember I didn't slacken the cam pulley bolt, although, as the cam sensor picks up on the pulley itself and not the cam, not slackening the bolt is probably not a relevant factor. Although I drove quite gently on my test drive I did accelerate quite briskly a couple of times with revs peaking at around 4000 rpm - so far no EML illuminated!

So. This seems to have all gone well. Our old Felicity (92 Panda Parade) was definitely easier to work on - Becky's engine mounting is a bit of a pain! My older Boy's Punto 1.4 looks as if it has more room and should be easier (which is good as it's the next job).

There's a bit more "stuff" to tell you about to bring things right up to date, especially the brakes which held a surprise. But that's for another day, maybe tomorrow?

So stay safe everyone
Jock
 
Waterless coolant is another option but the system has to be THOROUGHLY flushed and its really not worth the cost unless you have a new radiator as well.

Premixed coolant is simple juts pour it in.

With coolant concentrate poor in 2.5 litres then top up with distilled water. That way you will not end up with a weak mixture.

Bleeding air from the system should be simple enough. It's not necessary to use a tall filler and TBH the (slight) pressure increase might make airlocks more likely.

Always take some additional coolant (or distilled water if you used concentrate) on the first teats drive.

You can get distilled water from a dehumidifier tank or just buy premixed coolant.
Aye, the bleeding was easy and I probably didn't need my"contraption" but I got a lot of pleasure from making it! Can't see about 12" of water head pressure making any real difference in increasing the likelihood of air locks? But having seen how vigorously the pump circulates the water it supports the opinion that my "contraption" is irrelevant! - still enjoyed making it though!

I like to premix my coolant in a container so that way I know the ratio is correct. I suppose, if you've flushed the system through with a hose there will be a very small quantity of water left behind. I just add a guessed "splash" of extra concentrate to compensate. You can't do that with premix of course - but the difference is probably not worth worrying about. Any mix left over goes in an old "pop" bottle which then joins my small box of emergency stuff in the boot just in case of, well, emergencies!

I've always tended to avoid expensive, non main stream, options like the waterless coolant and nitrogen in my tyres. There are undoubtedly advantages in using these products but they invariably cost more and can be difficult to access in emergency situations. For instance if a top up is needed in a remote location (other scenarios can be imagined). I feel also that for standard everyday motoring in standard everyday type cars the advantages are minimal.
I forgot to include (because a phone call interrupted my thoughts) in my comments in the middle paragraph, that as long as you have a reasonable concentration of antifreeze (maybe in excess of 25%?) in your system you are unlikely to experience any problems from frost in our relatively mild climate. In my view it's the additives which minimise corrosion etc which are the more important consideration with the mix of materials used in modern engines and the possibility of electrolytic corrosion which this encourages. (I would not use a less than 50% soln. for this reason) So changing your coolant at the recommended intervals (seldom done on a routine basis in my experience) is very important. - Let's not get started on brake fluid eh? Does yours look nice and clear or is it dark and mucky? Oh, and then there's silicone brake fluid too! No! Stop it Jock!
 
As a complete off-topic (but to get you started):
I religiously change brakefluid every 2 years. Last saturday I changed mine on the 100HP after (due to circumstances) a little more then two years. It was so nice and clear, I could not see the difference with the new fluid.
When I bought her first thing I did was of course fresh brakefluid. The muck that came out then must've been in from new I guess.
And before anyone says: why change if it looks nice and clear? You can't see the watercontamination in the fluid. Only the rust and desintegration of the rubber hoses the water creates.

gr J (a wee little less old, but still;))
Hi A3jeroen. Many years ago we were on holiday down in the West Country (Devon/Cornwall) and we decided to visit the picturesque village of Lynmouth. You get there by driving down a very long and very steep hill road. By the time we reached the bottom of the hill the drum brakes on my old Ford Anglia were very smelly and smoking slightly but more worryingly the brake pedal was VERY spongy and almost going to the floor. Another 1/2 mile and I'd have had no brakes! I was newly married, just started training as a mechanic and poor as a church mouse so spending money on the car was a big no no when new wife wanted other things (important house type things she said!) I knew what was going on, the heat caused by the linings was vaporising the moisture in the fluid. I was not surprised to find all was well when we returned later in the day to drive back to where we were staying. When we returned home I popped the drums off to find, on the front brakes, some rather black, cooked, glazed linings and mildly singed cylinder dust cover rubbers. I really didn't feel happy with this so renewed the brake shoes and cylinders despite protestations from Mrs Jock!

This experience left a deep impression on me (much more forcefully than any training could have done) and I have, ever since, changed brake fluid at least every 3 years. That is until about 8 years ago. My children, I have 3, couldn't think what to buy for my Christmas present and had heard me talking about brake fluid testers. Would you like one Dad? Well yes, but a good one which checks boiling point is not cheap. That's OK we'll all club together. In the end Dad had to make a small contribution and we bought a Liquid Levers (company name) Sure Test. I regularly dunk it in every vehicle in the "family fleet" and a few friends and neighbors too. It's been an absolute revelation! With some showing almost no degredation after a couple of years and some having almost dangerous levels after 3. I do agree fluid colour has little to do with it although all the ones I've seen which gave poor readings were badly discoloured.
 
Sounds interesting. However I still keep changing it every 2 years. Turned to ATE Racingfluid with a very high boilingpoint and amazingly good pedalfeel a while ago. And with carefully choosing where to buy from, might turn out cheaper then buying the tester over the next few years.
Thx for sharing the wisdom though.
To me it's an absolute shame that this gets neglected (even by large dealerships) so often.

gr J
Not just a shame but, possibly criminally negligent if an accident ensues due to it. Very difficult to prove though as the brake pedal returns to a normal feeling as soon as the heat source is removed. From the maintenance point of view alone it is worth doing as it will minimize cylinder and piston corrosion. It would probably help a lot if the manufacturers would invent an alternative to the present bleed nipple system which, in my experience, usually snap off if you sneeze too loudly when near them!

As the manufacturers of the brake components and fluid both recommend a fluid change every two years then legally you are probably best to do this anyway!

I'm just starting a thread on Becky's brakes (our new/old Panda which we've just bought) hope you may like to read it. might get it posted today.

regards
Jock
 
The issue is that disc brakes can handle a lot more heat than drum brakes so wet fluid, that would give ample warning in a drum braked car, can seem fine in disc brakes. Then one day you are half way down the Stelvio Pass (or maybe Lynmouth) and find the pedal is on the floor. Water will also corrode the caliper metal around the seals sooner or later jamming the brake.

Silicone fluids are good as they don't absorb water but I believe there are other issues. They only really work when the system is new. Any vestiges of old fluid will still absorb water, negating the big benefit of the silicone stuff.
 
Fascinating reading - I have enjoyed this thread

Just one word of caution. I am sure Puggit Auld Jock is very careful, and knows what he is storing in his "pop" bottle of radiator mix.

But for anyone else, if you store anything in an ex drinks bottle, please, please, remove the label, and put on a new label that clearly identifies the contents. From professional experience with Health & Safety and pesticide useage I am aware of at least one fatality where a bottle labelled "spring water" contained a pesticide for which, even in small quantities, there was no antidote. Even if you know what is in the bottle, someone else might not
Absolutely, FarNorthPanda. A very good point to make. I usually use a 2 litre polycarbonate bottle because that's what we buy the "pop" in. I always remove the label and write on the bottle, with permanent marker, what it contains. Each of our vehicles has a small box of emergency stuff in the boot and this is where it goes. Now that I'm retired and available to the extended family for breakdown help I have actually been thinking I should keep this sort of thing in my garage and not in each individual vehicle as my older boy and both daughters in law don't even know how to open their bonnets and have no interest in finding out! It would also mean that we would not need to store much in terms of quantity.
 
My daughter does a consistent mileage so a PCP scheme works for her. She gets to drive an Audi with everything taken care of. Currently it's a diesel, but I doubt she cares.
 
Just a wee update. Been more than a week now since refilling Becky with new antifreeze mix. She's only done the odd trip to the supermarket etc over this time and she hasn't really needed much in the way of topping up. Yesterday she did a longer trip across town, probably an hour or so of running and one "crawl" in heavy traffic for about 15 minutes. Just checked coolant level this morning which needed about 1/2 a teacup full to bring back to max mark. All checked cold. Probably a wee bit of air coming through with the thermostat fully open in the traffic (nice hot weather yesterday, the fan was cutting in and out) - can't see any obvious leaks. I'll feel happier when it stabilizes though.

There seems to be a small oil leak here the breather pipe exits the cam cover, which surprises me slightly as the pipe looked in good nick and I used a new jubilee clip on reassembly. At least the cam cover gasket seems oil tight.

Did a quick scan with MES too. Glad to say the steering DTC hasn't returned yet!! You may remember also that I purposefully haven't done a phonic wheel relearn to see if it throws a DTC after the timing belt change? Interesting to observe this hasn't happened yet and she is driving fine, don't notice any substantial differences to before. There was a small (probably most people wouldn't have heard it) whining from the new belt when first started up but this had vanished after the road test.
 
Keep an eye on the coolant. The engines are touch little beasts but low coolant overheating will almost always take the head gasket.

Check the coolant pipe across behind the exhaust manifold for leaks. It's almost totally hidden so can rust (and leak) undetected.
 
Keep an eye on the coolant. The engines are touch little beasts but low coolant overheating will almost always take the head gasket.

Check the coolant pipe across behind the exhaust manifold for leaks. It's almost totally hidden so can rust (and leak) undetected.
Thanks Dave. Yup, I had that problem on Felicity (our '92Panda Parade). Knew there was a leak, not sure where, kept topping up, then missfire on No1 cylinder and spark plug washed super clean! Stripped head off. Luckily got it early so no distortion. Whilst cleaning up the block face found the corroded and leaking water pipe. New pipe. New head bolt set. Head gasket set, antifreeze, cam cover gasket, etc back on the road next day! Delightfully easy one to do.

So I checked Becky's pipe very carefully and guess what? Leaking seal! Stripped the pipe out. Oh dear, a couple of very crusty deep rust pits, although the rest of the pipe looked great. So check carefully, I might have missed them if I hadn't removed the pipe. After recovering from the heart attack induced by Fiat's price quote for a replacement pipe I bought one, which included the seal, for less than half the price from Shop4parts and I'm delighted with it's quality. The seal is a much improved design when compared to Felicity's simple O ring.

Now a question. When I bought all the parts to do this job (belt change) I knew the cam cover would be coming off so bought a new gasket. It wasn't 'till I took the cover off that I discovered the O ring seals in the cam cover (3 of them) which seal the oil supply at the 3 cam bearing housings. - Evo 2 1.2 8valve. The gasket came without the O rings. Asked at my local factor, yes he keeps the gaskets on the shelf, no they don't include the O rings, no he's never been asked for them. Went in to the main dealer. Service reception (no chance of speaking to a techie. I can understand that, it would cost them money) told me that anything that needed to be done would be, when would be a good time to book it in? Explained I was doing it myself. Reception guy looked a bit incredulous, but still couldn't say about the seals, pointed me at stores desk next to his (unmanned). After a wee wait a very pleasant chap came out and, at first, didn't know the parts I wanted. After a good scan of his computer, which was in the back shop so I couldn't point out to him the parts I was looking for, he came back with the price of the seals, a lot! He did say though that they don't keep them and that they have none showing in other Scottish dealers. He didn't actually say "we don't change them" but I would infer that. On my way home I stopped at our local Fiat independent who told me, in a quiet voice, that they just put the cover back on with the old seals still in place and have never had a problem. OK everyone. What do you think. Anyone done one of these? Did you change the O rings? I didn't, just put the new gasket into it's groove with a wee dash of sealant in the corners and popped it back on. Seems all ok after some 10 days now.

Whilst at the main dealer I was waiting for some time whilst the parts guy checked on his computer in the back shop (at least, I guess that was what he was doing, maybe he had a nice cup of tea he didn't want to go cold!,) The reception guy was, I think, intrigued by this 71 year old duffer who was going to do his own cam belt. And started talking to me between customers at his desk. During one of these brief conversations he mentioned that, did I know the electronics needs to learn a new belt has been fitted? Of course I'd read a lot about Phonic wheel relearn after changing the cam belt on our forum and bought my registered MES and interface from Gendan to be ready. I decided to play stupid and asked him about it. He said not to worry, it's very simple, just rev the engine to the limiter 3 times and that teaches it. I don't think that would work as you need to use MES (or similar) to prepare the ECU to accept the new info. Just reving up without any prep work will achieve nothing? Or does someone know better?
All the best
Jock
 
So you fit a new cam belt then start the engine and bounce it off the rev limiter.

That has to be a great way to needing a new engine (or car if it's a few years old).

When I did the HGT Punto (16V, cam Variator, etc, etc). I fitted the new belt and used the car. It ran fine with good fuel consumption. To be honest, I can't the advantage of ECU learning: A properly fitted cam belt should have the engine spot on it's correct timing.

As for O rings: If the existing are not hardened and still have the correct round section, then clean and re-use them. Alternatively, measure and buy new O rings.

Rightly or wrongly, I like to use an anaerobic gasket sealant on gaskets (though not head gaskets of course). It also works on questionable O rings**. It cures only where the air is excluded so any excess leaves no nasty clag to cause harm. It also come apart (next time) without leaving a mess.

** I have some old motorbikes where parts are near on impossible to get. Re-using old O rings on them is a calculated risk. So far, they have all been ok which I put down to Loctite 518.
Actually, to be specific, he said 6,000 rpm. - pretty much the same thing though? And again, to be fair, MES does actually detail this procedure for my engine (and my boy's Punto 1.4 8 valve). It's all to do with the adaptive learning on these engines. I don't think the 16 valve units have this? (I'm sounding cleverer than I really am now as I only half understand what I'm talking about here). What I would query is his assertion that all you need to do is the reving up procedure on it's own? MES seems to clear learned values before doing it. Anyway, as previously stated I haven't done any of it and I'm waiting to see if the engine light comes on before I do. Really don't like the idea of reving it like that!

I'm with you on the gasket stuff too. Belt & braces, always good - except, as you say, on head gaskets of course. I'm a bit "old school" though as I have quite a liking for Hylomar which I was introduced to years ago first used on BMC A and B series thermostat housing gaskets. I use various Loctite products and have always found them excellent. Never tried your 518 though. I've just sneaked a peak at the Loctite website and it looks interesting, I'll give it some thought!
 
I bought a large syringe type tube of 518 back in 2004 when I rebuilt an MZ250 bike engine. It's the stuff for joints using aluminium. It's now nearly used up, but I would recommend it to anyone.

I never use it on sliding O-ring joints or anywhere that cured sealant could jam the joint when it has to be opened next time. Those get some red rubber grease on the sliding face. Though in some cases (e.g. where corrosion has to be kept out) copper grease on the joint flange (not the O-ring) is a good option.
 
I find our is a king sized PITA as well. My solution. Fill rad almost to the top WHen cold, engine off i lean over and blow into the top of the rad as hard as I can. It does the trick but even so it took 6 months of topping up each week untill the level finally settled down. I concur that of the 85+ vehicles I have run this is by a country mile the most taxing to bleed the rad. Puggit AUd Jocks idea looks A1. Im considering modifying a radiator cap to allow a header to be hung a meter or two above the car to apply pressure via garvity as anti freeze is poisonous so my idea above is not a vary safe one. I need to change the front pipe on Daffo and will report in the spare / modified rad cap in due course.
 
Waterless coolant is another option but the system has to be THOROUGHLY flushed and its really not worth the cost unless you have a new radiator as well.
There are some very strong arguments that this stuff is a really bad idea for your engine. Mainly along the lines of if something goes wrong then you wont know. If the current colling system works properly then there is no issue, and if it does go wrong they you can normally tell by steam or puddles of water.

Anyway, bleeding, when doing mine, citroen have a special custom part of a tall bottle designed to fit on to the header tank. I made similar to you Jock:

coolant.jpg
 
Back
Top