Ok...So we want to tint/smoke/black out our rear light!?!
Well hopefully this guide will help you get the job done; i know when i was thinking about doing it i used the search tool and only found pictures of before/ after pics, and a little explanation on how to do this; so i thought i would take picture of me doing it and then post it for others to hopefully use.
*Please any useful comments/ hints and tips from others would be great*
Now i have heard different ways to go about tinting your rear light e.g. black tights, black spray, window tint film etc etc; but for this guide I’m focusing on using a pre-made 'Tint Spray' - these are widely available on auction sites, with the two main products being the 'E-Tech' spray, and the 'Savage' spray - both do the same job i guess, except with savage you get a 400ml can, compared to a 150ml can with e-Tech. these sprays are about £10 on average but shop about to find a good price.
Ok, so once you have bought your spray we can move on to prepping...
Prepping
Ok to start i would recomend doing this on a decent day with minimal wind/rain for spraying - or you can happily do this in a garage or somewhere.
What you will need*:
- Tint spray
- Newspaper/dust sheet etc
- Screw driver (Philips head)
- Bin bag/paper
- masking tape or other tape
- space to work in.
Now that everything is together we can continue with prep work...
Prepping cont...
I have taken a few pics of my seicento before starting, so the difference can be seen before/ after.


So screw driver in hand head out to your car, open the boot so that you can access the two screws holding the lights in place.
you might need to lift the boot seal up to get to it but they are pretty easy to get to.
Just unscrew each crew (2 for each light) and then tease the light out by lifting it up a little and giving it a pull - they come out easy enough.
Next you will see the electrical wiring that is connected to the lights
View attachment 75875
This is removed by just nipping it together and pulling - again it should come off easily enough.
now your lights are off your car you need to look at the back of them, and find two red clip type of things holding the actual light board in place.
View attachment 75876
just un-clip both and the lights will come out (remember which one cam from which, i left them in my boot on same side they came from). Also remember not to lose any parts, i.e screws, keep them safe.
View attachment 75877
now your left with your lights to spray, and gaps in your car where the lights came from.

Its up to you, but i decided to cover these wee holes as the weather looked a bit dodgy that day, and i didnt want some kids stuffing them with crisp wrappers and stuff.
I cut to size some bin liners, and masked them up over these holes so they were slightly weather reistant and wouldnt attract anyone to them.

Now thats done, close your boot, lock up and head back inside.
Cleaning
Right now you might want to rush ahead and start spraying, but if like you and you dont clean your car every day! then your going to have a build-up of dirt and grime which would spoil your hard work to come(not really hard
") )
)Fill a bucket, sink, bath etc with hot soapy water and give those lights a soak.

Now get a cloth and give them a nice clean, removing any grease and dirt build ups on the lights so that you will have a smoother finish.
Rinse the lights well to get all soap of, drain off excess water and rather that towel dry (as that might leave fibres behind) leave out in the sun, or on a washing line to dry out - i put mine in the sun on a wheelie bin and they dried out quick enough.
starting to spray
[/SIZE][/FONT][/FONT][/COLOR]
Ok, while those lights are drying off, prep your area to spray in if needed - i just lay lots of newspaper on the floor in my kitchen, opened all windows and doors to vent out those solvents.
Get your now dried lights and you can start*
View attachment 75873
The 'Savage' spray i used gave instructions as to use "2 light coats...", however i know of others using far more and still maintaining a legal limit of light being emitted - and i also used mroe than stated; so make your mind up as you go along as to what looks good and if you want it darker or lighter.
View attachment 75885
Before a sprayed i gave the can a good shake, and warmed it up as i have heard this gives a more even coat, and done this by dipping it into warmed water for a few mins.

Next layers...
Ok, while those lights are drying off, prep your area to spray in if needed - i just lay lots of newspaper on the floor in my kitchen, opened all windows and doors to vent out those solvents.
Get your now dried lights and you can start*
* As this stage some people have talked about giving the lights a light sanding with dry/wet paper and another rinse so they are smoother for spraying, also some people have sanded of the part number/details located on the top to help with this. - i didn’t find a need for this, but maybe a good idea if your lights are scratched and scuffed.
Here is a picture of cleaned lights before spray:View attachment 75873
The 'Savage' spray i used gave instructions as to use "2 light coats...", however i know of others using far more and still maintaining a legal limit of light being emitted - and i also used mroe than stated; so make your mind up as you go along as to what looks good and if you want it darker or lighter.
View attachment 75885
Before a sprayed i gave the can a good shake, and warmed it up as i have heard this gives a more even coat, and done this by dipping it into warmed water for a few mins.
Next layers...
Layers
[/COLOR][/SIZE][/FONT][/FONT][/COLOR]
So as i mentioned the spray says to use 2 coats, however after applying to really light coats i could see i would need more to get the effect i wanted. remember to leave about 15 mins between coats to give it time to set well. (i used time in garden and had cooker timer on so i knew when to apply next coat)
Here is light with 2 light coats:

As you can see there is not a drastic difference, now 3 light coats:

getting there but still not much black.
here is before and after 3 coats:
View attachment 75873
I continued with a further 2 coats that i applied a bit heavier to get the effect i wanted without going too far.
Next the end product...
So as i mentioned the spray says to use 2 coats, however after applying to really light coats i could see i would need more to get the effect i wanted. remember to leave about 15 mins between coats to give it time to set well. (i used time in garden and had cooker timer on so i knew when to apply next coat)
Here is light with 2 light coats:
As you can see there is not a drastic difference, now 3 light coats:
getting there but still not much black.
here is before and after 3 coats:
View attachment 75873
I continued with a further 2 coats that i applied a bit heavier to get the effect i wanted without going too far.
Next the end product...
Finished
[/COLOR][/SIZE][/FONT][/FONT][/COLOR]
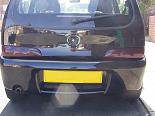
Ok so you have your level of darkness you want, simply put lights back together, and fit to your car again.
As i mentioned at the start i had a can of clear laquer to use, but i wanted to test the matt look first so no laquer has been added yet.

View attachment 75889
You can see the matt effect clearly in this picture:

I like the matt effect, but think i will add the laquer next week, and will add pics of it when done.
So thats it really, simple job that takes a half a day at the most, and gives a good affect to your car when done.
Hope this helps.
Before:

After:

Ok so you have your level of darkness you want, simply put lights back together, and fit to your car again.
As i mentioned at the start i had a can of clear laquer to use, but i wanted to test the matt look first so no laquer has been added yet.
View attachment 75889
You can see the matt effect clearly in this picture:
I like the matt effect, but think i will add the laquer next week, and will add pics of it when done.
So thats it really, simple job that takes a half a day at the most, and gives a good affect to your car when done.
Hope this helps.
Before:
After: