


Introduction
Hi there guys
Note been here for a while, but back in the Uno fold!
So, here is what i brought, a Uno 60 with a Punto GT engine conversion.
I wasn't really looking for an Uno again, however this was absoultey mint! Never seen a welder, been waxoled religiously, was just too good to pass up...
Anyway, here are a few of pics of from the previous owner.
Pre conversion
 17436277_10155175486061133_4067005824794538346_o
 17505291_10155175486056133_4403625514477524486_o
and a pic of the engine and conversion, nice low mile 33k engine and box from a crashed GT.
 33k miles
Few pics showing how clean the chassis leg's were!
 17545151_10155202021251133_9017383826645831261_o
 17546709_10155202021271133_6284075121915445096_o
And a few of the conversion parts
Turbo Loom
 17620464_10155201643396133_4410026011063445848_o
Turbo rack and brake servo
 18700503_10155380928311133_6638692855718458288_o
 17855263_10155236761556133_5650748184055805630_o
GT Brakes and Turbo Hubs
 20915246_10155697191151133_5836332418976815106_n
 21231073_10155750781666133_5455011764000393731_n
 29790695_10156399968121133_5956662486089564548_n
New valve guides and stem seals
 35345776_10156602637951133_1324371981973323776_n
And a few of the pics of how i brought it..
 IMG_4290
 IMG_4288
 IMG_4289
 IMG_4291
When i brought it, it had a few issues i wanted to sort, firstly a really unstable idle, and a few bits that i wanted to re-do to my spec. Firstly the fuel system...
This was how it come
 IMG_4374
 IMG_4350
Firstly, i got a Metal Mk2 Uno Turbo fuel rail rather than the plastic GT one.
 IMG_4380
 IMG_4372
So, cut off the fittings and TIG welded some AN6 Fittings on
 IMG_4381
 IMG_4445
I also changed out all the lines to 8mm nylon front to back
 IMG_4457
Next i needed to make up a mount for the FPR
 IMG_4450
 IMG_4452
Next up made up the lines and fitted
 IMG_4462
 IMG_4862
 IMG_4864
 IMG_4778
At the fuel tank end i replaced the original turbo tank with a baffled tank. The days of an undertank fuel pump are gone what with the invent of high flowing in-tank pumps
Old tank
 IMG_4569
Old vs new pump
 IMG_4570
And fitted
 IMG_4587
Next up was sorting a pet hate of mine, bad wiring...
Stuff like this
 IMG_4373
 IMG_4377
 IMG_4376
A few before and afters:
 IMG_4389
 IMG_4388
and after
 IMG_4392
Drivers side
Before
 IMG_4446
After
 IMG_4447
Next up was the engine loom, i wanted to clean up the engine bay, move the ECU and relays into the car and make it look clearner
Here was the loom before
 IMG_4395
 IMG_4396
Making a template of the original loom
 IMG_4478
Mid making
All new wires
 IMG_4482 (Medium)
And done, lovely MIL spec connectors
 IMG_4624
 IMG_4625
 IMG_4626
ECU, Relays, Fuses, and Bar sensor moved into the car.
This was the location when i brought the car.
 21231651_10155750779106133_4228195100090642726_n
And after, tucked under the dash.
 IMG_4610
 IMG_4611
 IMG_4612
Sorted a few other bits such as this massive leak..
 IMG_4384
And cut and welded smooth
 IMG_4387
Also fitted central locking
 IMG_4645
 IMG_4650
 IMG_4646
Next up was sorting the lack of any kind of ducting on the intercooler and oil cooler, seen the difference a well ducted design could make on my Supra so figured i would fabricate some up.
Before, you can see the gaps all around where the air would escape
 IMG_4659
 IMG_4660
TIG'd up some ducts from aluminium
 IMG_4667
 IMG_4669
 IMG_4668
Oil cooler
 IMG_4688
 IMG_4685
New ducts and stainless hardware
 IMG_4689
 IMG_4691
 IMG_4690
 IMG_4693
Much better, now the cooler will do something!
 IMG_4779
Next up i wanted to make an AFM mount as it was just floating about, so...
 IMG_4707
Picks up on original mounts
 IMG_4709
Also made up a cable mount
 IMG_4714
Also TIG'd up some new boost pipes to replace the original mishmash, also changed the filter to a stock air filter housing
Before
 IMG_4288
Making the new pipes up
 IMG_4698
ICV Spout
 IMG_4700
Swage the ends
 IMG_4703
 IMG_4701
Fitted and done
 IMG_4705
 IMG_4706
 IMG_4771
 IMG_4775
 IMG_4778
 IMG_4777
Last job was fitting a light grill i got from italy along with Mk2 Sideskirts
 IMG_4718
Next a nice simple thing, getting rid of my old knob as it was a bit blue for me..
 IMG_5249
Nice little carbon number to replace it
 IMG_5251
Next up was to put a proper Turbo boot on, this is the one that come with the car, looked great but prefered the turbo look
 IMG_5385
Weight of the stock metal boot
 IMG_5387
Weight of the new fibreglass turbo boot
 IMG_5388
And fitted
 IMG_5389
 IMG_5403
Much better!
Next up was fitting my new boost controller, using the original clock location
 IMG_5404
 IMG_5407
 IMG_5410
Perfect fit!
I still wanted the original digital dash boost gauge to work, so i used the original MAP from the Uno Turbo ECu with a 5V step down power source mounted to the back of the clocks
 IMG_5455
Cut down
 IMG_5456
And fitted
 IMG_5482
 IMG_5483
Next thing to replace was the original black carpet with a red turbo item
 IMG_5437
Stripped out and cleaned the floor and protected
 IMG_5438
 IMG_5440
 IMG_5441
 IMG_5443
 IMG_5445
 IMG_5446
Above you can see the original sills, the previous owner regularly waxoyld it and you can tell... no rust!
Now thats a carpet!
 777B7CDF-CDB2-4ADE-AE3A-96D24E52882F
While fitting the carpet i decided to add the turbo door and rear cards along with electric windows.
This is how the cards were before...
 IMG_5562
First up was putting relays in each door, made up a little aluminium mount
 IMG_5586
All fitted and wired up
 IMG_5559
Turbo door cards, electric motors and rear cards fitted
 IMG_5594
 IMG_5597
 IMG_5596
 IMG_5598
 IMG_5599
And also fit my new clutch slave as the old one started leaking.. new braided stainless line too...
 IMG_5535
 IMG_5538
 IMG_5471
First the Speedo stopped working! Looks like the original Sharp optical sensor had started to break down
 IMG_5613
So replaced with a modern sensor, was very tricky!
 image1
Next up was a wheel change, got some Strada 14" Speedlines
 IMG_5876
 IMG_5875
This is how they come back
 CF8F002E-745E-4518-938B-E3B708DCDA21
 IMG_6094
Next up was to change the rad, i want a 50/50 split with the intercooler. I looked at a few options but in the end went with a 4 core 60mm thick Civic radiator.
So, here goes...
Stock rad
 IMG_5946
As the radiator was rotated 90 degrees i needed to split the radiator flow path, so gap cut
 IMG_5975
Plate slid into the gap
 IMG_5976
Welded up
 IMG_5980
Temp switch bung welded in
 DF934471-16FE-4D3E-80BD-D6D6CB60A458
Mount added to top to connect to slam pannel
 BCEBC23B-880A-44EB-B9C1-AAC557611DE2
Bottom rad hose fits perfect
 IMG_5991
Top rad hose needs some work
 IMG_5992
Made a custom top alloy rad hose and added an outlet to the top of the rad
 IMG_6123
As the rad was moved right to the passenger side i needed some very small trimming and wanted to push all the air through the rad
Trimmed up
 IMG_5993
TIG welded in place
 IMG_5998
ground back
 IMG_5997
Primered
 IMG_6002
and painted
 IMG_6018
Radiator wiring done, all contained so a direct plug in connection
 IMG_6116
And all completed!
 IMG_6136
 IMG_6133
 IMG_6132
 IMG_6131
Here you can see the area left for the intercooler
 IMG_6139
Last mod was a little anti social...
Welded a T into the downpipe
 IMG_6049
Welded in
 IMG_6058
and fitted
 IMG_6061
And done
 thumbnail_image2
 thumbnail_image1
First up was changing the rear bumper to a nice Mk2 one..

Then i had to take a look at the brakes, they were pulling to one side and really needed a stomp to get them to work...
Soon found out why! Pad's were welded in place with rust!
 IMG_6359
 IMG_6363
Stripped the brakes off cleaner re-painted and new pads
 IMG_6358
Much better
 IMG_6403
Then i fabricated a new clutch pot as the old ones look nasty
Old
 IMG_6341
New with AN4 Lines
 IMG_6353
 IMG_6354
Next up i wanted to improve the OE airbox as the pipe sizes are tiny and i will eventually be doubling the power
So fabricated this alloy case and s2000 paper filter with ducted inlet from behind the light. This way i get lots of cool fresh air and it allows the engine to breath
 IMG_6453
Here you can see the large 3" inlet pipe to the sealed airbox, little perspex window is to make sure nothing gets trapped in the box, 4 bolts allow quick removal and changing of the filter. This
all fits in the stock battery tray so no mods to the shell needed.
 IMG_7195
So with the new airbox in place i now had to find somewhere to fit a battrey. Didn't want it miles away in the boot and no way was i mounting it inside the car. A few years ago a cell went down in
an old car i had and started pumping acid into the cabin of the car... not a great experience...
So here is where the batt was, where the air filter now lives..
 IMG_7078
Then i thought, there is some space below the battery tray!
So...
Here is the replacment
 IMG_7073
 IMG_7072
New mount i made
 IMG_6857
 IMG_6859
New location
 IMG_6861
 IMG_6862
painted and foam to protect the batt
 IMG_7070
 IMG_7071
In place
 IMG_7075
And new leads fitted!
The leads are all stock Jaguar parts for the battery and required no mods, i also get the benifit of a fuse which the Uno never had. The only change was crimping new terminals onto the Uno starter
leads
Looks OE too
 IMG_7071
 IMG_7077
So next up i wanted to make a bonnet lifter rather than using the stay all the time
Simple plate that slides into the reinforced section of bonnet to spread the load
 IMG_7008
Then a mount bolts onto that
 IMG_7010
Here you can see the parts
 IMG_7003
The long part bolts in the original airbox mount holes so no holes need to be drilled
The ram is from a Mk4 Golf Bonnet
 IMG_7012
Another small mod was finishing the rad setup, i had made a temp top hose out of alloy
 IMG_7080
Howver my new AN20 fittings arrived so i welded threaded bungs onto the rad and thermostat and made the new hose
Big!
 IMG_6584
 IMG_7125
 IMG_7127
With the theme of AN fittings i also wanted to make a catch can
So made this tank, here is the inside showing the deflection plates and twin filters
 IMG_6778
Fitting welded to the original breather
 IMG_6781
Bolts where to the OE air box went so no holes (theme starting here lol)
You can see the drain at the base
 IMG_7011
Made the lines
 IMG_7189
 IMG_7191
 IMG_7190
Next on the list is the header tank, hate the big plastic OE one shown here
 IMG_6453
So been trying to learn some CAD, made these 2 files over a few evenings
 IMG_6570
 IMG_6612
Sent them off to a chap with a 5Axis CNC Machine
And these come back
 IMG_6822
Fabricated a tank and welded it all up with AN fittings
 IMG_6845
 IMG_6846
 IMG_7079
Last item which is still a work in process is the inlet manifold
Currently my car has the stock Mk2/PGT type
Here is an old pic:
 IMG_6131
So, i wanted the better looking Mk1 Manifold but they have a really old odd fuel injector setup, also no spot for a ICV and just need modernising in gerneral
So a stock old Mk1 Manifold
 IMG_6366
Here you can see the old style angled injector mounts
 IMG_6367
First job was to smooth them out and remove the old mounts
 IMG_6406
Both sides done
 IMG_6407
Next i tackled the throttle itself. It has no location for a Punto GT TPS and with my future power goals i decided to go for a 57mm (i think) Coupe 20V Turbo throttle body
So, cut off the original
Here you can see the coupe size vs stock!
 IMG_6409
 IMG_6466
Needs a bit more taking off the stock manifold
 IMG_6467
Machined some more out
 IMG_6469
 IMG_6471
Then welded the new coupe TB flange and also new injector bungs for modern style injectors
 IMG_7103
 IMG_7113
Started mocking up the rail also, needed some more work to get it bang level but needed to get the holes in place first
 IMG_7128
Next up was the throttle cable, needed a new mount for it and i also wanted to suppot the inlet manifold like stock
Made this mount
 IMG_7187
Goes here
 IMG_7192
and has a step for supporting the manifold
 IMG_7193
Test fit
 IMG_7179
Quite a bit still to do on the manifold but nearly there... The reason the TPS is facing up is due to the ICV height. Normally the ICV would be straight up but there is no space under the bonnet
hence the TB rotation.
Right next up was adding the PGT Heatshield to the Mk1 manifold
 IMG_7209
 IMG_7210
 IMG_7213
That should help
 IMG_7214
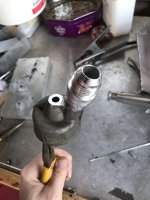
Next drilled and tapped the servo fititng to take an AN fitting
 IMG_7243
 IMG_7244
And test fitted the fuel rail mounts i had designed, these pick up on the original inlet manifold
 IMG_7352
 IMG_7398
Also designed a new rocker cover
 IMG_7399
All that was left was to paint everything up and refit!
 IMG_7460
 IMG_7464
 IMG_7465
 IMG_7466
 IMG_7467
 652486C4-C40C-4300-8FEC-9021A35FD379
 IMG_7470
 IMG_7471
All was going well!
Then...
 IMG_7580
 IMG_7591
Seems when the previous owner changed the headgasket the front row of bolts were either left loose or backed off! The bolts were spinning when i removed them!
New Payne Gasket and Bolts
 IMG_7660
Also took the checked the cam while it was all apart, and it seems one of the lobes were worn
 IMG_7633
So i purchased a new Kent Fast Road Cam!
 117715408_1184049468637512_2615549677328085204_n
 117644035_618733512107272_4780055688313382112_n
Clearances
 117818616_343312560169637_4734051037393991324_n
Meausring old shims
 IMG_7654
Working out shim sizes
 117843743_349823576419308_4090216532369945941_n
New cam in and covered in assembly lube
 117744902_921643884998886_8818175929095699843_n
Engine was really clean!
 IMG_7659
All back togther
 IMG_7466
Back to daily duties!
 IMG_7692
 IMG_7691
Note been here for a while, but back in the Uno fold!
So, here is what i brought, a Uno 60 with a Punto GT engine conversion.
I wasn't really looking for an Uno again, however this was absoultey mint! Never seen a welder, been waxoled religiously, was just too good to pass up...
Anyway, here are a few of pics of from the previous owner.
Pre conversion
and a pic of the engine and conversion, nice low mile 33k engine and box from a crashed GT.
Few pics showing how clean the chassis leg's were!
And a few of the conversion parts
Turbo Loom
Turbo rack and brake servo
GT Brakes and Turbo Hubs
New valve guides and stem seals
And a few of the pics of how i brought it..
When i brought it, it had a few issues i wanted to sort, firstly a really unstable idle, and a few bits that i wanted to re-do to my spec. Firstly the fuel system...
This was how it come
Firstly, i got a Metal Mk2 Uno Turbo fuel rail rather than the plastic GT one.
So, cut off the fittings and TIG welded some AN6 Fittings on
I also changed out all the lines to 8mm nylon front to back
Next i needed to make up a mount for the FPR
Next up made up the lines and fitted
At the fuel tank end i replaced the original turbo tank with a baffled tank. The days of an undertank fuel pump are gone what with the invent of high flowing in-tank pumps
Old tank
Old vs new pump
And fitted
Next up was sorting a pet hate of mine, bad wiring...
Stuff like this
A few before and afters:
and after
Drivers side
Before
After
Next up was the engine loom, i wanted to clean up the engine bay, move the ECU and relays into the car and make it look clearner
Here was the loom before
Making a template of the original loom
Mid making
All new wires
And done, lovely MIL spec connectors
ECU, Relays, Fuses, and Bar sensor moved into the car.
This was the location when i brought the car.
And after, tucked under the dash.
Sorted a few other bits such as this massive leak..
And cut and welded smooth
Also fitted central locking
Next up was sorting the lack of any kind of ducting on the intercooler and oil cooler, seen the difference a well ducted design could make on my Supra so figured i would fabricate some up.
Before, you can see the gaps all around where the air would escape
TIG'd up some ducts from aluminium
Oil cooler
New ducts and stainless hardware
Much better, now the cooler will do something!
Next up i wanted to make an AFM mount as it was just floating about, so...
Picks up on original mounts
Also made up a cable mount
Also TIG'd up some new boost pipes to replace the original mishmash, also changed the filter to a stock air filter housing
Before
Making the new pipes up
ICV Spout
Swage the ends
Fitted and done
Last job was fitting a light grill i got from italy along with Mk2 Sideskirts
Next a nice simple thing, getting rid of my old knob as it was a bit blue for me..
Nice little carbon number to replace it
Next up was to put a proper Turbo boot on, this is the one that come with the car, looked great but prefered the turbo look
Weight of the stock metal boot
Weight of the new fibreglass turbo boot
And fitted
Much better!
Next up was fitting my new boost controller, using the original clock location
Perfect fit!
I still wanted the original digital dash boost gauge to work, so i used the original MAP from the Uno Turbo ECu with a 5V step down power source mounted to the back of the clocks
Cut down
And fitted
Next thing to replace was the original black carpet with a red turbo item
Stripped out and cleaned the floor and protected
Above you can see the original sills, the previous owner regularly waxoyld it and you can tell... no rust!
Now thats a carpet!
While fitting the carpet i decided to add the turbo door and rear cards along with electric windows.
This is how the cards were before...
First up was putting relays in each door, made up a little aluminium mount
All fitted and wired up
Turbo door cards, electric motors and rear cards fitted
And also fit my new clutch slave as the old one started leaking.. new braided stainless line too...
First the Speedo stopped working! Looks like the original Sharp optical sensor had started to break down
So replaced with a modern sensor, was very tricky!
Next up was a wheel change, got some Strada 14" Speedlines
This is how they come back
Next up was to change the rad, i want a 50/50 split with the intercooler. I looked at a few options but in the end went with a 4 core 60mm thick Civic radiator.
So, here goes...
Stock rad
As the radiator was rotated 90 degrees i needed to split the radiator flow path, so gap cut
Plate slid into the gap
Welded up
Temp switch bung welded in
Mount added to top to connect to slam pannel
Bottom rad hose fits perfect
Top rad hose needs some work
Made a custom top alloy rad hose and added an outlet to the top of the rad
As the rad was moved right to the passenger side i needed some very small trimming and wanted to push all the air through the rad
Trimmed up
TIG welded in place
ground back
Primered
and painted
Radiator wiring done, all contained so a direct plug in connection
And all completed!
Here you can see the area left for the intercooler
Last mod was a little anti social...
Welded a T into the downpipe
Welded in
and fitted
And done
First up was changing the rear bumper to a nice Mk2 one..
Then i had to take a look at the brakes, they were pulling to one side and really needed a stomp to get them to work...
Soon found out why! Pad's were welded in place with rust!
Stripped the brakes off cleaner re-painted and new pads
Much better
Then i fabricated a new clutch pot as the old ones look nasty
Old
New with AN4 Lines
Next up i wanted to improve the OE airbox as the pipe sizes are tiny and i will eventually be doubling the power
So fabricated this alloy case and s2000 paper filter with ducted inlet from behind the light. This way i get lots of cool fresh air and it allows the engine to breath
Here you can see the large 3" inlet pipe to the sealed airbox, little perspex window is to make sure nothing gets trapped in the box, 4 bolts allow quick removal and changing of the filter. This
all fits in the stock battery tray so no mods to the shell needed.
So with the new airbox in place i now had to find somewhere to fit a battrey. Didn't want it miles away in the boot and no way was i mounting it inside the car. A few years ago a cell went down in
an old car i had and started pumping acid into the cabin of the car... not a great experience...
So here is where the batt was, where the air filter now lives..
Then i thought, there is some space below the battery tray!
So...
Here is the replacment
New mount i made
New location
painted and foam to protect the batt
In place
And new leads fitted!
The leads are all stock Jaguar parts for the battery and required no mods, i also get the benifit of a fuse which the Uno never had. The only change was crimping new terminals onto the Uno starter
leads
Looks OE too
So next up i wanted to make a bonnet lifter rather than using the stay all the time
Simple plate that slides into the reinforced section of bonnet to spread the load
Then a mount bolts onto that
Here you can see the parts
The long part bolts in the original airbox mount holes so no holes need to be drilled
The ram is from a Mk4 Golf Bonnet
Another small mod was finishing the rad setup, i had made a temp top hose out of alloy
Howver my new AN20 fittings arrived so i welded threaded bungs onto the rad and thermostat and made the new hose
Big!
With the theme of AN fittings i also wanted to make a catch can
So made this tank, here is the inside showing the deflection plates and twin filters
Fitting welded to the original breather
Bolts where to the OE air box went so no holes (theme starting here lol)
You can see the drain at the base
Made the lines
Next on the list is the header tank, hate the big plastic OE one shown here
So been trying to learn some CAD, made these 2 files over a few evenings
Sent them off to a chap with a 5Axis CNC Machine
And these come back
Fabricated a tank and welded it all up with AN fittings
Last item which is still a work in process is the inlet manifold
Currently my car has the stock Mk2/PGT type
Here is an old pic:
So, i wanted the better looking Mk1 Manifold but they have a really old odd fuel injector setup, also no spot for a ICV and just need modernising in gerneral
So a stock old Mk1 Manifold
Here you can see the old style angled injector mounts
First job was to smooth them out and remove the old mounts
Both sides done
Next i tackled the throttle itself. It has no location for a Punto GT TPS and with my future power goals i decided to go for a 57mm (i think) Coupe 20V Turbo throttle body
So, cut off the original
Here you can see the coupe size vs stock!
Needs a bit more taking off the stock manifold
Machined some more out
Then welded the new coupe TB flange and also new injector bungs for modern style injectors
Started mocking up the rail also, needed some more work to get it bang level but needed to get the holes in place first
Next up was the throttle cable, needed a new mount for it and i also wanted to suppot the inlet manifold like stock
Made this mount
Goes here
and has a step for supporting the manifold
Test fit
Quite a bit still to do on the manifold but nearly there... The reason the TPS is facing up is due to the ICV height. Normally the ICV would be straight up but there is no space under the bonnet
hence the TB rotation.
Right next up was adding the PGT Heatshield to the Mk1 manifold
That should help
Next drilled and tapped the servo fititng to take an AN fitting
And test fitted the fuel rail mounts i had designed, these pick up on the original inlet manifold
Also designed a new rocker cover
All that was left was to paint everything up and refit!
All was going well!
Then...
Seems when the previous owner changed the headgasket the front row of bolts were either left loose or backed off! The bolts were spinning when i removed them!
New Payne Gasket and Bolts
Also took the checked the cam while it was all apart, and it seems one of the lobes were worn
So i purchased a new Kent Fast Road Cam!
Clearances
Meausring old shims
Working out shim sizes
New cam in and covered in assembly lube
Engine was really clean!
All back togther
Back to daily duties!
