Technical Timing belt 1.2 FIRE 8V 2004 (EVO 1)

Currently reading:
Technical Timing belt 1.2 FIRE 8V 2004 (EVO 1)

Joined
Oct 25, 2018
Messages
1,766
Points
666
Location
West Clare
Hello! Preparing to change my timing belt soon, been reading up but I'm a bit confused...
...varesecrazy's guide looks nice and easy but is 1.1, Andy Monty & Jock refer to EVO2

I have the old square oil filler 1.2 (is that EVO1?), air-con, separate coolant expansion tank, cable throttle

Engine number 55192459.

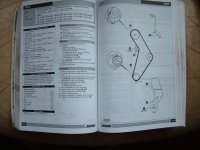
I've had a look at this guide:
cam locking tool.jpg
I've 'assisted' a couple of timing belt & chain changes before, this is my first time flying solo...

I want to do it right, but would also like to keep it as simple as possible :)

My question is: can I just make timing marks and replace the tensioner and belt, or do I need to set TDC and get this tool to lock the cam?

Thanks!
 
Last edited:
Yes you are suppose to use a locking tool on the rear of the camshaft 2.000.004.000 not the normal one

You are suppose to set piston at top dead centre with a dial gauge


Tensioner is the type with the built in gauge, just line up the little prongs and you are good to go


Far simpler and quicker to make your own timing marks

Theres a good chance the pulley still have the old timing marks on them, which would make transfering and making your own marks simpler
 
Last edited:
Yes you are suppose to use a locking tool on the rear of the camshaft 2.000.004.000 not the normal one

You are suppose to set piston at top dead centre with a dial gauge


Tensioner is the type with the built in gauge, just line up the little prongs and you are good to go


Far simpler and quicker to make your own timing marks
So is that the more accurate method and is the AutoData manual wrong, this is a genuine query.
I have always relied on it, but I know there can be occasional mistakes in data.:)
 
I don't bother

It's my labour

I can do these in about half an hour now if needed

Not had a water pump fail even with 2x at 200,000 miles

Have had a couple of core plugs fail, it can be changed, just without removing the belt again anyhow

First one took several hours mainly checking and double checking, I do remember have trouble removing one of the engine mounts bolts, until I realise if you can lower or raise the engine until it slides into to hole opposite

There is a good video on a ford Ka I believe,.yes it vvt but doesn't alter the process done with the tipex,. couldn't find it again a few months ago, see if I can dig it out
 
All the videos seem to be missing a step

You are suppose to tighten the tension to maximum first, two crank revolutions, to set the teeth properly, then set the tension properly


If you mark the belt, pulley and crankcase, then transfer the marks to the new belt, it's almost impossible to get it wrong

Weight need spreading under the sump with a plank of wood or similar, it fairly easy to dint
 
Thank you Txuchin :)
Happily mine looks easier, earlier version (shall we call it EVO 1? I want to call it EVO 1)
But good to see rocker cover stays in place, and timing marks applied.

OK, feeling confident about it now :)
Jock's guide warned me one of those engine mount bolts in the block is tricky for access.

Interestingly different timing marks used for the crank in those two videos (500 on left, Panda right), although both show VVT 1.2:unsure:
Screenshot 2025-07-17 1051.jpgScreenshot 2025-07-17 1052.jpg
Will be fascinating to see what timing marks I find on mine
 
Last edited:
Not had a water pump fail even with 2x at 200,000 miles
Good to know, thank you :)
I think I'll leave the rocker cover gasket and water pump for next time, keep things simple for my first go...

...I'm guessing removing the water pump makes replacing that fiddly steel coolant pipe easier?
I keep smearing the pipe with oil or grease and it seems OK, but it was rusty before I got to it.
 
.I'm guessing removing the water pump makes replacing that fiddly steel coolant pipe easier?


Pipe in the block from one side and the pump is in from the other

I can't see it makes any difference, unless I am missing something obvious, which I normally do


The 10mm headed bolts on the heat shield can be a real pain, I don't bother with a 10mm socket I just hammer on an imperial socket

25/65 if it's not too bad 9.921mm
3/8 if the head had deteriorated badly 9.525mm

They are only M8 normally at least one snaps off for me, But they now come out easy with a blowtorch and vice grips

What you don't want to do is round the head, your then in a world of pain
 
Pipe in the block from one side and the pump is in from the other

I can't see it makes any difference, unless I am missing something obvious, which I normally do
No I'm sure you're right. I haven't had a proper look at it, just wrongly assuming they were somehow connected.

I don't ever want to touch the heat shield studs, the state of them on my car.

I'll just keep liberally smearing everything I can find in grease :)

I wonder if it'll make the tyres last longer and stop the front seats from fraying
 
Back
Top