I did mine one winters evening..I'm hoping I won't need to change handbrake cables. I imagine its quite difficult!")
Not an awful job


I did mine one winters evening..I'm hoping I won't need to change handbrake cables. I imagine its quite difficult!
I did mine one winters evening..
Not an awful job


Some good pointers in this thread

Grande Punto - Grande Punto Handbrake
This thread is for the general discussion of the Guide Grande Punto Handbrake. Please add to the discussion here. Andi9386 submitted a new guide: Grande Punto Handbrake Replacing the Handbrake cable on a Grande Punto Tools needed: Trolley Jack Axle Stands 13mm Socket 17mm Socket (for your...www.fiatforum.com
As per my comment in the thread, I changed mine in a couple of hours after driving home,
Ok, but now... in your position...
I would raise both sides
( if parked on the level, just leaving in 1st gear is enough to stop any movement)
Obviously chock a front wheel if you are concerned,
I always put the removed wheel under the sill, so if Anything fails..
Jack, Mounting Point, Axle stand, etc
It means there is still @6 inches of car off the ground
Better for your legs And space to introduce another Jack (or airbag)
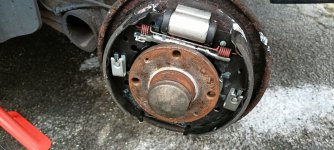
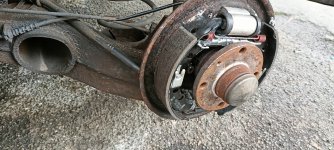
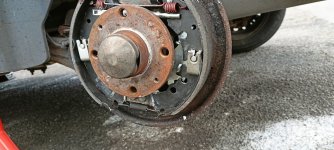
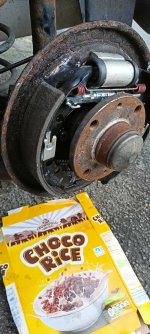
Once safely up with both rear wheels off
Strip the rear brakes
undo the Handbrake barrel nut
Remove the 'horseshoe' cable support
Then at the hub end.. Pull the cable through as far as it will go
Should have @25cm of cable hanging out..
Do same Left and Right
One much stiffer?
At this point:
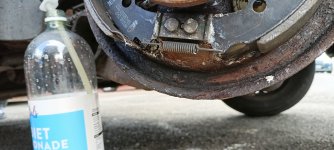
Wipe the cable, and squirt WD40 type light lubricant on the first 10cm that will normally be hidden inside.. Both cables
Now back in the cabin:
Pull both cables back through.. Any changes?
This will guide your next move..
If one is free running and one really stiff, chances are that is junk and needs replacing
My 15 year old 120k cables had the outer so corroded it had swollen and was pinching the inner
I bought new as they were £15 + £17 and the car was transformed
Other punto got them lubricated, similar effect
Just Do Not oil next to the shoes..
Leave the end 10 cm dry
The best I could find is the thread below. I have some left over plastic/fibre glass glue from doing the bumper so I can use that and another 'thing' yet to be determined.Broken stub.. Common issue
SEARCH 500 thread for the repair options
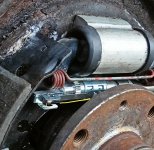
lolThe new brake adjuster is arriving some time today, I bought a spare just in case
I couldn't install it fully extended. It looked to be the same size and shape.Www.shop4parts
Don't sell crap
I'm concerned that you could fit an auto adjuster fully extended and still get the drum on clearly incorrect part.
Any replacement part must be the same as original fiat part
Please be careful, just because ebay seller says something fits does not mean it does
Is it possible n/s adjuster on o/s? Or even shoes upside down, it's amazing what I have seen when working on cars, even a "repair" section of metal pipe soldered in to repair a rusted brake pipe, that was when inspecting a Bond Bug for a customer interested in buying, from yet another dodgy car dealer.I couldn't install it fully extended. It looked to be the same size and shape.
I adjusted it to 3 or 4 threads so it was slightly scraping on the drums but then it wouldn't tighten any further. I've had zero clicks out of the adjuster and think it should have done at least a few.

I can get a flat head screwdriver and push upwards to make it click manually and tighten, so it kind of works, but as those brakes wear down then it won't self tighten.The flat strip underlined in yellow should NOT be able to stop the toothed wheel turning.
Could just be Camera angle I can't tell
I can get a flat head screwdriver and push upwards to make it click manually and tighten, so it kind of works, but as those brakes wear down then it won't self tighten.
Perhaps @AnthonyH can work the spare adjuster in his hands off the car to see better how it operates.Play with your spare adjuster , press each end of the adjuster toward each other.see the curved strip curve more.
Relax the pressure pushing ends together see how the tooth in the centre of the curved metal strip turns the adjuster wheel one or two teeth at a time when the curved strip straightens slightly
.I have just been playing with the broken one I took off and after squeezing it together I can see how the mechanism works, I was surprised at how it moved, now I know this I can get the one on the car off and see if it is clicking properly.Play with your spare adjuster , press each end of the adjuster toward each other.see the curved strip curve more.
Relax the pressure pushing ends together see how the tooth in the centre of the curved metal strip turns the adjuster wheel one or two teeth at a time when the curved strip straightens slightly
I will give this a go, I can imagine this adjuster might work if I know the trick.Perhaps @AnthonyH can work the spare adjuster in his hands off the car to see better how it operates.
My other suggestion assuming the new parts work easily, especially on the threads, is to place a screwdriver in the space between the wheel cylinder and the brake shoe at the adjuster end of the bar, rest it against the hub as a pivot point and gentle ease the shoe outwards as though the wheel cylinder piston was pushing it to see if it actuates the adjuster and winds/adjusts the threaded bar.
You may need to watch the other shoe doesn't move to far and remember you are only checking that the adjuster does work as when piston pushes the brake shoe, also don't get carried away and push the piston out