- Joined
- Sep 14, 2009
- Messages
- 19,492
- Points
- 3,294
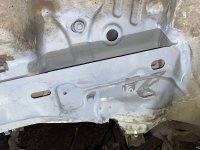
The Panda has what I believe is a design fault in the front beams which go from body shell to front bumper and carry the engine mounts. It's a box section tube with the wider spot welded flange facing outwards behind the front suspension struts wheels. This is a horrible dirt trap that easily fills with mud. The damp just sits there giving the (not inconsiderable) rust proofing a hard time. Fiat could so easily have set those beams to face outwards and avoided the problem. But I guess nobody noticed before it was too late to change the design.
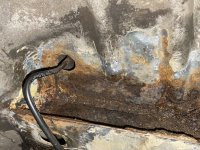
My Multijet diesel has the engine out so I've been looking for signs of trouble while I have good access. The worn out front struts are also removed. I was "worried to find rust staining in that awkward access area of the front beams.
The clean up is tedious but basically you have to spare the paint and mastic sealant back to the metal and chip off any rusty scale. Mine was an issue at the furthest side where the metal creates a trough for damp etc to soak into the joints. I found the best way was a large sharp screwdriver to scrape away the paint then a slammer one to chip away any rusty scale. It has to go back to clean metal. A vibration multitool was great for getting into the corners and a small screw driver for digging out the channel. The ends are slathered in sealant mastic. It has to come off as there will be the beginnings of rust underneath.
I got mine fully clean I mean really fussy using a good flashlight and mirror with shop vac to suck away debris. I used Hammerite rust inverter but any similar product will do. Its then had a coat of primer and two coats of paint. I used Hammerite smooth but any relatively slow drying paint will do. It will get mastic over the back end to fill in the drain holes. These run into the sills and I feel add to potential issues under there. The front should of-course remain open s that water cannot collect. A wax finish over the top will keep it nice.
If you spot trouble, the struts are easy enough to temporarily remove/replace so you can work on the problem over a few days. If in doubt dig it out. If its good, repaint and mastic the area. If you find any rust stains, clean out the whole lot and do it properly.