

You are using an out of date browser. It may not display this or other websites correctly.
You should upgrade or use an alternative browser.
You should upgrade or use an alternative browser.
Technical Project Paolo
- Thread starter Paolo66
- Start date
Currently reading:
Technical Project Paolo
OP
OP
Paolo66
Established member
- Joined
- Feb 6, 2013
- Messages
- 1,004
- Points
- 235
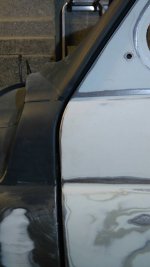
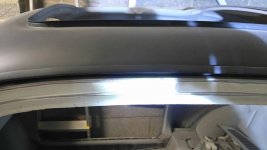
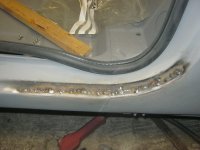
Can someone advise on door gaps please? I have offered up my door and bolted it where it felt right. I have no rubbers fitted and no locks and latches. The crease lines in the door line up perfectly with the lines in the wings. This would suggest top to bottom the door is in the right place (?). There seems to be a big gap at the front though, although if it's excessive I dont know how you get rid of it. The only adjustment you have is the hinges and these only allow for straightning a wonky door. I've only replaced the sill so technically the only gap I could have messed up is the bottom one
Attachments

Damian, it could be that the wing has been replaced in the past. They look a doddle to but I found it was very easy to misread how tightly they attach by the front edge of the door and mine ended up with an awkward sized gap there. But are you saying neither the door or the wing has been replaced recently and this has happened since the new hinges?
I looked at some perfectionist American websites for general advice and ended up carefully welding on extra fillets to the wing (and sill) to make it look good.
I've used wedging tactics on other types of car, to bend the hinges to fit, but I don't recommend with your car. If the horizontal swage lines at both ends and the door opens and closes without catching then I would say that is a pretty good outcome.
OP
OP
Paolo66
Established member
- Joined
- Feb 6, 2013
- Messages
- 1,004
- Points
- 235
I have only replaced the sills Peter so everything else is as is. I can trim all the other gaps up so they are the same all the way around. It was just the front gap that concerned me a little. However it did come in handy as I put the hinge bolts on loose, shut the door, lined it all up and then got my spanner in the gap to tighten up the bolts! Perhaps it is a design feature The only problem with spending 2 years on a restoration is you forget how the car should look like!
The only problem with spending 2 years on a restoration is you forget how the car should look like!hi Damian,
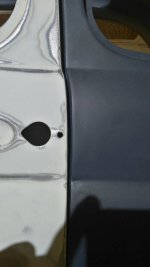
I think the gaps dont look too bad top and bottom.
front edge always seems to be larger, as Peter said especially if a new wing has been fitted probably due to worn pressings.
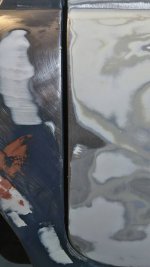
I had a problem with the gap at the bottom rear corner by the sill. I had to cut it in the recess, pull it out & dress the curve in as there was not enough of a gap. If it is too tight then time you put the paint on it will be even tighter and more than likely cause damage when you shut the door. Yours does look tight down there but cant really tell from the image.
I think the gaps dont look too bad top and bottom.
front edge always seems to be larger, as Peter said especially if a new wing has been fitted probably due to worn pressings.
I had a problem with the gap at the bottom rear corner by the sill. I had to cut it in the recess, pull it out & dress the curve in as there was not enough of a gap. If it is too tight then time you put the paint on it will be even tighter and more than likely cause damage when you shut the door. Yours does look tight down there but cant really tell from the image.
OP
OP
Paolo66
Established member
- Joined
- Feb 6, 2013
- Messages
- 1,004
- Points
- 235
It is tight there Sean, that is one of the areas I was going to address. Hope I don't have to go to your extremes though seeing as I don't have access to a welder. Think I'm just going to have to live with the front gap
mine is a little larger at the front than i would have liked. But to be honest once its painted and fitted up i dont notice it so much. I have seen welding rods and bits of metal welded down the edges and then ground up, but that can cause distortion to the panels and i just preferred to leave it alone.
I will send a couple of pics when im on my home pc.
I will send a couple of pics when im on my home pc.
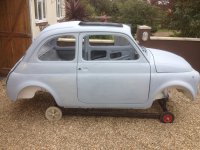
Having had a good look at your photos Damian, I'm sure that most of the issues you probably had before restoration and they are most likely due to previous work done. Here is a photo of Murphio, when he arrived, untouched by welding repairs. You can see that the gaps are fairly even but not particularly tight.
 Fiat 500 As Delivered by Peter Thompson, on Flickr
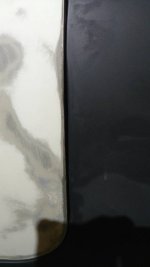
Even from new, the bottom sills always seem to show a slight widening taper towards the front of the car. I think this is because the overlap of the front wing meant they had to leave a bit more space there...it's the same with my other car. Also, the rear corner that Sean describes is slightly tighter than the other.
If you can fit a spanner in the gap that does sound quite wide but without welding I can't see any real options for improvement.
Fiat 500 As Delivered by Peter Thompson, on FlickrEven from new, the bottom sills always seem to show a slight widening taper towards the front of the car. I think this is because the overlap of the front wing meant they had to leave a bit more space there...it's the same with my other car. Also, the rear corner that Sean describes is slightly tighter than the other.
If you can fit a spanner in the gap that does sound quite wide but without welding I can't see any real options for improvement.
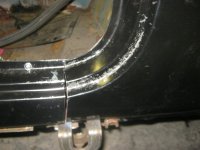
Here's a few photos
some showing the alterations I had to make to improve the gap in the corner
some showing the alterations I had to make to improve the gap in the corner
Attachments


Here's mine. I'm pretty sure that every panel is original, although it's obviously had a ding on the lhs rear quarter, going by the filler.
Not the best pic for panel gap, but only one I have of it's side...

Not the best pic for panel gap, but only one I have of it's side...
Having some time out from my project, don't know for how long. Really struggling to get the finish I want and the door hinges and gaps tipped me over the edge. Probably be itching to get back in there by the weekend!
We all know that feeling. When frustrated or flummoxed by a particular job, I've found it good to give it a break like you. I've also it found it beneficial to find some small relatively easy jobs on your list that take thirty minutes to an hour to complete. Knock off a few of these over the next week and it gets you back in the positive mindset, and a few jobs ticked off your list too.
If you don't have a list of what needs doing, try making one. It helps on big projects like this and it's satisfying to cross them off as you progress. Also, make this list items single task. For example, don't have 'fit new brakes'. Break it down into sections.
cheers, Steve
Don't beat yourself up chasing perfection Damian.
I think most non-professionals will have to compromise on some aspects of their restorations; I certainly did.
Despite that, I am also certain that with some exceptions, most professional restorations, other than those which effectively have no budgetary limits, will have things which could have been done better.
Ultimately I'm sure you want to be back behind the wheel with the little buzz-bomb behind pushing you along, so you'll have those tools back in your hand soon.
I had a three and a half year sabbatical from mine.
I'm finding that dottering between two big restorations and an endless maintenance project:bang:is unexpectedly giving me that benefit of not getting too peed off with things.
Damian,
Restorations can get the better of the best of us. I usually struggle with time! I just don't get enough of it - too much work, not enough play!
It's s bugger when life gets in the way, but remember you should enjoy it so as Steve says take a break from the panel work for a while. I once spent 3 weeks solid on a rolls Royce silver cloud re spray where I took it to bare metal and had to virtually skim the whole car in filler to get rid of all the imperfections. I got so depressed and my hands were sore and bleeding from the sand paper.
Could I suggest maybe if you are struggling with the filler work, see if you could spend a few hours with a panel beater in a bodyshop and pick up a few tips.
Also the Italian car show is on at Brooklands next Weekend. Come down and we could meet up and discuss tactics!
OP
OP
Paolo66
Established member
- Joined
- Feb 6, 2013
- Messages
- 1,004
- Points
- 235
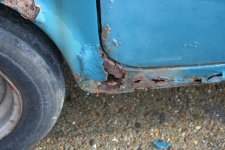
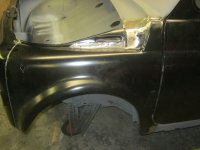
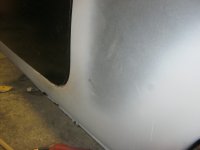
Getting there slowly! That front left wheel arch has been the death of me. This is an old repair that got exposed when I got the shell shot blasted. It was right on the curve of the arch and I have been filling and sanding (repeat many times) trying to get it to look like new. Now just got right hand side, inside and the dreaded doors to go until its ready for painting. Decided to fill in the line between front panel and wing. It looks quite good and didn't want to wreck all my hard work by trying to put a false gap back in
OP
OP
Paolo66
Established member
- Joined
- Feb 6, 2013
- Messages
- 1,004
- Points
- 235
Can someone do me a favour please? Trying to get door gaps right but what I've noticed is when you open the door it gets very close to the wing. It's just below the crease line. I can't see how you get more clearance. Can someone open their door until the door and wing are at their closest and take a picture of the gap please?
Hi Damian, for some reason I cant upload my photos either from my I-phone or pc - maybe a site problem again. I will upload as soon as I can.
Yours may be slightly different as mine are new doors and I don't think the hinges open so much.
Don't forget to fit the check strap as this may prevent the door from opening as much as it does at the moment.
Yours may be slightly different as mine are new doors and I don't think the hinges open so much.
Don't forget to fit the check strap as this may prevent the door from opening as much as it does at the moment.
Similar threads
- Replies
- 7
- Views
- 880