PANDA 2012/2016
HOW TO INSTALL THE REMOTE CENTRAL LOCKING KIT (amazon)
On my second attempt I finally managed to install successfully the remote locking kit!!!
I only found some vague schematics for other kits on some Italian forums, but nothing specific for this cheap amazon kits. So I thought about sharing the schematics and to give so tips to make your life easy if you want to try yourself.
IN THE PICTURES YOU WILL FIND:
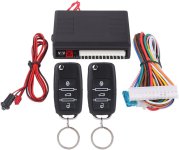
THE KIND OF KIT I USED (don’t worry about the brand as long as it looks the same kit)
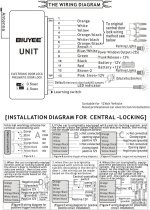
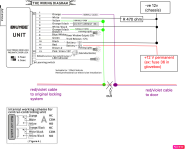
THE CABLE SCHEMATICS.
A 470 ohm RESISTOR IS NEEDED FOR THIS INSTALLATION (check schematics)
you will notice how 3 cables goes to -12v (ground). the first cable needs the resistor connected in line, the 2 others needs to be connected after the resistor, bypassing it, otherwise the kit won’t work correctly. (for the nerds--- pure -ve12v signal is an open signal, and -12v 470omh is a close signal)
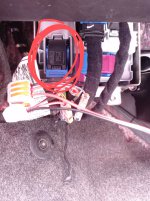
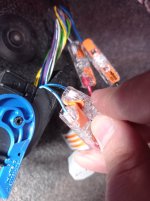
THE RED/VIOLET CABLE is found in a bundle of cables that runs through the door grommet.
so get under the steering wheel, remove some paneling next to the door, find the bundle coming from the door, and dig until you find the correct cable.
THE KEY ON THE DRIVER SIDE LOCK WILL NOT CLOSE THE WHOLE CAR AFTER THIS INSTALLATION. but the passenger side lock will work as normal.. (I realised only after the installation)
-UPDATE- sadly the red/violet cable is only found on the driver side.. even though I think it's easier to install the box on the side where the fuse box is, as it' easier to tap into power/ground and turning signals
TIPS AND TRICKS!!
--UPDATE---
I found that the best position for the box is on the passenger side, where the fuse box is. It makes it easy to tap in to power, ground and turning signals
THE CABLE FOR THE OPENING CLOSING SIGNALS (RED/VIOLET) IS ONLY ON THE DRIVER SIDE!
A ground point is located behind the panel where the trunk release lever is located.
The most practical way I found to pass the cable from the driver side to the passenger side is to slide the radio out and to drop the cable down following the wiring already present on the left and right. in that way the cable is up high, away from the pedals and the passenger feet.
---TAPPING INTO THE TURNING SIGNAL---
You need to find the lower vertical plug below the fuse box,
You need to tap into the blue/white and blue/black cables --photos below--
IF you can do yourself a favour and use FERRULITES on you cable endings and WAEGO connector (if you are doing any kind of electrical jobs, invest in those 2 things.. they are a life saver!!)
It will make quick work of all the connections when you are cramped under the steering wheel!!
The first time I was using lighters and crimpers... not fun!!! especially if you make mistakes..
It will take seconds to swaps cables around, instead of hours!!
I would Advice to PREPARE THE KIT WIRING before going to work on the car..
so connect together the 2 cables that go to the red/violet cable (central locking side)
and connect together the 3 cables that goes to ground (-12v) making sure the resistor is in the right position.
For any questions ask below!!
HOW TO INSTALL THE REMOTE CENTRAL LOCKING KIT (amazon)
On my second attempt I finally managed to install successfully the remote locking kit!!!
I only found some vague schematics for other kits on some Italian forums, but nothing specific for this cheap amazon kits. So I thought about sharing the schematics and to give so tips to make your life easy if you want to try yourself.
IN THE PICTURES YOU WILL FIND:
THE KIND OF KIT I USED (don’t worry about the brand as long as it looks the same kit)
THE CABLE SCHEMATICS.
A 470 ohm RESISTOR IS NEEDED FOR THIS INSTALLATION (check schematics)
you will notice how 3 cables goes to -12v (ground). the first cable needs the resistor connected in line, the 2 others needs to be connected after the resistor, bypassing it, otherwise the kit won’t work correctly. (for the nerds--- pure -ve12v signal is an open signal, and -12v 470omh is a close signal)
THE RED/VIOLET CABLE is found in a bundle of cables that runs through the door grommet.
so get under the steering wheel, remove some paneling next to the door, find the bundle coming from the door, and dig until you find the correct cable.
THE KEY ON THE DRIVER SIDE LOCK WILL NOT CLOSE THE WHOLE CAR AFTER THIS INSTALLATION. but the passenger side lock will work as normal.. (I realised only after the installation)
-UPDATE- sadly the red/violet cable is only found on the driver side.. even though I think it's easier to install the box on the side where the fuse box is, as it' easier to tap into power/ground and turning signals
TIPS AND TRICKS!!
--UPDATE---
I found that the best position for the box is on the passenger side, where the fuse box is. It makes it easy to tap in to power, ground and turning signals
THE CABLE FOR THE OPENING CLOSING SIGNALS (RED/VIOLET) IS ONLY ON THE DRIVER SIDE!
A ground point is located behind the panel where the trunk release lever is located.
The most practical way I found to pass the cable from the driver side to the passenger side is to slide the radio out and to drop the cable down following the wiring already present on the left and right. in that way the cable is up high, away from the pedals and the passenger feet.
---TAPPING INTO THE TURNING SIGNAL---
You need to find the lower vertical plug below the fuse box,
You need to tap into the blue/white and blue/black cables --photos below--
IF you can do yourself a favour and use FERRULITES on you cable endings and WAEGO connector (if you are doing any kind of electrical jobs, invest in those 2 things.. they are a life saver!!)
It will make quick work of all the connections when you are cramped under the steering wheel!!
The first time I was using lighters and crimpers... not fun!!! especially if you make mistakes..
It will take seconds to swaps cables around, instead of hours!!
I would Advice to PREPARE THE KIT WIRING before going to work on the car..
so connect together the 2 cables that go to the red/violet cable (central locking side)
and connect together the 3 cables that goes to ground (-12v) making sure the resistor is in the right position.
For any questions ask below!!