i can but it will be next week before i get a chance.


You are using an out of date browser. It may not display this or other websites correctly.
You should upgrade or use an alternative browser.
You should upgrade or use an alternative browser.
Technical panda 4x4 LHD to RHD conversion
Currently reading:
Technical panda 4x4 LHD to RHD conversion
i reckon you could get that panel out but Iam not sure what would make it worth your while. it would be a lot of work its hard to count the welds without digging out the sealer lots of duble thickness and reinforcement. if you were doing a lhd- rhd then you would have a big job to do the dash panel as well. I will just cut some new holes and patch the old ones.
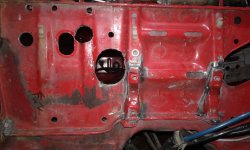
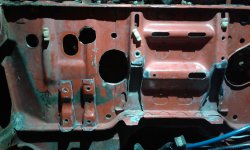
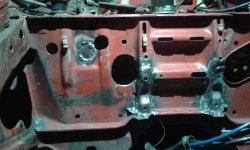
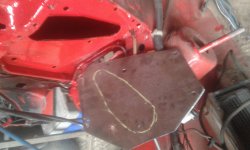
i have been adjusting my bulkhead cut some holes. i realized that the mounting points for the steering rack are not symmetrical. So i cut of the saddles, bolted them on to my lhd rack. Got the rack in a good positon tacked the mouts in position. removed the rack and welded them up. heres the pictures.
there is a rusty bit under the battery i will cut that part out of lipstick and weld it in, i may be able to move over some steering column mounts and heater cut outs in the same job. iam not sure if its worth the hassle yet.
there is a rusty bit under the battery i will cut that part out of lipstick and weld it in, i may be able to move over some steering column mounts and heater cut outs in the same job. iam not sure if its worth the hassle yet.
Attachments
Hey kozala here is a closer look at bulkhead removal
Sorry. I am Having problems uploading the vid
i had to put it on youtube heres the link [ame]https://youtu.be/_t2NyJP7Yc0[/ame]
this video will only interest you if you spend time thinking about swapping panda bulkheads
this video will only interest you if you spend time thinking about swapping panda bulkheads
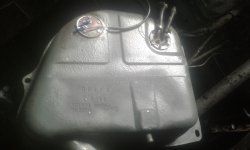
got back at the panda after a bit of break. replaced the dreaded prop-shaft support bearing put in fuel tank which wasn't original and was a bit different but will work far me as i am gona use a carb. fitted a new fuel gauge sender which was a new land rover sender i found in my workshop (confusing as i have never owned a land rover) cut a hole bent the float and jammed it in with self tapers and epoxy putty maybe not in the best location as it it is a bit tight to the floor. not sure how it will get on with the panda gauge, time will tell and at worst i will end up with a functioning warning light. all so slapped a bit of paint (Massey Ferguson red) on the bulkhead and made a blanking plate for the left hand side for the servo to bolt to. and fitted me steering rack struts control arms and new ball joint boots
Attachments
Sjvarley
Established member
- Joined
- Oct 18, 2016
- Messages
- 827
- Points
- 212
i have been adjusting my bulkhead cut some holes. i realized that the mounting points for the steering rack are not symmetrical. So i cut of the saddles, bolted them on to my lhd rack. Got the rack in a good positon tacked the mouts in position. removed the rack and welded them up. heres the pictures.
there is a rusty bit under the battery i will cut that part out of lipstick and weld it in, i may be able to move over some steering column mounts and heater cut outs in the same job. iam not sure if its worth the hassle yet.
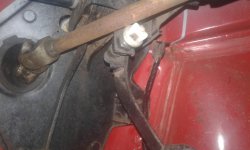
I see you have swopped out the different diameter steering clamp locator I looked at this too for the same swop l/r h d my plan would be to make a smaller diameter packer from a spare top clamp and place to the rear of the larger diameter the smaller clamp could then cutout diameter only with slits in the housing then clamp up pushing the curvature back to the new diameter remove then weld up Less work I think . for the pedal box r h d marked out and cut the whole profile then reflange the edge
Last edited:
What is the reason for using the Land Rover sender unit, does the original sender unit not work properly? The tank you have is a carb tank.
the sender for that tank didn't work and land rover one seemed to be handiest option will see how it turns out. the car was originally injection (ie) so my old tank was different.
re: sjvarley think that would work. i found i had to move the sadles slightly on the left/right axis
Last edited:
the sender for that tank didn't work and land rover one seemed to be handiest option will see how it turns out. the car was originally injection (ie) so my old tank was different.
Fair enough! Do you still have the injection tank? Could be handy for someone doing a 1242 swap into a carb'd car if so.
old tank is in badly rusted.
it is close but not that close. i cant remember how close..
have taken the steering column out again to paint but will try some messing with the rack soon as i will be doing the big put together.
i have been painting it reminds me that i don't relay enjoy painting. i was looking at at a tin of pint the other day it was labeled anti corrosion paint i wondered why any one would want any other type of paint.
the process i have been using is this.
angle grinder with wire brush to remove rust pant and filer in afflicted areas only.
sand blaster to get in crevices and really persecute any remaining rust.
2 pack epoxy primer applied with brush (hope it works as it was expensive when you ad the price of hardener and thiner)
filler sealer and high build primer where required.
more sanding and filing.
even more sanding and filling.
prep with gray scotchbrite and wipe down with standard thinners.
several coats of 2 pack acrylic single stage paint (sprint) the shop called it "the cheap paint" but was expensive again as i had to buy different hardener and thinner. all so need decent respirator.
stand back and realize i didnt do enough sanding and filling.
i have leairnt a lot as this is the first time i have painted an entire car, but i think if i were to start again i would go for a top coat of mat black applied with a 4 inch brush as it would hide the brush stokes of the epoxy primer.
Similar threads
- Replies
- 0
- Views
- 145
- Replies
- 0
- Views
- 278