:devil:


You are using an out of date browser. It may not display this or other websites correctly.
You should upgrade or use an alternative browser.
You should upgrade or use an alternative browser.
Styling KC3 Project Silver
- Thread starter KC3
- Start date
Currently reading:
Styling KC3 Project Silver
New super mod to be added shortly. TURRRBO
you put wrong smiles, you should put:
New super mod to be added shortly. TURRRBO €€€€€€€€€€€
Nice!
Last edited:
OP
OP
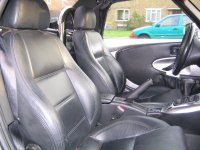
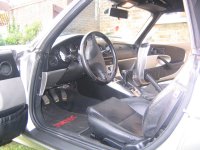
Said i wasnt going to do this, but put the leather interior in the B today.
Looks and feels great!
Looks and feels great!
Making the turbo Barchetta that little bit lighter :devil:
Piccie then KC??
OP
OP
Some pics of the new interior, Really like it inside now, only thing i,m not so happy to drive her as she feels slow compared with the other wild thing -(Barchetta Turbo)
Need to get the turbo on her and i,ll be
only thing i,m not so happy to drive her as she feels slow compared with the other wild thing -(Barchetta Turbo) Need to get the turbo on her and i,ll be
OP
OP
Nice job Kiry, love the Novitec floor mats - a hint of things to come!!
can you post some pictures how did you fitted those rollbars? how did you attach them? only bolts?
Yup, bolts secure it to the top of the bulkhead. Bottom of the hoops sit on a flat piece of aluminium with pre-drilled holes in it, mark up the bulkhead and drill (being careful not to drill into the fuel tank!!).
BOOM! :devil:
OP
OP
can you post some pictures how did you fitted those rollbars? how did you attach them? only bolts?
The bars LRB is talking about are the cheaper versions which are easy to fit. as they just bolt on from above.
The ones i have are the better, stronger type. but need to be fixed from below the rear bulkhead.
They are a few good hours to fit as you need to
1, remove seats,
2, remove rear plastic panel which is behind seats.
3, unbolt metal backing which exposes fuel tank and empty space of rear shelf.
4, I also removed the hood as it was difficult to get to this panel, cant remember in which order but it made things easier .
5, the bars are made from 6mm thick steel bars and around 65mm in diameter and have large bolts that screw into them from underneath.
5, remove the fixing bolts and place bars into there correct positions, now this is reasonably simple as one end of the bar contours with the shape of the rear shelf.
6, mark round the bars where they will sit and cut through into the plastic trim to expose rear metal chassis.
7. You may also want to remove the rear plastic trim but can get away with leaving it on.
8, drill correct size hole for the bolts. this is a bit tricky as the rear shelf has a box section which is angled to the shape of the bars and does prove difficult to drill because you will be drilling at the correct angle and not straight down. . and be carefull here as the fuel tank is just below.
9, Once drilled, refit rear plastic shelf, place bars into there position, and bolt through the rear box section. the drivers side is relatively simple to fit but the other is more difficult because of space issues but not impossible. Someone with a good tool kit should be ok.
10, Refit all panels, trim, hood , seats and thats about it.
The total product is proffesionally looking and felling bars. but if you cant be bothered with all the hassle of fitting these type then the bolt on cheaper versions would look just as good.
Hope this helps.
OR, you could leave them off and not make your b look like an MX-5!!
<snip...snip>The ones i have are the better, stronger type. but need to be fixed from below the rear bulkhead.
They are a few good hours to fit as you need to
1, remove seats,
2, remove rear plastic panel which is behind seats.
3, unbolt metal backing which exposes <snip...snip>
Point 1 BEFORE removing seats: unhook battery,
unless you want a little pilot light on your dash
Last edited:
OP
OP
The bars LRB is talking about are the cheaper versions which are easy to fit. as they just bolt on from above.
The ones i have are the better, stronger type. but need to be fixed from below the rear bulkhead.
They are a few good hours to fit as you need to
1, remove seats,
2, remove rear plastic panel which is behind seats.
3, unbolt metal backing which exposes fuel tank and empty space of rear shelf.
4, I also removed the hood as it was difficult to get to this panel, cant remember in which order but it made things easier .
5, the bars are made from 6mm thick steel bars and around 65mm in diameter and have large bolts that screw into them from underneath.
5, remove the fixing bolts and place bars into there correct positions, now this is reasonably simple as one end of the bar contours with the shape of the rear shelf.
6, mark round the bars where they will sit and cut through into the plastic trim to expose rear metal chassis.
7. You may also want to remove the rear plastic trim but can get away with leaving it on.
8, drill correct size hole for the bolts. this is a bit tricky as the rear shelf has a box section which is angled to the shape of the bars and does prove difficult to drill because you will be drilling at the correct angle and not straight down. . and be carefull here as the fuel tank is just below.
9, Once drilled, refit rear plastic shelf, place bars into there position, and bolt through the rear box section. the drivers side is relatively simple to fit but the other is more difficult because of space issues but not impossible. Someone with a good tool kit should be ok.
10, Refit all panels, trim, hood , seats and thats about it.
The total product is proffesionally looking and felling bars. but if you cant be bothered with all the hassle of fitting these type then the bolt on cheaper versions would look just as good.
Hope this helps.
Oh ! and first thing, Must disconnect the battery as you will need to pull air bag plugs from under seats.
Thanks to Rollie for pointing this out.
OP
OP
Link to the bars i have.
http://translate.google.com/transla...=com.microsoft:en-us:IE-SearchBox&rlz=1I7PCTA
http://translate.google.com/transla...=com.microsoft:en-us:IE-SearchBox&rlz=1I7PCTA
Last edited:
OP
OP
sorry , link diddnt work to correct page but click barchetta and then accesories and you will find them .
62mm is the ones i have.
62mm is the ones i have.
Just thread through most of this thread, some good info here!
Quick question though: If I've understood correctly you've discovered that after adding a GSR air intake you went from 130 to 151bhp. Then you found that the next limiting factor was the petrol pump.
I assume that's because the injectors were opened for as long as they could but couldn't get enough petrol in. So, by adding a higher pressure pump you were able to get more petrol in (in fact the right amount) so got your power increase.
How much power did you get? You mention the possibility of 170 or so without changing the injectors. Did the ECU automatically take advantage of the new pump as it noticed the changed mixture, or did you need to re-map again?
OP
OP
Hi! Matt,
The first time i went to Red Dot and had the B on the rollers, she read 138. something bhp. and approx 97/98 wheel torque.
This was with a green induction and Dtr middle and rear box. The bhp was good but showed the car was running very lean.
2nd time i added the supersprint and Gsr prototype induction.
RR results showed 136.7 bhp similar torque. the bhp was down and after a remap we showed 146bhp but car was starving fuel. after fitting a new fuel pump and fuel pressure regulater, a few adjustments to remap and we managed 151.1bhp . with a much better torque of 107.4
The B is running good and would expect to gain even more with a de catt and new full supersprint exhuast.
I now also have the turbo B so hope to add that soon. 200bhp should not be a problem.