Technical Is your dashboard half-lid like mine!?

Currently reading:
Technical Is your dashboard half-lid like mine!?

StanZlatan

Member
Joined
Sep 6, 2021
Messages
123
Points
87
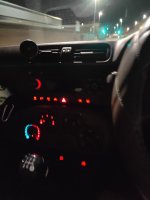
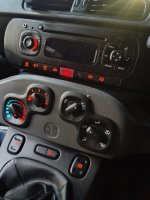
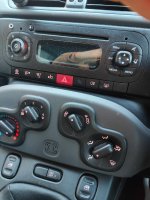
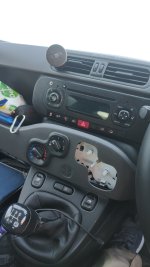
I just noticed that two of my rotating buttons for the air flow to my cabin are dark. I am not sure if this occured now or its like this for a year or more. My dashboard looks like this on the image
 
Model
fiat
Year
2014

Attachments

  • IMG20250101204629.jpg
    IMG20250101204629.jpg
    7.1 MB · Views: 169
  • IMG20250101212320.jpg
    IMG20250101212320.jpg
    3.5 MB · Views: 112
It looks suspicious for both bulbs to go off. I suspect something wasnt connected during gear cables reassebley. Either way what bulbs do i have to buy?
 
There’s only one bulb for each pair of control knobs - so only one bulb has failed. The spec of the bulb is in the guide that the post above linked to, often called a T5 or a number 286 bulb. I see you say the guide is crap…? Your choice - remember it was for the old model but with an update that the link above went to. Most folk find it helpful.

I’ve just used this Forum’s wonderful ‘search’ button (top right of the page) and it has also found this extra update that might be less crap…
https://www.fiatforum.com/threads/changing-hvac-backlights-on-a-rhd-panda.487444/post-4596951
 
Last edited:
If i search like you suggest i spend too much time reading irrelevant posts. Explanation also I dont always understand what they mean. Technical terms like heat control unit i have to google to see what exactly this includes. Mine is technically airflow control unit, the other side.

What ended up helping me was a video on youtube where I can see how its done on a 2023 panda.
I am under impression i can not post video. However for future reference of others included, I can explain with images how I did it slightly adjusting his advice because not all that he did i could do.

The main thing is that you have to detach the Entire grey panel. Otherwise you will struggle a lot and may be scratch the panel a lot. Even with the mechanic's bent tool for removing panels.
I suggest to get a rag like me and pull on the edge closer to the steering wheel of that panel proving it was not a mistake to be born a male.
I was pulling softly in begining but that didnt do it. After detaching it it looked very sturdy so i dont think it van beeak easy. Obviously after detachment be ready to stop yourself with some counterpoint otherwise you might break something inside. I use my knee to put a stopping point.
Then both knob pairs become loose and easy to remove.

Next the bulb. If you break the bulb you are for torturous adventure so dont break the bulb. Ever.
On the video the man who i think was american used electrical tape and pulled it joking it was a boy. I could not do it. The tape simply slided.
Instead i used same a rag and a pair of small tiny electrical pliers and gently dislodged it by pulling outwards.
Repair is, you install some of the said T5 bulbs back and all panels back in reverse order. I attach photos.
 

Attachments

  • IMG20250102110743.jpg
    IMG20250102110743.jpg
    9.4 MB · Views: 97
  • IMG20250101212320.jpg
    IMG20250101212320.jpg
    3.5 MB · Views: 145
  • IMG20250101204629.jpg
    IMG20250101204629.jpg
    7.1 MB · Views: 127
  • IMG20250102125629.jpg
    IMG20250102125629.jpg
    11.7 MB · Views: 50
  • IMG-20250102-WA0002.jpeg
    IMG-20250102-WA0002.jpeg
    641.2 KB · Views: 29
  • IMG-20250102-WA0000.jpeg
    IMG-20250102-WA0000.jpeg
    735.3 KB · Views: 31
Last edited:
If i search like you suggest i spend too much time reading irrelevant posts. Explanation also I dont always understand what they mean. Technical terms like heat control unit i have to google to see what exactly this includes. Mine is technically airflow control unit, the other side.

What ended up helping me was a video on youtube where I can see how its done on a 2023 panda.
I am under impression i can not post video. However for future reference of others included, I can explain with images how I did it slightly adjusting his advice because not all that he did i could do.

The main thing is that you have to detach the Entire grey panel. Otherwise you will struggle a lot and may be scratch the panel a lot. Even with the mechanic's bent tool for removing panels.
I suggest to get a rag like me and pull on the edge closer to the steering wheel of that panel proving it was not a mistake to be born a male.
I was pulling softly in begining but that didnt do it. After detaching it it looked very sturdy so i dont think it van beeak easy. Obviously after detachment be ready to stop yourself with some counterpoint otherwise you might break something inside. I use my knee to put a stopping point.
Then both knob pairs become loose and easy to remove.

Next the bulb. If you break the bulb you are for torturous adventure so dont break the bulb. Ever.
On the video the man who i think was american used electrical tape and pulled it joking it was a boy. I could not do it. The tape simply slided.
Instead i used same a rag and a pair of small tiny electrical pliers and gently dislodged it by pulling outwards.
Repair is, you install some of the said T5 bulbs back and all panels back in reverse order. I attach photos.
Glad you got there. It's not nice when you cannot see the controls at night.
Your description neatly matches the two linked posts, which is always nice to see :)
 
Last edited:
Not exactly. I could not remove it with a pry tool. Need to disconnect the grey panel Entirely first which is what i specifically underlined. You have plastic prying tool i have metal and it scratches the panel. My method or rather youtubes method do not require any prying tools.
 
Then i need to see in the guide specific spots to use this screwdriver. Nor screwdriver nor any tool helped. Just raw pulling force to detach the grey bit.
But what i am saying is that in your guide you do not touch the grey bit as far as i have read. You remove the plastic bit that knobs are on which for me ended up damaging a bit the plastic.
 
On my 2017 4X4 the heater controls are only illuminated when the exterior lights are on.
 
I have purchased led purple from amazon. I will update if they work and if they do i should be set for the life of the car
 
I have purchased led purple from amazon. I will update if they work and if they do i should be set for the life of the car
I bought some LEDs for mine - but they were far too bright so I took them out again. I need to find some LEDs that are no brighter than the little light bulbs but which last longer.
 
Then i need to see in the guide specific spots to use this screwdriver. Nor screwdriver nor any tool helped. Just raw pulling force to detach the grey bit.
But what i am saying is that in your guide you do not touch the grey bit as far as i have read. You remove the plastic bit that knobs are on which for me ended up damaging a bit the plastic.
Hi Stan
Wondering if this is the YT vid you mentioned that helped you fix this? (see below)
Coincidentally I stumbled across this vid only last week and was so impressed I added it to my “Panda maintenance” favourites list!
Btw - if you want to post a link to any YT vid in your comments you just have to click “Share” and then “Copy link” in the popup (to get it in your clipboard) then paste into your comment 😊

 
Last edited:
Hi Stan
Wondering if this is the YT vid you mentioned that helped you fix this? (see below)
Coincidentally I stumbled across this vid only last week and was so impressed I added it to my “Panda maintenance” favourites list!
Btw - if you want to post a link to any YT vid in your comments you just have to click “Share” and then “Copy link” in the popup (to get it in your clipboard) then paste into your comment 😊


Yes it was! Normal Americans sometimes do the best non complicated down to ground solid explanations.
 
I finally changed all to LED after other half burned. Managed to break the bulb too so i used some werd pliers to remove the fuking bulb.
The led bulbs are purple. It does not seem to matter as the colour seems same yellowish red. One thing i struggled a lot is to fit them. The led are a lot thicker and till my father helped with advice how to twist one did not fit. I have 15 in reserve and i tried 10 before i found the right thickness.
 

Attachments

  • Screenshot_2025-02-20-20-23-35-87_92460851df6f172a4592fca41cc2d2e6.jpg
    Screenshot_2025-02-20-20-23-35-87_92460851df6f172a4592fca41cc2d2e6.jpg
    590.6 KB · Views: 19
I finally changed all to LED after other half burned. Managed to break the bulb too so i used some werd pliers to remove the fuking bulb.
The led bulbs are purple. It does not seem to matter as the colour seems same yellowish red. One thing i struggled a lot is to fit them. The led are a lot thicker and till my father helped with advice how to twist one did not fit. I have 15 in reserve and i tried 10 before i found the right thickness.

cool 😎
 
Back
Top