Technical Interior of outer sill - early rust preventative measures

Currently reading:
Technical Interior of outer sill - early rust preventative measures

brispan

New member
Joined
Oct 4, 2024
Messages
7
Points
28
Location
Bristol
Hi all,
Hope you're having fine evenings!
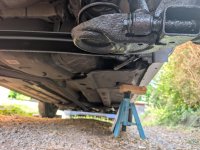
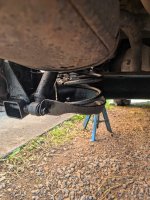
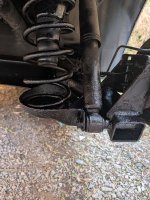
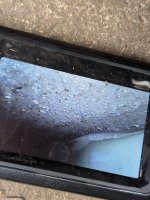
This week after browsing the forum for another issue(rusty rear axle), I became aware of the common issue of rust inside the sills due to jacking on the sill seam. As I've already got her up on stands with the rear wheels off, I took the rubber sill bungs out today, stuck an endoscopic camera in and saw that at least black surface pitting of the galvanised layer(as well as spider poo) is beginning to show up at each of the four jacking points, and with visible red surface rust at the rear. The exterior sill paint is largely intact except for a section on the tip of the seam at the rear, although the seams are indented from poor jacking previously. The inner sills seem okay on the camera. I've gone the whole way along with a rubber mallet, and there's no apparent structural issues.
I'm at a bit of a loss as to what to do here - it's a 2008 1.2 Dynamic Eco with 56000 miles, so not a high value Panda by any means.
Cutting out and replacing the whole outer sill seems nuclear, given the above, and the low impact the rust has had so far.
Is there any point to spraying a decent rust converter/stabiliser(vactan?) through and then some cavity wax, using the drain holes already present, and then stripping the failed exterior paint and re-sealing?
If it only earns another year or so before she's finally done for good.
Would love any advice anyone can give

Thank you
 
Model
Dynamic Eco 1.2
Year
2008
Mileage
56000
Last edited:
Post some pictures so we know what we are dealing with

Normally you can get a few more years out of them

No doubt you will now get every product ever used being recommended now

zinc layer 10 - 12 microns thick

And unpainted areas loose approximately 1 micron per year

Rubber mallet isn't going to help to determine structural integrity

Visible red rust on a galvanized 1.2mm pamel, probably means there's not much metal left
Hi koalar! Thank you for replying. I've read a lot of your replies in my searches so far

Unfortunately the pictures I have are very amateur, but I think they get the point across.
 

Attachments

  • PXL_20250603_164631422.jpg
    PXL_20250603_164631422.jpg
    4 MB · Views: 41
  • PXL_20250603_164719559.jpg
    PXL_20250603_164719559.jpg
    689.1 KB · Views: 37
  • PXL_20250603_165019724.jpg
    PXL_20250603_165019724.jpg
    3.1 MB · Views: 37
  • PXL_20250603_165028030.jpg
    PXL_20250603_165028030.jpg
    3.1 MB · Views: 40
Is there any point to spraying a decent rust converter/stabiliser(vactan?) through and then some cavity wax
Hi and welcome:)
I think there is. It's an area that can and does rust, any treatment to slow down the corrosion is worth doing if you intend to keep the car.
I just pour some used engine oil through the bung in the rear wheel arches a few times a year.

Also have a look at:
Oil sump pan
Coolant return pipe in front of engine
Mud traps behind front springs
Hi!
Thank you for the welcome and the reply. I'll have a proper look at all of these shortly when I'm back outside, I have it in my head that the coolant return and oil sump are fine, or at least were when I serviced last September, but I didn't take a very hard look and I daresay I've never checked those mud traps.
I've seen a few people reference the access point in the rear arches - is this the oval rubber one a fair few inches up the arch? Mine seems to be covered with paint, which peeled a little when I pressed it and saw the rubber underneath. I eventually gave up coming through the arch as I wasn't sure and just used the under sill holes. Using this access point would be ideal for the sills though

Thanks again!

EDIT(tangential)
I've just had a peer at the sump and those mud traps. No corrosion on either, hooray! Coolant return might be looking a little crusty though, thanks again for the advice.
 
Last edited:
Evening and welcome,

It’s hard to tell from the pictures what the state is but my low mileage, 2007 car is getting sill work done as we speak as well as other work done including rear axle replacement due to corrosion.

Now, to prove Koala’s point! My ill-informed view based on the limited information, if its structurally sound and you want to preserve then I’d consider something along the lines of:

- degrease to make sure the surface is as clean as possible to receive the next stages. The simplest approach is to use something like brake cleaner and a 360° spray tube/nozzle thing (lots of options on Amazon), park the car on an incline so that it flushes out one end rather than pools all the detritus somewhere. Be generous at this stage, you can’t do better prep so this is the best it’ll get.
- spray a corrosion converter product like Hydrate80 from Bilthamber (works well for me but other products available). Again a 360° nozzle tube would be best used for this but these products aren’t typically aerosol based and only place I can find the right configuration for the sprayer without home bodging is from Lanoguard so not cheap (£20?). Hydrate80 is water based and will seep out of everywhere. Normally you apply it sparingly but I’d go with a good coating, allow to dry for longer than the manufacturer recommends and add a second coat. Its a largely enclosed space so expect everything to take a lot longer to dry than what the manufacturer suggets at each stage. Any rushing will impact how effective your work is.
- Once dried out I’d then spray paint over this, 360° nozzle again. Ideally, assuming there’s some galv in there then I’d look for something which’ll adhere to both galv and steel, Jenolite direct to rust claims to adhere to just about anything which is a brave claim and not one that I’ve tested!

This should significantly slow the corrosion but its a rough approach so is not by any means perfect.

I’d then look to use Lanoguard/cavity wax/used engine oil etc to provide additional protection. If you jump to this phase without attempting to deal with the existing corrosion it’ll continue to corrode under the corrosion protection, worst case hidden by your corrosion protection so you spot it late (possibly record use of the word corrosion in one sentence there!).

Ultimately its a delay tactic and the only real way to deal with it is to eventually replace the sills.

Cheers,
Chris
 
Ultimately its a delay tactic and the only real way to deal with it is to eventually replace the sills.
Hi Chris!
Thank you for replying and for all this info, I really appreciate it. So far I just had the plan of vactan and engine oil interior, with dinitrol 4941 on the exterior.
Pouring something fast evaporating through is also kind of ingenious to me, I was planning jerry rigging a workshop hoover(don't have a compressor) and progressively sucking and blowing until most of the tat is brought out(it's actually somewhat worked already). I'm just making the decision now whether to try 99.99% IPA or brake cleaner, as I already have the IPA but only aerosol brake cleaner so would have to pick some up in liquid form first.

Can I ask you the nature of your current sill work being done, and how much that is costing you? The car is my first despite being early 20s when I bought her in 2023, and while I could just about afford to pay for a similar vehicle upfront I would love to keep her as long as possible, and have been considering whether biting the bullet to have the full sill job done could be smartest for me. As it is I can't see that I wouldn't end up buying just another Panda, probably even 169.

Thank you!
 
Last edited:
Hi Chris!
Thank you for replying and for all this info, I really appreciate it. So far I just had the plan of vactan and engine oil interior, with dinitrol 4941 on the exterior.
Pouring something fast evaporating through is also kind of ingenious to me, I was planning jerry rigging a workshop hoover(don't have a compressor) and progressively sucking and blowing until most of the tat is brought out(it's actually somewhat worked already). I'm just making the decision now whether to try 99.99% IPA or brake cleaner, as I already have the IPA but only aerosol brake cleaner so would have to pick some up in liquid form first.

Can I ask you the nature of your current sill work being done, and how much that is costing you? The car is my first despite being early 20s when I bought her in 2023, and while I could just about afford to pay for a similar vehicle upfront I would love to keep her as long as possible, and have been considering whether biting the bullet to have the full sill job done could be smartest for me. As it is I can't see that I wouldn't end up buying just another Panda, probably even 169.

Thank you!
I can’t answer your question yet… I’m waiting ti hear the damage as I took it to a garage. Challenge is finding someone/where willing to do the work. I’ll keep you posted!
 
Is there any point to spraying a decent rust converter/stabiliser(vactan?) through

I'd be wary of spraying any kind of converter product into a box section

some cavity wax, using the drain holes already present,

Yes, definitely. I'd just buy a couple of spray cans of waxoyl and get that into the box section; a cheap, easy DIY solution and a proportionate response.

Do that and the sills will likely outlast the car.

What's the state of the twist beam & spring pans, out of interest?
 
I'd be wary of spraying any kind of converter product into a box section


Yes, definitely. I'd just buy a couple of spray cans of waxoyl and get that into the box section; a cheap, easy DIY solution and a proportionate response.

Do that and the sills will likely outlast the car.

What's the state of the twist beam & spring pans, out of interest?

Morning!
Thank you for the advice. I'm debating just flushing it out with brake cleaner but skipping the vactan then going towards dinitrol/waxoyl.
I'm surprised with the integrity of the twist beam and spring cups. It's by no means a good job that I've done but the metal should last a fair while longer - I just gave it a good steel brushing, tiny bit of sanding then went over it with dinitrol rust converter and then dinitrol 4941, did focus on the welds and areas where they commonly seem to fail and rip but did the whole of the thing where I could. I'll need new shocks yesterday though and exhaust very soon.
 

Attachments

  • PXL_20250606_073916526.jpg
    PXL_20250606_073916526.jpg
    2.1 MB · Views: 25
  • PXL_20250606_073906872.jpg
    PXL_20250606_073906872.jpg
    2.3 MB · Views: 25
  • PXL_20250606_073854538.jpg
    PXL_20250606_073854538.jpg
    3.3 MB · Views: 28
  • PXL_20250606_073836363.jpg
    PXL_20250606_073836363.jpg
    3.7 MB · Views: 24
  • PXL_20250606_073833669.jpg
    PXL_20250606_073833669.jpg
    3.2 MB · Views: 27
I look at the state of the near side outer sill here

Looking for scabs down the seam joint

You get I good idea if its solid if you push you thumb nail in

It can get quite thin without any pain bubbling showing, normally any bubbling is showing corrosion from the inside

There is normally only two places that go first

The reinforcement for the jacking point and the reinforcement at the joint of the rear arch


Unfortunately neither area is shown on the endoscope, the rest is normally not effected

I can see in your latest pictures the drivers side outer sill looks to be in excellent condition


Screenshot_20250606-072823.png


Assuming it's still solid any protection, especially if done regularly will help

Axle looks good from what I can see


Theres loads of different products


Take with a pinch of salt


Last edited:
Bilt Hamber (see web site) products are used on oil rigs. The seem very good and their can design means it can be sprayed at any angle. I have tried it and am very pleased with the results so far. The best stuff Ive found so far by a long way.
 
I would go for ACF-50 followed by Lanogaurd or another lanolin formula. It does not dry up like Waxoyl.

I have had success on garden equipment with chain saw bar oil thinned with white spirit. It's cheap, displaces moisture and it soaks into bare metal and light rust. As with anything else, it does nothing where bubbling paint covers the rust. Just don't use it on a nice front driveway as it will drip out and make a mess.
 
Hi all,

Thank you all very much for all the advice and tips. Regarding the sills, ultimately I've:
Flushed out with 5l of brake cleaner
Hoovered extra junk with endoscope + straw attached to hoover nozzle(painstaking and clumsy but reasonably successful)
Gradually sprayed 2x cans of jenolite rust converter, and after an extra long pause for curing, then 2x jenolite "waxoil" through 360 spray can adapters

I went with jenolite as it was cheapest compared to dinitrol or branded waxoyl, and I can't say I've been at all impressed with the jenolite rust converter when compared with the dinitrol rust converter I used on the back axle, although I suppose that's to be expected when the dinitrol was about £35 a can and the jenolite "only" £18. The jenolite rust converter made almost no difference to the interior rust, with a lot of it staying red but just being covered over by the epoxy layer so in a way that was impossible for me to correct without cutting a hole in the sills for cleaning properly. It was certainly dry and as clean as possible within the sill, and I found the jenolite to have the same lack of impact even on rust I tested it on outside of the car and around the garden. Despite the cheapness of the jenolite, I still spent about £170 all in on the back axle and the sills just on this rust proofing excapade.

I'm letting it all air out now, and have ordered some new silicone plugs to cover up the factory sill drains from when it was dip galvanised as some had gone missing before I started working on this. Wheels are back on so I hope to have the car lowered and back on the road by tomorrow. I'm hopeful that I've bought a little time before the sills fail, especially as long as I keep topping it up.

Thank you again everyone for taking the time to help me out!
 
Last edited:
I'm letting it all air out now, and have ordered some new silicone plugs to cover up the factory sill drains from when it was dip galvanised as some had gone missing before I started working on this.
One is suppose to be missing

They were from new

Not 100% sure which it was now from memory it the front one
 
Thank you both, I noticed one missing on the left when I began but wasn't aware of it being gone from the right, but when I was eventually counting them up having removed them all I did notice that an additional was missing but assumed one had fallen out before and then that I had already lost one myself after having removed them, as for a while at the beginning I was removing and replacing them individually to poke the endoscope through. Sounds like I probably didn't lose that extra one
 
Yep early cars didn't have any holes at all

Any water entering had no way out

The B post is always open to the sill, condensation means the sill will always become damp

Then they rotted from the inside

Pretty consistently, rot would start to show on the outside at 10 years old give or take a year or so

Since they can now drain there life appears to be extended
 
The infamous front frame mud traps "behind" the suspension struts will drain into the sills when the PU mastic has failed.

They should be regularly cleaned but any older Panda (all of them) should be thoroughly check with a mirror and derusted as necessary. Pick out the old sealant and replace with new. They get ignored, because the front struts have to be removed to do it properly, but that's really not such a bad job.

At least 5 years ago, I had my back axle grit blasted and zinc metal sprayed. It's overkill but a steal for £80 (more now obviously). My regret was not having it epoxy painted over the zinc.
 
Back
Top