General Franko the 1971 500L

Currently reading:
General Franko the 1971 500L

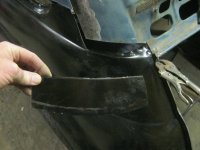
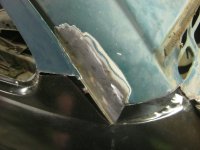
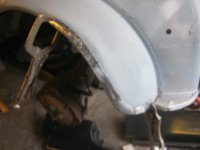
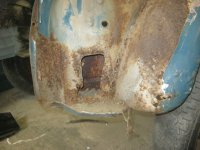
Sean, the only brazing I found was at the top of the wing to scuttle joint.
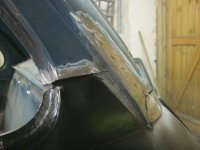
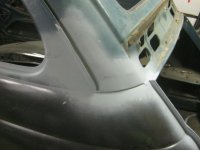
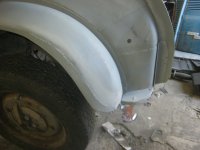
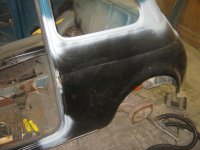
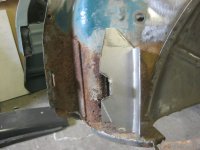
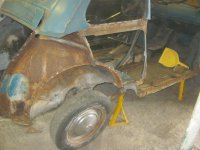
The front wing/front panel is spot welded then filled with sealant and should be quite a tight line. Where the front wing joins the sill it should overlap itl and there is a pressed swage to accommodate this.


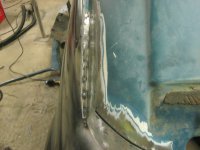
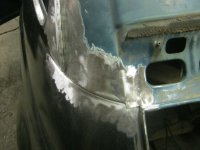
That joint was not filled as original and I doubt had any sealant but I have sealed. The key to all this is very tight joints needing little fettling afterwards...right up your street:)
 
Cheers Damon,
im glad of that because i hate brazing! i dont have a tig welder & oxy accetylene causes major corosion.
No sealer! that probably explains why they coroded so much. My one will definately have some sealer wiped in the joint. It will prevent moisture getting in there.

Sean
 
Cheers Peter,
Thats what i thought/hoped it would be.
As you said, a nice tight joint & i think i might add a couple of plug welds on the outside face & grind them flush to strengthen the joint from moving and then wipe some sealer in the joint.

Thanks
Sean
 
Some tricky little bits done. Where the 1/4 joined the roof, I cut the lower section of the roof pillar off as it was corroded and is supposed to be welded to the 1/4. There is no way of welding the 1/4 on properly without removing this section. Because of the corrosion I made a new section.
Also there was some heavy corrosion a little further up the roof rail which even if cleaned would be so thin I thought it better to cut it out and replace it.
So I made 2 new sections, the roof section and a new roof rail section. There was one on the 1/4 panel but it was in the wrong place and completely the wrong profile.
I welded the roof section in first, then attached the roof rail to it. Very tricky work with the grinder to get them looking flush!
The lower roof section i have tacked in place to the 1/4, then removed the 1/4 and then welded this section to the 1/4 panel.
I will probably weld a small filler piece behind the original panels so when I weld the 1/4 up with a seam weld it will give a stronger joint and prevent it blowing holes in the thin steel.

Having a few problems with the new outer arch. It lines up with the arch profile of the 1/4 panel for about 2/3rds and then there is a gap. I have tried panel beating it but its just the wrong shape. I think some drastic action is needed. Cut the section off, make a new one that fits better and weld it back in place.
Off to the NEC show Saturday, so hopefully be able to get the 1/4 on for good on Sunday.
 

Attachments

  • IMG_4675.JPG
    IMG_4675.JPG
    495.5 KB · Views: 76
  • IMG_4678.JPG
    IMG_4678.JPG
    510.1 KB · Views: 71
  • IMG_4699.JPG
    IMG_4699.JPG
    503 KB · Views: 61
  • IMG_4750.JPG
    IMG_4750.JPG
    467.7 KB · Views: 73
  • IMG_4749.JPG
    IMG_4749.JPG
    523.5 KB · Views: 72
  • IMG_4748.JPG
    IMG_4748.JPG
    450.7 KB · Views: 65
  • IMG_4702.JPG
    IMG_4702.JPG
    503.5 KB · Views: 66
I feel your pain there. A very tricky repair and partly an area that I know very well. I managed to avoid fitting entire rear quarters but would have expected doing so to have reduced alignment issues; clearly not so :(
I think your precision and thoroughness would shame many other restored Fiats...keep motoring on and take some pics at the show.
 
Cheers Peter, I was saying to Tony that I didn't envy you doing your roof rails.
I nearly killed myself years ago whilst using an angle grinder on a roof rail. It caught it sharply and the grinder bounced off and hit me smack bang on my goggles. I was standing on a chair at the time, I was lucky it didn't hit my head. I then lost balance, fell on my arse and saw the grinder hurtling towards me still spinning.
Needless to say I don't like roof rails anymore and as I said to Tony, if my 500 had your roof rails it would have put me off buying it!
So my hat goes off to you for your skill and efforts in sticking with it!
thumb.gif
 
Good precise work as always Sean. Keep it going. Angle grinder story sounds a bit scary!!!!! They can be a bit deadly if you catch the metal at slightly the wrong angle and they come hurtling towards you.
 
Latest stage:
tried fitting the 1/4 panel, the new outer arch unfortunately it does not line up very well with the 1/4 panel. I tried reshaping it but it wasn't having it. So I made a new section & welded it in allowing me to spot weld the complete arch.
!/4 panel is now fully welded in place & the joints to the roof didn't come out too bad. Nothing a small skim of filler wont sort out
thumb.gif

Today I have pulled him out the garage, looks different in the light.
turned him around and he is now back in the garage and the OS sills are off!
Time to start again!
banghead.gif
 

Attachments

  • IMG_4784.JPG
    IMG_4784.JPG
    456.2 KB · Views: 64
  • IMG_4782.JPG
    IMG_4782.JPG
    461.6 KB · Views: 66
  • IMG_4764.JPG
    IMG_4764.JPG
    416.6 KB · Views: 64
  • IMG_4760.JPG
    IMG_4760.JPG
    323.7 KB · Views: 59
  • IMG_4762.JPG
    IMG_4762.JPG
    399.7 KB · Views: 63
  • IMG_4788.JPG
    IMG_4788.JPG
    503.2 KB · Views: 64
  • IMG_4789.JPG
    IMG_4789.JPG
    488.2 KB · Views: 71
Looking Good Sean. I suppose you can look on the bright side that you have now completed the worse bit. Hopefully the other side won't present you with the same issues on the inner wing. The front should be a lot easier and floor pans quite straight forward.

Tony
 
Thanks Tony,
that gives me a bit more assistance in working out how to repair my roof.
My old roof was virtually non existent, so i havent much to go on.

Thanks
Sean
 
Let me check my pictures of my restoration I may have one with the sunroof off completely that will give you a better idea.
 
I have gone over to the other side!
devil.gif

Well, maybe just of little old Franko.
Now I know my way around the 500 its getting easier.
In one day I fitted the door. Yet again with very minor adjustments this one fitted rather good. I then cut out the inner & outer sill, 1/4 panel & rear arch and inner sill reinforcer.


The inner wing I am glad to say is better than the other side. It looks bad in the photos but this is very light surface rust that cleans up really well with a clean'n'strip disc.
Today I cut out the lower rear inner wing, after making a copy of the reinforcer. Then welded in a new section. After that I have replaced the os engine bay/chassis rail panel.
All the inner panels are now cleaned up, I have started on the lower roof rail which again is better than the other side and I am not cutting the lower roof section off where it joins the 1/4.
So far looking good. Just need to make the L panel than sits next to the rear floor and then I can start putting it all together.
thumb.gif
 

Attachments

  • IMG_4976.JPG
    IMG_4976.JPG
    424.5 KB · Views: 66
  • IMG_4978.JPG
    IMG_4978.JPG
    412.6 KB · Views: 59
  • IMG_4973.JPG
    IMG_4973.JPG
    445.6 KB · Views: 69
  • IMG_4972.JPG
    IMG_4972.JPG
    500 KB · Views: 63
  • IMG_4971.JPG
    IMG_4971.JPG
    460.3 KB · Views: 69
  • IMG_4969.JPG
    IMG_4969.JPG
    497 KB · Views: 61
  • IMG_4977.JPG
    IMG_4977.JPG
    402.1 KB · Views: 61
  • IMG_4979.JPG
    IMG_4979.JPG
    419.7 KB · Views: 57
Looks like a busy Sunday Sean. There's that funny hole in the inner rear wing or should I say there it was! I wonder what it is for?

Is that little bracket in the engine bay supporting the little horizontal panel an addition you have added or was there one on there before? It's a good idea if it is an addition, as it is a little flimsy otherwise. My car doesn't have one.

Tony
 
I'm not sure what it was for Tony. The 500 is too early for crumple zones, and I wouldn't have thought it was access for anti corrosion as they weren't that hot on that in the early 70's. I can only guess it was strengthening as making a hole then putting a swage around it usually makes the panel stronger. All I know is it is a rust trap, hence why it is now gone!
That small bracket was there originally, probably an addition on the 500L over the F. I think they made a few changes, also noticed the rear inner side panels are fitted differently on the L.
Have you finished fitting the engine yet?
 
Back
Top