

You are using an out of date browser. It may not display this or other websites correctly.
You should upgrade or use an alternative browser.
You should upgrade or use an alternative browser.
General Franko the 1971 500L
- Thread starter Franko500
- Start date
Currently reading:
General Franko the 1971 500L
Very nice. I WILL have to flat down and respray my dashboard
OP
OP
Looks a rather nice restoration.
Very shiny dash Peter, get that T-Cut out.
hers another interesting video.
which one is your favourite 500?
https://www.youtube.com/watch?feature=player_embedded&v=mT3q30HLtPQ
Very shiny dash Peter, get that T-Cut out.
hers another interesting video.
which one is your favourite 500?
https://www.youtube.com/watch?feature=player_embedded&v=mT3q30HLtPQ
Looks a rather nice restoration.
Very shiny dash Peter, get that T-Cut out.
hers another interesting video.
which one is your favourite 500?
https://www.youtube.com/watch?feature=player_embedded&v=mT3q30HLtPQ
Great find Sean. I luv the colour of the 500 about 53 secs in a sort of translucent purple/blue colour also towards the end a little racy looking Abarth in red. Sadly it sort of shows that maybe Italians are that overly enthusiastic about classic 500's, they seem more concerned about crossing the road. If that happened in the UK people would be smiling all over their faces, it's that sort of car.
OP
OP
I found a few videos like this, the Italian's have fiat 500 days. It's crazy!
I just watched it again and I don't think I saw one N or D model in there.
Are they getting that rare?
I just watched it again and I don't think I saw one N or D model in there.
Are they getting that rare?
OP
OP
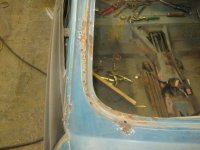
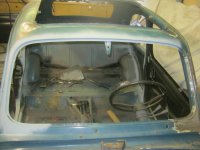
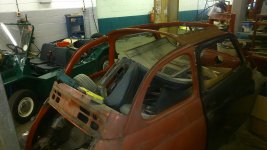
I have been quietly working away on the front screen aperture.
Well maybe not quietly as I have had a lot of cutting, shaping welding & grinding.
Unfortunately I had a bit of a set back, I have been unable to do anything for just over a week as I hurt my back moving a large flower pot. Its getting better so I ventured into the garage today for a couple of hours.
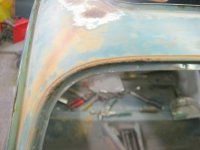
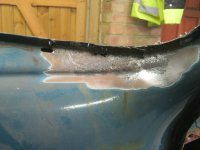
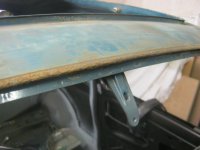
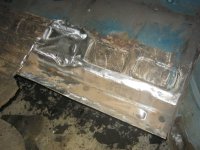
Sadly the windscreen has probably been changed a few times and the paintwork around the screen aperture had been damaged and so the metal corroded over the years.

Once the paintwork was cleaned back, a lot of it was surface rust. The easiest way to deal with this was to clean it up the best I could, and then mig weld all the pitted areas, this will turn any corrosion into metal and when ground up it leaves a good solid surface. I got enough penetration to give it some thickness on the back. When the car is painted it will get some wax in all the cavities which will protect the bare metal parts I cant reach from rusting.
I had to cut some sections out, including a piece of the dashboard. I could of plated this up and not worried as the 500L has the black plastic facia covering it. I have seen a few 500L's with the dash exposed like its predecessors and might go down this route yet, so I made it as close to the original as I could.
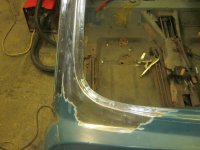
Well that's the f/screen all done apart from a skim of filler.
Well maybe not quietly as I have had a lot of cutting, shaping welding & grinding.
Unfortunately I had a bit of a set back, I have been unable to do anything for just over a week as I hurt my back moving a large flower pot. Its getting better so I ventured into the garage today for a couple of hours.
Sadly the windscreen has probably been changed a few times and the paintwork around the screen aperture had been damaged and so the metal corroded over the years.
Once the paintwork was cleaned back, a lot of it was surface rust. The easiest way to deal with this was to clean it up the best I could, and then mig weld all the pitted areas, this will turn any corrosion into metal and when ground up it leaves a good solid surface. I got enough penetration to give it some thickness on the back. When the car is painted it will get some wax in all the cavities which will protect the bare metal parts I cant reach from rusting.
I had to cut some sections out, including a piece of the dashboard. I could of plated this up and not worried as the 500L has the black plastic facia covering it. I have seen a few 500L's with the dash exposed like its predecessors and might go down this route yet, so I made it as close to the original as I could.
Well that's the f/screen all done apart from a skim of filler.
Attachments
-
 IMG_5365.JPG452.4 KB · Views: 58
 -
 IMG_5370.JPG459.5 KB · Views: 57
 -
 IMG_5366.JPG324.1 KB · Views: 46
 -
 IMG_5371.JPG356.6 KB · Views: 46
 -
 IMG_5368.JPG416.8 KB · Views: 55
 -
 IMG_5446.JPG411.9 KB · Views: 56
 -
 IMG_5445.JPG419.7 KB · Views: 54
 -
 IMG_5444.JPG364.2 KB · Views: 55
 -
 IMG_5367.JPG343.5 KB · Views: 52
 -
 IMG_5369.JPG394.5 KB · Views: 50
 -
 500L Dash.jpg391.6 KB · Views: 62
Oh happy memories ; ( ")
OP
OP
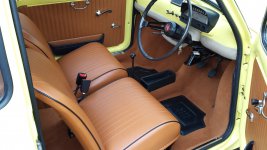
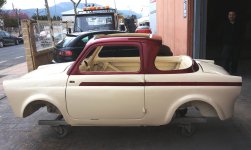
I could only hope to do it that quick Tony.I don't understand how Sean went from the first picture, to having the car sprayed in yellow and a new interior fitted in one afternoon?
Not sure I would pick yellow though!
OP
OP
One of our forum members wanted to know how to replace a floor. So here goes a quick overview. Please note I have missed out the basics of cleaning rust, paint & sealer etc & presume you have some experience. If not you might want to get some local advise from someone who knows what they are doing.
Here's a little run through of the process of replacing a floor.
Now this depends on the welding equipment you have, but I am going to presume you only have a mig welder.
1. Drill through spot welds on the lower outer sill section that is welded to the floor. I have already replaced the sills & will probably spot weld mine.
2. Drill through spot welds on the inner sill that is welded to the floor. Again I have started with a new sill.
3. If you haven't already done so you need to remove the sound deadening pads from the areas you will be drilling/welding. The easiest way is to warm it up with a hot air gun and then use a scraper and it will leave barely any left. This can be cleaned with a degreaser or a clean'n'strip wheel.
4. Check where your new panel will go, sometimes best to mark where you are going to cut with a pen or masking tape.
5. Use a sharp bolster chisel and a large hammer to cut the bulk material away. Use the corner first to start the cut then keep it at an angle to slice through the thin steel.
6. Once the bulk is removed, clean up the rear foot well area slightly to expose the welds. There are some large ones that hold the rear floor strengthener together. Then there are some small ones that hold the floor to the rear floor section, these are the ones to drill all the way through with a larger drill bit. These holes will be used to mig weld through later.
7. Then go to the front foot well section, expose the welds, this time you just want to drill through the first layer of metal. Ideally use a spot weld drill or alternatively use a grinder.
8. Break all the joints by hammering a thin blade/scraper in between the panels to break any welds not fully drilled out.
9. Then use a grinder to remove any burrs on the remaining surfaces and use a hammer and dolly to dress all the joining surfaces nice and flat ready for the new panel.
10. Where the floor meets the centre tunnel, just dress this up with a grinder for a neat edge, hammer it up flat & clean the surface of paint/sealer as the floor will be welded to this surface.
11. Prepare the floor. Don't forget to make sure the front jacking points and seat belt anchors have been welded to your new floor first, its far easier than doing it after. Then clean the paint from the areas which are to be welded as the mig welder does not like paint.
12. Try the floor in place and make any minor alterations to fit nicely. I had to cut a small section out at the rear near the inner seat belt so the rear section can fit under the floor and the inner length can go over the original lip. I also had to trim up the seat rails under the floor as they were slightly too long.
13. When you are happy with the fit, either drill holes or use a punch along the areas you want to weld. Make sure the surfaces are tight together. Mig weld through the holes, then grind the welds flat after.
Unfortunately I have to remove the centre tunnel section due to corrosion so I cannot weld mine in yet. But hope this gives you the idea.
Attachments
-
 IMG_5453.JPG481.5 KB · Views: 70
 -
 IMG_5452.JPG494.6 KB · Views: 66
 -
 IMG_5449.JPG529.2 KB · Views: 59
 -
 IMG_5448.JPG544.5 KB · Views: 69
 -
 IMG_5447.JPG393.4 KB · Views: 78
 -
 IMG_5460.JPG565 KB · Views: 69
 -
 IMG_5457.JPG495.6 KB · Views: 64
 -
 IMG_5459.JPG474.4 KB · Views: 62
 -
 IMG_5455.JPG495.9 KB · Views: 60
 -
 IMG_5454.JPG498.9 KB · Views: 64
 -
 IMG_5463.JPG472.2 KB · Views: 79
 -
 IMG_5464.JPG545.9 KB · Views: 81
 -
 IMG_5462.JPG493.1 KB · Views: 93
 -
 IMG_5466.JPG469.9 KB · Views: 62
 -
 IMG_5467.JPG641 KB · Views: 63
Last edited:
OP
OP
It's a real shame they don't do a complete floor for the 500, it would be such a neat job to carry out.
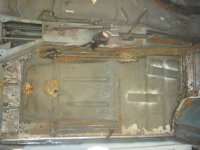
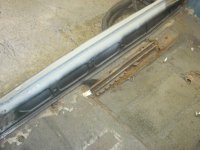
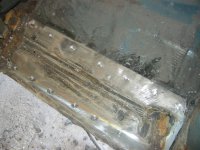
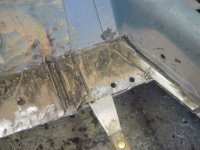
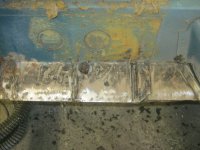
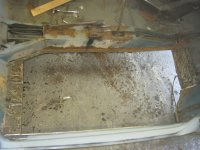
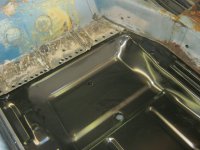
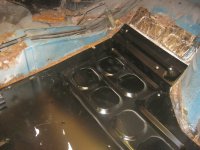
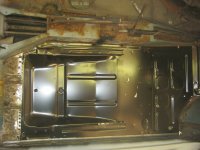
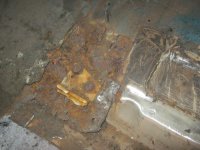
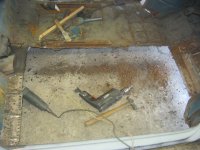
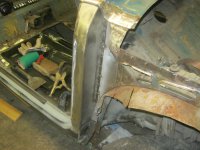
My hole in the floor has got bigger! I was tempted to take the whole floor out in one go, but by leaving one side in it will stop the bulkhead moving and therefore should not affect the geometry of the car. Although the sills are all strong having been replaced there is still some flexibility in the bulkhead. Ideally doing this kind of work calls for going on a jig to keep everything in its correct position.
Removing the tunnel was a little difficult, I could not find the spot welds at the front as it was too heavily corroded, so I just drilled as much as I could.
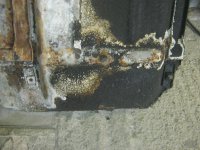
It would appear the pipes are originally welded by brackets to the box section and when installed they are tacked with braze where they enter the holes in the rear floor bulkhead. This caused a little problem. I had separated the tunnel from the car as a complete unit and then realised I couldn't get it out because of the pipes, but lucky enough with a little wiggle the brazed joint broke and it came out in one section.
After drilling out the spot welds which attached the floor to the tunnel section, the full damage caused by the corrosion can be seen.
I will get some more sheet steel to make the new floor section, that's straight forward. I think the best thing to do with the tunnel is get it sand blasted then get some lengths of steel folded to a right angle, cut the rusted lower section off and spot/plug weld them on to the tunnel section. This will give me a nice new straight edge to weld back to the floor. One the carpet is down, no-one will know - apart from anyone who reads this!
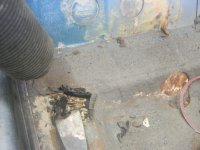
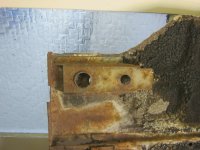
The front lower bulkhead where the accelerator pedal is attached was very corroded. I removed the corroded section after making a template so that the captive nuts go back in the same position. Made a new piece and welded the original nuts in place as the threads were fine. Welded the new section in place and ground it up nice and flush. This will eventually be covered by the tunnel & sound deadening pads. I will give the underneath a clean up with the grinder when I eventually turn the car on its side. There's no way I am jacking the car up at this stage, that would surely cause some damage.
My hole in the floor has got bigger! I was tempted to take the whole floor out in one go, but by leaving one side in it will stop the bulkhead moving and therefore should not affect the geometry of the car. Although the sills are all strong having been replaced there is still some flexibility in the bulkhead. Ideally doing this kind of work calls for going on a jig to keep everything in its correct position.
Removing the tunnel was a little difficult, I could not find the spot welds at the front as it was too heavily corroded, so I just drilled as much as I could.
It would appear the pipes are originally welded by brackets to the box section and when installed they are tacked with braze where they enter the holes in the rear floor bulkhead. This caused a little problem. I had separated the tunnel from the car as a complete unit and then realised I couldn't get it out because of the pipes, but lucky enough with a little wiggle the brazed joint broke and it came out in one section.
After drilling out the spot welds which attached the floor to the tunnel section, the full damage caused by the corrosion can be seen.
I will get some more sheet steel to make the new floor section, that's straight forward. I think the best thing to do with the tunnel is get it sand blasted then get some lengths of steel folded to a right angle, cut the rusted lower section off and spot/plug weld them on to the tunnel section. This will give me a nice new straight edge to weld back to the floor. One the carpet is down, no-one will know - apart from anyone who reads this!
The front lower bulkhead where the accelerator pedal is attached was very corroded. I removed the corroded section after making a template so that the captive nuts go back in the same position. Made a new piece and welded the original nuts in place as the threads were fine. Welded the new section in place and ground it up nice and flush. This will eventually be covered by the tunnel & sound deadening pads. I will give the underneath a clean up with the grinder when I eventually turn the car on its side. There's no way I am jacking the car up at this stage, that would surely cause some damage.
Attachments

I have given this much thought Sean and finally remove my crown and hand it on to you as restorer of the most challengingly rusty Fiat 500. I was King for a while but the rightful heir has arrived.
Brilliant work taking on that level of challenge.
Wobbly bulkhead..see this one..
 restauro_scheletro2_1_7 by peterthompson, on Flickr
Brilliant work taking on that level of challenge.
Wobbly bulkhead..see this one..
restauro_scheletro2_1_7 by peterthompson, on Flickr
OP
OP
That's seems a bit excessive to save a 500L even by my standards!
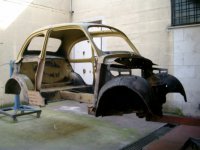
I thought this one was bad enough.
Mind you Motobambino are doing one where it is a full resto & they are replacing the roof. Not sure if you can see there photos on line but I am following them via facebook and they add some rather interesting projects including a Neckar Weinsberg 500 coupe.
It seems there are a lot of people willing to spend money of these little beauties at the moment. This can only put there value up.
Attachments
Nice Facebook page Sean.
Those guys really know how to fix a Fiat.
As you say, amazing lengths to go to to rebuld a car.
The yellow one came in for an MOT?!!!! The owner must have had the shock of his life.
Those guys really know how to fix a Fiat.
As you say, amazing lengths to go to to rebuld a car.
The yellow one came in for an MOT?!!!! The owner must have had the shock of his life.
OP
OP
I know Peter, initial photos look quite good. You never know what lies beneath. Hence going for a full resto that way I know it's all solid.
My feelings exactly. It's a great feeling looking at mine in paint and knowing there's no weaknesses. I notice Moto Bambono's scuttle repair panel now has the rain channel included. I had to make that bit .Also they do an air intake grille. Mine was second hand from Italy. I had quite a few panels from them but that was 5 years ago. Things move on.

OP
OP
Very funny Peter,https://www.fiatforum.com/images/smilies/rofl.gif
it cant be me, there arent enough sparks flying!
it cant be me, there arent enough sparks flying!
OP
OP
The company who are fabricating my centre tunnel are taking a fair time to do a simple job. They have promised me it will be done this week though!

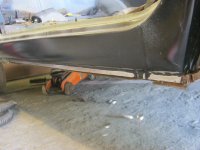
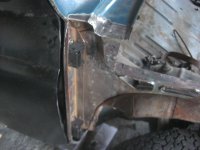
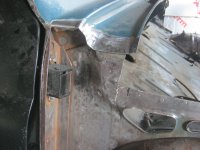
So I decided to finish the A post.
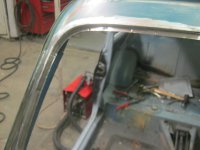
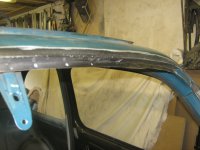
When I removed the OSF wing it was similar to the NSF. Surface rust inside & out, so "in for a penny in for a pound" I decided to cut if off and make a new one.
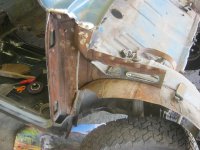
I left the front face in place as this is welded to the strengthening panel and also in fair condition. Once removed the surface rust cleaned up quite well with no heavy corrosion visible.
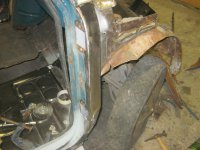
I fabricated a new one is slightly thicker steel, this should add to the strength & stand up to any further corrosion longer. This area seems to be a bit of a rust trap as the drain tubes from the front screen dump the water straight into this area which only had a coat of primer. I have removed my drains so this shouldn't happen in the future. I sprayed the inside panels with a heavy zinc paint which has great resistance to corrosion. Welded the panel in place and then ground the weld down flush.
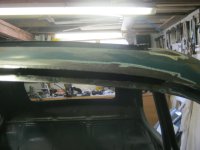
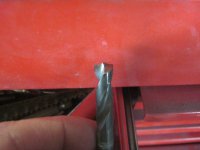
The fitting of the 500 front wing is tricky at the scuttle panel area. I wanted to make the joints look original, but this wing had clearly been replaced at some time so I cut off the original wing flange and also the scuttle & inner wing flange which had been ground to death and also corroded.
Cut a couple of new pieces of steel to match and welded them in nice and flush. I now have some good clean metal to spot weld the wing to when I come to fit it.
That's another couple of jobs ticked off.
So I decided to finish the A post.
When I removed the OSF wing it was similar to the NSF. Surface rust inside & out, so "in for a penny in for a pound" I decided to cut if off and make a new one.
I left the front face in place as this is welded to the strengthening panel and also in fair condition. Once removed the surface rust cleaned up quite well with no heavy corrosion visible.
I fabricated a new one is slightly thicker steel, this should add to the strength & stand up to any further corrosion longer. This area seems to be a bit of a rust trap as the drain tubes from the front screen dump the water straight into this area which only had a coat of primer. I have removed my drains so this shouldn't happen in the future. I sprayed the inside panels with a heavy zinc paint which has great resistance to corrosion. Welded the panel in place and then ground the weld down flush.
The fitting of the 500 front wing is tricky at the scuttle panel area. I wanted to make the joints look original, but this wing had clearly been replaced at some time so I cut off the original wing flange and also the scuttle & inner wing flange which had been ground to death and also corroded.
Cut a couple of new pieces of steel to match and welded them in nice and flush. I now have some good clean metal to spot weld the wing to when I come to fit it.
That's another couple of jobs ticked off.
