General Franko the 1971 500L

Currently reading:
General Franko the 1971 500L

Hoorah!, finally got my panels back for the centre tunnel section.
They made quite a nice job of them.
2 panels made and half a sheet of 1mm steel of for the sum of £30..BARGAIN!!!!

Now all i have to do is put it all together.
 

Attachments

  • IMG_6092.JPG
    IMG_6092.JPG
    422.5 KB · Views: 76
I was in a Bodyshop today inspecting a vehicle and i noticed a classic car that had been lined with sound deadening material.
It is called Extreme Dynamat. The material is covered with self adhesive one side & foil on the outside. It can be moulded into all different shapes.
The repairer said this can be applied direct to bare metal & forms a perfect seal to prevent moisture. Ideal for convertible vehicle then.
Personally i would always recommend sealing joints and painting the metal before applying to prevent any further problems.
This material is excellent to stop drumming noise & also helps acoustics when using a good stereo system.
Readily available on E-Bay. Little more expensive than the standard stuff though.
 

Attachments

  • Dynamat.jpg
    Dynamat.jpg
    15.2 KB · Views: 69
Hoorah!, finally got my panels back for the centre tunnel section.
They made quite a nice job of them.
2 panels made and half a sheet of 1mm steel of for the sum of £30..BARGAIN!!!!

Now all i have to do is put it all together.

That is a reasonable price Sean. Are you going to fabricate a new top panel or is the top salvageable?
 
The top should be okay Tony. Once I take the 2 side sections off I should be able to clean it up nicely. It's about 2mm thick so plenty off metal still on it. Just mainly surface rust.
There's a lot of work making that panel as it has all the mountings & holes for the starter lever, h/brake & gear lever. So best to save it if possible?
 
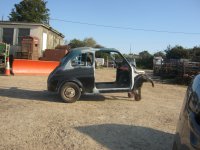
At last I have been able to get on with the floor.
thumb.gif
I had already replaced the OS floor panel & removed the centre tunnel. But I have been waiting to get the panels fabricated to refurbish the centre tunnel before I can do the NS.
thumb_down.gif

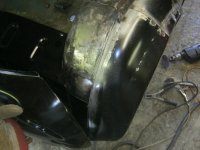
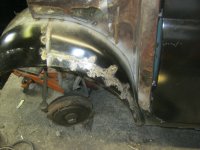
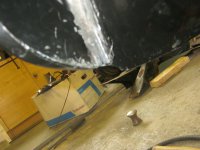
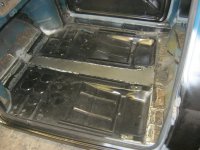
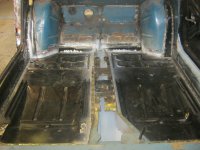
First off, replace the NS floor panel. I couldn't do this up until now as I had removed the NSF outer wheel arch, and there wasn't much holding the shell from distorting. But I have replaced this now which stops the bulkhead moving.
smile.gif

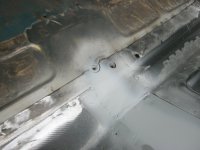
Then I made a new centre section out of 1mm sheet mild steel & plug welded this in place. I have placed this under the floor panels. Reason being is the floor panels have a joggled edge that allows you to weld the floor over the top of the centre tunnel flanges. But I wanted it to look as original as possible, so I have flattened these out before welding the centre section in. Then the tunnel can go over the top and look similar to the original. An additional section was then welded in to finish the centre section where it covers the 2 bolts for the throttle pedal.
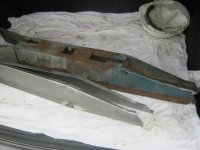
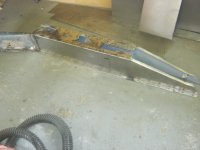
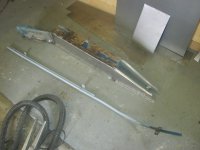
The tubes going through the tunnel needed a good clean up & a couple of new mounting brackets made.
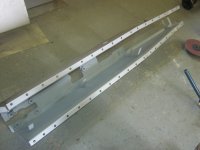
The tunnel section was fun, I measured the position of the gear lever mounting so as to make sure I don't have any issues later. I cut the holes in the new side panel & then cut the old ones off and drilled out the spot welds on the top surface.
A good clean up to remove any surface rust from the inside of the top panel, not too worried about the top as this will get sandblasted.
I then welded the top section to the 2 sides & then placed it in the car to measure where to cut the 2 rear sections which I am using from the old panels. These were then welded onto the new side panels.
I made some new metal cable ties that are spot welded inside the side panels, these hold all the cables in place.
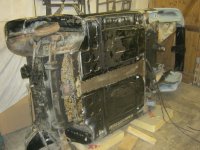
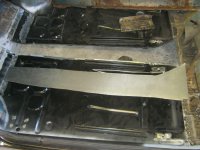
Positioned the tubes in place, fitted the centre tunnel to make sure it all lined up then welded it in place using plug welds. Then ground all the heads off. Unfortunately I ran out of mig wire 2 welds from the finish, so a little bit to finish off tomorrow. When the shell is ready it will go on its side to scrape off any remaining sealer etc, I can then finish the floor - there are 2 centre rail sections that need to be added. Then it wont be long before it can go to the sandblasters. Then it will look like a new shell
smile.gif

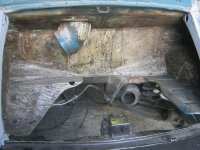
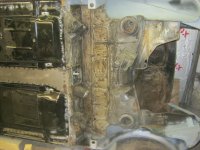
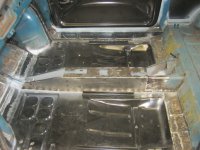
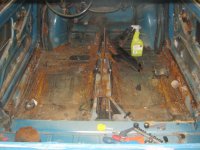
Im really pleased with how this turned out as the original pictures show this floor was a right mess before.
biggrin.gif
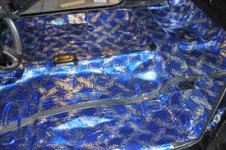
Once the floor has been sealed, painted & sound deadening pads applied, this floor will be as good as new. Shame to cover it with a carpet!
 

Attachments

  • IMG_6150.JPG
    IMG_6150.JPG
    404.6 KB · Views: 58
  • IMG_6148.JPG
    IMG_6148.JPG
    384.9 KB · Views: 60
  • IMG_6147.JPG
    IMG_6147.JPG
    425.2 KB · Views: 63
  • IMG_6145.JPG
    IMG_6145.JPG
    524.5 KB · Views: 69
  • IMG_6144.JPG
    IMG_6144.JPG
    509.4 KB · Views: 67
  • IMG_6151.JPG
    IMG_6151.JPG
    425.4 KB · Views: 68
  • IMG_6152.JPG
    IMG_6152.JPG
    497.4 KB · Views: 64
  • IMG_6153.JPG
    IMG_6153.JPG
    492.5 KB · Views: 66
  • IMG_5478.JPG
    IMG_5478.JPG
    606.2 KB · Views: 66
  • IMG_4027.JPG
    IMG_4027.JPG
    580.6 KB · Views: 60
  • IMG_4024.JPG
    IMG_4024.JPG
    609.7 KB · Views: 62
You have been busy Sean!!!! Good to know that with the right anti corrosion treatment put in place Franko should be solid for another 40 years plus.

Effectively you have replaced all the metal work on the floor between the A and B posts? And managed to do it with no flexing in the bodywork. Top work.

Tony
 
I spent the whole day yesterday dealing with the NSF outer arch.
What a nightmare!
I had already split the panel in two as it just wasn't fitting, and I had managed to get the rear half to fit but I had to cut the arch section off and reposition it as it was pressed completely in the wrong position.
If I lined it up with the wing the part that attached to the inner arch had a 5mm gap and was 5mm short of the floor panel.
Again with the front section, when I fitted all the panels in place there was a 5mm gap at the top of the arch where it meets the inner wing. I had no alternative but to cut it and weld some more metal into it to make it wider.
This was actually easier than it looks but quite time consuming.
It all lines up nicely now and I have managed to dress the lower section up to get the front panels/wing/outer arch to line up nicely with minimal gap. Sorry about the blurry image, it looked okay in the garage.
The outer arch now follows the same contour as the wing and will be easy to spot weld together when it comes back from the sand blasters.
Just need to dress up the osf to deal with the small gap and my welding is nearly complete!
 

Attachments

  • IMG_6401.JPG
    IMG_6401.JPG
    468.4 KB · Views: 83
  • IMG_6402.JPG
    IMG_6402.JPG
    458.3 KB · Views: 68
  • IMG_6403.JPG
    IMG_6403.JPG
    479.3 KB · Views: 78
  • IMG_6399.JPG
    IMG_6399.JPG
    446.7 KB · Views: 71
Looking good Sean. Some major, I would use the word tweaking but that would an injustice to the amount of work you had to do to get it all to fit together.

So what's left front outer wings and front panel? Then off to get it sand blasted?
 
Well Tony, just a little more tweaking of the front wings & f/panels. I might weld the inner front panel in place then next step is do any last minute welding jobs, whip off the suspension & steering, turn it on its side, scrape off some sealer etc then down to the sand blasters.
Then it will come back rust free in all those bits I can't get to. They also spray it with a weld through primer. Then I can weld the front wings & f/panel on.
After that it's a few filler repairs, some final dressing up & check bolt on panels etc fit & time to get it painted.
I'm off to Menorca in 2 weeks, so would like to get to blasters before I go then it will be ready to pick up when I get home.
 
I have now been around the car doing those final little welding jobs.
Spent an hour scraping the stonechip & sealer off the engine compartment.
I released the front suspension ready for removal at the blasters, couldn't believe every nut just come undone. I never had that with all my old Mini's, every nut and bolt on those used to rust solid.
Next, the rear suspension came off. Had to clean about 20 years of mud out of the rear arms. It was rock solid inside. The top coil spring rubbers were like new under the collars.
Franko then got rolled onto his side. Removed all those items that were left (must be getting older, I used to crawl underneath and get filthy dirty) and then scraped off the remainder of the sealer etc.
Only jobs left now are a few welds, a bit of grinding and make the small floor rails that join one floor to the other.
I wanted to get Franko down to the blasters so they could do their magic whilst I was on the beach, but I think I shall wait until I am back. I would prefer to be there to make sure everything gets done properly.


Time for a holiday I think!
wave.gif
 

Attachments

  • IMG_6591.JPG
    IMG_6591.JPG
    639.4 KB · Views: 72
  • IMG_6754.JPG
    IMG_6754.JPG
    490.8 KB · Views: 90
  • IMG_6742.JPG
    IMG_6742.JPG
    510.9 KB · Views: 88
Nice one Peter. Been busy all last week but managed to spend all Sunday in the garage. Try to get an hour here and there, every little counts. Have you got yours finished yet? Must be close now?
 
Thanks Owen,
This has been some what challenging as it was in similar condition to yours. Im taking a while longer than you as i have to fit it in around my job and the wife.
Its more of a hobby for me, but i am really enjoying it. Keep up the good work!
 
am the same as u lol except i have no wife lol , and i do mine for my self ,i wouldnt do that for no body, to much time and effort involved as u well no

and no job , i had 2 heart attacts on 1 dec 2013:cry:
 
Back
Top