General Franko the 1971 500L

Currently reading:
General Franko the 1971 500L

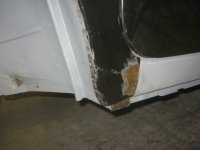
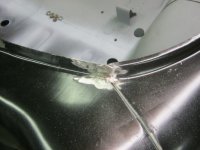
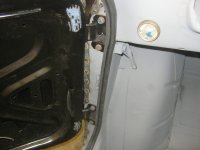
I can see that you really work things out first Sean, so one thing here to advise you about that you might not expect. When I plug welded that flange at the door pillar I asumed that with everything else in alignment the shut line had to be perfect.. But there was a small amount of tension in the panel which had the effect of pulling the A-post shut line slightly wider than it had been on the dry run. Obviously the door had to come off for welding.
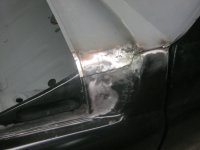
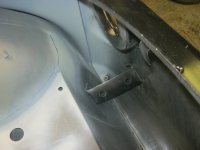
I don't know how you can avoid this but I ended up welding on a very fiddly extension to the vertical end of the wing .on the driver's side.
Equally, you don't want the gap tolerance as good as a modern car because the hinge geometry brings both it and the door leading edge very close to the wing when opening.

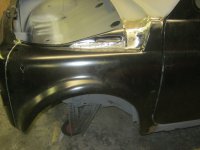
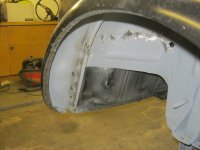
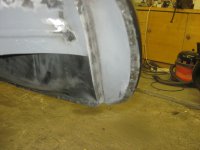
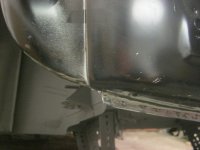
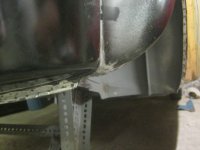
I know what you mean Peter, i have clamped the wings in place using vice grips, self tappers and panel pins, all looks great until you fit the front panel then everything changes. And when you clamp the inner arches to the wings it got even worse. That's one of the reasons i had to do so many alterations to the inner arch panels to get them fitting flush with the outer arch.
That's another reason i have gone for fitting it all in one go.
Unfortunately a lot of it is down to the poor quality panels, but also the design of the car. Hence why modern vehicles have all gone away from the inner and outer arches being joined this way. Not only does it prevent alignment issues, it also helped reduce corrosion as the moisture wont get into the seam.
 
Been a bit slow here since last post. Unfortunately my little dog got ill, spent most of a week nursing her and spending some time with her. Sadly we had to take her to the vets as her heart was giving up and wasn't producing enough oxygen to breathe. Rest in peace little Mazie, sadly she will never her get her ride in Franko.
cry.gif
 

Attachments

  • IMG_1152.JPG
    IMG_1152.JPG
    2 MB · Views: 32
Still life goes on.
I have finally found some time to get the front welded in place.
Wheel arches have been spot welded, so has the lower edge of the front panel and top of wings that attach to the inner wings.
I have plug welded the back edge of the wings to the A post, and also put 2 more welds at the bottom of the wing to secure it to the sill panel.
I still need to do a bit of tidying up with the welds which secure the wing to the scuttle panel, but I will do these when I take the doors off to grind the welds on the back of the wing flush.
2 small pieces were made up for the scuttle panel, these overlap the top of the wings. I mig welded these in place and ground them down flush, with a skim of filler and some sealer these should look great.
The battery tray is welded to the inner front panel with a few spot welds and a couple of tack welds to secure the support to the front panel (not too much heat as I don't want to distort the outer front panel).
And last of all a couple of plug welds to secure the tyre support to the front panel at the bumper mount hole.


I spent a bit more time dressing up those inner arches and managed to close the gaps up quite nicely. Nothing a bead of sealer wont fill.
I'm not sure if it was correct but I decided to weld the gap up where the top lip of the front panel meets the 2 wings. I thought it looks neater and also adds a little strength.


Next step is to go over a few welds that developed pin holes due to the sandblasting doing such a good job.
 

Attachments

  • IMG_7363.JPG
    IMG_7363.JPG
    455 KB · Views: 62
  • IMG_7364.JPG
    IMG_7364.JPG
    419.7 KB · Views: 70
  • IMG_7365.JPG
    IMG_7365.JPG
    384.8 KB · Views: 58
  • IMG_7366.JPG
    IMG_7366.JPG
    435.7 KB · Views: 54
  • IMG_7368.JPG
    IMG_7368.JPG
    371.9 KB · Views: 58
  • IMG_7379.JPG
    IMG_7379.JPG
    457.4 KB · Views: 41
  • IMG_7377.JPG
    IMG_7377.JPG
    436.2 KB · Views: 54
  • IMG_7374.JPG
    IMG_7374.JPG
    440.8 KB · Views: 45
  • IMG_7372.JPG
    IMG_7372.JPG
    426.1 KB · Views: 46
  • IMG_7371.JPG
    IMG_7371.JPG
    370.6 KB · Views: 50
  • IMG_7380.JPG
    IMG_7380.JPG
    411.9 KB · Views: 59
  • IMG_7383.JPG
    IMG_7383.JPG
    453.6 KB · Views: 65
  • IMG_7384.JPG
    IMG_7384.JPG
    530.3 KB · Views: 68
Been a bit slow here since last post. Unfortunately my little dog got ill, spent most of a week nursing her and spending some time with her. Sadly we had to take her to the vets as her heart was giving up and wasn't producing enough oxygen to breathe. Rest in peace little Mazie, sadly she will never her get her ride in Franko.
cry.gif

Heartbreaking Sean. I feel for you, they are members of the family after all. May she RIP.

Our dog was 12 on Sunday and she has been acting really funny since really tired and sleeping a lot. Not like her at all. Then she kept us awake all night last night until 5am, really restless. I don't know if this was because she escaped from the garden at about midnight to chase a badger across the fields and was a bit hyper? So she can't be that poorly!!!!

Tony
 
Dogs are great aren't they? Always glad to see you no matter how bad a day you are having. Hopefully she will be okay Tony, but always best to get her checked out, dogs are do good at hiding their illness until it is too late.
 
Top work Sean those inner, outer wings and front panel have come together really nicely.

It's probably stronger than when it came out of the factory.

What's that round thing on the dashboard in the third to last picture?

Tony
 
Ah well spotted! When I first got Franko I found this on the inner side of the roof. It is a magnetic ST Christopher (patron saint of travellers). Despite everything I have kept this on the car at all times. Maybe in my old age I am getting more superstitious.
I forgot to mention it when it went to the blasters. When I collected him the guy said he noticed it and kept moving it around the car whilst he blasted it. So it stays with the car to the end!
 
Oh no I am with you there. I wouldn't let it go either. Imagine if you took it out and had a prang on the first test drive!!!!!!
 
Very neat detailing on that welding. You did the right thing at the front panel/top of wing as originally they had to put a rough blob of setting goo there to "stop" water getting in.
I lost it with the overlap on the scuttle to the wing and ended up reluctantly filling over the eyesore.
I'm not sure the bumper reinforcer in the spare wheel well actually needs welding to the front and my battery box was never welded to the panel either.
I lke your thinking on St Chris and I'd be the same but he ain't been much help to Franko until Brother Sean found him, has he?. :)
 
I looked at the front panel and there is a bracket that lines up next to the side of the battery tray perfectly. I presume these two were welded to add strength & support to the battery tray, also there were two small tabs on the battery tray/spare wheel support, again these were crying out to be tacked to the front panel to add strength. It would be nice to know if this is correct as my 500 had the front panel replaced before.

Ps I had been called other names with regards Franko "Jesus Christ are you going to repair that?"
 
That's the one. The one on the N/S won't matter, as you say the bumper bolt holds it tight. My OCD gets the better of me sometimes. Probably why things take me so long. My dad has always been a perfectionist so I always seem to live up to his standards!
 
Thought any further on a colour yet Sean? You can't be far away from deciding, a few dabs of filler here and there you must be near priming him.

I can't remember did the engine run when you first bought Franko?
 
I still haven't decided on colour yet Tony. I originally thought of keeping Franko original and therefore painting him in Blu Turchese 419. But then I got the red 500D. I thought the 500D would be better suited to Azzurro Acquamarina 433, even though it was not used in 1962. Trouble is I would then have 2 500's in blue. So I might stick with Rosso red for the D.
That leaves me with a choice for Franko, so probably keep 419 with red seats, or go for 433 and go for tan/beige interior. Decisions, decisions.
Jac said she would prefer the Aquamarina!


Yes is shouldn't take long to get him ready for primer, still deciding whether to paint him myself in cellulose or get him painted in 2k. I might wait a while and get on with the engine & gearbox etc. That way when the paintwork is done I can start assembling straight away rather than risk the paintwork getting damaged.


The engine wasn't running when I got it. Going by the paperwork he hadn't been on the road for 20 years. within an hour of getting him home I got the engine running before taking it out.
 
Owen, I was so excited that it started I thought it was very apt for a good old thumbs up!
I couldn't believe it, especially there were barely any contact left in the dizzy. I had to put a small bottle of fuel down by the side of the engine as the fuel line was blocked, and it was a little loud due to the state of the exhaust.
 

Attachments

  • IMG_4064.JPG
    IMG_4064.JPG
    525.4 KB · Views: 23
Nice one Sean.
By the way, I can heartily recommend that 419 blue with tan seats:)
Failing that, please paint it Positano yellow with black seats.
I've nearly finished hand cutting the cellulose with Farecla; not to deep as I can't be bothered. Apart from the deep shine I'm getting, the colour has a real lustre that suits the car. I end up with an almost factory finish that I really like (very slight wave of orange peel rather than mirror flat.) Unfortunately, I can still see my face in it.:eek:
I must admit though, there is a lot to be said for the stability of more modern paints.
 
I know what you mean Peter, 419 really is a nice colour. There wasn't any shiny parts on mine to really get a feel of it, but when i went to see Tony's Luigi it really does look a good old classic colour. Tony's is painted in Cellulose as you know and they did a really nice job of which Tony loves to polish.

As much as i used to like painting cellulose, it can be a lot more work (dont need to tell you that!) and it is not quite as durable as 2k. But i cant/wont paint 2k in my garage as it is lethal unless you are in a fully extracted booth with full face air fed mask. If you don't have that set up then don't expect to live to long.
The real advantage of cellulose is that you can get high on it for a while.

If i went 419 colour, not sure about seats. Tan/White(500F type) or red with a choice of F/L seats? decisions decisions.
 
Back
Top