Technical Becky's timing belt - the ongoing saga!

Currently reading:
Technical Becky's timing belt - the ongoing saga!

Joined
Oct 1, 2017
Messages
7,224
Points
2,255
Location
Edinburgh Scotland
Well, here goes! This is not in anyway intended to be a guide as to how to change a Panda Timing Belt, Andy Monty's guide has to be the definitive work on that and I can't thank him enough for his guidance.

As I've said elsewhere I'm a great believer in leaving things alone if you don't need to touch them. So I was wondering, as I set to work on this, if I really needed to slacken the cam sprocket retaining Torx bolt?

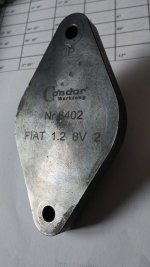
The only way I could know for sure would be if I checked it with the proper tools when I'd finished so my two items of major expense were the timing kit (I bought a Neilsen kit for a very reasonable price on eBay) and the Belt kit.

P1070224.JPG

P1070225.JPG

P1070229.JPG

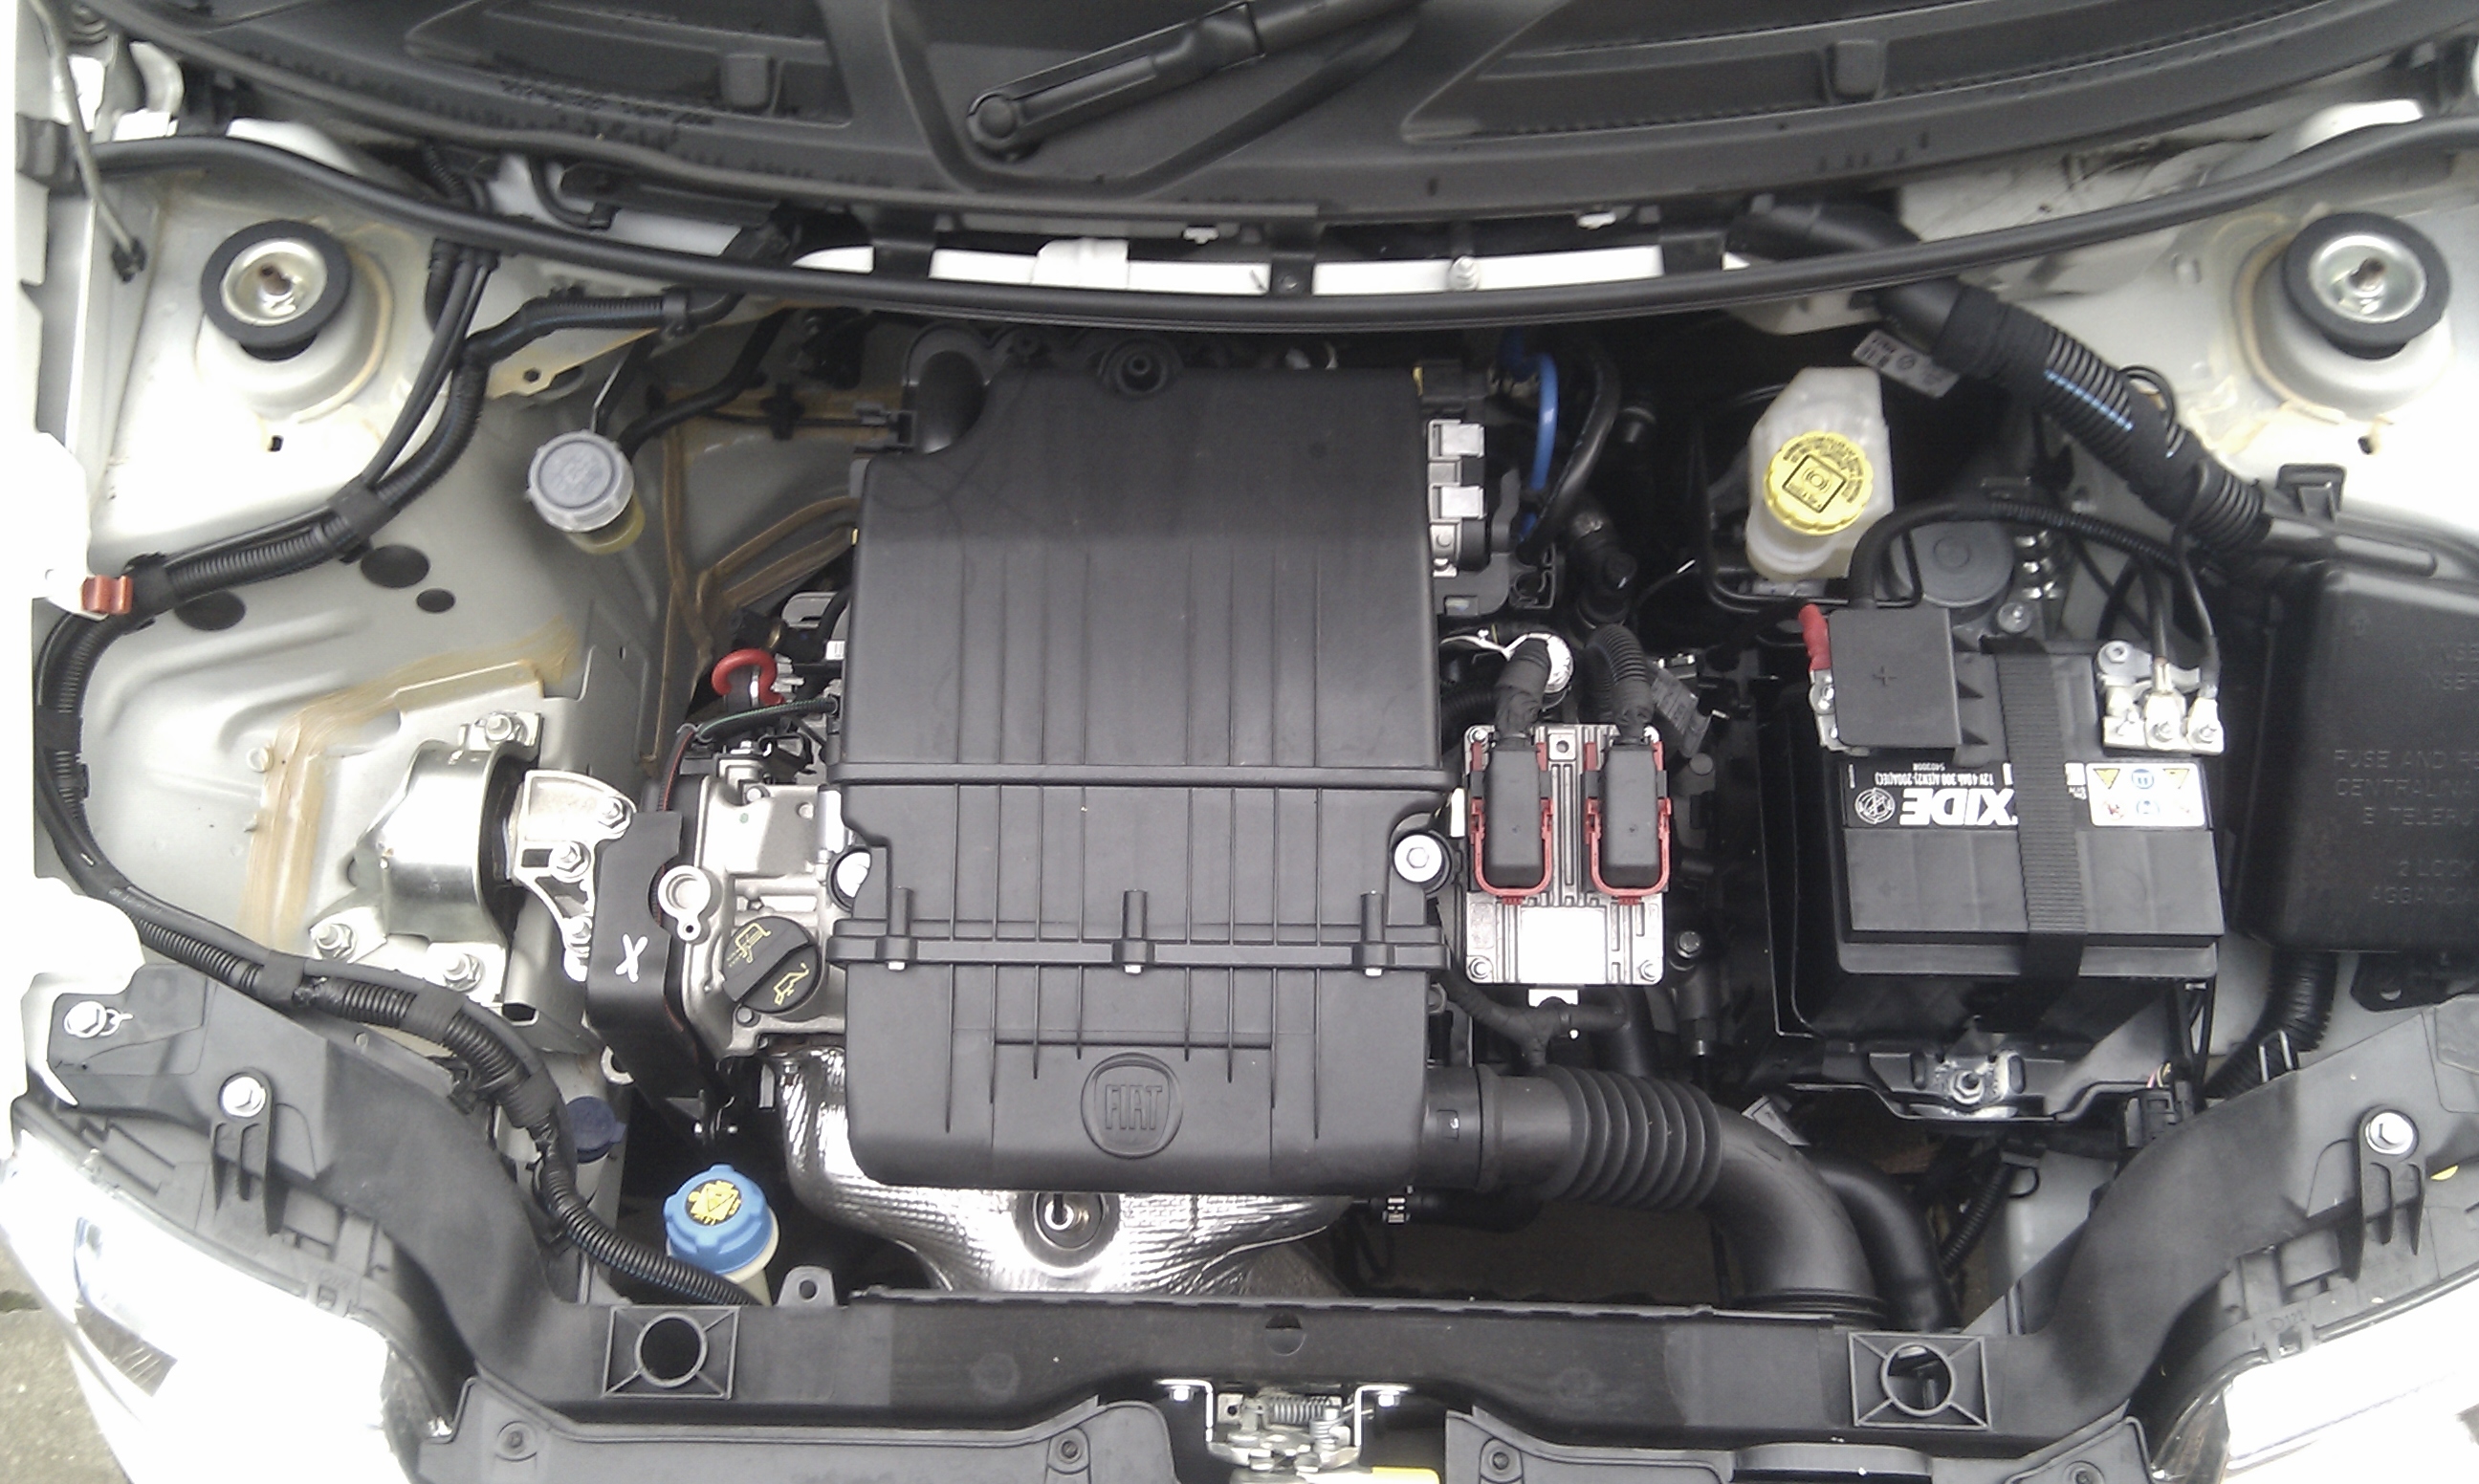
The Haynes manual recommends removing the battery and tray then the individual coil packs and finally the coil pack holder. With a little dexterity you can get the three holder screws out on their own so you can leave the battery where it is. The harness for the injectors is held by one set screw easily accessed but watch out for the right hand end which has a small plastic extension which needs to be coaxed out of it's hole carefully to avoid it snapping off.

P1070235.JPG

Next problem was the engine mount. To be specific, not so much the mount itself which comes off quite easily (piece of wood and trolley jack under sump), but the block which is bolted to the front of the engine. It's held by four large (15mm headed?) set screws which are very tight up on the inner wing. I had thought my Halfords Vortex sockets would come in handy here as they are much shallower than my standard 1/2" drive stuff

P1070231.JPG

P1070233.JPG

Unfortunately they are too "fat" and wouldn't sit squarely on the bottom bolt heads! eventually I got them with the ring end of a combination spanner and 3/8" long extension used as a lever on the open jaw end! They were VERY tight! There was also a lot of jacking up and down to gain access and to remove the mounting block itself. Really this was probably the most awkward part of the whole excercise.

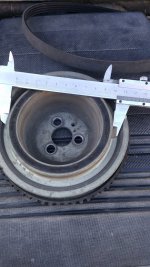
So now all the stripping work is done. Mount dismantled, belt guards off, cam cover removed, crankshaft phonic wheel pulley removed, etc. First thing I notice is the dirt (rubber dust from belt wear and gritty dust) around the bottom sprocket, but, thank goodness, not a trace of oil from either top or bottom seals. I was going to change them if there had been any question but it's bone dry! Yippee!

P1070239.JPG

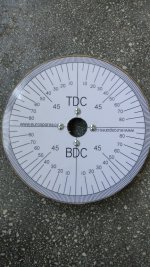
Beginning to think this is the original belt maybe. (I have no evidence of it having been changed despite a full book of service stamps. Car's 8 years old with 62,000 miles approx) So, now fit up the timing tools and apply tippex marks to belt and sprockets.

P1070242.JPG

P1070240.JPG

P1070241.JPG

Slacken tensioner and remove old belt. Hmmm. Surprisingly good but quite "hard" feeling and very shinney.

P1070271.JPG

P1070270.JPG

P1070269.JPG

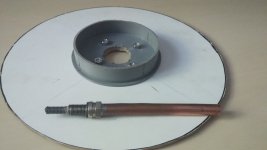
Oh well, it's obviously not been done recently so It's just as well I'm doing it now. Next strip out the water pump. And there you go. Give it a nice spin and suspicions confirmed, a nice scrunchie bearing noise. So there's the culprit behind that little bearing zizz I was hearing!

Next I transferred the tippex marks from the old belt to the new one and all that's left to do now is build it all back together. Boring job cleaning up the block face where the pump sits, boy does that Fiat sealant stick! Didn't slacken the cam sprocket/pulley torx bolt so found I had to remove the small locating screw that holds the bottom sprocket timing tool to the bolt hole for the cover and back off the crank by about 1/2 a tooth to get the new belt over the sprockets. Removed all the timing tools, set the tensioner to "max" position and, very gingerly, rotated the crank for a couple of revs and rechecked timing. All looking A1!

P1070243.JPG

Then thought, I'll just swing the engine over maybe a dozen times before setting the tensioner back to it's running tension just to bed everything down nicely. OOPS! Forgot the cam cover is off! Next minute frantically scrambling for my drip tray to catch the teacup full, or so, of oil which has leaked down the front of the engine from the oil feed hole in the head and is now spreading out nicely on my sand colored slabs! Took about 1/2 an hour to clean that up - What a clot!
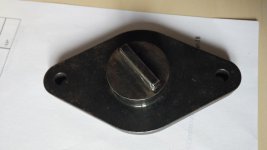
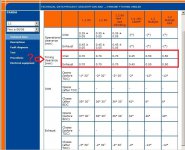
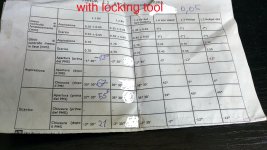
Ok now for the big check. Have I got away without slackening that cam pulley retaining bolt? So carefully turn her over till the crank locking tool lines up and, struggling up once more on these 71 year old legs, I find that the cam locking plate just slips in as nice as you like! Just all the "bits" to put back now and I'm done. Oh, Damn! I forgot there is a leak on the metal pipe where it comes out of the back of the water pump

So. The story is, yes you can accurately do the cam belt on these engines by the "Tippex" method BUT, and it's a big but, only if the cam sprocket was correctly set by the last person to do it. (As, I think, was mentioned by s130? in my Tech Talk thread about finally getting my Multiecuscan working.

Well, last time I tried this none of the pictures came out! So as it's taken me quite a while to do this I'm a bit nervous about hitting the "Post" button! Come on though Jock, just do it! Yes, Do it NOW
 
I mentioned above that there was a water leak from the back of the water pump. The leak is between the metal pipe and the rubber seal. The pipe has to come out to change this seal and it is held to the block by a small (6mm) set screw. I had the same problem on our '92 Panda Parade (Felicity) but she put up a fight - the set screw sheared off which caused me quite a lot of extra work. Becky though proved to be a proper lady, the fixing surrendered intact to my 3/8 drive 10mm socket. Once I had wiggled the pipe out it was obvious that although the seal had failed (now a much more substantial seal than that on Felicity), the pipe itself, although looking good over most of its exterior, had a couple of local severe corrosion problems. I decided on a new pipe. Popped into the Fiat agent to pick one up and almost had a heart attack! I think he said £48 and some pennies, but that does include the seal sir! However we'll have to order it. Went home and rang another Fiat dealer, £46 63p and yes it includes the seal. I ordered the cam cover gasket, for Becky's belt change, from Shop4parts and I got the proper TUTELA gear oil at the same time. The price was good and delivery took only a day! So rang up S4P's Mick Holdsworth who could do me one of theirs for £15.63p and it includes the seal! Also ordered a cabin filter, oil filter and 5 litres engine oil all at roughly the same price my local factor does them, only his oil is not a big name like the Petronas brand Mick supplies. Took a day and a half to arrive! Can't see any difference between the Fiat original which I removed from the engine and the one Mick has supplied - except Mick's isn't rusty! This has been my second exceptional example of good service from Shop4parts so I just felt it would be useful for people to know. By the way I have no vested interest in Mick's business, apart from the selfish one of hoping he stays in business for a long time so I can continue to avail myself of his bargains and good service!
 
Nice post!

As we discussed in the Tech Talk within reason a carefully done belt change (with tooling or tipexing) should be fine. Tooling makes the job quicker, more reliable etc. etc.

I've done somewhere buried in these forums in the past additional information on cam belt changes.

Points that come immediately to mind are:

o Always remove the spark plugs - you need free rotation and no compression issues

o Once belt is set and tensioned always hand cycle the engine over a few revs. Don't do it on the starter motor. You need a smooth, forceless start with no undue jerks/tensions being applied.

o Check belt settled position - is it looking like it wants to run off the edge of a pulley or is being unduly guided by flange?

o If all happy then start car and allow to idle till engine is fully warm then stop the engine

o Check belt tensioner position. Is it in the mid window? (for dynamic sprung loaded tensioners. For fixed static one do a 90 degrees belt twist test on the pull tensioned down length of the belt (camshaft to crank pulley section of the belt).

o Lastly I personally then start the engine again (whilst still warm) and do a few rev up and rev down cycles looking for what I would describe a belt "whipping". There will always be some whip/wobbling/flapping

o BIG mistake is to just do the belt and water pump, put the covers back on and assume all is ok!
Thanks s130, couldn't agree more with all your points. Turning the engine over by hand is made much easier if the plugs are out and I always do it. It also makes it easier to feel piston to valve contact if you've got it all hopelessly wrong and is another reason why not to do this initial turn over with the starter motor.

I also like your comment about rechecking belt tension (or tensioner setting if it's an automatic spring type tensioner) once the engine is hot. I have found this can be quite a noticeable factor on engines with a fixed (non spring loaded type) tensioner - Felicity was a good example - as there is no spring to compensate. I assume this is because the block and head expand when hot so increasing the centre distance between crankshaft and camshaft. For this reason you need to be sure the whole mass of the engine is fully up to temp (not just showing hot on the water temp gauge - this assumes, of course, that you're lucky enough to have a car with a temp gauge! I'm going to admit to something rather "sad" (in the modern meaning of the word). I like to drive, unless it's on fast main roads, with my window open. I'm not one for ICE so I often find myself listening to the vehicles around me and from time to time, stuck in a traffic jam or perhaps next to me at the lights, I hear a car with an overtightened timing belt (once your ear is "tuned in you can hear a lot of interesting noises in traffic!) and have sometimes wondered if it had its belt tension set cold, so now hot it's too tight?

I too like to observe the belt running before replacing covers etc but have never actively looked for whip. I've seen it when I was young on the long belts which ran between the tractor and threshing machine on the farm next door to our house and it could cause big problems. - We youngsters were not supposed to be there of course but were warned to run away very fast if anything looked to be going wrong!

Thanks so much for your input s130, I have so enjoyed this conversation
Regards
Jock

PS As Becky is new to our "family fleet" I'm slowly working my way from front to rear sorting out all the problems I can find. For the last couple of days, as I was waiting for the parts to arrive, I've been sorting out the front brakes which had one very common problem and one rather unusual one. I've had my camera handy and hope to do another illustrated post on this soon.
 
Fuzz does an Alfa V6


Fuzz does a more simple cam belt


Cut the old belt down the middle all the way around. Slacken tensioner, and remover outer half of old belt. Slide new belt onto the wheels. Cut the other half of the old bet away and side the new belt into place. Reset the tensioner.

If you want to replace the water pump and tensioner then use zip cable ties to hold the old belt.

On a non contact engine like most Pandas this is all a bit OTT. But on twin cams etc you are better to get a cam locking kit and do it by the book.

Also note the belt is tensioned with cam timing wheel loose on the cam. This allows any timing creep caused while tensioning to not affect the engine timing. Make sure the crank is at correct setting before locking the cam wheel.
 
Fuzz does an Alfa V6

https://www.youtube.com/watch?v=dw3j8BRVfzo


Fuzz does a more simple cam belt
https://www.youtube.com/watch?v=Tti7sGU1dOA

Cut the old belt down the middle all the way around. Slacken tensioner, and remover outer half of old belt. Slide new belt onto the wheels. Cut the other half of the old bet away and side the new belt into place. Reset the tensioner.

If you want to replace the water pump and tensioner then use zip cable ties to hold the old belt.

On a non contact engine like most Pandas this is all a bit OTT. But on twin cams etc you are better to get a cam locking kit and do it by the book.

Also note the belt is tensioned with cam timing wheel loose on the cam. This allows any timing creep caused while tensioning to not affect the engine timing. Make sure the crank is at correct setting before locking the cam wheel.
"On a non contact engine like most Pandas".

I think this is an old subject so please forgive me for raising it here but there seems to be widely varying opinions as to which of the 8valve engine family are interference and which are not. Felicity, our 92 Panda Parade 999cc was definitely non contact. I know because I, perhaps foolishly, many years ago, turned the crank over (very very slowly and gently) when I changed the cam belt just to check out this very question. There was no hint of anything touching. So I think it's reasonable to say the old engines with the narrow, coarse tooth pitch, belts are probably all non interference. Several people have now told me that Becky, our 2010 Panda Dynamic Eco (Evo 2 engine) is definitely interference. And I believe my boy's 1.4 8 valve Punto is also of the same "persuasion".

So does anyone know definitively which engines are and which are not interference?
 
The 1.1 54hp and the 1.2 60hp engines are non interference.


The later 1.2 69hp is interference.
These are usually identified by a different airbox (screws holding the cover on rather than just clips) and they use a cam variator, it's solenoid sticks out of the cam cover, you can see it here just to the rear of the oil filler cap.
https://www.fiatforum.com/gallery/data/3198/IMAG1239.jpg
Also, the throttle body it off to the right rather than central to the cylinders .


The 1.4 100hp Panda engines are interference as well.


By the looks of your pictures, I'd suggest yours in non interference.
 
Last edited:
Another point on cam belts

They do not like being re used. Slackening and re using an old belt even within it's service life makes it more likely to fail. In such a situation just fit a new belt though you may not need to fit a new tensioner and water pump as well.

Auxiliary belts and cam belts are often changed at the same time. If an Aux belt is cracking across the drive-side ribs, it's likely the cam belt teeth are doing the same thing. Driving the car like that is asking for trouble.

Always check when buying a car. Knackered aux belt = dodgy service history and cam belt on the losing lottery list.
 
Thanks Goudrons - I'm 99.9% sure mine (2010 Dynamic Eco) is a 60hp evo2 engine. Here's a picture of it.

P1070191.JPG

There is a plug (like the filler/level plug in the gearbox) in the hole where the variator solenoid is showing on your picture.
So this is excellent news. Nice to know that all I'll need is a tow home if the worst happens!

I'm not 100% happy with the "cutting it in half" idea. true it does give you a way of doing it if you have neither the tools or specific product knowledge. But does it not rely on the timing being spot on before you start? There is no way to verify correct settings on engines without timing marks if you use this method. Think I'll just stick to what I know.
 
I'm not 100% happy with the "cutting it in half" idea. true it does give you a way of doing it if you have neither the tools or specific product knowledge. But does it not rely on the timing being spot on before you start? There is no way to verify correct settings on engines without timing marks if you use this method. Think I'll just stick to what I know.

Absolutely but if the engine has previously been performing well its a good option.

On the other hand (1) If the tensioners and water pump are getting on then its best to just do it by the book.

On the other hand (2) If a faulty water pump or belt tensioner need to be replaced you can use zip cable ties to hold the old belt then do Fuzz's belt cutting method.

The main thing with ANY CAM BELT WORK is to make sure nothing is touching by carefully turning the engine by hand at least two full turns of the crank.

IIRC the 1.2/60 uses a cam locking pin rather than a cam lobe locking block. But I may well have made that up. :eek:
 
Last edited:

Attachments

  • IMG_20180403_172446.jpg
    IMG_20180403_172446.jpg
    306.4 KB · Views: 32
  • IMG_20180531_120421.jpg
    IMG_20180531_120421.jpg
    1.3 MB · Views: 27
  • IMG_20180423_115602.jpg
    IMG_20180423_115602.jpg
    195.9 KB · Views: 23
  • caladistributie2.jpg
    caladistributie2.jpg
    187.7 KB · Views: 22
  • cala distributie.jpg
    cala distributie.jpg
    77.5 KB · Views: 38
  • timing angle.JPG
    timing angle.JPG
    136.1 KB · Views: 39
  • IMG_20180413_182357_HDR.jpg
    IMG_20180413_182357_HDR.jpg
    234.7 KB · Views: 34
Last edited:
Anybody knows what that means "Timing Clearance"?

Timing clearance I think you will find is the follower gap. i.e. the gap feeler gauge gap between the heel of the cam and the follower shim.

Another import point to note is that valve open and closing values are often quoted with a specific timing clearance which *can be* different to the normal running clearance setting. This can/does lead to differences in the valve opening and closing times.

In your case 0.7mm timing clearance is certainly NOT the running clearance as the engine would be rattling/tappeting like mad!

Below is what we have for the Strada 130TC engine as an example:

Inlet Valves Clearance for Timing Checks (7o BTDC, 52o ABDC)
0.80 (measure/set)

Exhaust Valves Clearance for Timing Checks (8o ATDC, 51o BDC)
0.80 (measure/set)

Inlet Valves Running Clearance
0.45 +/- 0.05

Exhaust Valves Running Clearance
0.50 +/- 0.05
 
Absolutely but if the engine has previously been performing well its a good option.

On the other hand (1) If the tensioners and water pump are getting on then its best to just do it by the book.

On the other hand (2) If a faulty water pump or belt tensioner need to be replaced you can use zip cable ties to hold the old belt then do Fuzz's belt cutting method.

The main thing with ANY CAM BELT WORK is to make sure nothing is touching by carefully turning the engine by hand at least two full turns of the crank.

IIRC the 1.2/60 uses a cam locking pin rather than a cam lobe locking block. But I may well have made that up. :eek:
Thanks Dave, all good stuff. I just feel happier checking it all out with the tools and at the end of the day I think that feeling happy and contented with what you've done is a lot of what it's all about when you're doing this as a hobby/enthusiast.

I'm making friends with our local Fiat independent - owned by an older chap, like myself - he has been able to tell me my engine is definitely an Evo2 1.2 60hp. He seems quite amused and supportive of my efforts. He knew I had been swithering, when the weather was colder, between doing the cam belt myself and just giving it to him to do. I went in, with the car, to tell him I'd done it myself. After discussing the difficulties of dealing with the engine mount and scraping the old silicone sealant from around the water pump stud and other things he (jokingly I think) offered me part time employment for times when he had taken on too much work! I feel very flattered but have no intention of accepting!

Completely agree, turn it over a minimum of 2 crankshaft revolutions, by hand, on completion. This, of course will take each cylinder through an entire operating cycle so if anything is out of sync you'll feel it before hitting the starter and doing irreversible damage! Plugs out for this or it makes it a harder job.

Regarding the cam locking. If you look at the first post I did in this thread, the eighth picture down shows the locking tool in place on/in the slot in the back end of the cam - hex bolt at each end (right hand end if you're standing in front of the car looking at the engine). I don't think pandablu's locking tool would work on mine as there is no hole in the right hand end of the cam cover - I'm guessing it's to be used with cam cover in place from its shape - (as was the case with the older engines with the distributor). I think the 16v engines use locking pins but 8valve engines all lock using the slot at the end of the cam, or on the earlier engines like our '92 999cc the crank and cam sprockets had timing marks. But I always stand, humbly, ready to be corrected by my betters!
Regards
Jock
 
For "proper" cam belt and valve gear "fun", you need to get yourself a Punto HGT (1750 engine).

Mine slipped it's cam belt costing me for 16 valves at around £20 each plus a head gasket set. At least I had breakdown recovery service.

The HGT Punto cam belt access is mind bogglingly tight. I had to use an 8mm AF Torx screwdriver bit and turn it with an 8mm ring spanner. There is no space for anything larger.

The tensioner spring had to be compressed with a jack and timber batten as again there was no space to simply lever it on.

BTW, I got lucky as the oil pressure remained good even 10,000 miles later. Blown cam belts on those engines often crease the crank bearing shells leading quickly to a knocking crankshaft.
 
Timing clearance I think you will find is the follower gap. i.e. the gap feeler gauge gap between the heel of the cam and the follower shim.

Another import point to note is that valve open and closing values are often quoted with a specific timing clearance which *can be* different to the normal running clearance setting. This can/does lead to differences in the valve opening and closing times.

In your case 0.7mm timing clearance is certainly NOT the running clearance as the engine would be rattling/tappeting like mad!

Below is what we have for the Strada 130TC engine as an example:

Inlet Valves Clearance for Timing Checks (7o BTDC, 52o ABDC)
0.80 (measure/set)

Exhaust Valves Clearance for Timing Checks (8o ATDC, 51o BDC)
0.80 (measure/set)

Inlet Valves Running Clearance
0.45 +/- 0.05

Exhaust Valves Running Clearance
0.50 +/- 0.05
Oh dear, I just can't leave this one alone. It occurs to me that a few people may be reading about these setting/timing clearances and wondering how they relate to the, completely different, running clearances? I'm putting my head in the lions mouth here as all my knowledge on this is self taught and learned by practical experience. I hope a bigger, better informed, lion doesn't come along and bite it off!

I think I've mentioned elsewhere that I've always had an interest in motor sport, especially if it's a minority genre (speed hilclimbs and drags) this all started back in the '60's where I helped with tuning Minis, Anglia's, VW engined beach buggies etc. That was before I got interested in 2strokes - a real black art they are, stuffed pistons, full circle cranks and megaphone exhausts. Now-a-days I lead a very quiet life by comparison.

Ok, let's get back to the subject. So what are these setting/timing clearances all about? Well it's all about getting the gasses in and out of the cylinder efficiently. Whether you have a high performance or standard profile camshaft the manufacturer will have taken very great care to make a shaft which opens and closes the valves at exactly the best places, in relation to the position of the pistons in their bores, to get the gasses in to the cylinder, burned and out again.

s130 has detailed some figures for you above as an example. Also above, in pandablu's post, you can see an example of a degree wheel. This needs to be fixed to the crankshaft pulley and very accurately zeroed to TDC (usually on No 1 cylinder). If we now look at s130's figures we can see that our inlet valve should be opening at 7 degrees before top dead centre. Now we need to be able to observe exactly, and I really mean EXACTLY, when that inlet valve is just, and again I mean JUST, lifting away from it's seat in terms of degrees of crankshaft rotation.

This is where the setting (I prefer to call it timing) clearance comes in. First off we need to understand how the cam lobe is acting on it's follower. The valve, spring and follower (on the older engines I was working on there were push rods and rockers too), although quite small components, do have mass, and when you think about what's happening to them you can see the problem. To start with they are just sitting there at rest. Then the cam lobe, as the camshaft rotates, forces the follower to move. The cam follower picks up the valve stem, compressing the spring, which causes the head of the valve to uncover the port so that gasses can flow. Then the whole process reverses to set the valve back on it's seat and seal the cylinder. If you think about how fast this is happening, even at idle, (let's say an idling speed of 900 rpm. Camshaft rotates at half that speed so this valve is opening and closing 450 times a minute at idle. That's about 7 times a second! WOW! if you really stomp on the gas and hit 5000rpm that's the wrong side of 35 times a second! Now at these sort of speeds the relatively small mass of the valve train, follower, spring (well part off), valve, becomes significant. You can't expect to take something that's sitting still, even if it doesn't weigh very much, and instantaneously, have is moving rapidly. So the shape of the cam lobe is profiled so that as the lobe approaches the cam follower it closes the gap (running clearance) very slowly. Then it rapidly accelerates the rate of opening as it transitions to a much steeper ramp shape. Finally it slows down the speed of opening with a much more gentle ramp shape until the valve is fully open. The process is reversed to close the valve back onto it's seat. To obtain the performance that the cam is intended for (be it standard, fast road, full race, or somewhere in between) it needs to be opening and closing at exactly, EXACTLY, the degrees of crankshaft rotation specified by the camshaft manufacturer. The procedure I illustrated with the crank and cam locking tools at the beginning of this thread get pretty close to it but to be truly accurate you need to "dial" it in. This is done with the aid of the degree wheel on the crank pulley (now you see why it must be zeroed at exactly TDC) and a dial gauge on the cam follower (or, on my older engines, the valve spring retainer) or anywhere where you are going to pick up when the valve itself starts to move.

So you are turning the crankshaft (DOR of course) and watching the dial gauge on the cam follower/valve, and, did it just move? What's that? 5degrees? Try again just to be sure. What have we his time? Oh, 8degrees? How can that be? Well the trouble now is that the acceleration ramp phase of the cam profile, because it picks up the clearance on the cam follower so gently, makes it very difficult to establish exactly when the follower actually first moves. This is where the setting/timing clearance comes in. By increasing the valve clearance, that is the distance between the back side of the cam lobe (90 degrees opposite to the peak of the lobe) and the cam follower the cam has to rotate further before it picks up the clearance and starts to move the valve. What this does is moves the contact point onto the more aggressive part of the lobe profile so that much less movement of the crankshaft produces movement of the follower and this makes it much easier to be certain of exactly when the follower starts to move. Of course you may find, in fact you will usually find, that the valve is not opening at exactly the number of degrees of rotation of the crankshaft that it should! The fun starts in trying to "dial" it in. This takes a bit of explaining and is not, at present, part of this post.

When you've finished don't forget to restore valve clearances to running clearances or lots of noise and rapid wear will result. If you're lucky enough to have a twin cam, you've got twice the fun with 2 cams to dial in!

Well, there we are. Now you guys who really know what you're talking about can come on and tell me how I should have been doing it all these years!
As always, regards from the north.
Jock
 
Well Jock, nicely explained. Yes increasing the clearance gap brings the opening angle onto a much more aggressive lift and thus more precisely detectable.

I didn't want to over upset the poster pandablu about him finding that the timing tool was not as accurate as the dial method but he had obviously not realised that the dial method in all Fiat engines I've worked on have a specified clearance gap. I think if he was to redo his comparison with the correct gap then there will be little or no difference between the two methods.

Detecting setting TDC at the top of the throw of the crank is also hard and often inaccurate hence the method of setting at 90 degrees offset and then using an accurate 90 degree jig to set TDC.

Sadly I'm not sure many modern younger vehicle technicians are trained in the finer arts of how and why something is done the way it is. The same is also to some extent true in engineering degrees. Course syllabus gets broader every year as technology develops yet the timeframe of x years remains the same so something has to give.

Another factor in the automotive arena is engine reliability. Go back 40+ years and engine rebuilds, decoking, etc. were far more common and just about every technician got their hands dirty. With today's vehicles engines being so reliable and more accurately fuelled, then with the possible exception of small indy garages, I'm not sure today's young technicians are really that experience and practiced in rebuilds and the finer arts of tuning.
 
Last edited:
Well Jock, nicely explained. Yes increasing the clearance gap brings the opening angle onto a much more aggressive lift and thus more precisely detectable.

I didn't want to over upset the poster pandablu about him finding that the timing tool was not as accurate as the dial method but he had obviously not realised that the dial method in all Fiat engines I've worked on have a specified clearance gap. I think if he was to redo his comparison with the correct gap then there will be little or no difference between the two methods.

Detecting setting TDC at the top of the throw of the crank is also hard and often inaccurate hence the method of setting at 90 degrees offset and then using an accurate 90 degree jig to set TDC.

Sadly I'm not sure many modern younger vehicle technicians are trained in the finer arts of how and why something is done the way it is. The same is also to some extent true in engineering degrees. Course syllabus gets broader every year as technology develops yet the timeframe of x years remains the same so something has to give.

Another factor in the automotive arena is engine reliability. Go back 40+ years and engine rebuilds, decoking, etc. were far more common and just about every technician got their hands dirty. With today's vehicles engines being so reliable and more accurately fuelled, then with the possible exception of small indy garages, I'm not sure today's young technicians are really that experience and practiced in rebuilds and the finer arts of tuning.
Personally, as I've got a DTI there for checking for valve movement anyway, (and an extension for the probe) I like to go "X" distance (through the plug hole) before TDC, mark the pulley opposite the TDC mark (or a mark you make yourself on the block) then the same "X" distance after TDC and mark the pulley again. Carefully bisect the marks and you've got TDC. Works a treat on most engines but can be a problem if you've got a very offset plug hole or it's a modern diesel where the last thing you want to do is mess with injectors!

With regard to training. I do feel that abandoning the old apprenticeship schemes did us a big disservice. Drilling out and retapping or installing a helicoil in an awkwardly placed fixing in a "real world" situation is very different to doing it on the bench. Working alongside a skilled man, day in day out, and you soon learn how not to cross thread plugs when you can only install them by feel because you can't see the hole! (Probably not allowed to give you a clip round the lug-ol any more though) You learn to leave wheel cylinder securing bolts (or perhaps clips) loose so you can "wiggle" the cylinder to make it easier to get the tube nut started on it's thread. Exactly where to hit, and how hard to hit, a ball joint taper with a nice big hammer so that it seperates quickly and without damage and saves you the time of going to the stores to get the ball joint splitter, and so on, and so on. Actually, now I'm on this "hobby horse" who thinks there is generally too much academic training these days? So many of the youngsters seem to me to be brainwashed into thinking university is the only way to go. Do a few years at Uni, get a degree (sometimes in something strangely obscure) and then find there is no call for their skill, or too many people flooding the market, and end up filling shelves or flipping burgers. A lot of folk, like me, aren't academic but can train to have good practical and technical skills. And make a good living that way? Or am I being cynical if I say unis nowadays are businesses and it's all about money and bums on seats?

I also think the pace of advancing technology is outstripping the ability to train enough people to understand it in depth. As you'll know if you've been following my threads I have both VCDS (Vag- Com) and Multiecuscan on which both of them I am self taught and I have 6 family cars to practice on. I'm a long way from understanding them in depth (especially the VCDS) but I'm really quite handy at the day to day stuff. There are times though when I find myself in deep conversation with other professionals and suddenly, to my surprise, I realise, this chap is waffling! I seem to actually know more than him!

Decokes? What are they? Actually they have, of course, been replaced by carbon fouled inlet manifolds and EGRs to say nothing of siezed up variable vane turbos!

Really enjoy your posts s130. Thank you
Regards
Jock
 
Back
Top