manicstereo
Member
Does anyone have a video or detailed guide for removing glow plugs in the 2013 Fiorino 1.3 Multijet engines?


Take it to the garage and let them do it.Does anyone have a video or detailed guide for removing glow plugs in the 2013 Fiorino 1.3 Multijet engines?
Pretty sure it's been well covered in the Panda sectionDoes anyone have a video or detailed guide for removing glow plugs in the 2013 Fiorino 1.3 Multijet engines?


yeh bit worried about them snapping. i did get a kit for broken glow plugs but access would be the issue to removing them if they snap.Take it to the garage and let them do it.
A cop out I know but these are so prone to snapping off that at least if they snap off at a garage it’s then their problem to sort it out, if they snap off when you’re working on it at home then you can be in for a world of pain
i'll have a look.Pretty sure it's been well covered in the Panda section
Whats the issue?
Poor starting, or just the flashing symbol?
Worth doing diagnostic work if its Just a flashing light
yeh got some freeze shock spray and glow plug removal spray as well. just looks a bit tricky to access.Get red hot and soak in freeze shock spray and oil
But they can still snap if your not careful
i'll have a look.
flashing light, difficulty starting in cold weather, bit smoky as well.
it did have faults for no 2 and 3 glow plug and they have never been changed.
either way i want to replace them anyway as it's over ten years old and never been doneDO check power is actually getting to them
Often that I'd the issue
The Risk is of having too much carbon on the innards of the combustion chamber,either way i want to replace them anyway as it's over ten years old and never been done


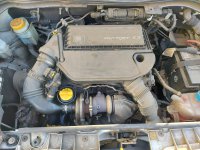
yeh saw that guide before but this was the one with the turbo in front of the plugs will post a pic shortly. it's just more an access issue than removing themThe Risk is of having too much carbon on the innards of the combustion chamber,
Makes the the plug get TIGHTER on its way out.. Rather than looser
I had a 1248 motor with NO HEAT
it turns out a plug had failed, taking out the massive supply fuse
The plugs were probably factory fit
People commented quite how badly corroded the outers were
I rehearsed the removal, sprayed the visible parts regularly
"feeding" the threads with fluid when just parked, so engine heat helped work the fluid in
Then, after a 2 hour journey
Got the 2 easiest access plugs removed
Spray, cooling the plug to "shrink it",
Apply torque, see if it creeps
If it starts to move, another spray, then back and forth (like tapping a thread)
Obviously this takes time..
I could remove ducting, etc
in 2 minutes with practice
Then had @5 minutes work time
As the motor cooled
2 working plugs made quite a difference,
the other 2 waited until the height of summer (and were much more difficult to extract)
All good after though,
BUT torquing them back in.. ,
one hole was obviously still full of carbon, as getting a gas-tight seat was something that took several attempts
Again.. Got it HOT
backed out plug a couple of turns, then reseated
On one plug I got an "extra" half a turn, and was then seated, obviously shifted the offending carbon
I will try and add links
This great GUIDE, and my links in the comments

Grande Punto - Replace the glow plugs on 1.3 diesel
This thread is for the general discussion of the Guide Replace the glow plugs on 1.3 diesel. Please add to the discussion here. levemircento submitted a new guide: Replace the glow plugs on 1.3 diesel In this guide we are going to replace the Glow Plugs in a 1.3 Diesel Grande Punto, this was...www.fiatforum.com
i already removed the top heatshield from the turbo to get a look inThe Risk is of having too much carbon on the innards of the combustion chamber,
Makes the the plug get TIGHTER on its way out.. Rather than looser
I had a 1248 motor with NO HEAT
it turns out a plug had failed, taking out the massive supply fuse
The plugs were probably factory fit
People commented quite how badly corroded the outers were
I rehearsed the removal, sprayed the visible parts regularly
"feeding" the threads with fluid when just parked, so engine heat helped work the fluid in
Then, after a 2 hour journey
Got the 2 easiest access plugs removed
Spray, cooling the plug to "shrink it",
Apply torque, see if it creeps
If it starts to move, another spray, then back and forth (like tapping a thread)
Obviously this takes time..
I could remove ducting, etc
in 2 minutes with practice
Then had @5 minutes work time
As the motor cooled
2 working plugs made quite a difference,
the other 2 waited until the height of summer (and were much more difficult to extract)
All good after though,
BUT torquing them back in.. ,
one hole was obviously still full of carbon, as getting a gas-tight seat was something that took several attempts
Again.. Got it HOT
backed out plug a couple of turns, then reseated
On one plug I got an "extra" half a turn, and was then seated, obviously shifted the offending carbon
I will try and add links
This great GUIDE, and my links in the comments
Grande Punto - Replace the glow plugs on 1.3 diesel
This thread is for the general discussion of the Guide Replace the glow plugs on 1.3 diesel. Please add to the discussion here. levemircento submitted a new guide: Replace the glow plugs on 1.3 diesel In this guide we are going to replace the Glow Plugs in a 1.3 Diesel Grande Punto, this was...
i already removed the top heatshield from the turbo to get a look in
Somewhere about here… https://www.fiatforum.com/guides/replacing-glow-plugs-2018-panda-multijet.901/
finally got around to it yesterday and it turned out to be a lot easier than i expected, just a bit fiddly
That's good news,finally got around to it yesterday and it turned out to be a lot easier than i expected, just a bit fiddly
i removed the air filter box, give a bit more access to the heat shield around the turbo. i have different types of glow plug lead pliers so made it easy to remove the leads, if you don't have them probably need a set on long, long noise pliers. none of my glow plug sockets were of any use, a 1/4" ratchet, 9mm socket and a long wobble extension did the job. a small telescopic magnet to remove and sit the plugs in helps a lot. just a matter of find the correct angle through the turbo for no1 and 2 cylinders, 3 and 4 are pretty straight forward.That's good news,
got any hints and tips..?