Technical Just started and could do with some 4x4 help.

Currently reading:
Technical Just started and could do with some 4x4 help.

Ghetto Garage Spot Of Sun.

Today's only task was to drop the prop shaft given my Ghetto garage has a leaking roof! Have a plan to order sun next week from John Lewis as they always deliver?

First a bit of spray to mark the starting position. In fact later found a few helpful scratch marks suggesting someone has been here before?

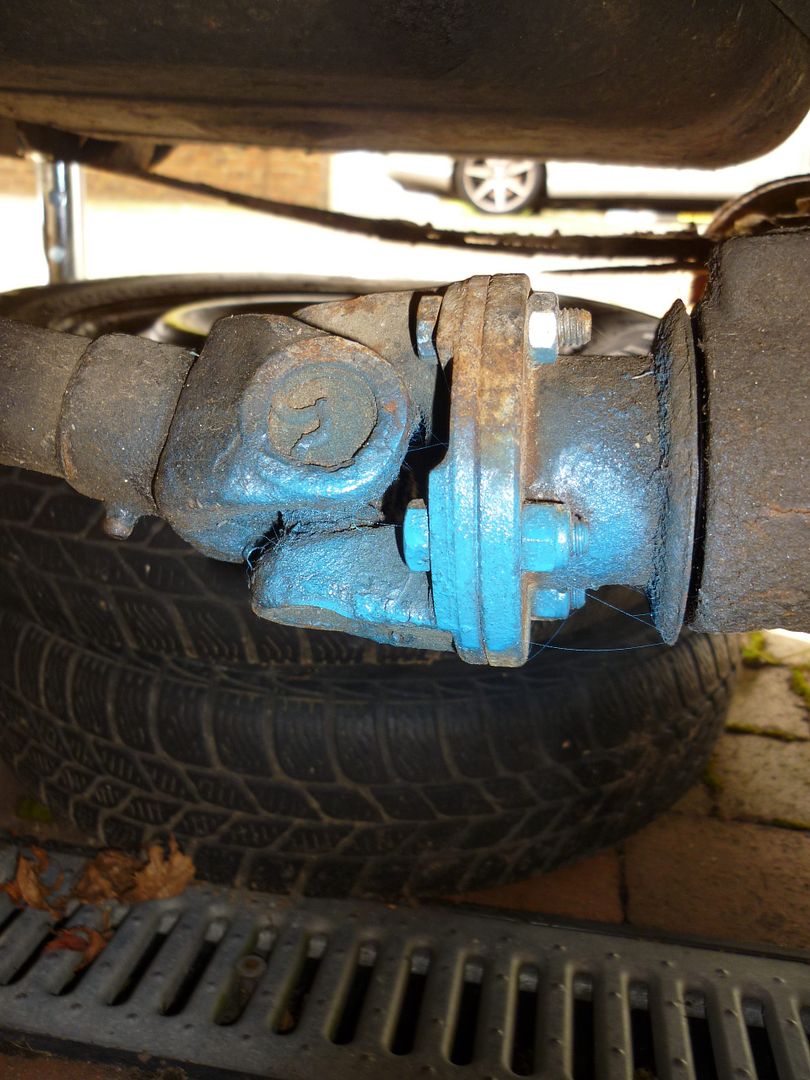
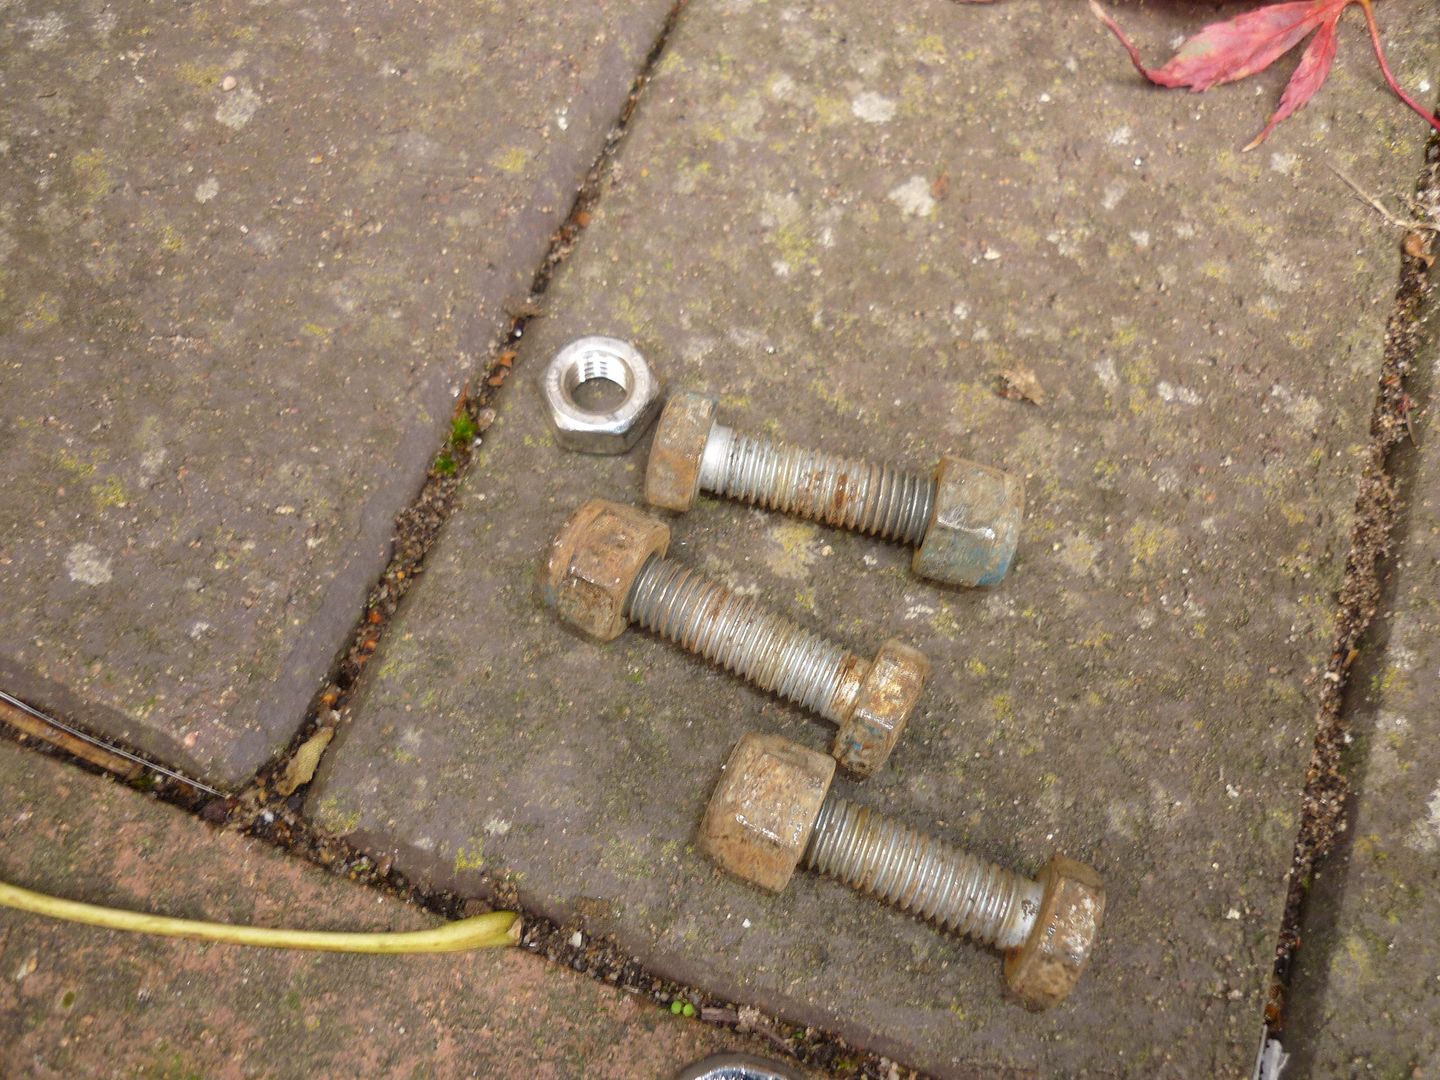
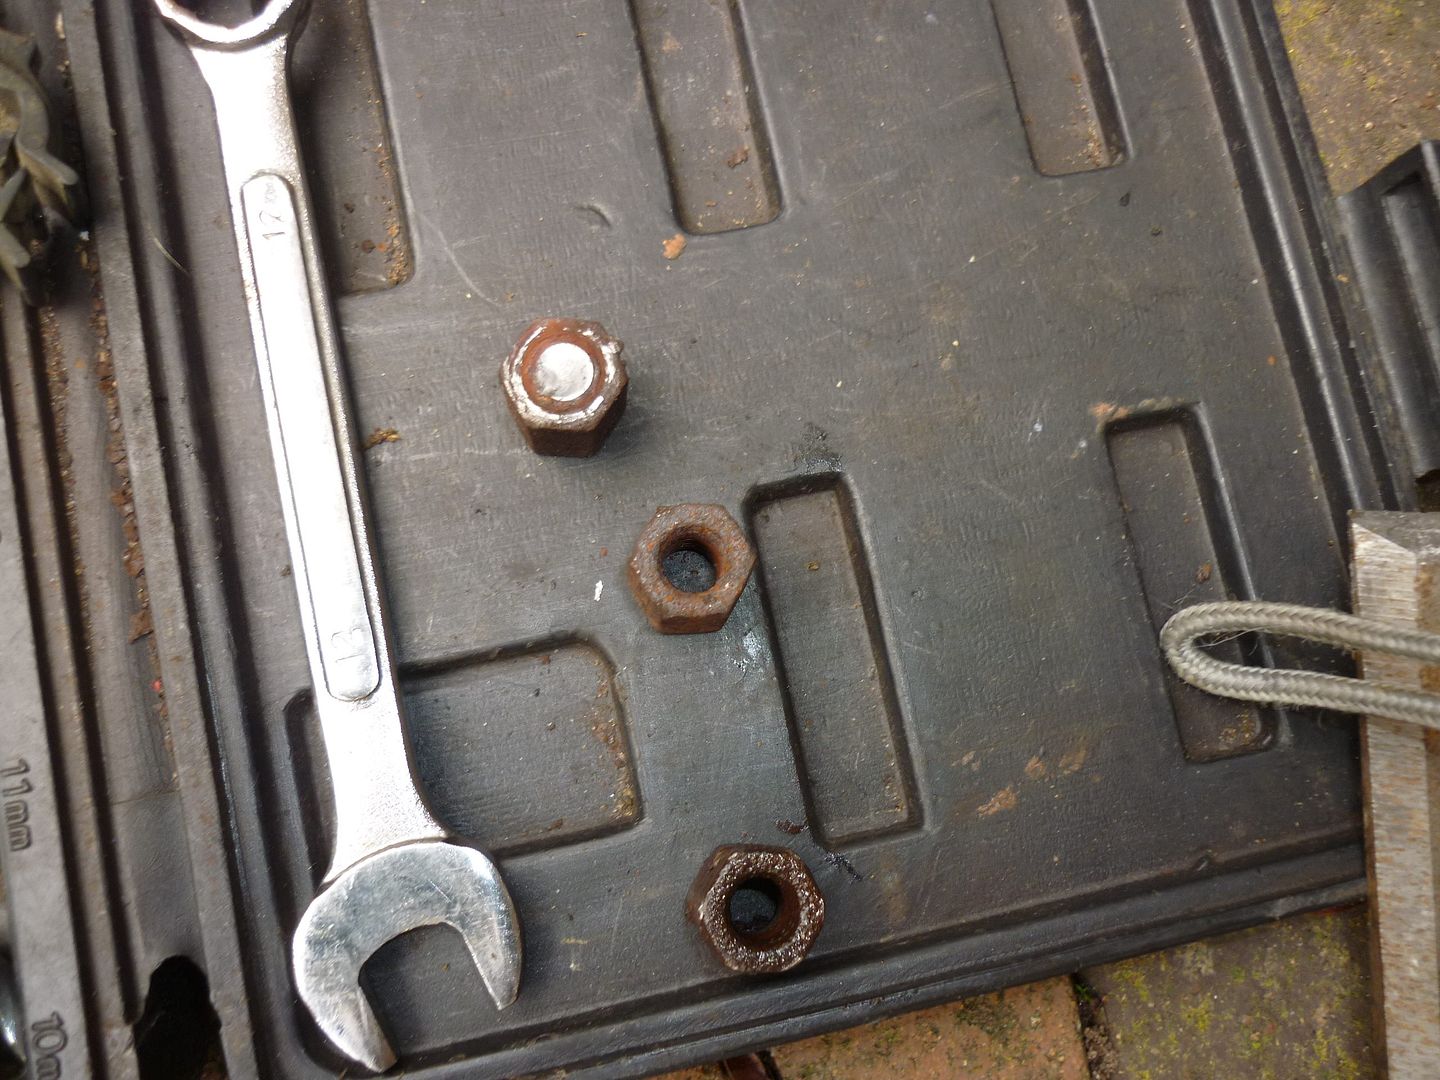
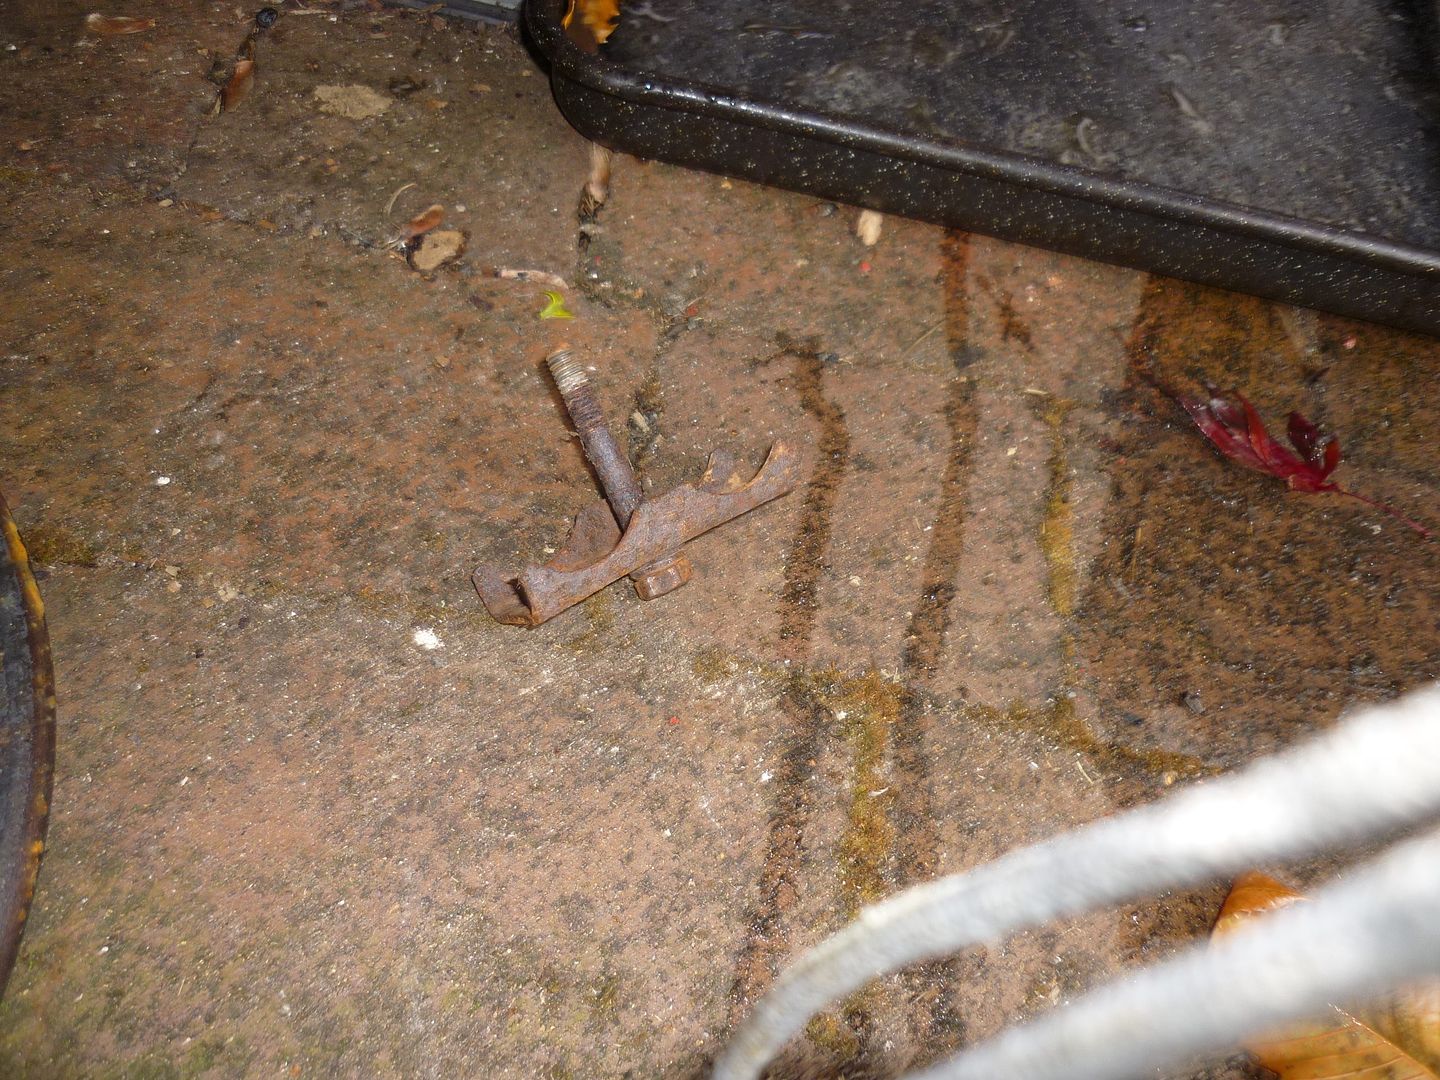
Yup someone has been before 3 Nyloc and one stainless??

All the bolts out but no movement?
Handbrake off, in neutral, 4WD off but no rotation?
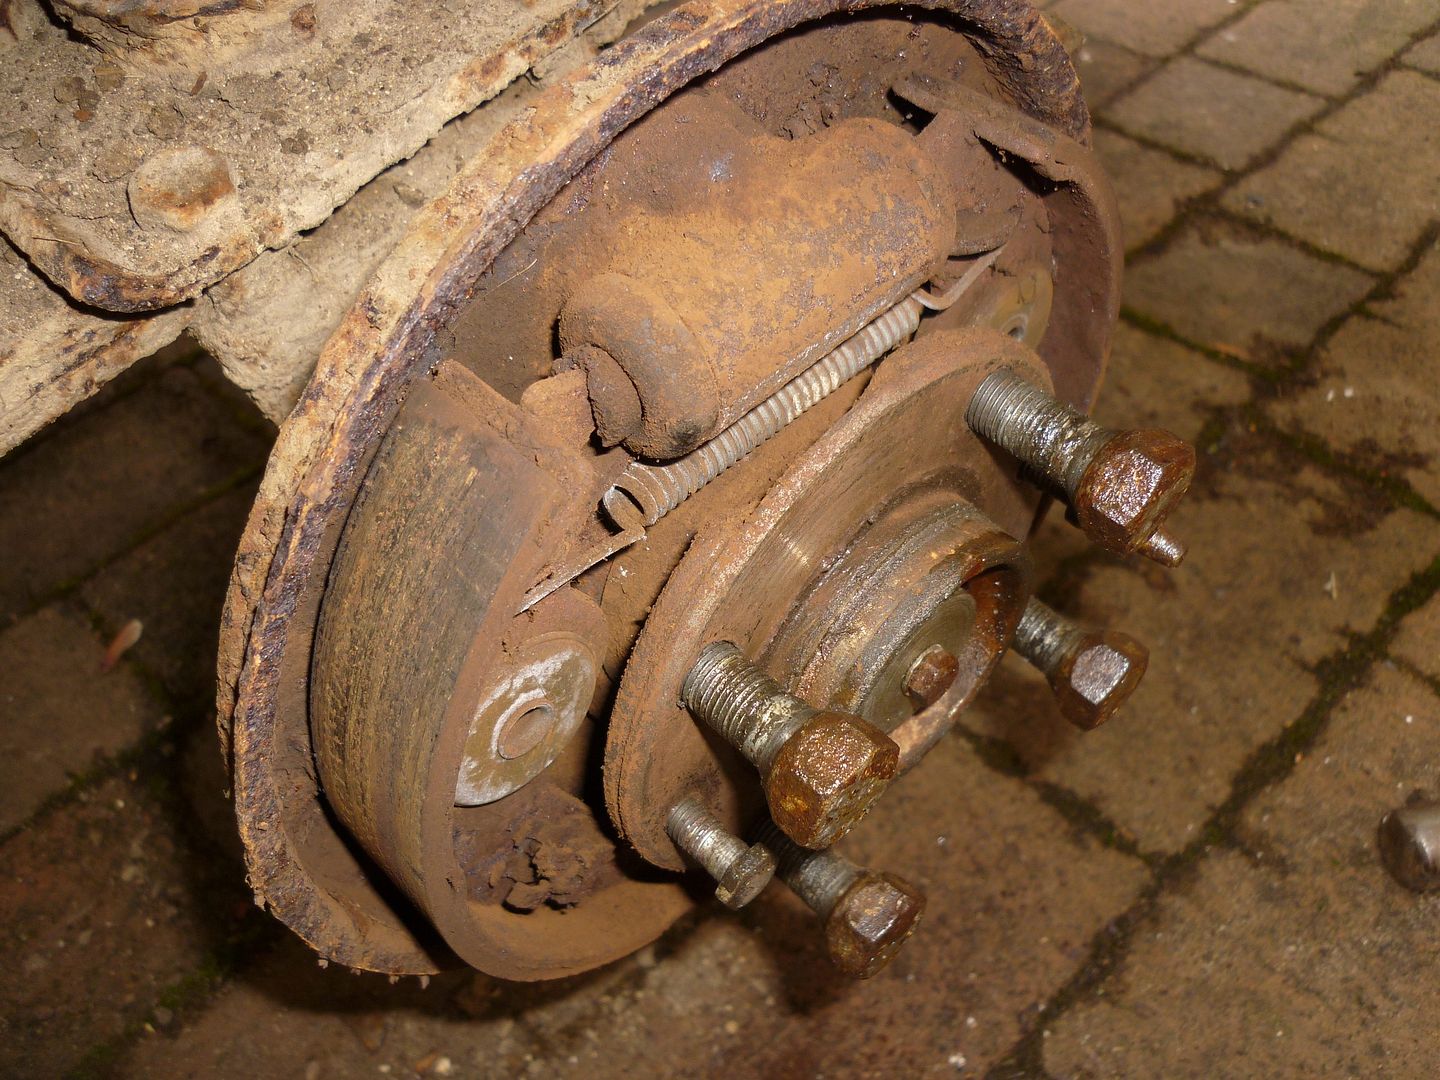
Brake hubs off then.


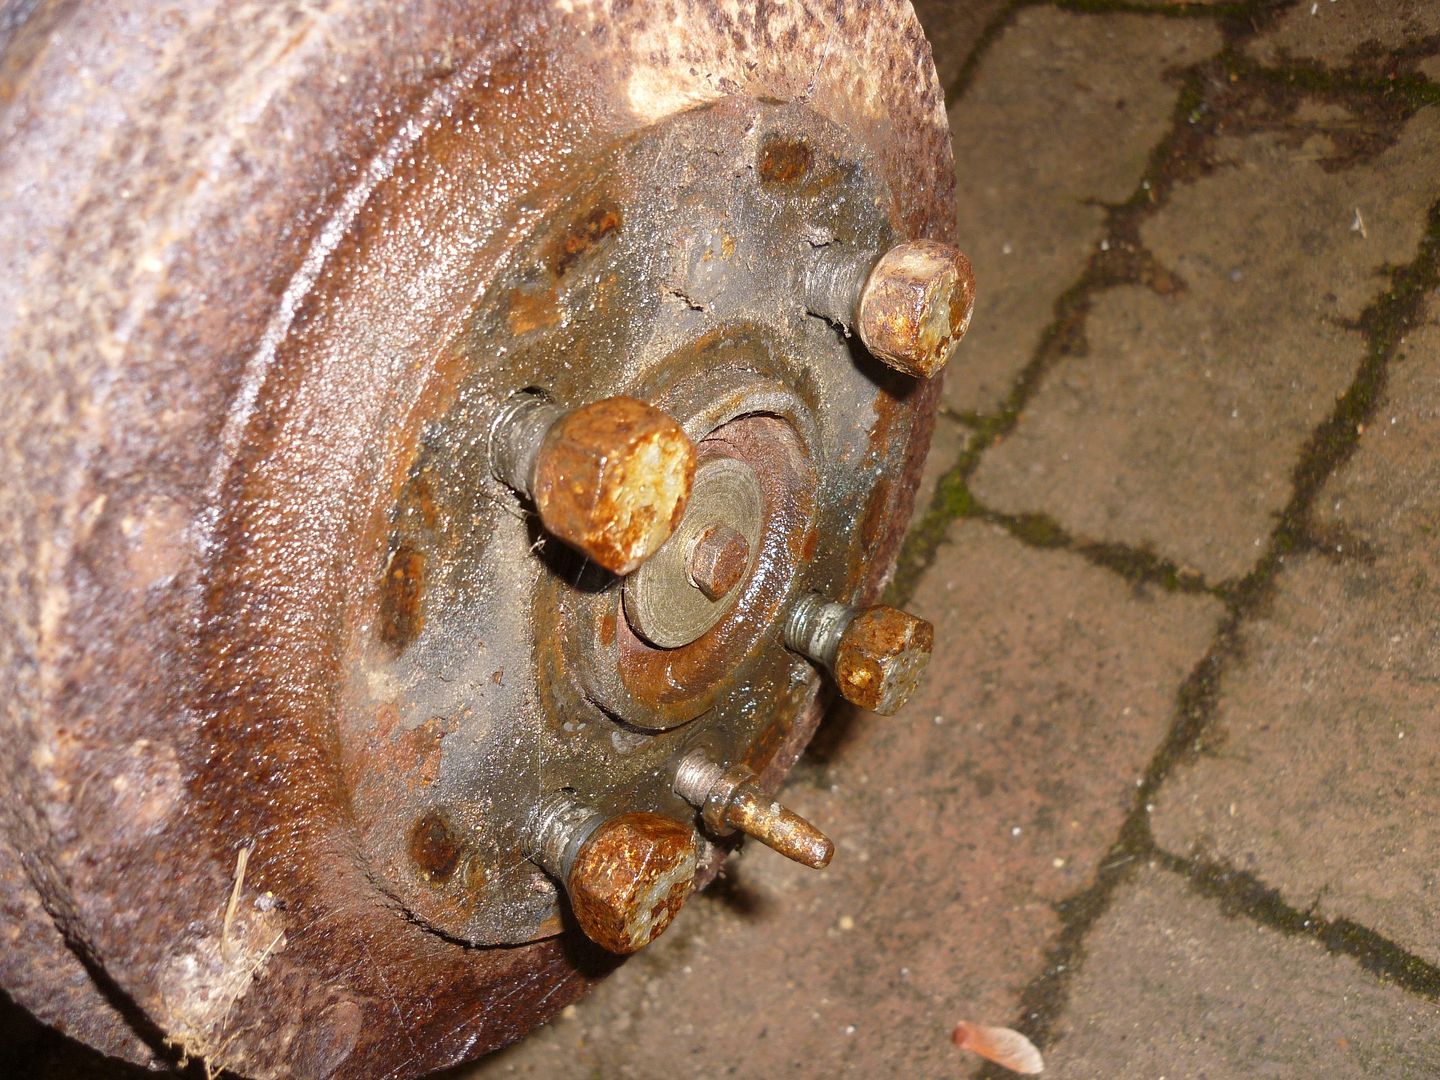
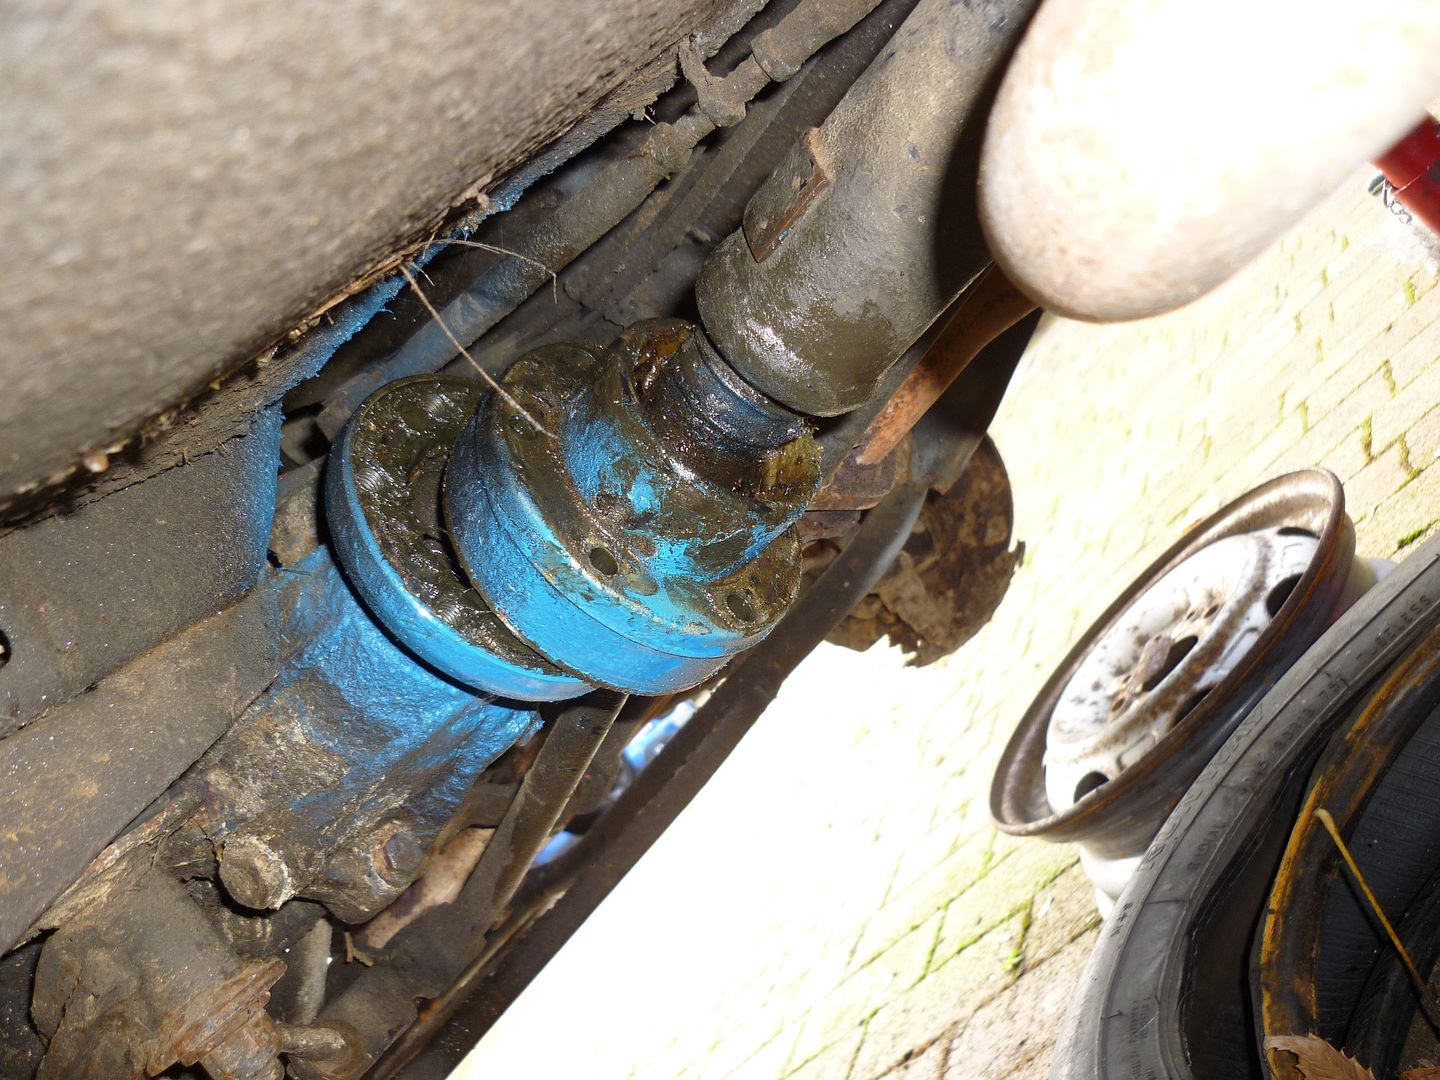
Seen worse but one seized.

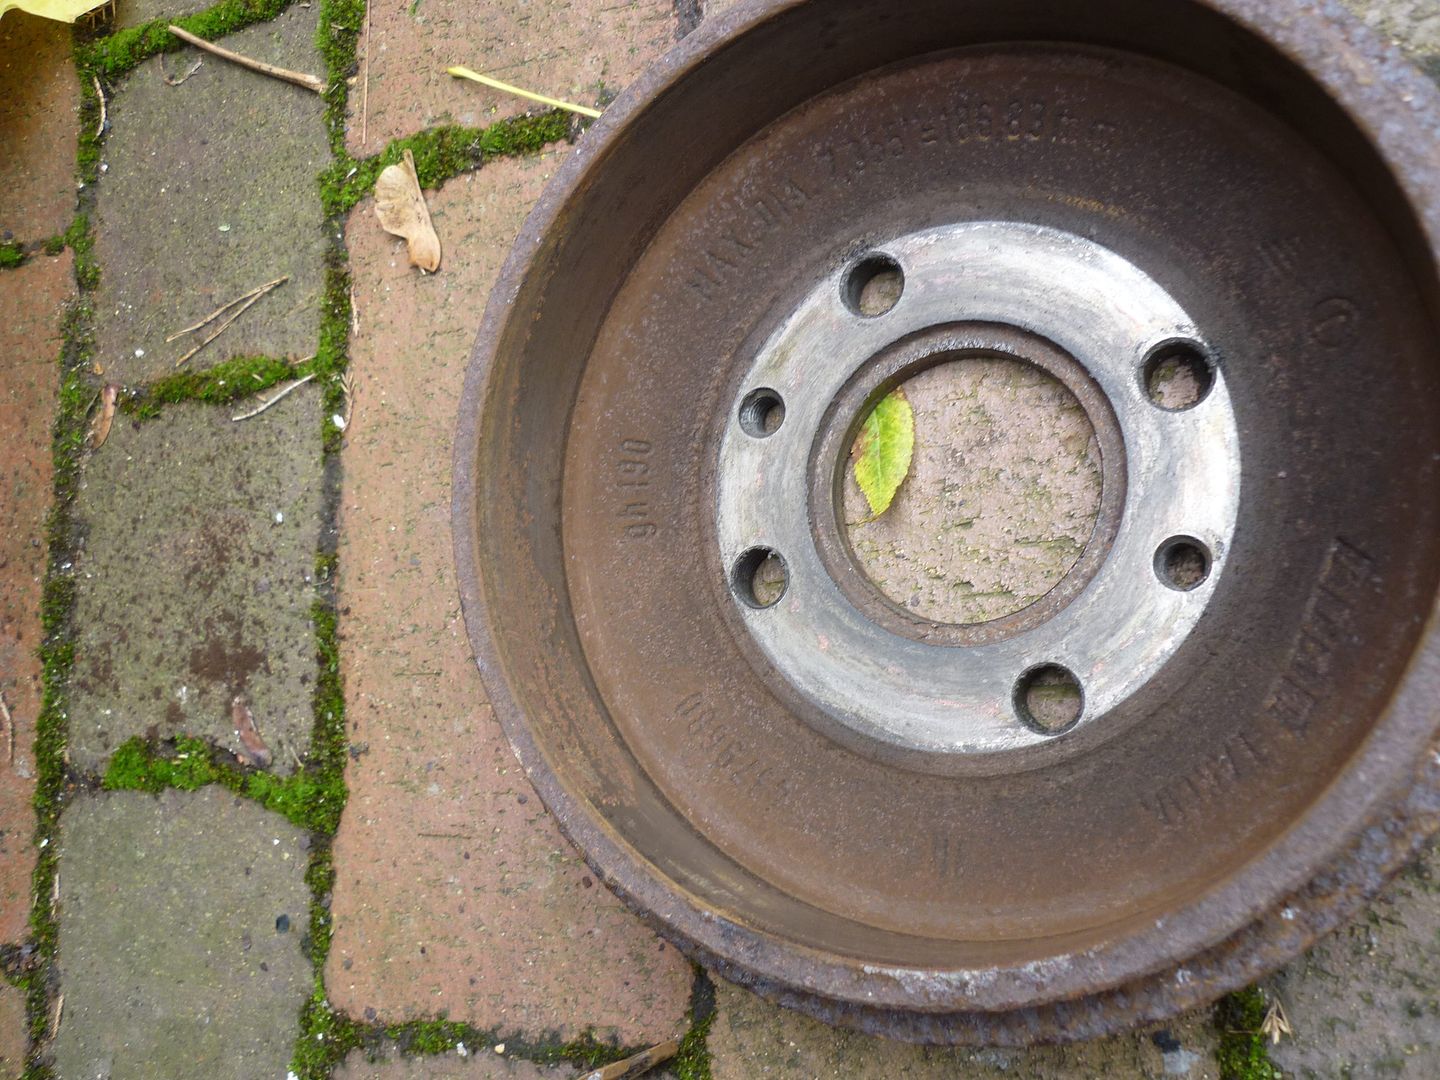
Other side better but not nice.


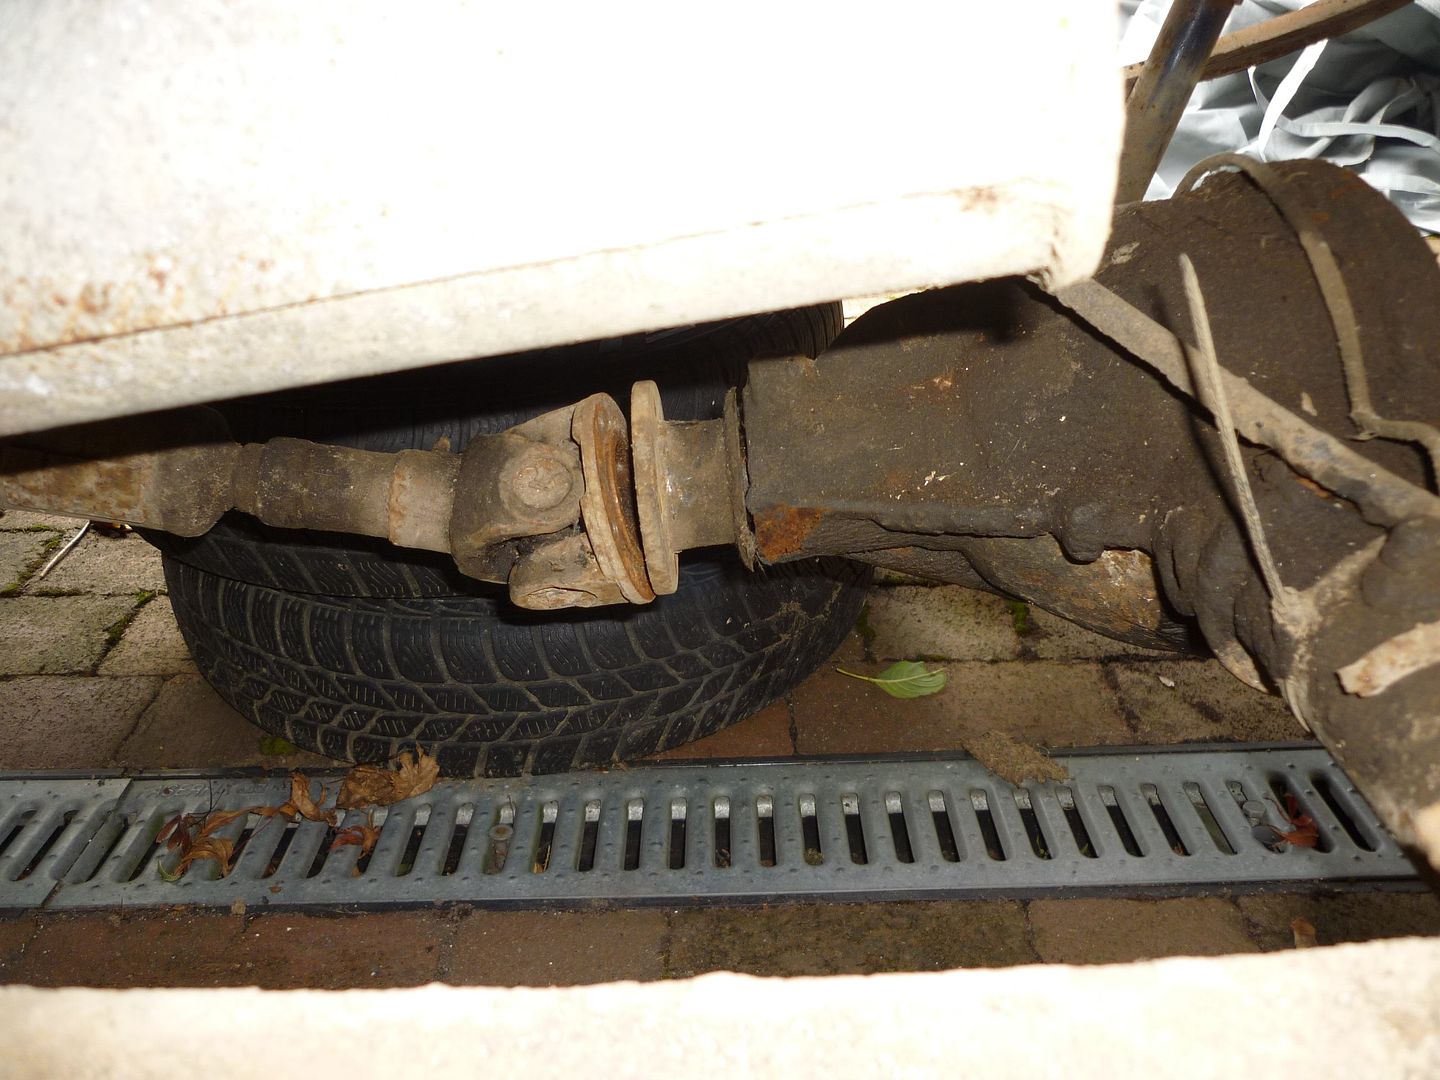
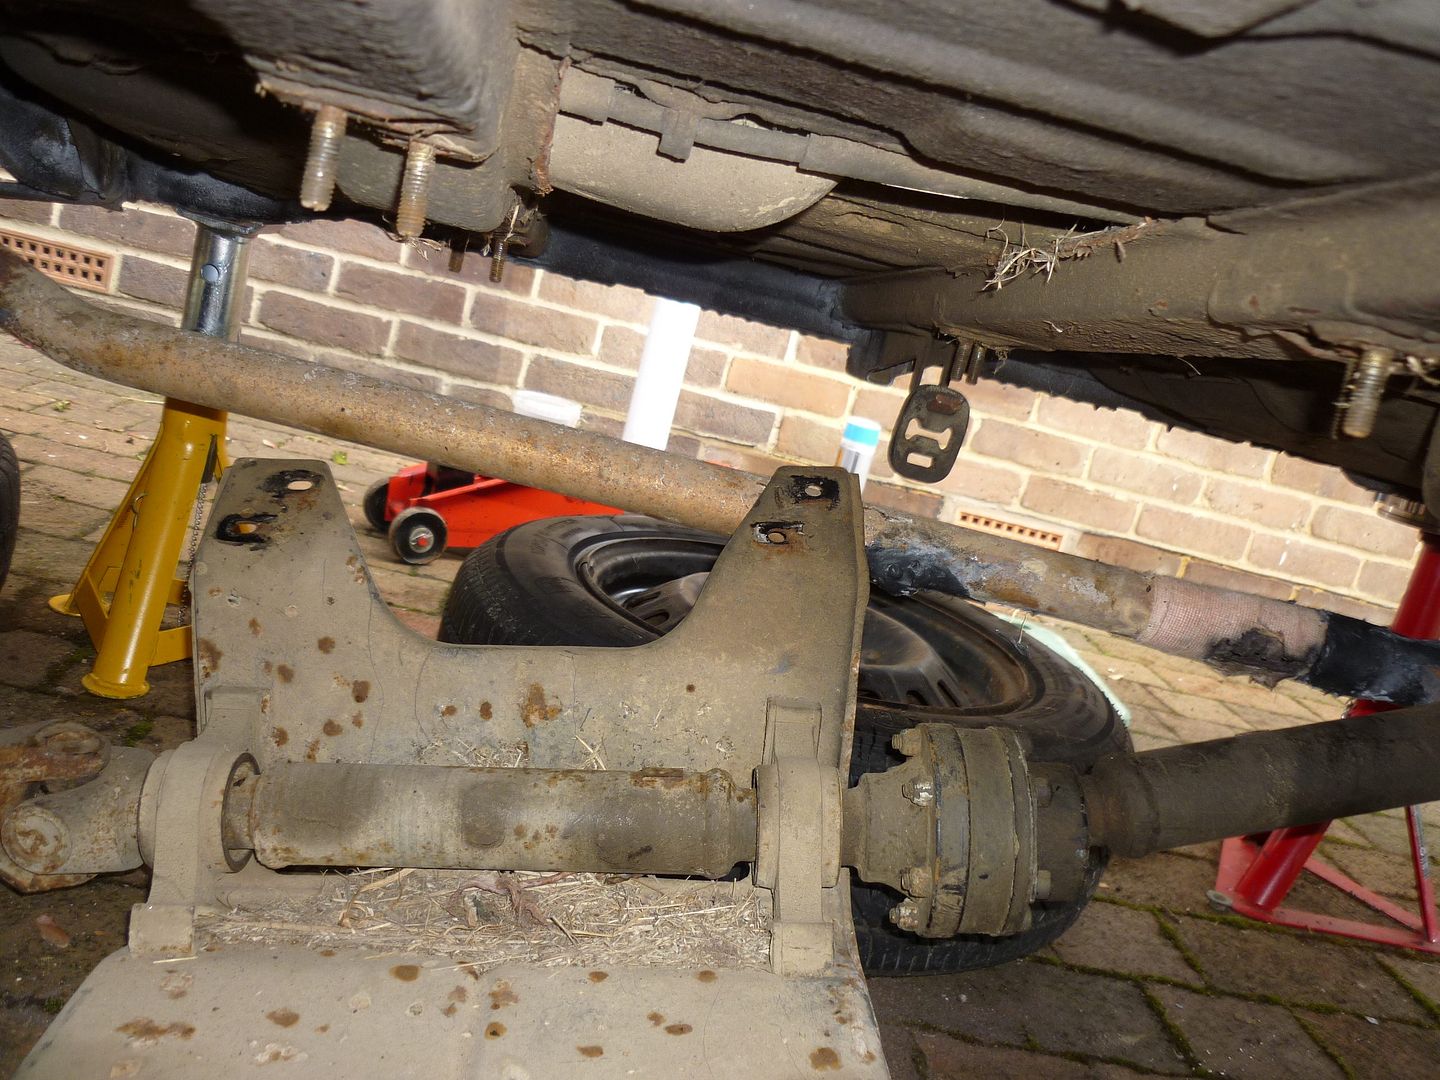
Moment I removed the hub the prop dropped off.


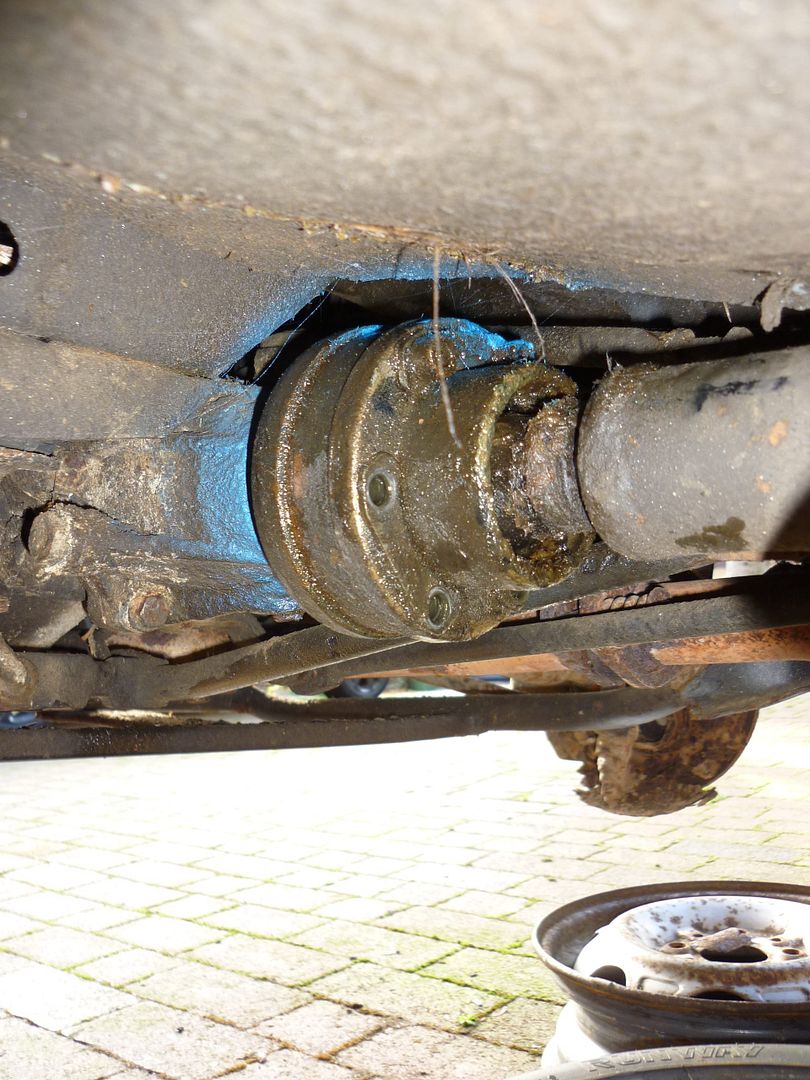
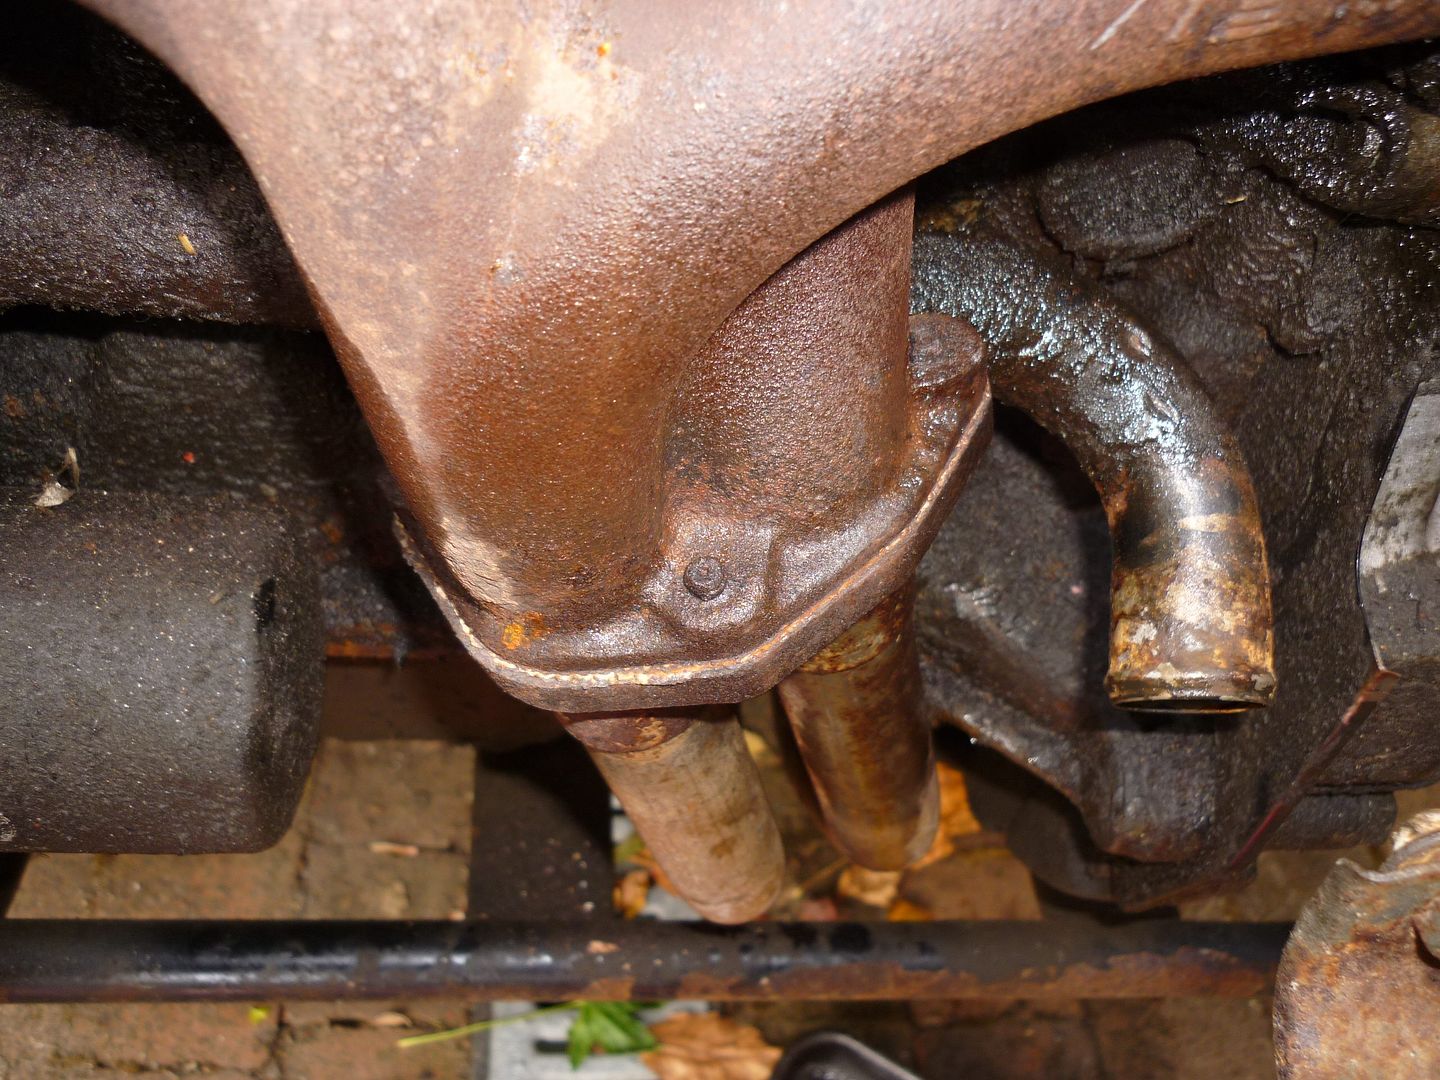
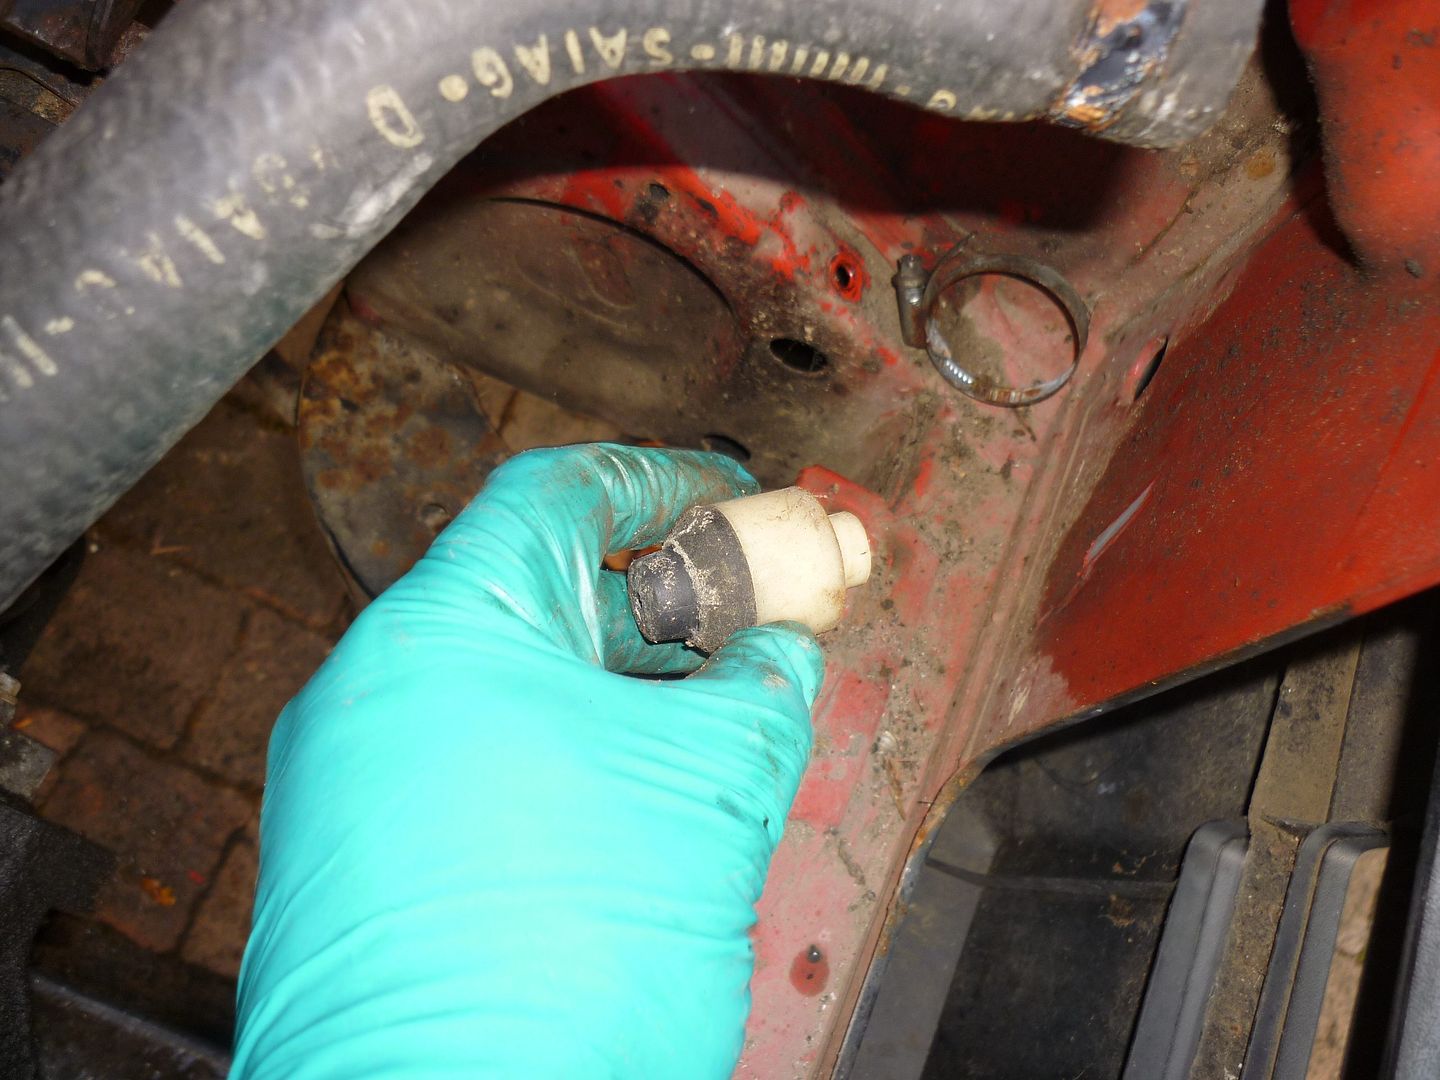
Engine end not clean. Guess I will be looking for a seal kit if they do one?


4WD shifter works and assisted in removing the bolts.


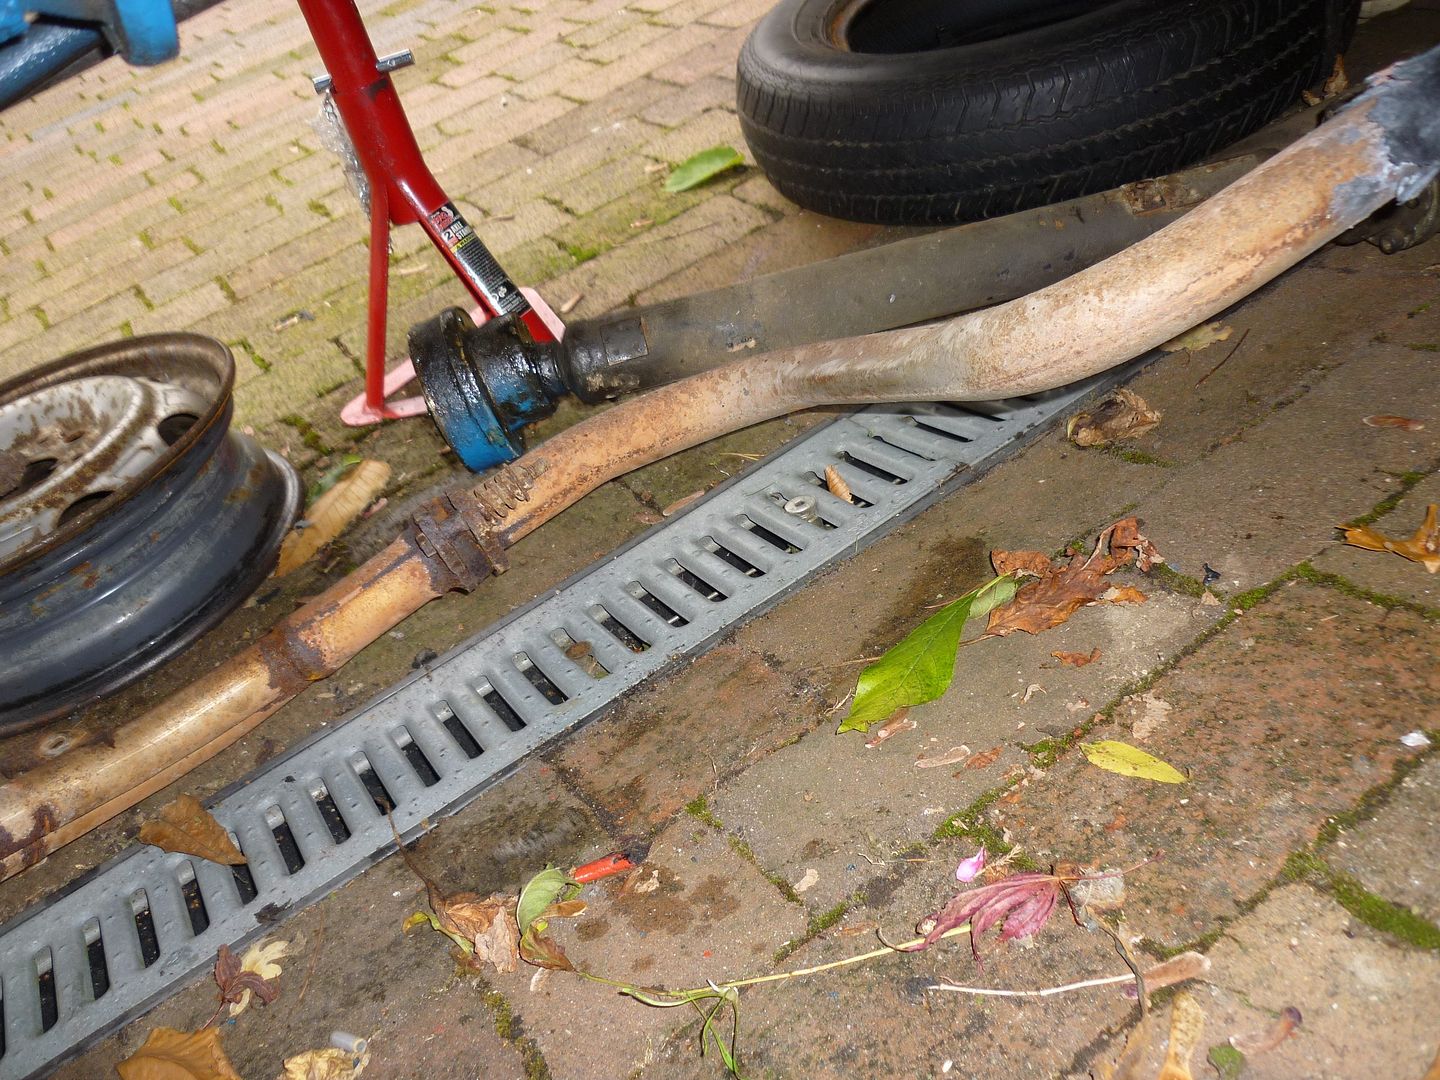
then dropped the middle bearing and shield.


Half a corn field in here.


Thought easier to drop the exhaust to free up the shaft and get another job done.


My first failure despite care and easy out fluid one sheared thread.


Thought the middle clamp might go the same way but bit of heat and out it came.


Also rescued the radiator bump stops.


So two more parts out.


Not pretty?


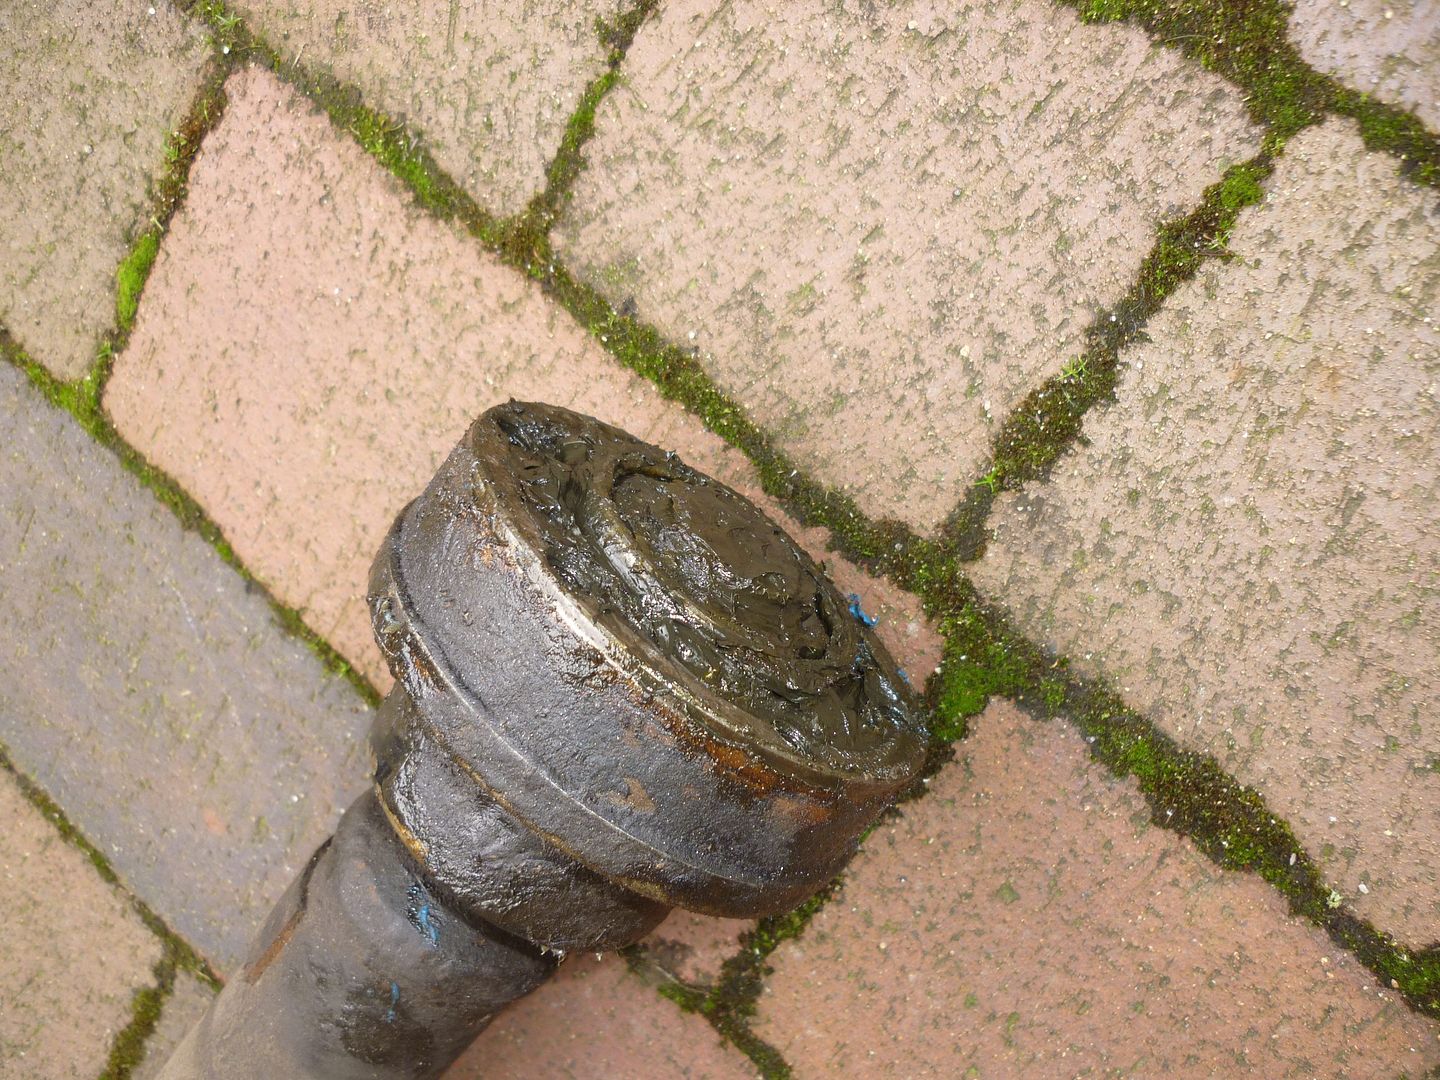
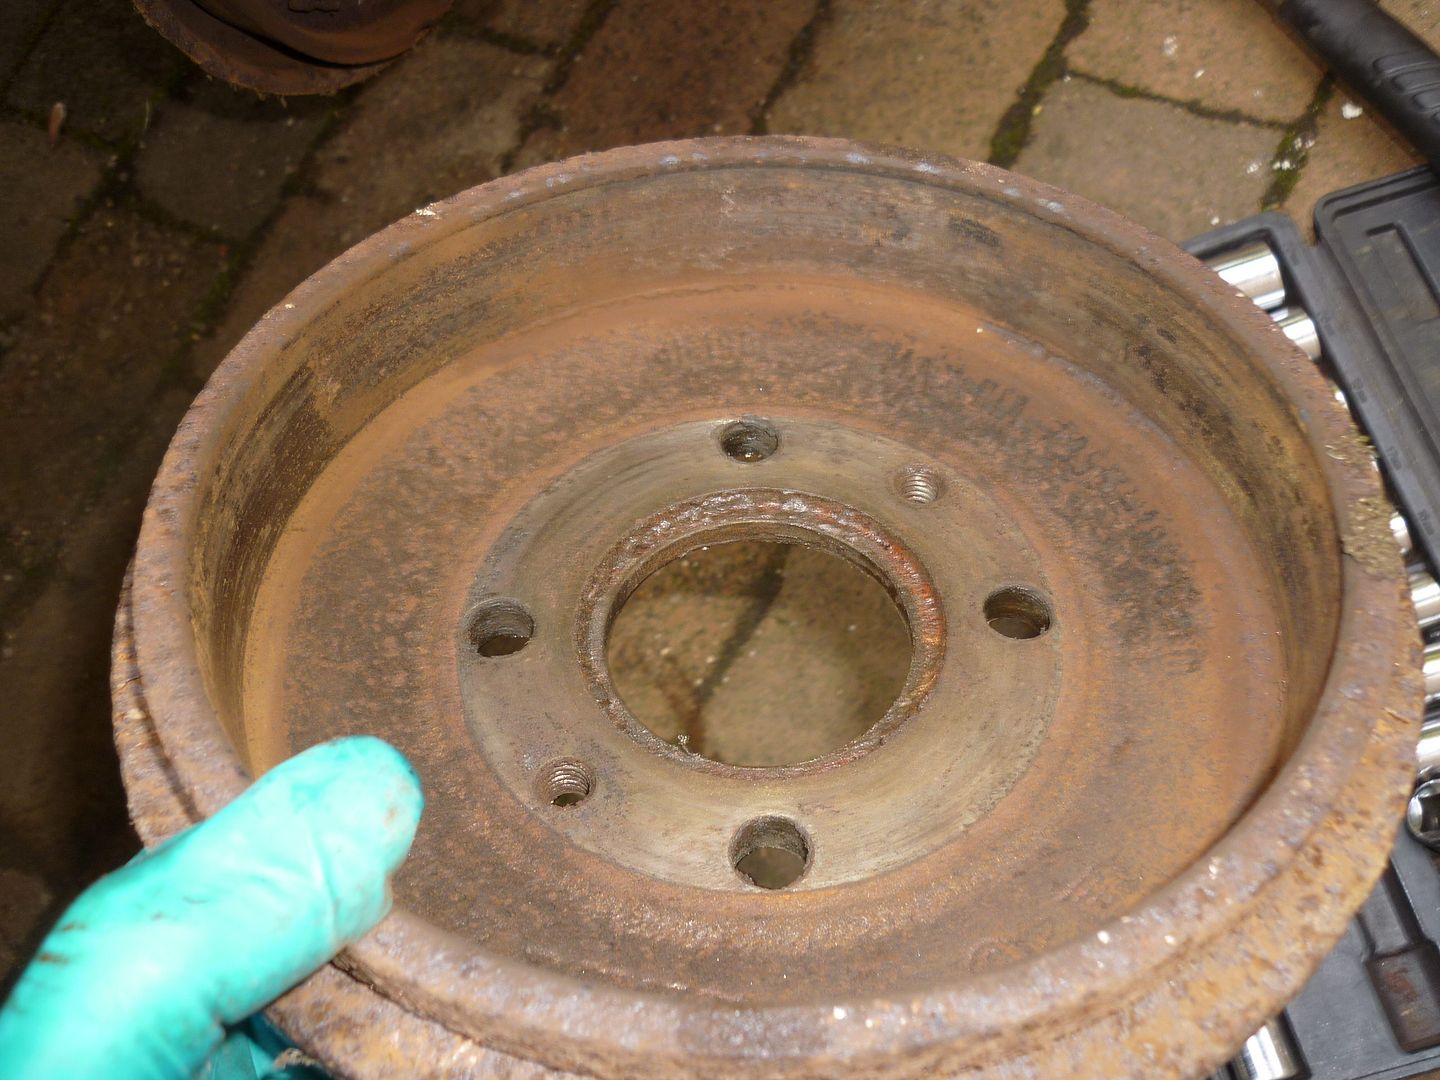
Other end clean (ish).

Next has to be the front suspension to free up the drive shafts.
Drop the steering.
Drop the engine and trans.
Remove the screen and bumpers.
Drop the rear suspension.

Weld and then paint prep?

F1 time. Arrivabene vincere o crostini!
Forza Ferrari:slayer:
 
Looking good, nice to see a proper methodical strip down being done.

Just so you know, there is no need to mark the prop shaft position at the gearbox and axle flanges, it makes no difference to the balancing. However, if you are dismantling the three sections from each other then yes you will need to mark those as they are balanced as one piece.

Thanks!

Afraid so of my practices are old school. But then apparently so am I!
 
The seal kit you speak of on the engine end of the propshaft (cv joint) is available, I did a refurb on this part of the shaft earlier this year. Just like what I believe has happened on yours, my gaiter had split, however my joint was run like this for a long time and hence dried out as you can see!
3.jpg

I took apart this joint to clean it completely. Brake and clutch cleaner and a lot of rags later, left with the remnants of the cv joint - a lot of battered balls...
18902384_1518723494866804_1004787983_n.jpg

And a lot of heavy grooves!
18928215_1518723701533450_1069159454_n.jpg

I got a new joint for this side but the other side was cleaned and re-greased which you will be able to do if yours are not damaged. Yours does not look dry but you could have a closer look and inspect. New gaiters I got from Panda1408, just a post above you! ;)

New grease, get it messy!
1.jpg

Looked nice after putting it all back together but looks just as dirty after a few months driving and a couple of off road meets. The new paint didn't say either, don't think the exhaust heat does good things for Wilko outdoor paint (y)
DTFumhN.jpg

What matters is that the joints are now really good, I had a really loud clattering when decelerating before which was the dry wrecked joint screaming in pain :p
 
The seal kit you speak of on the engine end of the propshaft (cv joint) is available, I did a refurb on this part of the shaft earlier this year.

What matters is that the joints are now really good, I had a really loud clattering when decelerating before which was the dry wrecked joint screaming in pain :p

Brilliant thank you so much for the detail.
Will see about a better inspection but agree the gaiter looks like the cause.
Did it press off easily?
 
Brilliant thank you so much for the detail.
Will see about a better inspection but agree the gaiter looks like the cause.
Did it press off easily?
As yours is not dry it should be better as I say but always worth a look. Circlip off the end, take the joint off, take the gaiter back off (not sure if it was quite as easy as pulling, might have needed gentle persuasion!), the actual joint itself needed the middle part turned and I managed to get it to a point where it all just fell apart, I don't think there was any special trick or anything, just got to get it at the right angles to pull it apart! Takes a bit of time to clean up but worth doing now and cleaning and getting new cv grease in there when doing a new gaiter on it :)
 
Re: Ghetto Garage Spot Of Sun.

Given the amount of time you are spending on this to make the perfect panda do you not think it would be better having the shell dipped and then e coated ? As I am sure there will be lots of hidden cavities and box sections that appear good on the outside but will be rusting on the inside where it can't be seen.

Good point and yes it on my mind. Door's being a first call!(n)

Long discussion to be had with the body shop. Been putting off the discussion until its stripped and welded plus work keeps getting in the way. :(

Perfect probably not but different yes. There's a cost implication as I started with a firm budget and the lift kit took some of that. Accepted the aim is to make it a bit different and despite my CV I never did have a job come in on time and to budget!:slayer:

Much grinding and cutting to start now the panels are here. That may throw a better view on me. I think we may be into media blasting as a compromise to just sand and paint. :bang:

Think my trusty snap-on scope will be looking inside the sections before hand.;)
 
Blowing the Doors Apart?

Well my halogen work lamps have still not been returned so night work is still off the schedule.
Decided to tear down the doors indoors.

First this little clip was more agro to remove than its should of been.


Then of course the handle has to go back on (lesson learned).
Trim puller in use again.


Mirror cover held in with 3 screws.


And one on the frame to hold the mirror in.


Shot of lube to pull off the cover and gaiter.


All to bits easily.


Removed the internal handle and pulled the door operating rod.


This little bit easily lost.


Pulled all the seals off. Remarkably still pretty flexible.


Then took all the bolts holding the regulator out.


And the screw for the glass channel.


Which released this.


Lovely bit of old Italian bin bag glued to the window glass.
Either someone has been here before or this has been previously jammed in the mechanism. You see the window regulator clamp and the securing stud that goes through the glass (just).


Another view of the securing stud suggesting someone has indeed been here before. Expect to see 'AS' scratched on the parts (old HGWells line).


Wonder if you can get new ones of these?


Glass and bin bag didn't put up a fight once the stud 'wings' had been compressed.


Then spin the regulator round a bit and out it comes.


3 bolts to drop the door lock.


Then pull the internal lock push bar off.


Hand up inside to find the outside door lock and find the spring locking clamp. Then a screwdriver to help it on its way out. Thai Ladyboys fingers tool needed?


Then drop the outside door lock linkage to the door lock (gentle push).

Its free!


So is the lock.


More of the white plastic clips holding on the outer plastic trim.


Light mallet touch to release the trim panel.


This time I used a heat gun to help pull the trim clips. I noticed I deformed the panels slightly pulling these mothers out last time. Not a concern as under the trim but Rule 1 do no harm.


Good look at the rust shows a layer of filler so not the first time!


So tonight is 'strip door repeat'.(y)

I hope I can free the engine and transmission this weekend.
Keen to get the body off for its makeover before the ice appears.
 
Last edited:
Good Day Stripping

Well a rather nice day and got 6 hours straight in.

First this is Ghetto garage working...


First removed the bumper and inner covers.


Then a gentle tap and the ball joints dropped out.


Next start on the hubs and shafts. Going to try in 1 piece.
Found these little pins an easy pull.


Then tapped out the clamp plates.


Removed the brake hoses and dropped the caliper.
Weedy little thing...


Pads trashed.


Discs similarly trashed but not the worst I've had.


Other side just as bad.


This didn't look to tidy? Assume its the hub seal.


Dropped the trailing arms. Bushes need to go.


3 bolts to drop the front control arm with its bracket.


4 hex heads to drop the drive shaft. One a right cow as yet again someone had been here before and rounded it off (and left out a washer) Nice new'ish looking gaiter as reward.


Drop the strut bolts (whilst holding on to the strut)


Panda has its paws pulled!
Strip these later.


More later...(y)
 
Last edited:
Well found the other side of the driver’s floor rot. Luckily nothing too massive.

Spent a few minutes understanding how the side lights fall apart.


Only 3 x 10mm bolts for the O/S drive shaft.


Just a bit of fuss pulling the shaft out with the exhaust support in the way.

Then drop the front and rear arms.


Pair of Panda Paws!

Nice view up the transmission.

Next drop the gear linkages. The 4WD shaft came off with a large screwdriver twist.

The next shaft needs the locking pin removed to free up the arm.

The outer shaft is another quick twist.

Then plug the fuel lines in and out. There’s only a few litres in there but safety first.

Next pull the clutch cable.


Now for the drop started by loosening the three engine/trans mounts.


More later.

Almost forgot...

Exhaust??


Remains of the O/S disc cover.


And the O/S pads ugh!


F1 Time.
 
Last edited:
Last of the Weekend Work

Having loosened all the mounts and got a couple of stands and a jack under the block started by removing the engine mount. Later realised that the rear transmission mount would have been a better bet.


Note this made the mounting arm move forward against the mounting plate. It was pivoting on the rear mount duh!

Pulled the upper mount to allow some movement and then ended up removing all the structure it was attached to. Well its needs a coat of paint.

This allowed a bit of swivel and cleared the body work nicely.


Plenty of support just in case.

Gently lowered and showered in antifreeze!

Decked. The body will now lift with one hand when I need to pull it out.

Last task was to pull the rear bumper and check out the tow bar location (separate post).

Well the side bolts and all but one of the 4 bracket bolts all sheared. Biggest loss of life on this project so far.


So the garage (if you call it that) is now full! Time to get some of this off to the upholstery people, media blasting, powder coating and the rest boxed and labelled.


Next drop the rear and the tank, gear levers, grab handles strip the brake system and get the body and panels off to the body shop.

Also need to find a home for all the bits inside….
 
Short Day on The Panda Tear Down.

Only a couple of hours on the Panda this weekend mixture of crap weather and (nice) family stuff.
Plan has to move up as the guys doing the body and paint will have their current build finished in about 2 weeks.
So first empty the shell and get the engine & transmission under cover.
While the sun is out stripped the unit. First the carb just two long bolts. Think this will be up for a refurb.


Not a single tight nut on the exhaust manifold. Anyone driving this would have been sniffing fumes big time.

Alternator off and will probably be swapped for a larger capacity.

Just a couple of bolts.
Belt seriously knackered.

Next the intake manifold. Better….. all tight nuts.
Lots of nuts and one bolt.

Collection of bits.

Lots of prep before this gets painted?

Two trans-side bolts and one block side. Luckily that one was loose as it held the earth cable.

Easy out!

Then split the trans from the block.
First bolt very nicely lubricated courtesy of the cam cover gasket failure.


One nut by the starter motor location.


Then two 10mm bolts and 2x 12mm holding the gear linkage and the clutch cover plate.


Quick pull and one plucked chicken.


Motor and transmission moved to the ‘garage’ nice that all this is a one man job.
Last bits under the bonnet now. Steering rack only 4 bolts!


Then exit trough the gift shop!…well wheel arch.
One gaiter up for replacement.

One bolt here on the brake servo.

Need to pull these small bolts to remove the cover inside the car.

Gives access to the actuator split pin.

Now the servo will drop out.

Then pull the six nuts that hold the pedal box in place.


Just the brake lines to release.

And one bolt to hold the balance regulator.

Now a quick tidy up removing the bump stops and clips.


Ok that’s it for now.
Windscreen to pop out. Nice video from Dragonman on that!
Rear axle and suspension (6 bolts) and the tank to drop then pull the gear lever and shafts.
Oh…and still have to remove the grab handles!!
 
Panda Fights Back (a bit)

Just a few hours today more to do with more rain tomorrow. The Panda was going to get revenge for all the tear down and played hard ball with the rear end.
First removed the hand brake cables pretty choked with years of gunk. Underneath this is a split pin.

This side the pin decided to break half way out and hey ho the same on the other so in with a drift pin.

Nest the rear hanger nuts came off with lots of penetrating fluid and a 500mm breaker bar.

Rear Shocks similar effort did not want to move.

Upper mounts in particular were close to the nuts being ground off.

Well this one was far from falling out claim.

Rear hanger outer plate easily off and note the domed face going inboard.


Other side hanger nuts and shock bolt even less willing to move.

Rear Shock eventually off and would probably be an MoT advisory? (bin)

Front hanger bolts were the worst. Over ½ hour to pull these two. But brute force wins in the end (note to self new bolts needed).

Old tyre provides the best landing pad and makes pulling it out easy.

The rear hangers eventually gave in after a drift and a lump hammer. I guess 29 years of road rot, salt and potholes means these teeth were never going to pull easily.

Cut the hydraulic hose and pull the Panda’s legs out!

Pull the gear levers and arms out while I was underneath. 4 x M10 nuts all loose (thanks Panda gods). All drops out the floor nicely.


Not forgetting to hold on to the mounting clamp plate.


4WD levers pretty much the same.


Small bolt hold the actuator to the handle. Going to need a new cover.

Undo the screw on the 4WD lever and the shaft drops out underneath.

Lots of bits for the bin!


Loosened off the tank nuts and pulled the filler hose out.


Finally for today pulled the fuel lines and rear brake line through.

So tank, windscreen (seal already released) and a few small bits and the body shop can collect!
 
Re: Panda Fights Back (a bit)

Just a few hours today more to do with more rain tomorrow. The Panda was going to get revenge for all the tear down and played hard ball with the rear end.
First removed the hand brake cables pretty choked with years of gunk. Underneath this is a split pin.

This side the pin decided to break half way out and hey ho the same on the other so in with a drift pin.

Nest the rear hanger nuts came off with lots of penetrating fluid and a 500mm breaker bar.

Rear Shocks similar effort did not want to move.

Upper mounts in particular were close to the nuts being ground off.

Well this one was far from falling out claim.

Rear hanger outer plate easily off and note the domed face going inboard.


Other side hanger nuts and shock bolt even less willing to move.

Rear Shock eventually off and would probably be an MoT advisory? (bin)

Front hanger bolts were the worst. Over ½ hour to pull these two. But brute force wins in the end (note to self new bolts needed).

Old tyre provides the best landing pad and makes pulling it out easy.

The rear hangers eventually gave in after a drift and a lump hammer. I guess 29 years of road rot, salt and potholes means these teeth were never going to pull easily.

Cut the hydraulic hose and pull the Panda’s legs out!

Pull the gear levers and arms out while I was underneath. 4 x M10 nuts all loose (thanks Panda gods). All drops out the floor nicely.


Not forgetting to hold on to the mounting clamp plate.


4WD levers pretty much the same.


Small bolt hold the actuator to the handle. Going to need a new cover.

Undo the screw on the 4WD lever and the shaft drops out underneath.

Lots of bits for the bin!


Loosened off the tank nuts and pulled the filler hose out.


Finally for today pulled the fuel lines and rear brake line through.

So tank, windscreen (seal already released) and a few small bits and the body shop can collect!


Excellent work!
 
Tear Down Closure

The tear down is almost complete…I know took some time.
So I had been underneath but thought this panel would give good access to the fuel connections…well no really certainly not with my pinkies.

Two front bolts also hold the stone screen.

Rear bolt also holds the rear brake hose support.

The breather hose goes through the bulkhead but a quick pull and what was left of the hose clip disintegrated.

Tank fell out. I did say put a jack under didn’t I? The 20lt of fuel helped it drop rapidly.

Terminals cant be mixed.

Have to drop the brake line before its free but it’s all out and taped up.

A few hose clips hold the hose round the tank area. The tank cable pulls out here into the cabin.


Now the handbrake warning light switch should go through here…..but someone in Turin did this!


Don’t bother with these…..just plastic caps….

Pulled the switch and that cleared the rest of the loom.


Got these out at last.


Roof trim held on with a few split pins and some sealant. Quick tap with a small drift.


Now to the screen.
The interior light cables hidden under the screen seal.

Then prise out the seal and lift the windscreen.


Then to the simple stuff…


That bits done (well bonnet stay and handbrake to remove)


More later….
 
Back
Top