I'm making this guide as there is not much online about the GT Garrett turbo's.
Ive rebuilt these turbos many times and this is the way I find it best and ive yet to have any problems
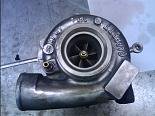
photos where taken while rebuilding a GT1752 with blown seals(bearings where perfect but replaced them anyway) and swapping the water cooled core with a air cooled core from a Astra GT15 turbo (which just goes to show how interchangeable GT turbo parts are!)
first of all strip the turbo... sadly I took no photos of this but ill explain, but if you look at the photos for putting it together you wont have a problem.
Ive tagged up a photo with numbers to help identify parts which should help here goes...
Ive rebuilt these turbos many times and this is the way I find it best and ive yet to have any problems
photos where taken while rebuilding a GT1752 with blown seals(bearings where perfect but replaced them anyway) and swapping the water cooled core with a air cooled core from a Astra GT15 turbo (which just goes to show how interchangeable GT turbo parts are!)
first of all strip the turbo... sadly I took no photos of this but ill explain, but if you look at the photos for putting it together you wont have a problem.
Ive tagged up a photo with numbers to help identify parts which should help here goes...
Lets start!...stripping...

remove the waste gate solenoid
I marked the shaft/nut/compressor wheel with a diamond scribe tool as to line everything up when put back together (Garrett turbo's have each component balanced as single parts so positions are not important but it helps ensure the nut is tightened the right amount and keeps it all in its original position)
...now spray everything with gasplus and remove the 10mm bolts from the turbine housing(1).
with the turbine housing(1) held in a vice, use a soft drift to tap the core(2) out of the housing. (never hit the aluminium parts of the turbo or the cast fins as they will snap off)
do this equally, if it starts coming out on one side start tapping it out on the other side... if you don't the turbine can hit the housing... not good!
next remove the 8mm bolts holding the compressor housing(3) on, the housing should remove without much effort... but like the turbine housing pull it off carefully!
now you need to be very careful, secure the core(2) in a vice and remove the nut(9) holding the compressor(5) on... this nut has a *LEFT HAND THREAD* the nut fits a 12point 8mm ring spanner perfectly, the turbine(4) will either have a triangle shaped head(which mine did and so made a tool to hold it) and others its just a simple 10mm head.
Once the nut is removed I usually wrap the turbine and compressor in a small amount of cloth(the wheels can be razor sharp) then hold the turbine and carefully twist/pull the compressor wheel.
Some times they slip of easy... If not GENTLY tap the turbine shaft down which should give you enough room to get your fingers behind the compressor to pull it off.
now pull the turbine(4) out. (may need a gentle tap if the seal has failed causing them to gum up)
behind the turbine MAY be a heat shield(8)
next remove the 4 torx screws (T15 if i remember) holding the compressor back plate (7) on to the core.
pull the back plate off.
Behind this you will see the thrust plate... remove this and the one half of the thrust washer.
next remove the bearing locator. this has a small nipple to help removal with needle nose pliers.
now remove the main bearing. it should be a rather loose fit but if the turbo has had a rough life then it may be gummed in. if this is the case then push it out from behind with a small screwdriver, etc.
now back to the compressor back plate.
in the center you will see the other half of the thrust washer/oil seal.
push this out of the plate. it may be tough as the seal is locked into a grove.
congratulations... you now have a pile of bits that was once a turbo
")
You can now clean the components as you wish (just be careful with the turbine and compressor wheel as they are VERY delicate)
next page is the rebuild
Lets fix this mess... The Rebuild!
I'm now assuming you have bought a rebuild kit for your turbo.
Note: apply as much lube as possible! you cant over do it!
First take the turbo core(2) then lube up and insert the new main bearing with the cut out at the top, line the cut out with the locator hole then insert the bearing locator. everything should sit flush.

next apply more lube then drop the new half thrust washer on top of the main bearing

Next the thrust bearing... be sure to fit it the right way! the bearing has a oil feed hole needs to face the core and lines up with the oil feed on the core.
also fit the rubber gasket (the ones in my kit where to big but the originals where fine)


now get the other half of the thrust washer (my kit came with a few of different lengths so match it to the original fitted to the turbo or make sure the one that came with the kit is the same length... this is very important! if non of them match you can reuse the original if the bearing surface is not scored and you replace the seal ring)and fit the seal ring (the smaller one) this is pretty tough to do so do it in a clean area as i had mine ping across the garage... luckily i found it
insert the new thrust washer/seal into the alloy compressor back plate(7) this can be tough! don't be tempted to tap it in as this will damage the alloy sealing surface and the turbo will always leak oil! I found inserting it at a slight angle then pushing it back straight and in at the same time helped.


now put the compressor back plate (7) onto the core(2) (make sure you fitted the rubber seal) and line the holes up(it will only fit in one position) then insert the screws and tighten (no idea on torque settings I just used common sense and tweaked them up to what i felt was right for the screw size)

**ignore the shaft in the photos as i forgot to take photos as i was building and so took them after fitting the turbine.**
next get the turbine(4) and remove the oil seal ring... this can be a right pain.(i used a small flat head precision screwdriver)once removed I snapped the old seal in half and used it to scrape any carbon build up from within the seal grove.
now fit the seal ring.

Now back to the core... place the head shield over the turbine end (if you have one)

next lube up the turbine shaft and insert it into the core gently. it may need rocking slightly to help it line up the thrust washers.
once its down almost all the way it may need a very light tap or hard push to get the seal ring into the core. (mine would not go and required me to clean the surface of the core which the ring sits)
(sadly I forgot all about taking photos from now but here is another i took for turbine comparison that shows how it should look,,,very close to the shield)

now turn the core over and slide the compressor wheel onto the shaft (can be a tight fit) and line up and marks you made when removing. now screw on left hand threaded nut (kit came with a new nut which is not balanced so used the original) and tighten the nut up so that all the markings you made line up.
next fit the large O-ring around the outside of the compressor back plate and then fit the compressor housing (be careful not to contact compressor wheel while doing this)
you can now fit the small 8mm bolts holding this housing on (I spin the turbine carefully while slowly tightening the first couple. doing this i can be sure the it spins free... if it starts to rub then i will know some things gone wrong somewhere and save tightening it up then finding out after and having a damaged compressor wheel)
next turn it over and fit the turbine housing (I do the same spinning thing as with the compressor)
All Done!
That is it... you should now have a fresh clean, smoke free turbo
Expect some smoke from the turbo and exhaust after start up and for the first few miles as oil burns off the turbo and turbine (even more so if you turbo seals blew)
Hope you found this guide useful!
Remember to hit thanks if you found this guide useful
Comments are welcomed and be sure to tell me if you see any errors or missing details