This kind off ties in with my guide "Cheapo jump leads" which is why I've referenced it. Also, apologies to more learned forum members, I've tried to keep this pretty simple so that the less technically minded/capable can benefit.
Let's say right away, this is not something to be undertaken lightly. The potential to do some very serious and expensive damage to your car should not be underestimated and, as I'll not be with you if you try it - to correct anything you may be doing wrong, I have to say YOU TRY THIS AT YOUR OWN RISK. If you've never done it before I strongly recommend you have someone with you who knows what they are doing. If in any doubt then definitely just don't try this. There's also the possibility that there may be something seriously wrong with the vehicle, maybe shorted out? So when you connect up the jump battery the whole shebang goes ballistic! Unlikely, it's never happened to me, but could be a possibility?
So, having frightened myself, and hopefully you too, with the above, let's take a look at this subject. The reason I've tried to put "the frighteners" up you is that for many years now, cars and most vehicles in general, have incorporated electronic control units and electronic components. These are delicate, expensive to replace and highly vulnerable to abuse and we are just about to "attack" our vehicle with an electric supply so violent it could happily "fry" a ship load of these bits and pieces. If you really get it wrong in a big way you might even manage to explode a battery - which would be nasty as they tend to be full of liquid sulphuric acid electrolyte which is not good for you or the car! If you're new to this it might be a good idea to wear safety goggles?
One big way we can limit the risk is not, I repeat NOT, to jump vehicle to vehicle. I could spend the next couple of paragraphs detailing why this is inadvisable but, suffice to say, just DON'T. So, if we limit our external power source to either another car battery of the same voltage or a stand alone jump pack then we're not going to be "hitting" the system with more than the vehicle's own battery could. Now all we've got to do is connect stuff up so we don't cause a short circuit or problems for the battery condition monitor (more on that in a moment).
On the subject of avoiding short circuits, one of the "novice's" traps many fall into is forgetting to ensure the cable clamps on the "other" end of the cables can't touch each other. For that reason I've always had the clamps on one end of the cables attached to a wee piece of wood until I actually need to attach them:
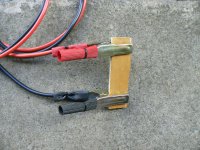
Now, even if I connect both clamps on the other end to the battery, I won't get an accidental short.
Ok, lets look at an older vehicle first, and the Panda is a good example (that's my 2010 1.2 Panda). So, with the bonnet open the top of the battery looks like this:
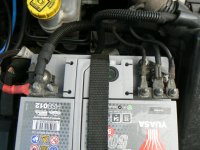
The terminal on the left is the positive. The red sleeve helps identify this but if you look carefully at the battery casing you'll also see a + sign (not so easy to see in the picture as it's partly hiding under that thick black lead - you can see it better "in the flesh". The one on the right is the negative and again there's a - on the battery case. Things are slightly confused because of all the leads coming off the terminals (two on the + terminal and three on the -) all we need to know is that a connection to the metal of the left one is + and the right one is - This is a relatively new battery so has a charge condition indicator - do you see the wee round "window" partly covered by the strap? Look closely and you can see it's displaying a small green indicator?

That means it's in a satisfactory state of charge. A very handy modern innovation I think, and doesn't, unusually in this day and age, involve a "smart phone!!
So let's start connecting up. First is to connect the positive terminals on both batteries (in the car and the jump battery) together with the red jump lead:

Be careful what you're doing not to let anything metal bridge between the positive cable/terminals and the car body as this will result in a short. General advice is not to wear a watch with a metal strap and take off any rings "just in case".
So now the positive on both batteries are connected. A wee "wiggle" as you connect them is always a good idea as it helps to ensure a good connection. Remember we are going to be passing high currents here so any poor connection will limit current flow and may produce heat and sparking. Next thing is to make the negative connections, so hook one end of the black cable to the jump battery's terminal post:
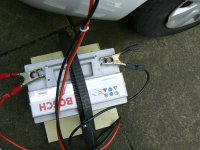
While you're doing this keep a hold of the clamp on the other end of this lead or position it so it can't touch a metal part of the car and so cause a spark. Now find a nice substantial metal part of the engine or gearbox to attach the other end to. DON'T attach it to the car's negative battery terminal.
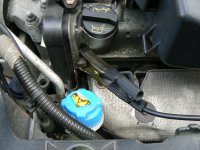
I've chosen the cam cover/cylinder head here just because it's easy to get at and there is always a nice thick earth cable running from the power unit to the chassis Anywhere like this will do. Oh, and don't forget to give it a wee wiggle to ensure a good connection. In this instance, because this car doesn't have a battery condition monitor, you could have connected that negative clamp directly to the battery negative terminal like this:
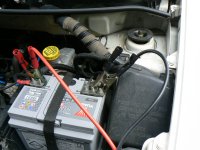
However I'd strongly advise against this because this is the connection that completes the circuit and the "flat" battery will immediately try to "suck" current from the well charged jump battery and the risk of a spark as you make the connection will be at it's greatest.
Now you've got both jump leads connected - positive terminal to positive terminal with the red lead and negative on the jump battery to remote earth on the vehicle with the black one. If you think about it, the batteries are now connected in parallel so what you now have is one much larger battery? However half the cells are depleted - that's the flat battery - and half are very well charged, that's the jump battery. So the depleted cells are, right now, pulling as much electricity as they can through those nice big thick jump leads. However, if your set of jump leads are a bit "wimpy" and "cheapo", maybe with poorly fitted clamps on the ends like you'll see on the set in the "cheapo" guide, and you immediately try to operate the starter then you may well find that there's not enough "left over" to spin the starter up! This problem can be overcome by simply delaying trying to start the engine by a few minutes, even two or three can make a difference, but five is probably better. The "flat" battery can't actually assimilate a full charge in this way but the surface of it's plates will become well charged so it'll not flatten the jump battery by doing this. Then, after a few minutes, and providing there's not something else wrong with the vehicle, it should spin up and start.
Now, with the engine running, DON'T disconnect the leads yet, let the car run at a fast idle (I have a length of cane which I use to prop the throttle so she'll run at about 1500 to 2000 rpm) for a few minutes during which the car's alternator will put charge into both batteries which is very desirable as it evens out the difference in charge between them. This is a good time to connect a voltmeter across the battery terminals to check if a charge is taking place. Before you try cranking the engine the battery voltage will probably show somewhere around 12.5 volts if the jump battery is well charged. Now, with the engine running at a fast idle, expect to see somewhere around 13.5 to 14.5 volts. If it's still showing around the 12.5 or less, then the battery is not being charged and you've got another problem to sort out. However, chances are she'll be charging so just let her run for a while. Then, maybe five minutes or so later, disconnect the leads. Do this in reverse order to when you connected them up. So the earth to the car's engine first, just in case there's a spark, then the neg battery terminal and finally the positive lead. Remembering to keep all the clamps from touching and not to short any positive clamps/leads etc to the car's body. Once the jump is disconnected I like to recheck the voltage at the vehicle battery terminals with my volt meter/multimeter just to be sure charging is still taking place. I'm thinking maybe the likes of a poor connection on a battery terminal or earth lead somewhere? Of course the car's battery will not be properly charged up yet so don't stop the engine
Both batteries may have been working pretty hard during this procedure so will be likely to have gassed more than normal. If your battery is now charging as it should then you'll find that if you drive around, or run the engine at a fast idle, for about twenty minutes to half an hour then the alternator will more or less fully charge the battery. However, if you have a battery charger then I'd recommend using it as a dedicated battery charger, especially a "smart" charger like the CTEK I have - other brands are available of course, will make a better job of charging the battery than most alternators can.
Most modern vehicles will have a battery condition monitor, most likely on the negative terminal. I've never seen one on the positive but I've read it's not impossible and some have monitoring modules on both neg and pos I think?
Anyway, I've only ever seen them on the negative terminal and the procedure for jumping seems to be the same as above. So Positive linked to positive with the red jump lead and negative on the jump battery to a remote earth on the vehicle, just as we did with the Panda above. I've read that this protects the battery monitor and I've also read many posts that say you MUST NOT connect directly to the battery terminal on vehicles with battery monitoring electronics. By the way, if your vehicle has Stop/Start it almost certainly employs a battery condition monitor - it's part of the system which decides when to allow stop/start to work and when not to.
Here's the top of Bluey's battery (our Skoda Scala):
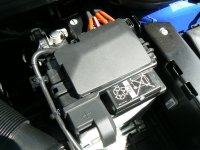
Bit daunting compared to Becky's (the Panda shown above) In fact it's not. The positive terminal has a black cover over it with a big + sign (at the bottom of the picture). If you pull the cover off you can see the terminal is very ordinary looking:
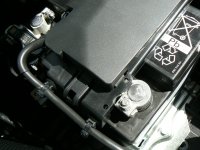
I've not yet had reason to remove the big black cover on top of the battery (let sleeping dogs lie I say) but I suspect it's nothing more complicated than a connector for all those red power cables and, maybe, some big fuses. Bloody inconvenient place for them to have put it though because it covers all the interesting battery specification figures - like Ah and CCA rating just to mention two.
The more interesting bit is on the other terminal, the one at the top of the picture, which is the negative terminal:

The terminal itself looks pretty ordinary but the interesting bit is the black "block" with all the writing on it, that's the battery monitor. This is the terminal you must not connect your earth lead to. However, very conveniently, Skoda have supplied an earthing point on the strut turret right next to the battery:
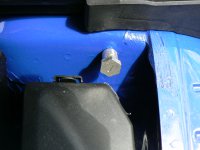
Which is where you connect the earth lead. So, with all leads connected just as we did on the Panda, First connecting the positive on the jump battery to positive on the Scala using the red jump lead and negative on the jump battery to the dedicated earth point on the strut turret with the black lead, it looks like this under the bonnet:

Of course I could have chosen to make that final negative connection to a remote earth such as the engine lifting bracket:
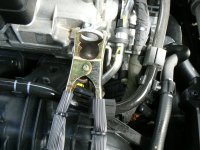
and it would have worked just the same, but with such a conveniently placed ready made earth available, why would you?
Cor, doesn't it all look so lovely and clean!
The actual procedure would be the same as for the Panda. Allow a wee charging period after connecting the jump battery and, assuming you get it fired up, a wee period of running at fast idle before disconnecting to allow both batteries to normalize. The final earth - the one to the block/gearbox/whatever or dedicated earth like the Scala (take a look in your car's owner manual if your's isn't obvious) - is always last to connect and first to disconnect, remember why? yup, you got it, because of the gasses and possibility of a spark.
If you're thinking of using a battery charger with the battery still connected to the car then, unless your vehicle is very old indeed and has no electronics in it, don't even think of using one which isn't a "smart" charger. Safest way is always to take the battery out and charge it on the bench - no danger of either electrical or other, like boiled over electrolyte, damage. However if you disconnect it from the car this often opens a right can of worms because "stuff" goes wrong - like it looses the radio code (do you know yours?) sometimes the auto windows settings are lost. Stored data can disappear. It varies from make to make but it can be very inconvenient. For that reason I don't like having to disconnect batteries when charging. Some years ago I explored possibilities for charging with the battery still in circuit and the only one which came back as pretty well 100% risk free were the CTEK products - I rang them and they confirmed they're output side is so well stabilized there's no risk and told me I could use it to do this with total confidence. Over several years now I've done so on various family vehicles and friend's cars too - most notably my pal's posh Jag and a neighbour's Merc and had absolutely no problems. In fact the charger I bought can also be used as a system maintainer when disconnecting the battery so it's output must be very stable. Then, a couple of years ago I bought a cheaper Lidl electronic charger - neither this or the CTEK is a transformer type so presumably inverter based? Just listen to me, sounds like I know what I'm talking about doesn't it! - The Lidl offering is much cheaper than the CTEK and I've risked it on our Panda, Boy's Punto, daughter in law's Jazz and later Mazda 2 and my 2016 Ibiza. All have charged up well and suffered no problems. So I guess that electronic "smart" chargers are probably generally pretty safe to do this with?
Connecting up the CTEK or Lidl charger couldn't be easier. Charger positive to battery positive and charger negative to remote negative on the car (I just do that out of habit on any car I'm working on now, never go for the neg battery terminal any more unless it's on the bench). Here's the CTEK on the Scala right now, it's not run for a week and is just a little low due to all the electronics supping away and it's last outing being just down the road to the market:

Mustn't forget to pop the positive terminal cover back on when It's finished.
So, hope that's been helpful. I'll say again, Jump starting is not a procedure to be lightly undertaken, you need to concentrate totally on what you're doing and the risk of making an expensive mistake is always there. I'm just recounting here what I've experienced in an earlier life in workshops and then later with family and friend's cars so can't be sure these procedures will be applicable to all makes and models. All I can say is it's worked for me but if you have a go yourself then you must accept responsibility for anything which goes wrong yourself and I'd greatly welcome comment from other knowledgeable forum members if they notice something I'm recommending here which is wrong.
Let's say right away, this is not something to be undertaken lightly. The potential to do some very serious and expensive damage to your car should not be underestimated and, as I'll not be with you if you try it - to correct anything you may be doing wrong, I have to say YOU TRY THIS AT YOUR OWN RISK. If you've never done it before I strongly recommend you have someone with you who knows what they are doing. If in any doubt then definitely just don't try this. There's also the possibility that there may be something seriously wrong with the vehicle, maybe shorted out? So when you connect up the jump battery the whole shebang goes ballistic! Unlikely, it's never happened to me, but could be a possibility?
So, having frightened myself, and hopefully you too, with the above, let's take a look at this subject. The reason I've tried to put "the frighteners" up you is that for many years now, cars and most vehicles in general, have incorporated electronic control units and electronic components. These are delicate, expensive to replace and highly vulnerable to abuse and we are just about to "attack" our vehicle with an electric supply so violent it could happily "fry" a ship load of these bits and pieces. If you really get it wrong in a big way you might even manage to explode a battery - which would be nasty as they tend to be full of liquid sulphuric acid electrolyte which is not good for you or the car! If you're new to this it might be a good idea to wear safety goggles?
One big way we can limit the risk is not, I repeat NOT, to jump vehicle to vehicle. I could spend the next couple of paragraphs detailing why this is inadvisable but, suffice to say, just DON'T. So, if we limit our external power source to either another car battery of the same voltage or a stand alone jump pack then we're not going to be "hitting" the system with more than the vehicle's own battery could. Now all we've got to do is connect stuff up so we don't cause a short circuit or problems for the battery condition monitor (more on that in a moment).
On the subject of avoiding short circuits, one of the "novice's" traps many fall into is forgetting to ensure the cable clamps on the "other" end of the cables can't touch each other. For that reason I've always had the clamps on one end of the cables attached to a wee piece of wood until I actually need to attach them:

Now, even if I connect both clamps on the other end to the battery, I won't get an accidental short.
Ok, lets look at an older vehicle first, and the Panda is a good example (that's my 2010 1.2 Panda). So, with the bonnet open the top of the battery looks like this:

The terminal on the left is the positive. The red sleeve helps identify this but if you look carefully at the battery casing you'll also see a + sign (not so easy to see in the picture as it's partly hiding under that thick black lead - you can see it better "in the flesh". The one on the right is the negative and again there's a - on the battery case. Things are slightly confused because of all the leads coming off the terminals (two on the + terminal and three on the -) all we need to know is that a connection to the metal of the left one is + and the right one is - This is a relatively new battery so has a charge condition indicator - do you see the wee round "window" partly covered by the strap? Look closely and you can see it's displaying a small green indicator?
That means it's in a satisfactory state of charge. A very handy modern innovation I think, and doesn't, unusually in this day and age, involve a "smart phone!!
So let's start connecting up. First is to connect the positive terminals on both batteries (in the car and the jump battery) together with the red jump lead:
Be careful what you're doing not to let anything metal bridge between the positive cable/terminals and the car body as this will result in a short. General advice is not to wear a watch with a metal strap and take off any rings "just in case".
So now the positive on both batteries are connected. A wee "wiggle" as you connect them is always a good idea as it helps to ensure a good connection. Remember we are going to be passing high currents here so any poor connection will limit current flow and may produce heat and sparking. Next thing is to make the negative connections, so hook one end of the black cable to the jump battery's terminal post:

While you're doing this keep a hold of the clamp on the other end of this lead or position it so it can't touch a metal part of the car and so cause a spark. Now find a nice substantial metal part of the engine or gearbox to attach the other end to. DON'T attach it to the car's negative battery terminal.

I've chosen the cam cover/cylinder head here just because it's easy to get at and there is always a nice thick earth cable running from the power unit to the chassis Anywhere like this will do. Oh, and don't forget to give it a wee wiggle to ensure a good connection. In this instance, because this car doesn't have a battery condition monitor, you could have connected that negative clamp directly to the battery negative terminal like this:

However I'd strongly advise against this because this is the connection that completes the circuit and the "flat" battery will immediately try to "suck" current from the well charged jump battery and the risk of a spark as you make the connection will be at it's greatest.
Now you've got both jump leads connected - positive terminal to positive terminal with the red lead and negative on the jump battery to remote earth on the vehicle with the black one. If you think about it, the batteries are now connected in parallel so what you now have is one much larger battery? However half the cells are depleted - that's the flat battery - and half are very well charged, that's the jump battery. So the depleted cells are, right now, pulling as much electricity as they can through those nice big thick jump leads. However, if your set of jump leads are a bit "wimpy" and "cheapo", maybe with poorly fitted clamps on the ends like you'll see on the set in the "cheapo" guide, and you immediately try to operate the starter then you may well find that there's not enough "left over" to spin the starter up! This problem can be overcome by simply delaying trying to start the engine by a few minutes, even two or three can make a difference, but five is probably better. The "flat" battery can't actually assimilate a full charge in this way but the surface of it's plates will become well charged so it'll not flatten the jump battery by doing this. Then, after a few minutes, and providing there's not something else wrong with the vehicle, it should spin up and start.
Now, with the engine running, DON'T disconnect the leads yet, let the car run at a fast idle (I have a length of cane which I use to prop the throttle so she'll run at about 1500 to 2000 rpm) for a few minutes during which the car's alternator will put charge into both batteries which is very desirable as it evens out the difference in charge between them. This is a good time to connect a voltmeter across the battery terminals to check if a charge is taking place. Before you try cranking the engine the battery voltage will probably show somewhere around 12.5 volts if the jump battery is well charged. Now, with the engine running at a fast idle, expect to see somewhere around 13.5 to 14.5 volts. If it's still showing around the 12.5 or less, then the battery is not being charged and you've got another problem to sort out. However, chances are she'll be charging so just let her run for a while. Then, maybe five minutes or so later, disconnect the leads. Do this in reverse order to when you connected them up. So the earth to the car's engine first, just in case there's a spark, then the neg battery terminal and finally the positive lead. Remembering to keep all the clamps from touching and not to short any positive clamps/leads etc to the car's body. Once the jump is disconnected I like to recheck the voltage at the vehicle battery terminals with my volt meter/multimeter just to be sure charging is still taking place. I'm thinking maybe the likes of a poor connection on a battery terminal or earth lead somewhere? Of course the car's battery will not be properly charged up yet so don't stop the engine
Both batteries may have been working pretty hard during this procedure so will be likely to have gassed more than normal. If your battery is now charging as it should then you'll find that if you drive around, or run the engine at a fast idle, for about twenty minutes to half an hour then the alternator will more or less fully charge the battery. However, if you have a battery charger then I'd recommend using it as a dedicated battery charger, especially a "smart" charger like the CTEK I have - other brands are available of course, will make a better job of charging the battery than most alternators can.
Most modern vehicles will have a battery condition monitor, most likely on the negative terminal. I've never seen one on the positive but I've read it's not impossible and some have monitoring modules on both neg and pos I think?
Anyway, I've only ever seen them on the negative terminal and the procedure for jumping seems to be the same as above. So Positive linked to positive with the red jump lead and negative on the jump battery to a remote earth on the vehicle, just as we did with the Panda above. I've read that this protects the battery monitor and I've also read many posts that say you MUST NOT connect directly to the battery terminal on vehicles with battery monitoring electronics. By the way, if your vehicle has Stop/Start it almost certainly employs a battery condition monitor - it's part of the system which decides when to allow stop/start to work and when not to.
Here's the top of Bluey's battery (our Skoda Scala):

Bit daunting compared to Becky's (the Panda shown above) In fact it's not. The positive terminal has a black cover over it with a big + sign (at the bottom of the picture). If you pull the cover off you can see the terminal is very ordinary looking:

I've not yet had reason to remove the big black cover on top of the battery (let sleeping dogs lie I say) but I suspect it's nothing more complicated than a connector for all those red power cables and, maybe, some big fuses. Bloody inconvenient place for them to have put it though because it covers all the interesting battery specification figures - like Ah and CCA rating just to mention two.
The more interesting bit is on the other terminal, the one at the top of the picture, which is the negative terminal:
The terminal itself looks pretty ordinary but the interesting bit is the black "block" with all the writing on it, that's the battery monitor. This is the terminal you must not connect your earth lead to. However, very conveniently, Skoda have supplied an earthing point on the strut turret right next to the battery:

Which is where you connect the earth lead. So, with all leads connected just as we did on the Panda, First connecting the positive on the jump battery to positive on the Scala using the red jump lead and negative on the jump battery to the dedicated earth point on the strut turret with the black lead, it looks like this under the bonnet:
Of course I could have chosen to make that final negative connection to a remote earth such as the engine lifting bracket:

and it would have worked just the same, but with such a conveniently placed ready made earth available, why would you?
Cor, doesn't it all look so lovely and clean!
The actual procedure would be the same as for the Panda. Allow a wee charging period after connecting the jump battery and, assuming you get it fired up, a wee period of running at fast idle before disconnecting to allow both batteries to normalize. The final earth - the one to the block/gearbox/whatever or dedicated earth like the Scala (take a look in your car's owner manual if your's isn't obvious) - is always last to connect and first to disconnect, remember why? yup, you got it, because of the gasses and possibility of a spark.
If you're thinking of using a battery charger with the battery still connected to the car then, unless your vehicle is very old indeed and has no electronics in it, don't even think of using one which isn't a "smart" charger. Safest way is always to take the battery out and charge it on the bench - no danger of either electrical or other, like boiled over electrolyte, damage. However if you disconnect it from the car this often opens a right can of worms because "stuff" goes wrong - like it looses the radio code (do you know yours?) sometimes the auto windows settings are lost. Stored data can disappear. It varies from make to make but it can be very inconvenient. For that reason I don't like having to disconnect batteries when charging. Some years ago I explored possibilities for charging with the battery still in circuit and the only one which came back as pretty well 100% risk free were the CTEK products - I rang them and they confirmed they're output side is so well stabilized there's no risk and told me I could use it to do this with total confidence. Over several years now I've done so on various family vehicles and friend's cars too - most notably my pal's posh Jag and a neighbour's Merc and had absolutely no problems. In fact the charger I bought can also be used as a system maintainer when disconnecting the battery so it's output must be very stable. Then, a couple of years ago I bought a cheaper Lidl electronic charger - neither this or the CTEK is a transformer type so presumably inverter based? Just listen to me, sounds like I know what I'm talking about doesn't it! - The Lidl offering is much cheaper than the CTEK and I've risked it on our Panda, Boy's Punto, daughter in law's Jazz and later Mazda 2 and my 2016 Ibiza. All have charged up well and suffered no problems. So I guess that electronic "smart" chargers are probably generally pretty safe to do this with?
Connecting up the CTEK or Lidl charger couldn't be easier. Charger positive to battery positive and charger negative to remote negative on the car (I just do that out of habit on any car I'm working on now, never go for the neg battery terminal any more unless it's on the bench). Here's the CTEK on the Scala right now, it's not run for a week and is just a little low due to all the electronics supping away and it's last outing being just down the road to the market:
Mustn't forget to pop the positive terminal cover back on when It's finished.
So, hope that's been helpful. I'll say again, Jump starting is not a procedure to be lightly undertaken, you need to concentrate totally on what you're doing and the risk of making an expensive mistake is always there. I'm just recounting here what I've experienced in an earlier life in workshops and then later with family and friend's cars so can't be sure these procedures will be applicable to all makes and models. All I can say is it's worked for me but if you have a go yourself then you must accept responsibility for anything which goes wrong yourself and I'd greatly welcome comment from other knowledgeable forum members if they notice something I'm recommending here which is wrong.

