Refitting the engine
So, your spanking "brand new" engine is ready to go in, is it?
Before you put it back in though, take some time to review the current state of the car, and change whatever is needed.
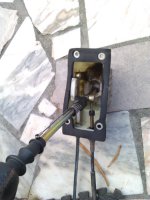
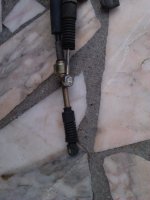
If you're doing the C526 to C514 gearbox swap, it is better to change the selector cables and gear while the engine is out of the car. It makes the job a fair bit easier.
- Go inside the car and remove the gearshift gaiter.
- Undo all the 10-size bolts from the front exhaust heatshield, and pull it down a bit.
- Undo 4 13-size bolts that hold the selector in place and it will drop down.
- Remove the selector and cables.
- Refit the new selector and cables following the procedure in reverse.
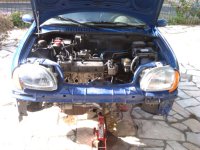
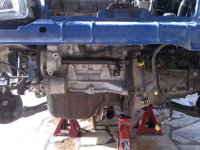
Have a friend help you drag the engine/gearbox into position. The refitting procedure is basically in the reverse order of the teardown procedure, so I won't bother detailing this. I will however, make some important notes on some things you will have to account for.
Exhaust Manifold
I suppose you're reusing the Sei exhaust manifold, after having it cut and diagonally lowered by 1 inch at the bottom. You -cannot- fit a Punto manifold here. If you must keep the manicat in place, this is the only way to do it.
You will have to remove the lugs from the head in order to be able to fit it with the 1.2 block. Since the block is taller, the head will sit higher and the manifold will foul against the slam bar. You can only fit it by removing the lugs first, then placing the manifold in place and replacing the lugs. Don't forget the exhaust manifold gaskets here.
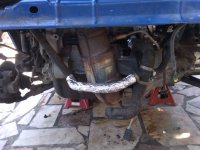
You will also notice that you cannot possibly fit the headshield at this point. That's alright, but you should insulate the coolant pipe that goes to the expansion tank, just in case:
Intake Manifold with P75 head
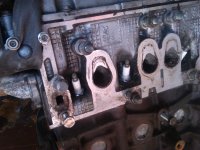
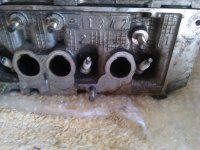
Here's the main reason why I DON'T recommend fitting the P75 head, despite the fact that I did. THe P75 head seems to be better ported, however you will take no advantage from it, since the port size is limited by the plastic SMPI manifold. Also, the P75 ports don't seal properly against the SMPI manifold: The SMPI ports are taller, and as such, you will have severe vaccuum leak and also fuel leakage at WOT.
This can be fixed easily by using a P75 intake manifold in between the P75 head and the SMPI manifold. However, since you gain no advantage in the end, you're better off just using the P60 or Sei head.
Sei/P60 (SMPI) ports:
P75 (MPI) ports:
Original Airbox
The original airbox will fit, provided you make some minor changes to it. However, at the time of writing this guide, the box still bangs slightly against the bonnet. Could be easily fixed with stiffer engine mounts.
If you can live with this, then follow this part of the guide. If you fancy a better intake, read the next page.
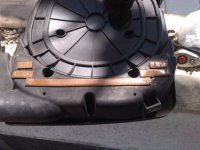
The original airbox is a really tight fit between the engine and bonnet, with the taller 1242cc block. You'll need to remove the small rubber feet underneath the box to lower it, as well as the metal fittings on the mounting points. You can then add something to prevent it from banging on the engine. I used window sealant (see below).
C514 gearbox selector alignment
While it may not seem evident at first, the order in which you mount the selector brackets in the C514 gearbox thoroughly matters.
The secondary bracket should go first. It mounts between the topmost of the three mounting bracket screws, and the middle screw on the upper gearbox bracket. There's another bracket there that holds one of the engine looms. Undo this bracket, and place the secondary selector bracket in between. Space it out with washers if needed.
I needed one washer to be able to put the car into fifth and reverse.
Now, place the main selector bracket. This is held by three screws behind the gearbox, one of which is shared with the secondary bracket. The main bracket should go on top.
This may seem confusing at first, but you'll understand that there's only one way the cables are "straight" when mounted.
Finally, mount the selector cables using the clips that you removed from the other gearbox.
You can also replace the clutch cable now. This was the very last thing I did on my car. The technical manual explains some fancy way of tuning the pedal position, I just pulled backwards on the actuator arm on the gearbox, in between small adjustments, until I had taken up all the slack in it. This means that the pedal is, at this point, at it's highest position, and there's no slack in the actuator arm so it will press the clutch immediately.
C514 electronics conversion
If your car had a C526 gearbox, you'll notice that the VSS sensor is not compatible, and neither are the cables that connect to the VSS and reverse switch.
Source a VSS from a Punto MK2. This will provide the correct speed measurement. Also the wiring from the C526 gearbox will be a straight fit, although it will be very tight. I'm unsure about other kinds of VSS sensor.
The reverse switch wire will need to be adapted. Just fabricate some extensions between the gearbox connector and the cable terminals. If possible, get the correct, weatherproof connectors as these might save you some headache in the long run.
Spark Plugs
Although I used the P75 head, I replaced the two-pole spark plugs with NGK BKR5E. These are the plugs from a Punto MK2, which are single pole. The engine seems to have liked those, so you may keep this in mind for your conversion. If you intend to do some extra tuning, especially if you're going turbo, get cooler plugs such as the BKR6E.
There's not much else to say about the process of swapping the engine. It all seems pretty straightforward.
Don't forget to top-up the engine and gearbox with corresponding oils, and also the coolant.
Once the engine is in and all properly connected, turn it on and check for regular operation. The engine should turn on right away even with all the changes. Purge the coolant purge valves, and let the engine head up for about 10 to 15 mins. This will allow the headgasket to cook and settle. While at it, check for coolant or oil leaks, and fix where needed.

