Hey guys!
Since the folks on the forum were so helpful when I was doing the swap on my Cento, and there seems to be a lack of information regarding simple 8V swaps on MPIs, as well as gearbox swaps, read ahead for more info!
Firstly I would like to thank four people for their invaluable input before and while I was performing work on my car. Those would be (in no particular order): cc1, fingers99, woj and Cento186.
This guide will cover three separate aspects of swaps that can be done in MPI Seicentos, particularly the base models like mine, but some of this may also apply to Sporting models or older Sei/Cinqs:
As mentioned before, you don't have to do all of these. You can do any of them in separate, although since I was doing all of them, I will go through the process all in one go.
NOTICE: I advice EVERYONE to read through the whole guide in order to familiarize themselves with the process prior to actually doing things.
First of all, here's what you will definitely need.
For the 1242 8V conversion:
For the C526 to C514 gearbox conversion:
For the P75 head conversion*:
* Note on the 75 head conversion: There seems to be not much to gain from it, since the better porting on the 75 head will be defeated by the plastic manifold on the Sei. Also, this WILL cause you problems later, as you will need to properly seal the manifold against the head surface. A Punto 75 gasket may solve these issues.
Honestly though, you're better off just swapping the camshaft onto a Sei or PMK2 head. Read more about this later.
A few other optional parts you will want to get:
Finally, a small note. This swap was made bearing in mind the idea that the car must look as if it is completely stock. Portuguese law require cars to be kept completely unmodified, so there's a lot of margin for improvements if you consider making some performance changes (like using P75 intake manifold, custom intake, exhaust headers, etc). Those won't be covered here.
Also, download the Seicento technical manual from the downloads section. It contains all the torque specs for the bolts, which you will need (also handy for disassembling things).
Onward then, to the work at hand!
Since the folks on the forum were so helpful when I was doing the swap on my Cento, and there seems to be a lack of information regarding simple 8V swaps on MPIs, as well as gearbox swaps, read ahead for more info!
Firstly I would like to thank four people for their invaluable input before and while I was performing work on my car. Those would be (in no particular order): cc1, fingers99, woj and Cento186.
This guide will cover three separate aspects of swaps that can be done in MPI Seicentos, particularly the base models like mine, but some of this may also apply to Sporting models or older Sei/Cinqs:
- Swapping a 1242 8V FIRE onto your Cento
- Swapping the C526 gearbox with a C514
- Using the P75 head and it's advantages/disadvantages
As mentioned before, you don't have to do all of these. You can do any of them in separate, although since I was doing all of them, I will go through the process all in one go.
NOTICE: I advice EVERYONE to read through the whole guide in order to familiarize themselves with the process prior to actually doing things.
First of all, here's what you will definitely need.
For the 1242 8V conversion:
- A complete block off a Punto MK2 or Panda MK2 (FIRE P60 SMPI).
- A P866 cam and respective shims would be a good idea, although optional.
- 5 liters of diluted coolant (buy it bottled or dilute it yourself).
- Some copper grease.
- Head gasket (unless you have a complete P60 engine).
- Head bolts (unless you have a complete P60 engine).
For the C526 to C514 gearbox conversion:
- A C514 gearbox, preferably off a Cinq/Sei Sporting.
- A C514 gearbox off a Punto 55 may also work, although unsure on this.
- Selector cable brackets from a Sporting (these are cheap at FIAT).
- All the selector gear and linkage from a Sporting (get from scrappy)
- VSS Sensor off a Sei Sporting MPI (alt. a Punto MK2 sensor can be made to fit).
- Rear lower gearbox mount bracket (you can reuse the rubber mount from the C526).
- Transmission shafts (complete) from a cinq or sei Sporting.
- Flywheel from a Punto MK1 or MK2, or a Panda.
- Clutch kit (must match the flywheel you got. A 1.2 16V flywheel might be a good choice).
- Some wiring will be needed, so be handy with electronics.
- 2 liters of 75W90 API GL5 gearbox oil
- A new clutch cable (it's the 700 something millimeter size one).
For the P75 head conversion*:
- An engine head off a Punto 75 or Palio 75
- Headgasket kit
- Timing belt kit fit for a Punto MK2 60
- Camshaft pulley off your original engine (or PMK2).
- Punto 75 manifold gasket
* Note on the 75 head conversion: There seems to be not much to gain from it, since the better porting on the 75 head will be defeated by the plastic manifold on the Sei. Also, this WILL cause you problems later, as you will need to properly seal the manifold against the head surface. A Punto 75 gasket may solve these issues.
Honestly though, you're better off just swapping the camshaft onto a Sei or PMK2 head. Read more about this later.
A few other optional parts you will want to get:
- New thermostat (change it while you're at it).
- New spark plugs (definitely change them).
- New water pump (unless you know the service history of donor engine).
- You'll need an engine hoist, or at least another pair of strong arms and be handy with the hydraulic jack. The hoist will make lowering the engine simpler though.
Finally, a small note. This swap was made bearing in mind the idea that the car must look as if it is completely stock. Portuguese law require cars to be kept completely unmodified, so there's a lot of margin for improvements if you consider making some performance changes (like using P75 intake manifold, custom intake, exhaust headers, etc). Those won't be covered here.
Also, download the Seicento technical manual from the downloads section. It contains all the torque specs for the bolts, which you will need (also handy for disassembling things).
Onward then, to the work at hand!
Original Powertrain Teardown
The very first thing you'll notice is that there are a whole bunch of incompatibilities between the C526 gearbox and the C514 you want to fit. But it's not only on the gearbox, the engine itself poses a few issues too, although very few:
The "manicat" on the Seicento MPI will NOT clear the 1242cc block. It's a very tight fit, both above and below the block. Overhead, it will bang against the slam bar with the new engine which has it's block made taller by about an inch, thus raising the head. On the lower side, it will rub on the sump and twist the flexi pipe.
You'll need to cut it right after the cat, and weld the pipe on a downward slope then straighten it onto the flexi pipe. It needs to exit about an inch lower.
Then, the C514 gearbox is so very different. If you're doing the gearbox swap, the very first step is to loosen the big nuts on the front wheel hubs. The whole transmission shafts need to be replaced too. If you're not doing this then just pull them aside when you need them out of the way.

Loosen that big nut before removing the wheels.
At this point, raise the car and support it on jack stands.
Then undo the two bolts holding the shock absorber to the hub. You can then pull the transmissions out from the gearbox and remove them or pull them aside.

Start undoing all the ancillaries on the engine.
- First, disconnect the battery
- Remove the airbox (one spring and two bolts).
- Then undo all the pipes on the intake manifold.You'll need to purge the pressure on the fuel rail before. Just use a screwdriver inside the Schrader valve on the left side of the rail. Be careful not to break the small tabs on the pipe connector.
- Then, remove the injector wiring, spark plug cables, etc.
- You'll notice it's still attached to the oil pressure switch.
- Undo the top cambelt cover and remove the oil pressure switch wire.
- Remove the piping right behind the intake manifold. You'll need to break the clip (buy new ones).
- Undo the two bolts that hold the water temp sensor assembly. Pull it downward to separate it from the manifold and remove the pipe. You'll need the extra clearance.
- Undo the 6 nuts holding the manifold in place, and pull it out of the engine.
- Undo the wiring on the alternator and starter motor. You may leave them in place. Move the wires away.
- Undo the knock sensor from the engine block.

Now onto the front side:
- Remove the bumper from the car.
- Undo the radiator and piping. Collect the coolant for reuse or dispose of it properly.
- Undo the the bolt that holds the exhaust manifold to the engine, below the sump.
- Undo the flexi-pipe clip bolt.
- Undo the heatshield bolts above and on front of the manicat.
- Undo the 8 bolts holding the manifold to the head.
- Disconnect lambda sensors.
- Carefully remove the manifold, and modify it as needed (see top of page).
- Collect the exhaust gaskets. Replace them if damaged/worn.
- Remove the remaining coolant piping from the engine.

Now onto the gearbox:
- Disconnect the actuator cables from the gearbox (if this is a C526, one will be held by a clip).
- Pull the two clips holding the cables to their brackets. Save these clips.
- Remove all the wiring (main engine ground, VSS sensor, reverse sensor).
- Undo and remove the clutch cable (this will need to be replaced in case of swap).


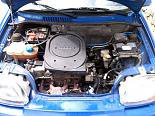
More pictures from the process. You'll notice several things when you fit the new engine, such as the block being about an inch taller. You'll know this by looking at the side of the water pump, which has a raised "block" of iron on the 1.2 block compared to the 1.1.
This is the 1.1:


All should now be ready for removal.
Engine Removal and Disassembly
The removal of the engine should be pretty straight forward. Since the car is lifted on the jack stands, the engine will just barely clear through under the front slam bar.
Support the engine with an engine hoist (alternatively, have a friend hold the engine straight and support it from underneath with a hydraulic jack and block of wood).
Undo the gearbox lower mount from the gearbox and chassis. Then undo the engine side mount, and the gearbox side mount, and lower the engine to the ground. If you're doing this with the jack, lower one side at a time and check for clearance on both sides. Like I said, I don't recommend this method, a hoist will definitely save you time and trouble.
When lowering the engine, drop it onto something soft so it isn't damaged. I used an old tire.
Tilt the engine slightly, and have a friend help you pull it towards the front of the car. Your old engine and gearbox are finally out.

Now, at this point, you'll have to collect a few parts from your old engine, depending on how you chose to do the swap. Here's a short list of the things you'll grab from your old engine:
For a block-only swap:
- Remove the complete SMPI head off your engine (it's the same as the 1.2 SMPI).
- There should be two dowel pins locating the head on the block. Save these.
Whether you have an additional head or not:
- Remove the oil pressure switchm, elbow, and banjo bolt.
- Remove the alternator, bolts and bracket.
- Remove the engine mount.
- Remove the starter motor (assuming you're re-using it).
- Separate the old engine from the gearbox. Keep all parts with the gearbox.
- Remove the coilpack bracket and coilpacks.
- Remove the water pump collector pipe.


If you're using a P75 head (again, won't reccommend this):
- Remove the camshaft timing pulley from the Sei head.
- Remove the cam cover and camshaft position sensor from the Sei head.
For a gearbox swap:
- Remove the upper bracket (black part) where the gearbox bolts to the engine. You'll need this for the new one.
- Remove the earthing cable (this is a true PITA to remove).
- If you're swapping the C526 with a C514, renew your transmission gaiters and joints if needed. It's best done while they're out.
Preparation of the New Engine
Now you'll need to prepare the new engine for fitting. Assuming you're only starting with the 1242 block, and you've already checked the head and block for warping/scratches/damage, and had them skimmed if needed:
Fitting the Clutch
- Fit the flywheel you got from the Punto engine (or other). Torque the bolts correctly.
- Fit the clutch to the flywheel. Center it properly (a centering tool will help or you can do it by eye). Torque the bolts correctly.
- At this point, also fit the collector pipe to the water pump.


Fitting the Gearbox
- Renew the clutch release bearing (it will clip into place only in two positions)
- Place the upper dustguard behind the flywheel. It will be kept in place by two dowel pins on the sides of the block.
- With the engine supported on the hoist, mate the gearbox with the engine. Keep the two large bolts on the front and backside of the block at hand, they're useful so the gearbox doesn't back out of the engine. Fit them as soon as you got it to mate well. Torque accordingly.
- Fit the lower dustguard. Bolt on the dustguard to the gearbox.
- Fit the upper bracket to the two upper bolts, and torque them accordingly.

Fitting the Head
- Make sure the block and head surfaces are perfectly clean. Use some brake cleaner on them.
- Note the two dowel pins that you've saved earlier. Fit them to the block.
- Place the new head gasket on the block. One of the sides will read "Top" on the gasket itself. This side should be up, and facing the rear of the block.
- Place the head over the gasket gently, making sure it mates to the two dowel pins.
- Apply some copper grease to the head bolts, and torque them into place. Follow torquing instructions that come with the gasket.


If using a P60 head and P866 cam
After fitting the head, if using the P60 head and if you have the P866 cam, now is the time to replace the cam:
- Remove the camshaft bearing bolts by undoing two bolts in each one. Mind the original place of these bolts.
- Gently remove the camshaft oil feed pipe.
- Remove the camshaft.
- Remove the shims from the lifters. Replace them with the ones where the P866 cam came from, in the same order they were in the donor engine.
- Fit the P866 cam and bearings. Check for clearance and replace the shims if needed. Then finally fit the oil feed pipe and torque all the bolts accordingly.
Notes on using the P75 head:
- You'll need to perform some work on the head for it to clear the timing nubs on the cam pulley (see photo below).
- If using the P75 head, you'll need to mount the cam pulley. Use an old belt, or a screwdriver through the pulley holes to lock it in place, and torque it accordingly.
- Despite sharing the bolt pattern, this head will NOT seal against the SMPI manifold. It's best to use the original Sei one. This can be fixed by fitting a P75 manifold gasket between the SMPI manifold and the head, however, since there is basically no mating surface in some points, it is a bodge.

Timing Belt Fitment Procedure:
I'm pretty sure you've read this on the forum countless times, but I'll explain how to set the timing properly.
- Open the small window covered by a rubber on the gearbox bellhousing. You should see some teeth and a scale.
- Using a 13 size wrench, turn the crankshaft clockwise until a notch on the flywheel lines up with the 0º tooth.
- Turn the camshaft clockwise until the notch on the cam pulley lines up with the notch on the back of the head.
- Place the timing belt tensioner in place, do not tighten it yet.
- Place the belt around the pulleys, making sure it's properly stretched on the side that goes through the water pump. Do NOT turn the pulleys.
- Use pliers to apply tension and tighten the timing belt tensioner.
- Turn the crankshaft around 720 degrees (two turns) clockwise. Undo the tensioner, apply tension and tighten it again.
- Test for the correct tension by twisting the belt between the cam pulley and water pump. It should twist around 90 degrees by hand, no more and no less.
- Align the notch on the flywheel with the 0º mark again. Make sure that after doing this, the camshaft pulley is also aligned.

There. Now your engine is timed.
Refit the accessories:
- Refit the timing belt covers.
- Refit the crankshaft harmonic damper / timing pulley (you can use the Sei one, it's lighter, same timing spec and sizing, no harmonic damper).
- Refit the alternator and belt. Test for correct tension using the 90 degree technique. Tighten alternator bolts.
- Refit the engine mount. Torque bolts accordingly. The manual is missing torque specs for the smaller nut, and notes that the bigger ones are torqued to 51Nm. I used 30Nm for the smaller one.
- Refit the Starter Motor.
- If you're doing the C526 to C514 gearbox swap, you'll need to crush and remove the dowel pin from the middle bolt hole on the starter motor. Fit this motor to the C514 gearbox using only the two outmost bolts. Ideally, you should get a proper fitting one from a Punto or so. I reused mine. See photos below:


Finally, at this point, your engine should be all set and ready to go. If you haven't already, now is the time to renew the thermostat, and the spark plugs. It's a breeze with the engine out of the car, although you can do these later.
Refitting the engine
So, your spanking "brand new" engine is ready to go in, is it?
Before you put it back in though, take some time to review the current state of the car, and change whatever is needed.
If you're doing the C526 to C514 gearbox swap, it is better to change the selector cables and gear while the engine is out of the car. It makes the job a fair bit easier.
- Go inside the car and remove the gearshift gaiter.
- Undo all the 10-size bolts from the front exhaust heatshield, and pull it down a bit.
- Undo 4 13-size bolts that hold the selector in place and it will drop down.
- Remove the selector and cables.
- Refit the new selector and cables following the procedure in reverse.


Have a friend help you drag the engine/gearbox into position. The refitting procedure is basically in the reverse order of the teardown procedure, so I won't bother detailing this. I will however, make some important notes on some things you will have to account for.

Exhaust Manifold
I suppose you're reusing the Sei exhaust manifold, after having it cut and diagonally lowered by 1 inch at the bottom. You -cannot- fit a Punto manifold here. If you must keep the manicat in place, this is the only way to do it.
You will have to remove the lugs from the head in order to be able to fit it with the 1.2 block. Since the block is taller, the head will sit higher and the manifold will foul against the slam bar. You can only fit it by removing the lugs first, then placing the manifold in place and replacing the lugs. Don't forget the exhaust manifold gaskets here.
You will also notice that you cannot possibly fit the headshield at this point. That's alright, but you should insulate the coolant pipe that goes to the expansion tank, just in case:


Intake Manifold with P75 head
Here's the main reason why I DON'T recommend fitting the P75 head, despite the fact that I did. THe P75 head seems to be better ported, however you will take no advantage from it, since the port size is limited by the plastic SMPI manifold. Also, the P75 ports don't seal properly against the SMPI manifold: The SMPI ports are taller, and as such, you will have severe vaccuum leak and also fuel leakage at WOT.
This can be fixed easily by using a P75 intake manifold in between the P75 head and the SMPI manifold. However, since you gain no advantage in the end, you're better off just using the P60 or Sei head.
Sei/P60 (SMPI) ports:

P75 (MPI) ports:

Original Airbox
The original airbox will fit, provided you make some minor changes to it. However, at the time of writing this guide, the box still bangs slightly against the bonnet. Could be easily fixed with stiffer engine mounts.
If you can live with this, then follow this part of the guide. If you fancy a better intake, read the next page.
The original airbox is a really tight fit between the engine and bonnet, with the taller 1242cc block. You'll need to remove the small rubber feet underneath the box to lower it, as well as the metal fittings on the mounting points. You can then add something to prevent it from banging on the engine. I used window sealant (see below).

C514 gearbox selector alignment
While it may not seem evident at first, the order in which you mount the selector brackets in the C514 gearbox thoroughly matters.
The secondary bracket should go first. It mounts between the topmost of the three mounting bracket screws, and the middle screw on the upper gearbox bracket. There's another bracket there that holds one of the engine looms. Undo this bracket, and place the secondary selector bracket in between. Space it out with washers if needed.
I needed one washer to be able to put the car into fifth and reverse.
Now, place the main selector bracket. This is held by three screws behind the gearbox, one of which is shared with the secondary bracket. The main bracket should go on top.
This may seem confusing at first, but you'll understand that there's only one way the cables are "straight" when mounted.
Finally, mount the selector cables using the clips that you removed from the other gearbox.
You can also replace the clutch cable now. This was the very last thing I did on my car. The technical manual explains some fancy way of tuning the pedal position, I just pulled backwards on the actuator arm on the gearbox, in between small adjustments, until I had taken up all the slack in it. This means that the pedal is, at this point, at it's highest position, and there's no slack in the actuator arm so it will press the clutch immediately.
C514 electronics conversion
If your car had a C526 gearbox, you'll notice that the VSS sensor is not compatible, and neither are the cables that connect to the VSS and reverse switch.
Source a VSS from a Punto MK2. This will provide the correct speed measurement. Also the wiring from the C526 gearbox will be a straight fit, although it will be very tight. I'm unsure about other kinds of VSS sensor.
The reverse switch wire will need to be adapted. Just fabricate some extensions between the gearbox connector and the cable terminals. If possible, get the correct, weatherproof connectors as these might save you some headache in the long run.
Spark Plugs
Although I used the P75 head, I replaced the two-pole spark plugs with NGK BKR5E. These are the plugs from a Punto MK2, which are single pole. The engine seems to have liked those, so you may keep this in mind for your conversion. If you intend to do some extra tuning, especially if you're going turbo, get cooler plugs such as the BKR6E.
There's not much else to say about the process of swapping the engine. It all seems pretty straightforward.
Don't forget to top-up the engine and gearbox with corresponding oils, and also the coolant.
Once the engine is in and all properly connected, turn it on and check for regular operation. The engine should turn on right away even with all the changes. Purge the coolant purge valves, and let the engine head up for about 10 to 15 mins. This will allow the headgasket to cook and settle. While at it, check for coolant or oil leaks, and fix where needed.
Tuning options and other stuff
For the final page, I'll cover some aspects of further improving your little Cento.
Keep in mind that I've not (yet) done any of these except mapping the ECU. These are mostly from experience with my Puntos, as well as feedback from other Punto/Cinq/Sei owners. So I'll approach these in a theoretical way. A few searches around the forum will likely provide better insight about these improvements. Again, all of these are left at your discretion.
In Portugal, all kinds of modifications to cars are outlawed, and therefore illegal. The way we get around this limitation is to make everything as low profile as possible. This leaves room for many things to still be improved, as you may have seen from this tutorial.
First of all; I think it is important to make a point here, and say that, in practical terms, there is absolutely NO REASON why you shouldn't be getting the stock power from your engine. Even if you've got a full P60 engine with P866 cams, you would still be getting near the baseline 73hp. The plastic manifold and Sei throttle body are the same as in the Punto, and it's not that restrictive. Plus, some SPI Cinqs and Seis doing the bottom end swap only, have dyno'd over 80bhp with minor changes, and the SPI manifold is a lot more restrictive.
This leads us to out first real issue: Mapping the ECU.
Mapping the ECU will unlock the full potential of your engine. Even though the stock ECU can keep up with the new engine (albeit running roughly after a reset, and it will take some time to adapt), you would always be better off with a custom map: It would allow you to get even more power than what is rated for the donor engine, as well as fuel ecconomy and emissions.
To put it simple... You need to have someone map your ECU to the new engine. Or else all the work will be mostly in vain.
From there, you can either get a larger throttle body (adapting Punto 85 TBs with a spacer plate is not unheard of; and it's pin-compatible to the Sei loom) or have your own machined and enlarged. Again, you should map the ECU after doing changes to the throttle body, as this will change the volumetric efficiency of the engine.
The exhaust manifold is an awful design as well. There are "cheap" alternatives on ebay which will provide a decent performance boost, as well as time-proven parts from Supersprint and the more. It's your choice really. You shouldn't go for an exhaust system that is too large (definitely not over 50mm) or you'll lose top end performance. Also, don't buy manifolds fit for a 1.0/1.1 FIRE engine. Remember to buy the 1.2/1.4 manifolds, as these are taller and will clear under the sump with no modifications. One from a Punto MK2 60 will do (two Lambda fittings). The Punto stock one won't fit, so don't try. It must be an aftermarket one. A P75 manifold can be adapted as well.
There are two things I'd recommend you to do when fitting one of these:
- Use insulating exhaust wrap to cover the manifold branches, and prevent them from burning other pipes.
- Adapt the exhaust system (NOT the manifold) to make it fit. The manifold will likely be for a Punto or so, and it will have a flange. Since you'll likely be changing manifolds more often than the exhaust system, just adapt it to fit any manifold of the same design.
The intake is one of the most easy to improve things in these cars. You will notice there's an empty space right above the gearbox, and in front of it there are direct openings to the outside on the bumper.
You can easily fit a boxed performance filter (like Green or BMC) in there and route the piping to the front.
I don't know if there are any pre-made kits that will fit an MPI sei. The most important thing is to get fresh air onto the engine here.
The TB outer diameter is 60mm.
For the last thing, you should definitely improve on your suspension and wheels.
I would say that even with a stock Cento, the worst part about it is the suspension, and the second one is the tire size. With an improved engine, you'll definitely need at least a 165-wide tire. I have 155/70 R13 tires and they simply cannot keep up. The last front set lasted only about 2000 miles

If possible, fit 175/50 R14 or 185/50 R14, which people seem to use often. The 175/50 R14 is the same size as fitted to the Sei Abarth.
I am also using TA Technix springs (those are rated 60/40) which add a bit of stiffness to your cento. They don't lower that much, and provide a good compromise between comfort and performance. Get better shocks too if yours feel sloppy around turns. Check the ARB bushes too!
Most importantly, have fun with your Cento! It means nothing to have the fastest, wildest car on your street, if you get no fun at all driving it! Consider that most mods approached in this guide will dynamically change your car, so don't do them if you don't feel like they're needed, or if you feel like they will hurt the fun factor of the car.


That's all guys! I hope this guide helps you, at least through some of the issues I've had on my own swap