This guide is intended to show you what is involved if you want to overhaul your front calipers.
Firstly I take no responsibility for your actions...brake are safety critical so if you have any questions or doubts, either exchange your current onces at a local motor factors, exchange them online, or send them off to www.biggred.co.uk for a top class service.
This guide in no way competes with the professional overhaulers. If you spend more time, you can get a similar product, but i was purely interested in cleaning the internals and replacing the rubber components, and NOT looking for an aesthetically pleasing product.....I can do that any time")
Now shall we continue.....
Firstly I take no responsibility for your actions...brake are safety critical so if you have any questions or doubts, either exchange your current onces at a local motor factors, exchange them online, or send them off to www.biggred.co.uk for a top class service.
This guide in no way competes with the professional overhaulers. If you spend more time, you can get a similar product, but i was purely interested in cleaning the internals and replacing the rubber components, and NOT looking for an aesthetically pleasing product.....I can do that any time
Now shall we continue.....
Tools
Depending on your calipers you will need different equipment.
Tools I used were:
- 17mm spanner and socket
- 8mm pipe spanner
- pliers
- hex bit (7mm i think)
- ratchet
- torque wrench
- foot pump
- small screwdriver
- 2x rebuild kits .. mine were from www.brakeparts.co.uk but also www.biggred.co.uk are great
- brake fluid to re-bleed the system
- gloves
- ptfe tape
Stripping
There are numerous guide on how to remove the caliper..or it's pretty obvious, so I'll leave that to you. Once you have removed it though, you should end up with something like this:

Start by removing the rubber slide guides....just pull and twist them out with a pair of pliers.
Here's the removed guides:

Nest, we need to remove the piston. If you have an air compressor, brilliant, if not, get your foot pump, fit an inflation attachment pretty much all pumps come with, seal/bulk it up with some ptfe tape:

Insert this into the hole where the hose used to go and hold it in tight, it requires lots of pressure to remove the piston! Make sure you block the space in front of the piston, it will not move and then it will suddenly give. Either you have your fingers there and it will hurt a LOT, or if you don't pack it with wood, spanners etc, the piston will fly out, get scratched and is scrap!:

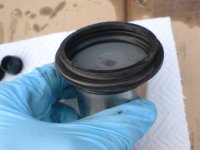
After a lot of pressure the piston will move out, stretching the dust boot with it:

Pull the dust boot from the lip and withdraw the piston:


Again you can just pull the remaining dust boot out with pliers:

Now you need to remove the actual fluid seal. It sits in the hole where the cylinder was. A small screwdriver will lift it out. DON'T scratch any of the internals though! :

Next clean up the piston.
It may take some scrubbing, and rubbing, but it should come up shiny. If any of it is rusted and you can't remove it, then you need a new one! If the internals of the caliper are rusted, it's pretty much a write off. Mine were OK
:

The Rebuild Kit
Typically kits come with all the rubber seals and some grease for slide parts.
If you need guides/slide, pistons or bleed valves (nipples) they are not normally included.
In my kit you can see:
- nipple cover
- dust boot
- fluid seal
- grease for slides
- slide housing
- slide housing caps

I also had spare bleed valves as well, though not shown.
Cleaning
sure my environment looks a bit dirty, but i make sure that all the seals, seal seats, and anywhere fluid gets is very clean. A spec of dirt can cause a leak, premature wear, or damage a dust boot.
Take note
Assembly
Assembly is pretty much the reverse. When fitting new seals, its perfectly fine to lubricate them with some clean fresh brakes fluid. It make sit much easier
Lubricate the fluid seal and seat it in it's groove. Make sure it sits flush all the say a round as they have a tendency to twist. If it does, press it, or remove and refit it. Do not leave it, you'll never get the piston in, and if you do, it will leak!

Slip the boot over the end of the cylinder you'll be pressing back in, and leave the end overhanging. The trick here is to get the dust boot seated in the piston, while having the piston itself out of the bore. This is the only way to do it and its a pain. If the boot slips off the piston, start again!
Start by feeding the boot into the hardest to reach part of the bore, and work around. Once it all slips into place, press the piston to the mouth ot the bore, and it will keep it from slipping out


Now we need to move the piston back in. Make sure is pointing straight, then either clamp it in a vise, or, do as I did and place a block of wood over the piston, and use two spanners to lever it in.
After forcing it back it should look like this:

If you bought a new nipple/valve, replace it now.....all the hard work and potentially damaging parts are over
:

Now push the new slide guides in...no grease needed for this part...put that on the metal guides and internally of these! :

Job done
Conclusion
To replace both sides took about 30 minutes, and was relatively painless (unlike rear calipers...leave those to the pro's ... I learned from trying
).For anyone fitting unknown calipers, this is a must!
As said previously, these are brakes! Any doubts and let someone else do the job!
Hope it's of help to some of you
Cheers,
Kristian