Technical Which radiator? Ours has AC but seems to have a non-AC rad

Currently reading:
Technical Which radiator? Ours has AC but seems to have a non-AC rad

Martin Y

Member
Joined
May 29, 2016
Messages
20
Points
55
Our 2010 1.2 has burst its radiator. I'm having trouble choosing the right spare part. Any experience gratefully received.

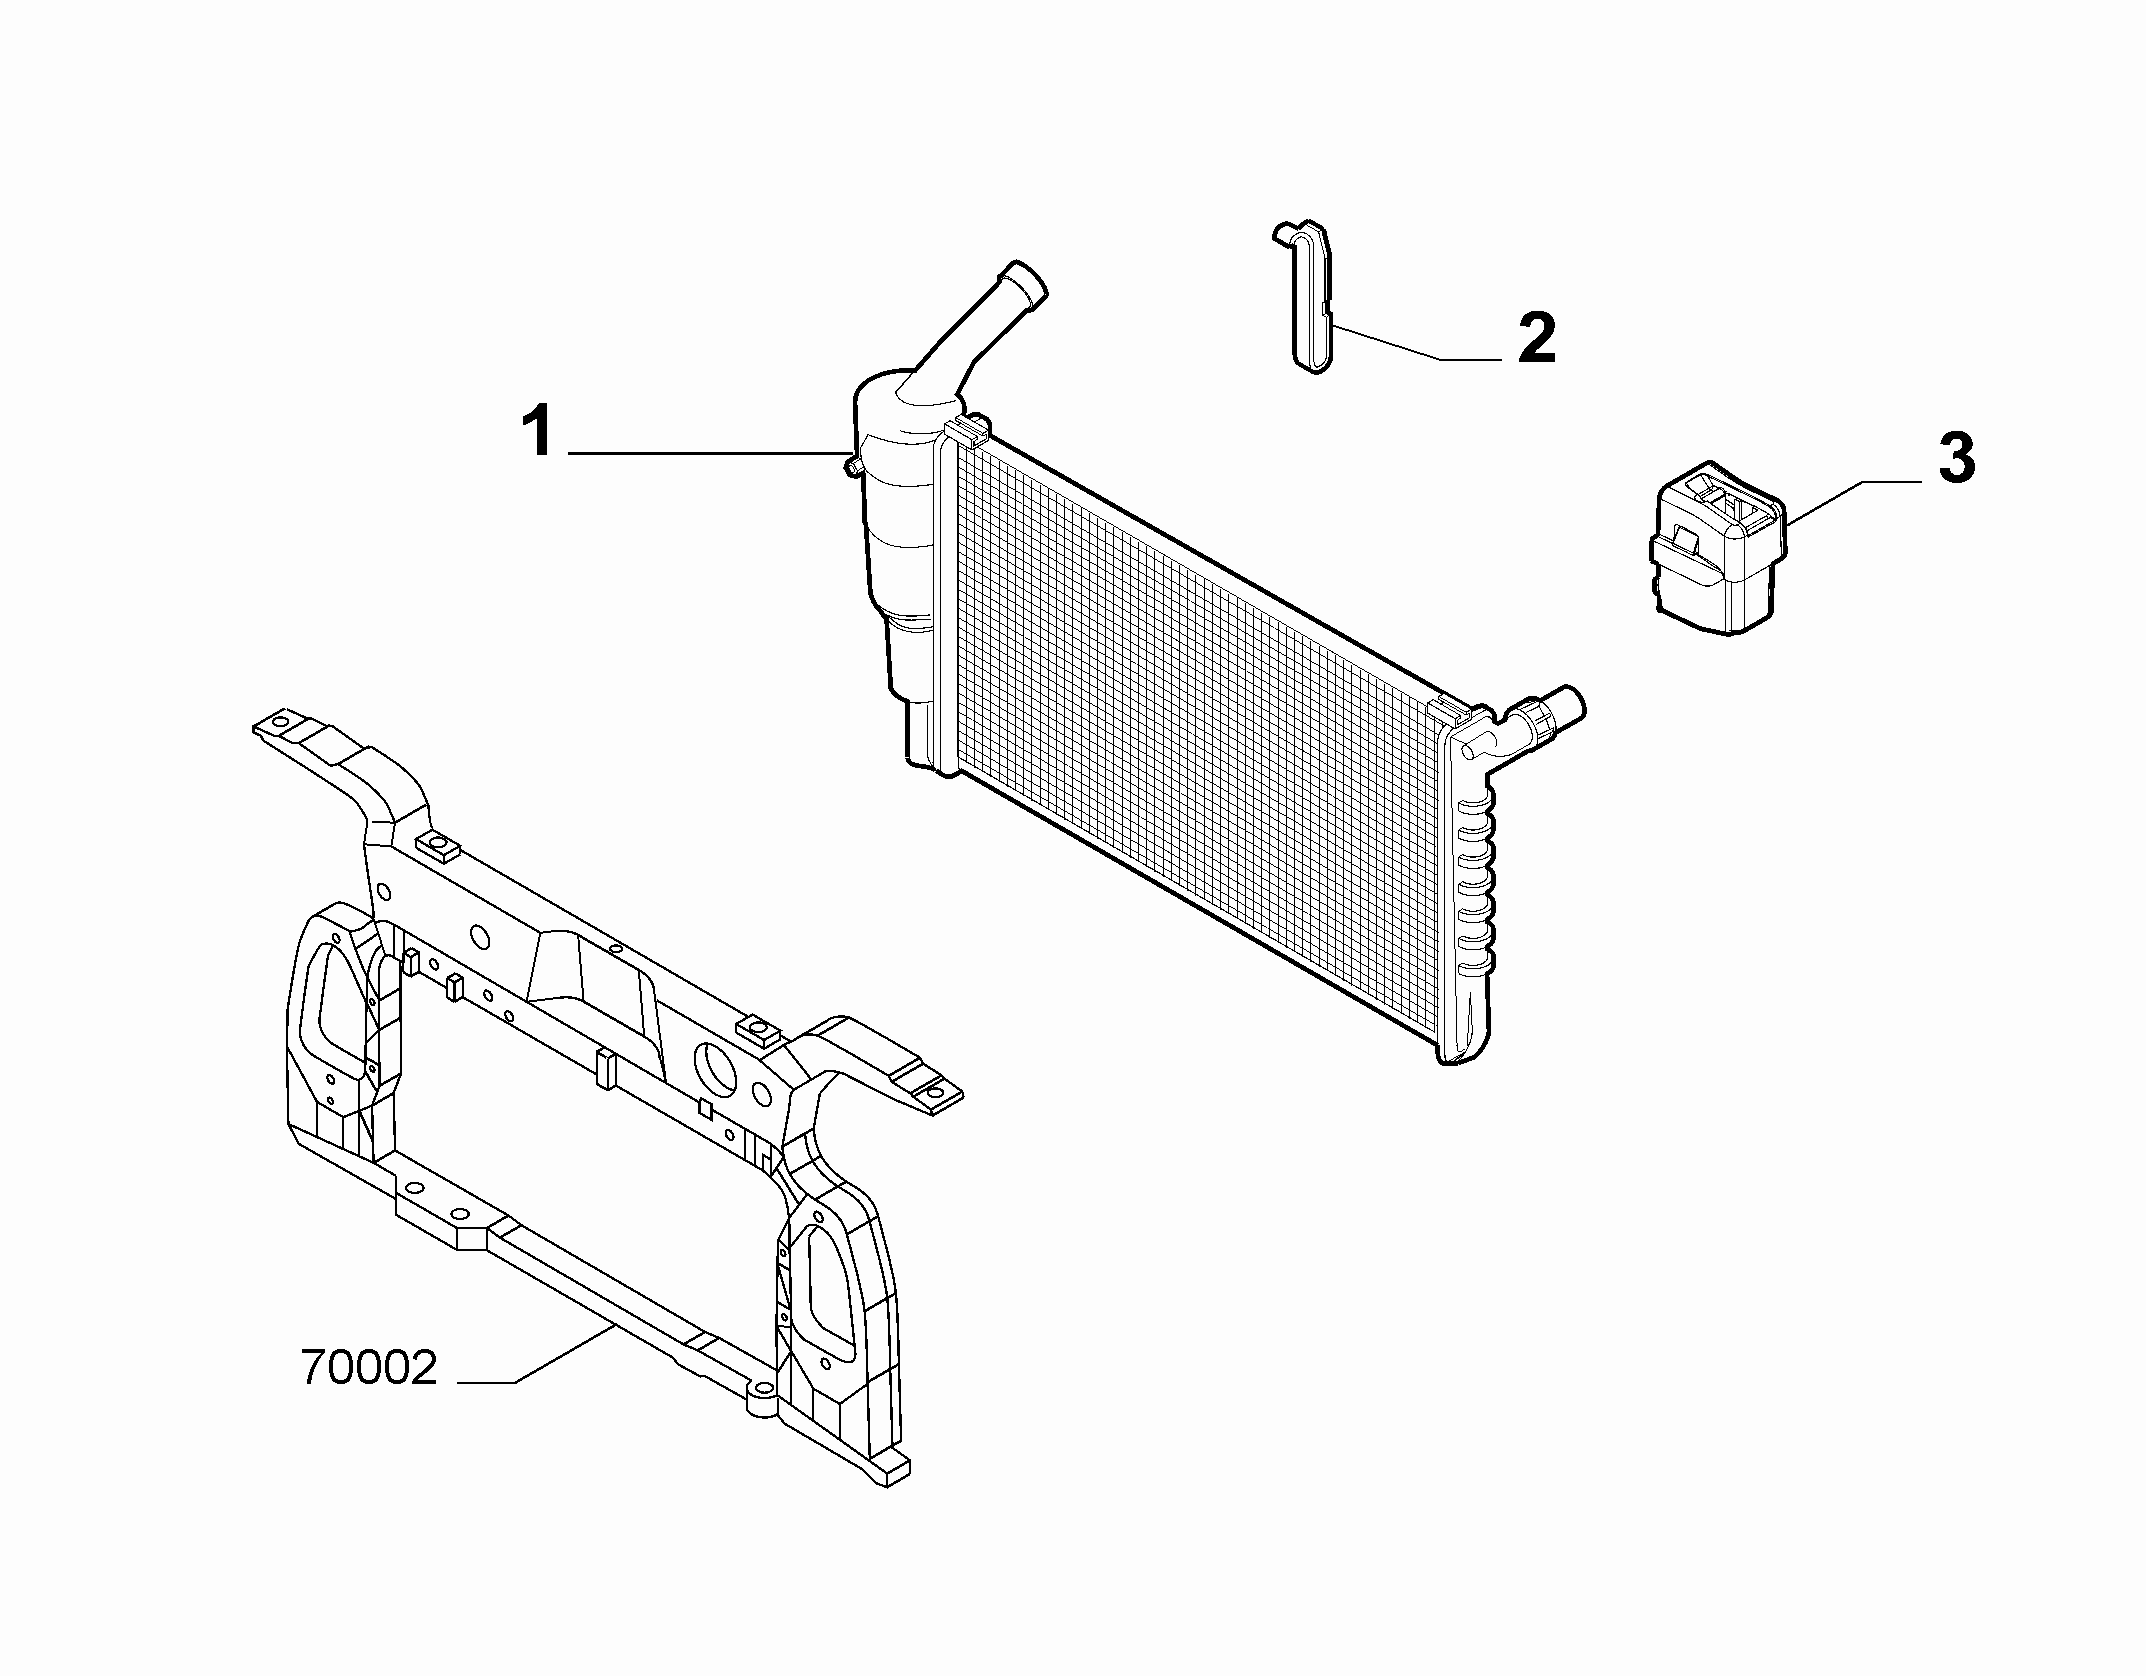
There are two versions of replacement offered - one has an end tank which is also the reservoir complete with filler neck, while the other is just a conventional radiator with normal end tanks. The one currently in the car seems to be the type with the reservoir and filler attached, but on the ECP website, and also in threads I've found here, that's described as the type for cars without aircon, but our car has aircon.

The aircon condenser has to fix to the front of the radiator so I'm hesitant about just changing my order to the non-AC radiator in case it comes without the right fixing points. I rather assume it'll be okay but I'd really appreciate any reassurance anyone can offer.

The next conundrum will be how to remove it. eLearn describes removing a radiator without a filler neck and I gather the idea is to go forwards and up. This one will seemingly have to go back and up.

I really thought this was going to be easy. Well, easy-ish.
 
Thanks for the quick reply! Very useful info.

Since Euro Car Parts only sell two versions (either with or without the integral expansion tank) I guess I'll change my order as the one without the tank is clearly wrong. If it turns out not to have the fittings to attach the AC condenser, well I'll be surprised, but I'll cross that bridge if I come to it. Both are Nissens brand, which I tend to trust.
 
There's several different radiators fitted to the
2010 1.2

Climbing
Treking
1.4 natural
1.2 And 1.1
Robot gearbox
Deisel

Theres some leaway as I have fitted a 1.2 rad into a 1.1 although slightly different it fitted fine

I make it this part number top one

Screenshot_20231216_154042.jpg


Or check yourself


Online listing can not be trusted
 
Thanks again. Crikey. That listing is a bit bewildering. Ours is a petrol 1.2 eco, so I can ignore diesel and 4x4 types. But the page doesn't appear to show a picture of each particular type (unless I'm misunderstanding how to use it) so I can't tell which features vary between the different types.

For better or worse, the one I've now ordered is this one: https://www.eurocarparts.com/p/nissens-radiator-203650478
It has the expansion tank and filler neck, and the hose entry and exit are in the right places. Unfortunately it only shows the rear view, so it doesn't show any detail of the side the condenser needs to fix to.

Fingers crossed.
 
I've found ECP in the past to be very accommodating. Why don't you take a picture of your set up to them and let them identify it then go home and order it on line with them that way you will get the discount.
 
I was thinking how expensive panda parts are getting

I bought one new a couple of years ago

I can't remeber the exact price or where I go it from

I payed not much over £40, I was going to get one second hand but it wasn't worth the effort. Got a couple of quid back on the old radiator at the scrap metal yard. Came under shredded aluminium

I bet a 500 one fits as these are still around £40
 
Last edited:
Early models with aircon had a larger radiator with separate expansion tank. Later models used a radiator with integral tank, with or without aircon. Aftermarket suppliers haev not all understood this.
I don't know if the radiator with tank is the same for all, so take care with dimensions when sourcing a replacement.
Yes, was like that trying to get the correct one for my 2005 climbing, took them three attempts to send right one despite giving them the parts number and, because of carriage costs, they didn’t want the other two back (UK seller but came direct from Poland). They came in useful for my mates car, same engine as mine but a two wheel drive, one of the two ‘freebies’ was a direct replacement
 
You want the one with the included tank as part of the radiator. The other one is for the 1.4, Twin Air and Abarth which has a separate header tank. I buy the EIS ones which are better than OEM and are cheap. I get them from www.carparts4less.co.uk when they are in stock. They come with the little nipple closed to the world which some of the non OEM ones don't and you have to put a little bung over the end. I use these all the time.

The type of radiator you have is nothing whatsoever to do with air con.

The EIS is out of stock at the moment. I always buy a couple of them at a time.

 
Well, ECP lady was very friendly but apologetic. Sorry but my radiator didn't get delivered, try again tomorrow. Nice.

Gives me another evening to try to get the front bumper off. :rolleyes:

I got the 3 top and 4 bottom Torx bolts off. (Well, I loosened the two nearer the middle underneath, as the bumper seems to be slotted, presumably to locate it on reassembly.) Now I see there are 2 more screws on the bottom toward the outside, and that's all the fasteners that eLearn mentions. But I can see there are screws under the wheel arch too and some kind of clip where it meets the front wings. Any hints would be more than welcome.
 
You don't have to remove the bump, do you

It been awhile but from memory you just undo grill and a few top ones and you can pull it forward enough to remove the radiator clips
 
Last edited:
Well, ECP lady was very friendly but apologetic. Sorry but my radiator didn't get delivered, try again tomorrow. Nice.

Gives me another evening to try to get the front bumper off. :rolleyes:

I got the 3 top and 4 bottom Torx bolts off. (Well, I loosened the two nearer the middle underneath, as the bumper seems to be slotted, presumably to locate it on reassembly.) Now I see there are 2 more screws on the bottom toward the outside, and that's all the fasteners that eLearn mentions. But I can see there are screws under the wheel arch too and some kind of clip where it meets the front wings. Any hints would be more than welcome.
Much as said above there will be slides on each side. When the bumper is unbolted you should be able to pull it fowards at each side simultaneously it will pull off. Put a blanket or old quilt on the floor to rest it on.
 
Last edited:
I'ver never tried with the bumper on. Without A/C you can but I don't think you can get to the four bolts that hold the A/C condenser to the Radiator without removing it. You can watch my video on how to remove the bumper safely from the wing brackets although a good old fashioned firm yank is what it needed.

 
I thought I had done one with aircon, maybe not


Instructions say yes,

they aren't alway correct, I had to dropped mine downwards for example to avoid removing a vertical support

As far as I remeber on the panda the condenser is bolted to the dryer one side and bolted straight down on the other

Might depend on model, year, engine

Certainly worth a try, saves having to deal with more rusty bolts than necessary

I could be wrong
 
Last edited:
ECP finally got my radiator (due Mon, arrived Thurs) and I finally got the front bumper out of the way. (Not off the car, just far enough out of the way.)

(The rest of this is mostly just TL/DR ranting about rusty fasteners which I just needed to get out of my system. Feel free to ignore.)

What a nightmare when the screws and clips are rusty! This ought to be a relatively straightforward job but one of the Torx head bolts was so rusted into its clip that the clip just tore loose from the plastic, leaving the bolt turning freely but uselessly. Both of the screws holding the wheel arch edge of the bumper to the arch liner were so rusty that pushing on the screwdriver hard enough that it didn't just cam out of the screw head eventually pushed the screw heads through the plastic bumper (one way to get them loose I suppose). The screws never gave the slightest hint they might turn. The hidden screws where the bumper wheel arch meets the wing wheel arch were relatively easy once I found them as that was a screw into plastic. The even better hidden Torx bolts going upward from the inside of the bumper just next to the corner of the headlight were also surprisingly easy when found. Less rust further in.

But the one which wouldn't play at all was the pozidrive head screw under the bumper at the drivers side. The one which holds the bumper to the bottom of the arch liner. Couldn't budge it despite penetrating oil. Began to round off eventually. Tried to drill it but fresh bits just skated, and I didn't want to melt the plastic if it got too hot. Tried to file a slot across the head but still couldn't budge it.

Eventually, as it was the last screw, I just gave up and swung the bumper like a gate, pivoted on that screw. So now I have the bumper swung half-off, its free end sitting on a cardboard box and a bungee cord stopping the top from flopping forward.

Having done all that it turns out my condenser is fixed with 2 bolts at the top but just located in sockets in the plastic at the bottom. So it may be I didn't have to remove the bumper at all, just loosen the top so I could get at the two bolts and the two plastic clips which secure the bumper itself.

With luck it's now just the two hoses and then it tilts back, up and out. That can wait till tomorrow though. Heartily sick of it for today.
 
Beware quick release that doesnt on the bottom hose. Fit a new O ring I suggest and some sealant. I never fixed mine once removed and had to buy a new hose to get the coupling. I got a gates one for £12.50 from eBay. and it was fixed straight away. Any pics showing rad and condenser fixings would be bonzer.
 
I feel your pain with those bolts. Most of my projects are like that. Those quick release things on the bottom of the rad need a tap with a hammer and screwdriver to get them loose. They rarely will just pull off. When you put it on the new radiator, make sure it's fully home. Again, a swift tap with a hammer will usually seat it right up to the hilt.
 
The 'quick release' is really a 'quick fit' for production line.
Only way I found for proper purchase on the clip was from below, meaning I was in direct line for the flood.
I always refit with a dab of silicone grease, seems to aid it going on. This year, it leaked a little, first time ever, so I ordered a new hose, but by the time it arrived, leak had stopped. Hose is waiting and ready.
 
Back
Top