As promised, here is the write-up:
As with all oil-changes, it helps if you take the car out for a drive first to warm up the oil -- it will drain more easily if it is warm. However, this will make working under the car more difficult, so beware.
1. Remove engine bay floor
Jack up the 500 and put it on axle stands or ramps. Never work on a vehicle supported only by a jack. I ended up using the scissor jack that came with the car as my bottle jack was too tall to get under the reinforced bits of floor.
Once you can get under the engine bay, remove the six anodized bolts and washers which hold the plastic engine-bay floor -- you will need a 10mm socket to do this.
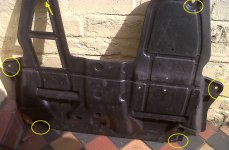
Here is the floor after I removed it, with the bolt holes highlighted:

Once the bolts are removed, you can slide the floor towards the back of the car and remove it. This will expose the engine sump.
2. Drain engine sump
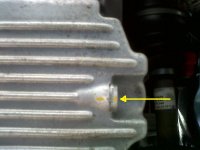
Locate the 17mm bolt towards the back of the sump:

Note that someone at the factory has painted a yellow line on mine to show the lining up of the bolt. Sneaky. Unfortunately, I did not notice this until I looked at the pictures for this write-up -- I'll need to do something about this before I take my 500 back for the first service...
Get a 3.5 litre or greater vessel under the sump. A long time ago, I invested in a wide circular drain pan with spout -- well worth the money!
Undo the sump bolt and drain the oil -- this will take some time, so get on with the rest of the job.
3. Replace oil filter
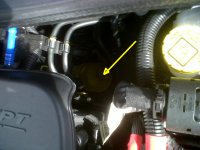
While the oil is draining, locate the filter housing -- it is near the top of the engine, at the back, just slightly offset to the right of the engine bay:

To undo the housing you will need a 24mm socket (I used a 15/16"), an extension bar, and a UJ adapter. Get all that together and unscrew the filter housing. There will be some oil still in there, so be careful not to spill it over the engine bay.
I found it quite difficult to get the filter and housing out from the engine bay -- it is just a little too big to be lifted out easily. What I found helped was rotating the housing 90 degrees, so that the filter was pointing up and out, then worming the whole thing out.
Drain any remaining oil by standing the filter and housing on some newspaper.
The filter cartridge is held in the housing by a circular clip, and is quite hard to pull out. Give it some welly: hold the housing with one hand, and pull the cartridge straight up and out with the other.
Clean the housing with newspaper or cloth.
Remove the old O-ring and discard.
Smear the new O-ring that comes with the new filter with clean engine oil, and replace in the groove on the housing.
Smear the felt seal on the new filter cartridge with clean oil and clip the cartridge into the housing.
Smear clean oil on the little O-ring on the overflow valve and the top of the cartridge in general.
Screw the filter and housing back onto the engine. At first do it by hand, being careful not to cross threads, and not to force anything.
As printed on the housing, torque up to 25Nm.
4. Replace sump plug
By now the sump should have finished draining. The sump bolt has a copper washer which deforms to make the seal. I didn't get a replacement at this point, as it is possible to reverse the washer and get an ok seal a second time around. I should have measured the washer before I refitted it, but I forgot -- sorry folks
Refit the sump plug bolt with the washer reversed.
Tighten until you feel the washer deform.
Wipe down the filter housing and sump drain to make sure that any oil which might leak will be easy to detect.
Pour the old oil into a receptacle and save to take to the dump -- most have an oil recycling facility.
5. Refill with oil
I used Selenia KPE as recommended by Fiat. Owners manual states 3.2 litres for sump and filter -- pour in 3 litres through the dipstick hole, using a funnel to keep the engine bay clean.
Check the level using the dipstick -- it won't be accurate since you have the car jacked up, but it's worth checking just to be sure.
6. Run the engine and re-check the level.
It's best to take it easy at first since the engine will get no oil until the filter housing fills up. I normally disconnect the coil to prevent the engine firing and crank it a few times just on the starter. Here, I just cranked a few times, cutting the ignition before the engine had a chance to start.
Once the filter housing is filled and the oil warning light goes out, start the engine. Run it for a little while (30 seconds), then turn it off.
Check under the car for leaks.
I like to start again and rev the engine a little bit at this point -- not too much as there is no load on it at the moment! -- to test the seals under pressure.
7. Refit engine bay floor
Once you are happy that the engine is not leaking oil, refit the engine bay floor -- first slide it into the two catches under the front bumper valence, then refit the six bolts and washers.
Tighten up in a cross-wise pattern to distribute the load evenly.
I didn't torque up, just did it "by feel".
8. Take the car out for a run, then re-check oil level and top up
Take the car off the axles.
Go for a drive, don't stress the engine.
Park up on level ground, use a spirit-level if you need to.
Let the oil drain into the sump -- 10 minutes should do it.
Check under the car for leaks.
Check the oil level using the dipstick and top up as necessary.
Hope this helps you TwinAir enthusiasts out there! Oh, and if you spot any clangers above, please let me know!
As with all oil-changes, it helps if you take the car out for a drive first to warm up the oil -- it will drain more easily if it is warm. However, this will make working under the car more difficult, so beware.
1. Remove engine bay floor
Jack up the 500 and put it on axle stands or ramps. Never work on a vehicle supported only by a jack. I ended up using the scissor jack that came with the car as my bottle jack was too tall to get under the reinforced bits of floor.
Once you can get under the engine bay, remove the six anodized bolts and washers which hold the plastic engine-bay floor -- you will need a 10mm socket to do this.
Here is the floor after I removed it, with the bolt holes highlighted:

Once the bolts are removed, you can slide the floor towards the back of the car and remove it. This will expose the engine sump.
2. Drain engine sump
Locate the 17mm bolt towards the back of the sump:

Note that someone at the factory has painted a yellow line on mine to show the lining up of the bolt. Sneaky. Unfortunately, I did not notice this until I looked at the pictures for this write-up -- I'll need to do something about this before I take my 500 back for the first service...
Get a 3.5 litre or greater vessel under the sump. A long time ago, I invested in a wide circular drain pan with spout -- well worth the money!
Undo the sump bolt and drain the oil -- this will take some time, so get on with the rest of the job.
3. Replace oil filter
While the oil is draining, locate the filter housing -- it is near the top of the engine, at the back, just slightly offset to the right of the engine bay:

To undo the housing you will need a 24mm socket (I used a 15/16"), an extension bar, and a UJ adapter. Get all that together and unscrew the filter housing. There will be some oil still in there, so be careful not to spill it over the engine bay.
I found it quite difficult to get the filter and housing out from the engine bay -- it is just a little too big to be lifted out easily. What I found helped was rotating the housing 90 degrees, so that the filter was pointing up and out, then worming the whole thing out.
Drain any remaining oil by standing the filter and housing on some newspaper.
The filter cartridge is held in the housing by a circular clip, and is quite hard to pull out. Give it some welly: hold the housing with one hand, and pull the cartridge straight up and out with the other.
Clean the housing with newspaper or cloth.
Remove the old O-ring and discard.
Smear the new O-ring that comes with the new filter with clean engine oil, and replace in the groove on the housing.
Smear the felt seal on the new filter cartridge with clean oil and clip the cartridge into the housing.
Smear clean oil on the little O-ring on the overflow valve and the top of the cartridge in general.
Screw the filter and housing back onto the engine. At first do it by hand, being careful not to cross threads, and not to force anything.
As printed on the housing, torque up to 25Nm.
4. Replace sump plug
By now the sump should have finished draining. The sump bolt has a copper washer which deforms to make the seal. I didn't get a replacement at this point, as it is possible to reverse the washer and get an ok seal a second time around. I should have measured the washer before I refitted it, but I forgot -- sorry folks
Refit the sump plug bolt with the washer reversed.
Tighten until you feel the washer deform.
Wipe down the filter housing and sump drain to make sure that any oil which might leak will be easy to detect.
Pour the old oil into a receptacle and save to take to the dump -- most have an oil recycling facility.
5. Refill with oil
I used Selenia KPE as recommended by Fiat. Owners manual states 3.2 litres for sump and filter -- pour in 3 litres through the dipstick hole, using a funnel to keep the engine bay clean.
Check the level using the dipstick -- it won't be accurate since you have the car jacked up, but it's worth checking just to be sure.
6. Run the engine and re-check the level.
It's best to take it easy at first since the engine will get no oil until the filter housing fills up. I normally disconnect the coil to prevent the engine firing and crank it a few times just on the starter. Here, I just cranked a few times, cutting the ignition before the engine had a chance to start.
Once the filter housing is filled and the oil warning light goes out, start the engine. Run it for a little while (30 seconds), then turn it off.
Check under the car for leaks.
I like to start again and rev the engine a little bit at this point -- not too much as there is no load on it at the moment! -- to test the seals under pressure.
7. Refit engine bay floor
Once you are happy that the engine is not leaking oil, refit the engine bay floor -- first slide it into the two catches under the front bumper valence, then refit the six bolts and washers.
Tighten up in a cross-wise pattern to distribute the load evenly.
I didn't torque up, just did it "by feel".
8. Take the car out for a run, then re-check oil level and top up
Take the car off the axles.
Go for a drive, don't stress the engine.
Park up on level ground, use a spirit-level if you need to.
Let the oil drain into the sump -- 10 minutes should do it.
Check under the car for leaks.
Check the oil level using the dipstick and top up as necessary.
Hope this helps you TwinAir enthusiasts out there! Oh, and if you spot any clangers above, please let me know!

