General Rescued Panda!

Currently reading:
General Rescued Panda!

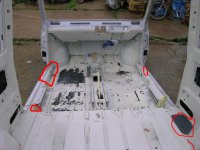
If anybody has photos of a completed repair to this area I would be interested to see them.
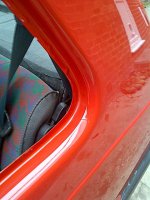
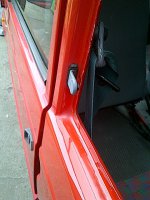
Is the door seal supposed to be split at that point? I am assuming it must be as it's the same on both sides.
 
****ing hell! :eek:

That is bad, although not in an awkward position, so should be fairly easy to repair I'd have thought.
It seems that the inner sill is knackered as far as the front edge of the door frame. I don't suppose it's any coincidence that the door is most rotten at that point as well.
Are complete inner sill section pieces available still?
 
It seems that the inner sill is knackered as far as the front edge of the door frame. I don't suppose it's any coincidence that the door is most rotten at that point as well.
Are complete inner sill section pieces available still?

Not easy to get now Hadrian has gone but you don't really need them. Just a bit of mild steel bent to the right shape in a vice will do.
 
That might be a bit tricky as the back section of the n/s sill has been welded by the previous owner.
At least there is something positive! I had a very quick go with the T cut on the tailgate this afternoon. Note the difference between the tailgate / rook/back quarter colours!
 

Attachments

  • IMG-20130128-00426.jpg
    IMG-20130128-00426.jpg
    86.7 KB · Views: 35
OK thanks. So in terms of welding up holes on cars this isn't too bad ?

If you are going to have grot this is the best place because you can get to it easily. No lying upside down with a welding torch inches from your face. Good access means its much easier to get decent welds. Good job on the t-cutting (y)
 
If you are going to have grot this is the best place because you can get to it easily. No lying upside down with a welding torch inches from your face. Good access means its much easier to get decent welds. Good job on the t-cutting (y)
Ok thanks. That gives me some encouragement (re the welding).
I have "borrowed" this picture of somebody else's project (which you will probably recognise) to highlight where the rust is that I have found so far. I am hoping that the rust around the bottom of the screen pillar has not gone too far in.
 

Attachments

  • rusty places found so far!.JPG
    rusty places found so far!.JPG
    109.4 KB · Views: 43
Oi!!!.......what do you mean somebody else's car!! Do you not go outside your own thread?? If you did then you would realise that belongs to the moderator of this section.... Me!!

That's mine..and you owe me £1,000 copyright fee...
Oops! Sorry boss!
Indeed I did venture outside my own thread which is where I found it. I am sorry i did not remember that it was yours though, being a newcomer to the section.
I read your thread in admiration and only saved your picture so that I could see what the "geography" of the stripped out shell should look like
 
Going back to seat removal, instead of bending flat the tab you can lever the rod that comes up against it inwards so that it misses, do one side at a time.
My colour has rusted out here too, but as has been said, it's in a good position for comfortable welding.
I would advise finishing the compounding of the paintwork before you do anything else, once it's shiny you will be spurred on to do the rest. (y)
Thanks for the sound advice. I will do.
I just hope Purple Haze is still speaking to me. I need all the friends I can get!
 
mine was starting to go there, but it was just enough to lift the paint so no holes.
another place you may want to check is around the rear windows under the rubber seals, much like the door seals it rusts under them too. mine had a hole in one side that i had to weld up.
I took the near side rear window out today as the rubber seal looked a bit "manky" as we say oop north. I am please to report that after a bit of cleaning up this is how that area looks!
 

Attachments

  • ns side window 2.jpg
    ns side window 2.jpg
    98.5 KB · Views: 25
  • ns side window 1.jpg
    ns side window 1.jpg
    96.5 KB · Views: 30
Back
Top