General rear brake drums

Currently reading:
General rear brake drums

tonyn

Member
Joined
Sep 15, 2013
Messages
124
Points
112
Can anybody advise me please.
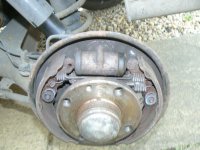
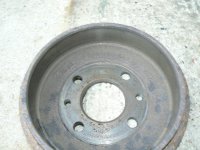
I want to change the rear brake drums on my 2004 1.2 Panda. They are both badly scored, as the brake linnings came away from the shoes on both sides and the brakes have been operating "metal to metal" which has destroyed the internal face of both hubs
I have searched online for replacements, and am a bit confused as to wether or not it is possible to purchase the hub and bearing as a complete unit.
I found this one,
https://www.shop4parts.co.uk/?name=store&op=Product&ProdID=1285
Only the imaged displayed is misleading/confusing me.
Dont want to order them and then receive the wrong item.
Any help much appreciated
Tony
 
The pictures is correct the hub/bearing simply bolts up inside of the brake drum with a single large but one of the easiest bearings on any car to replace

Unless you are looking for the drum back plate the the brake drum sits around/on top of
 
Last edited:
Sorry Varesecrazy, just realised my mistake.
Its 2 drums that I need.
Sorry for any confusions and thanks for the reply
Its been a long stressful day!!!!!!!!!!
 
Hi tonyn. You had me confused too! How about these:
https://www.shop4parts.co.uk/?name=store&op=Product&ProdID=148
and these:
https://www.shop4parts.co.uk/?name=store&op=Product&ProdID=3260
These people are not always the cheapest - although for things like that metal cooling pipe that runs along the front of the engine and other specialist parts they are hard to beat - but I buy from them because I have never been disappointed with the quality.
Good luck with it all and let us know how you get on. Especially if you turn up a good parts source.
regards
Jock
 
Open the bleed nipples when you push the pistons back to eject the old brake fluid. Top up when done. Even better replace the brake wheel cylinders along with shoes and drums.
 
Last edited:
Open the bleed nipples when you push the pistons back to eject the wet brake fluid. Even better replace the brake wheel cylinders along with shoes and drums.
Don't know about on the panda but the 500 they are a huge pain in the arse unless the nuts are in good condition as you can't get a socket on to them so likely to round off if rusty
So to get a socket on them requires removing the entire backplate on many cars
 
Don't know about on the panda but the 500 they are a huge pain in the arse unless the nuts are in good condition as you can't get a socket on to them so likely to round off if rusty
So to get a socket on them requires removing the entire backplate on many cars

Better that than have the seals blow and contaminate a set of new brakes. Rear drums on 500 and Panda are the same by the way. :)

I have a six point socket ground down to remove the internal chamfer. It fits snugly around shallow bolt heads and will happily shear off an old brake cylinder bolt. New bolts with the new cylinder (well protected with anti-seize paste) makes the job easier next time.

The metal brake pipes and flexi hoses are often seized to the flare nuts. Un-seize the nut with a gas lighter flame to soften the plastic coating. Treat the exposed metal to prevent future corrosion.If the flexi hose looks suspect, cut it and wind the fragment off the nut. You can then fit a new hose and keep the metal pipe (along the suspension arm) or replace from chassis to brake with braided hose. For normal brake pedal feel, leave the front brakes with rubber hoses.
 
Last edited:
Becky's rear cylinders don't look too bad

P1080660.JPG

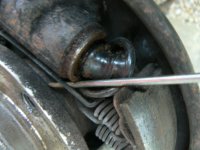
Until you peel back the dust rubber when you notice dampness and corrosion. They're a bit "notchy" too when you try to move the pistons manually.

P1080664.JPG

So one of the first jobs for when the less inclement weather returns is going to be to renew both cylinders.

There's a lot of corrosion on the fixings and the pipes don't look too brilliant either

P1080658.JPG

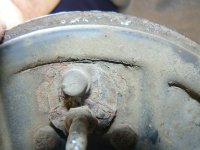
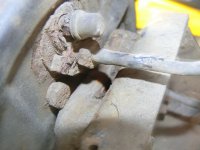
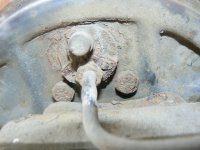
The tube nut looks as if it's going to "fight" me but if the pipe has to be renewed that's not much of an issue but the rear most of the two fixing bolts partially hides between the back plate and axle end plate which makes getting a socket on it pretty much impossible.

P1080657.JPG

P1080659.JPG

I've seen videos showing removal of the brake back plate to allow access for a socket but I don't want to risk shearing off the back plate securing bolts. I was chatting to the lads at Harrisons about it and they agreed that rear cylinder bolt can be a bit of a task to remove. One of them advised me not to waste my time on it but instead to put a cutting disc in my angle grinder and run a slit right through the lug - on the cylinder side (ie the side enclosed by the drum) - where the bolt sits in the cylinder casting, then use a chisel to burst the casting around the lug.

P1080667.JPG

This ruins both the bolt and old cylinder but I'll be fitting new ones anyway.

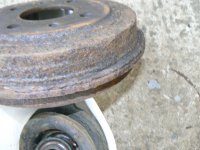
The brake drums look scabby on the outside - and this picture was taken after I'd busted off all the really crusty rust

P1080663.JPG

and, although the braking surface is smooth they had a big lip which made removing them very difficult. (I've ground the lips off so they look better then they are in the picture)

P1080662.JPG

So my intention is to just renew the shoes and drums as well and make a right job of it. My guess is that they'll then outlast me!
 
You can get a HEL braided hose made up for about £20 a side. Run that from the brake cylinder right up to the steel pipe under the rear floor. If you keep the OEM front hoses the brakes will not get that sudden action of all round braided hose. Four rubber grommets per rear brake line are enough to protect under zip ties (or P clips).

The ends are stainless so use a good anti-seize paste on the threads. That will avoid electrolytic corrosion of the iron brake cylinder. Ditto at the brake pipe end. Be VERY careful to not get the stuff inside the system - apply to the hose threads only.

Paint over the bare ferrous metal with copper grease. I use it on exhaust pipe welds and they do seem to last better.
 
although the braking surface is smooth they had a big lip which made removing them very difficult.
I've just removed my drums today to investigate a binding rear brake that showed up as an MOT advisory, and both my drums were also very stubborn because of this rusty lip.

I was worried about pulling the linings off the shoes as they are only bonded on. The linings were a little bit scored after dragging the rusty drums over them, but thankfully stayed attached. Fingers crossed...

After polishing the rust off, the drums went on fine and the binding seems to have gone, so this rust build-up inside the drum appears it can get so bad as to interfere with the shoes.

I think I'll be taking my drums off to inspect every year from now on...
 
Last edited:
I do wonder why they simply didn't have the cylinder mounted the other way around when the system was designed? Would make easy access to the securing bolts then
Probably a reason for it anyone?

Looking at the assembled in.situ pic of Jocks

If you flipped the cylinder 180'..

The hex heads probably wouldnt even clear the pressed ribs on the outer rim of the sheet backplate

The bleed screw would then be at the lower edge..

Not an issue in itself..

But of course the fluid line will
need securing to the cars suspension (as normal).. so worse obstructions than now..

What do you think..?? Charlie
 
Last edited:
Looking at the assembled in.situ pic of Jocks

If you flipped the cylinder 180'..

The hex heads probably wouldnt even clear the pressed ribs on the outer rim of the sheet backplate

The bleed screw would then be at the lower edge..

Not an issue in itself..

But of course the fluid line will
need securing to the cars suspension (as normal).. so worse obstructions than now..

What do you think..?? Charlie

Fair point all through I'm sure one could be designed with the mounting points at the top end of the cylinder if one didn't already exist in some place
 
Replying to several of above posts.

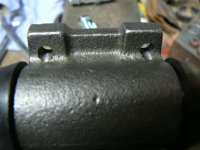
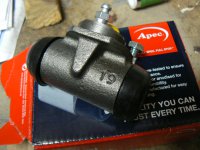
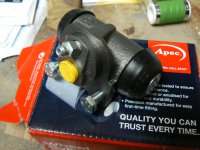
chris3224 and Charlie. Regarding the idea of fitting the cylinder "upside down" You're right Charlie, the bolts would then be located right on that pressed rim but worse than that, if you turn it upside down the bleed nipple will now be at the bottom - and the drilling which allows fluid to exit via this nipple breaks into the cylinder at the top (with the cylinder mounted in it's normal position) - which will make bleeding very difficult. You can see the "bump" in the casting which accommodates this drilling in the first of the pics I posted earlier. Here is one of the new cylinders I've got waiting to go on and you can see the "bump" on it too:
P1090212.JPG

P1090213.JPG

Of course it would have been better if the bolts had been at the top in the first place but it is what it is and probably easier just to work with it as it is. I remember (and I think I've said this before so humour me if you will) but this sort of question was one frequently asked of me when I was a trainer in light vehicle repair and maintenance. Trainees would often ask "Why did they make it this way" when struggling with an inaccessible or awkward component/fixing. The only reply I could find was " well there's nothing we can do about it. They've made it that way, we just have to find out how to fix it".

By the way, can I just suggest that, especially with new drum brake wheel cylinders, you pop a piston out and have a look down the bore for imperfections. Then, if OK, carefully pop the piston back in (to avoid damage to the seal). I can think of two occasions, admittedly many years ago now, where there were casting imperfections (one exacerbated by poor machining) which caused the cylinders to leak and ruin the new linings. It's a task which takes less than a minute when you remove the cylinder from it's packaging but is a real pain if it happens to you. Mind you, I haven't had a problem one for many years now so quality control is obviously much better now - I still wouldn't use one without checking first though. Never had a problem like this with a new caliper.

rmjbn1. Getting drums off when they have a big wear lip is an absolute pain isn't it. In the "good old days" - cue violins - when I first started, working on stuff like Minis, Austin Cambridges, Ford Anglias, etc, etc, they had drums all round and they were manually adjusted at every service (the improvement in pedal "feel" could be dramatic on a vehicle which covered high mileages) Our workshop always removed drums, blew out the dust - why don't I have emphysema/lung cancer? - and lubed these adjusters. we would also deal with any wear lip before it became problematic. Now a days, with disc brakes on the front (inherently self adjusting) and self adjusters on rear drums, many manufacturers do not seem to specify more than a visual inspection of the brakes at service time. They would only receive intervention if friction material was worn out. So, with drums, as the drum itself wears, the lip gets deeper and deeper and and the shoe self adjusts out to follow it. In the end you have a drum which won't come off over the lining even with the handbrake cables disconnected. Sometimes you can "trip" a self adjuster through a wheel retaining bolt hole but if you've got a car with studs you can't even hope for that solution. I find that, after fully backing off the hand brake/removing cables and removing the wheel and drum retaining screw/s, if you put two wheel bolts back into the hub and use a long screwdriver/tyre iron/etc to rotate the drum then another screwdriver, or similar, to prise between the drum rim and backplate whilst rotating the drum, you can often "walk" the drum over the linings - but be careful not to permanently distort the backplate. Often the drum will come "half off" and jam. In this case hitting it - quite hard - with a leather or plastic faced hammer on the side of the drum often works. If it still won't shift sometimes you can get at the shoe retainers through a wheel bolt hole and rotate it with a short length of small dia pipe through the hole until it disengages. Then you can drag the shoes away from the backplate by enough to release the drum. If all else fails due to the lip being so deep, it's likely the drum is worn to it's max dia anyway so just enjoy yourself with a very big hammer (2 lb ball pein works well I find) and break the drum up. It can be very therapeutic after, possibly, several hours of frustrating toil!

Brakes on "Family fleet" vehicles get dismantled, cleaned up and lubed (Copa slip/Cara Tec) every year at service time - even if it's only a lube service - and I rarely have any problems. I also always look under the dust rubbers and depress the pistons on the drum brakes back into the cylinders to make sure they are "free". I'm slightly undecided about pressing caliper pistons fully home at every service as they displace a much larger volume of fluid (so if you do it watch the reservoir doesn't overflow) which carries a larger risk of transferring foreign bodies into the ABS unit. Especially on older cars where the inside of the flex hoses are likely to be degrading a little. I tend now to do it on calipers where I can loosen the bleed nipple so fluid doesn't return (remember to top up when finished) and leave them alone if the nipple looks like shearing. Although I have great hopes for this with my new Vibro tool.
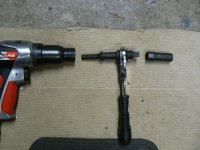
P1080782.JPG

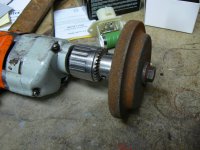
Here's my wee grinding stone which I use in my oldest drill to grind down lips on drums - I think it came off a valve refacing machine:
P1090211.JPG

Sorry if I'm telling you guys how to "suck eggs" but remember to ALWAYS pump the brake pedal to "set" the brakes BEFORE trying to move the vehicle. This will pump caliper pistons out to press the pads to the disk rotors - can take maybe half a dozen pumps - and set up self adjusters on rear brakes.

Those of you with "eagle eyes" may notice the new radiator fan resistor pack which I've just noticed has crept into the last picture, It's the green thing in the top of the picture. Oh, it's in the cylinder pics too. This has just arrived and was an eBay bargain (£11.00 approx) to replace the thoroughly knackered one on my boy's Punto:
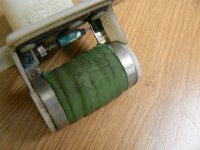
P1080790.JPG

The genuine article is about 4 times the price. even S4p are more than twice that. Hmmm. Wise buy? Oh well, done now.

Stay safe everyone and thank you, thank you, thank you to anyone working in the NHS and other services to keep us safe.
 
Fair point all through I'm sure one could be designed with the mounting points at the top end of the cylinder if one didn't already exist in some place
Well absolutely. Why not? probably because it would then have to be a dedicated fitting for this vehicle only whereas I suspect a lot of wheel cylinders/caliper pots are generic and used on several different vehicles? maybe even across manufacturers? After all it's not the individual vehicle manufacturers who make them is it.
 
there were casting imperfections (one exacerbated by poor machining) which caused the cylinders to leak and ruin the new linings.

Good point, Jock. I've had this recently (not with my Panda) on an aftermarket clutch slave cylinder (the genuine Mazda item was stupidly expensive...). Fitting the actuator, the seal popped out with some metal swarf attached, revealing a sharp lip inside the cylinder. So I had to swap it for the stupidly expensive one:( A lesson to beware cheap parts.

At least good quality Panda brake parts are cheap anyway, but fitting shoes and cylinders does look a faff. tonyn I hope you get all the parts you need and get your nice new brakes back together so you can slow as well as go:)

Our workshop always removed drums, blew out the dust - why don't I have emphysema/lung cancer? - and lubed these adjusters. we would also deal with any wear lip before it became problematic.
Aye, I have an old car with all-round drums, I back off the manual adjusters a couple of clicks before removing the drum. I've had the car 20 years and no rust on the drums... But then failed hub seals dripping diff oil into the rears probably helped:eek: At least the linings are riveted on so they can't drop off!

By the way, I know it's been shared before, but the OP might find this video useful. I did when I couldn't get my drums off t'other day.

Only part I don't get is when they spend ages fiddling with the self-adjuster near the end. Isn't it supposed to, well, self-adjust as Jock describes above by pumping the pedal?
 
That's a good video rmj. Did you notice the cloud of brake dust when he triggers the air gun? Hope he wasn't breathing in at that moment!

I've seen a few of their videos and they are pretty good aren't they? In this instance though I think he has been pretty lucky with this job in that the general condition of that brake assembly looks to be quite good. The tube nut undoes without binding to the tube and those Allen type back plate retaining screws came out easily too. Even the cylinder retaining bolts don't look too tight.

I very much like his special pair of pliers for dealing with the spring retainer clips. I've spent many hours searching under work benches etc when one of those has "escaped" from the jaws of my pliers. I now have a short length of pipe which works well.

The bit at the end where he's "mucking about" with the self adjuster? I do tend to do this to avoid having to work the hand/foot brake repeatedly to advance the shoes out to their best position. However he does make a bit of a "meal" of it doesn't he? I think he's trying to get it down to almost no clearance between the shoe and drum to get the best possible "feel" to the pedal. Personally I'm prepared to live with a wee bit of give and extra travel in the pedal with new shoes, it'll firm up once they've settled in. Also if you tighten up too much the brakes will drag and get hot and high points on the new linings may glaze before they can bed down properly.

Regarding imperfections in castings. Don't know if you do any plumbing? My oldest boy's first home of his own was an old tenement flat in the dock area of Leith - not fashionable in those days but popular now. The place was an absolute tip. Luckily I have a friend who owns a joinery company. He came and had a look at it and said, "D'you know Jock, best thing we can do here is take it back to wall and floors and start again". Took us 6 months with me acting as his labourer. I've lots of tales I could tell and I learned an awful lot about Fitting Kitchens, Bathrooms, Joinery and Plumbing. One of the most annoying things that happened came about because we discovered the flat had a water tank in the cupboard above the front door which was fed by the mains. All other water, including the kitchen supply, came via gravity feed, from this tank. So no mains supply for drinking water! Heating was done with storage radiators which were very old. We decided to scrap the lot, install a Combi boiler, take mains to the kitchen and bathroom and chuck the gravity tank all together. We got a Corgi guy to do the gas side but plumbed the water ourselves and it all went well. My pal did a brilliant job of installing the kitchen using cheap units which he made look great. then My boy moved in properly and within a week the man underneath him was complaining of water marks on his ceiling below my boy's kitchen. To lift the floor boards we had to dismantle some of the "so lovingly installed" units and we found a compression joint dripping away slowly! Neither of us could remember who had done that particular one, anyway the "blame game" is a pointless activity, so we tightened it up and watched it whilst having a cup of tea. Damn! still dripping. Ok Jock, you hold that big pair of water pump pliers whilst I really lean on that B****R! Still leaking at the same rate. Ok, turn the water off and out with the ice cream tubs whilst we drain it down. Removed the offending coupling and could plainly see the casting was not properly formed inside where the olive is compressed. These joints come with olives already installed and the pinch nuts on the threads so all you do when installing is to stick the pipe in the end and tighten the nut which collapses the olive onto the pipe but this one was never going to seal due to the flaw. a new coupling quickly sorted the problem but it then to the best part of two days to replace the flooring and rebuild the units. All in all a terrible waste of time for just one faulty coupling. I now NEVER EVER fit a compression fitting without spinning the nuts off, removing the olive and checking those mating faces. Never come across another like that though.

Do tell, what's your "old car"? sounds interesting, obviously RWD? I've still got my riveting drift and a few of the copper rivets somewhere in my tool box.
 
Presumably the previous occupants were drinking from that gravity tank?! Yikes:yuck:

Hopefully they were sticking to good old Scottish water of life instead:)

Funnily enough, tackled my first bit of plumbing last year when we installed a solid fuel boiler stove to an existing heating system. Enough PTFE to wrap the world a few times and a couple of buckets of Boss White, job's a good'un:) It's certainly satisfying when it stops leaking, isn't it?:eek:

Used the Panda to collect the stove too - rear seats removed it's a cracking little van.

I know like me you're partial to the old stuff, Jock:D so I'll send you a private message about my other old banger, I don't want to clog up this useful thread with too much non-FIAT chat (spoiler: it's not a FIAT)
 
Back
Top