

You are using an out of date browser. It may not display this or other websites correctly.
You should upgrade or use an alternative browser.
You should upgrade or use an alternative browser.
Technical Project Paolo
- Thread starter Paolo66
- Start date
Currently reading:
Technical Project Paolo

OP
OP
Paolo66
Established member
- Joined
- Feb 6, 2013
- Messages
- 1,004
- Points
- 235
God those doors are fiddly! Theres nothing too taxing it's just getting the order of fitment right. Has no one written an article on how to fit all the door bits together? At least I'm going to know what to do for the second door.
the hobbler
Distinguished member
- Joined
- Jul 25, 2012
- Messages
- 4,421
- Points
- 1,112
I was very lucky when it came to rebuilding my doors (sadly, pattern doors, but brand new) as Ann ('er indoors) suggested that I put an old blanket onto the spare bed and did them on that--you don't ignore offers like that. As a result, the doors were laid out flat at an reasonable working height. But, being that they were 'pattern', there was a fair degree of 'fettling involved--holes just did not line up and as you have discovered Damian, there is an easy way and real bugger of a way--the 2nd door is much easier!


OP
OP
Paolo66
Established member
- Joined
- Feb 6, 2013
- Messages
- 1,004
- Points
- 235
Doors all on and sorted now. Don't want to do that job again in a hurry. First one took a day and a half second one 2 hours. Here's how I did it but somebody else might have an easier way. I'll assume that like me you are starting with a completely bare door. I found it easier to work with the door hung on the car, I did try it with the door on a bench but found it awkward when it came to the window. Each to their own.
First I put the aluminium trim on both the outside and inside. This has a tendecy to bend so to straighten it out once it was in place I got an old pair of pliers and ground down the serrations at the end and then put some heat shrink over the ends. This meant I could then crimp the trim if any bends appeared without leaving any marks on the trim. I then put the door handle and catch mechanism in. The thing to remember when putting the catch in is to put the door lock in the hole before you lock it in place. Then I fitted the window in from the bottom and left it there. You then have to get 1/4 frame in but only partially. The 1/4 frame is a tight fit so I found putting some petroleum jelly on the inside of the aluminium trim helped. Now you have to multi task (I know us men aren't supposed to do that) by fitting the 1/4 frame fully but at the same time get the window into the seal on the 1/4 frame. I put the window seal into the door to aid this but didn't glue it at this stage. Once you've got the window so it can move up and down in the seals you can fit the winder mechanism. Get the window about quarter of the way up and slide the mechanism in. Before you fasten it in place get the mechanism into the window rail. Fasten it to the door by the 3 bolts and then test that it goes up. It won't go down straight as you haven't fitted the bottom rails yet. Fit the bottom rail on the catch side ensuring it lines up with the window seal. Fit the bottom rail on the 1/4 frame side ensuring the lug goes up the back of the aluminium track on the 1/4 frame. Fasten the 1/4 frame in place by the 2 screws. You can now test that the window slides up and down. If it does leave it down and you can remove the window seal as it needs glueing in place. I put the glue inside the door using a brush. Once applied refit the seal and then wind the window up fully to hold it in place and let the glue dry. Fit the door catch stop, door card and handles.
First I put the aluminium trim on both the outside and inside. This has a tendecy to bend so to straighten it out once it was in place I got an old pair of pliers and ground down the serrations at the end and then put some heat shrink over the ends. This meant I could then crimp the trim if any bends appeared without leaving any marks on the trim. I then put the door handle and catch mechanism in. The thing to remember when putting the catch in is to put the door lock in the hole before you lock it in place. Then I fitted the window in from the bottom and left it there. You then have to get 1/4 frame in but only partially. The 1/4 frame is a tight fit so I found putting some petroleum jelly on the inside of the aluminium trim helped. Now you have to multi task (I know us men aren't supposed to do that) by fitting the 1/4 frame fully but at the same time get the window into the seal on the 1/4 frame. I put the window seal into the door to aid this but didn't glue it at this stage. Once you've got the window so it can move up and down in the seals you can fit the winder mechanism. Get the window about quarter of the way up and slide the mechanism in. Before you fasten it in place get the mechanism into the window rail. Fasten it to the door by the 3 bolts and then test that it goes up. It won't go down straight as you haven't fitted the bottom rails yet. Fit the bottom rail on the catch side ensuring it lines up with the window seal. Fit the bottom rail on the 1/4 frame side ensuring the lug goes up the back of the aluminium track on the 1/4 frame. Fasten the 1/4 frame in place by the 2 screws. You can now test that the window slides up and down. If it does leave it down and you can remove the window seal as it needs glueing in place. I put the glue inside the door using a brush. Once applied refit the seal and then wind the window up fully to hold it in place and let the glue dry. Fit the door catch stop, door card and handles.
Hopefully these are the instructions for the one that took you just two hours. ")
Good progress, when's the Mot booked for?
Cheers, Steve
Good progress, when's the Mot booked for?
Cheers, Steve
OP
OP
Paolo66
Established member
- Joined
- Feb 6, 2013
- Messages
- 1,004
- Points
- 235
Hopefully these are the instructions for the one that took you just two hours.
Good progress, when's the Mot booked for?
Cheers, Steve
Yes thats how I did it in 2 hours after spending a day and a half fitting and removing things. Just the front seats to go in now and the engine to clean up and fit. I can see the end now.
Although I'm probably a few months off this job I will be referring to your notes.Tried to post photos but there seems to be a problem with app and mobile site. Will post when can
Thanks
Geoff
OP
OP
Paolo66
Established member
- Joined
- Feb 6, 2013
- Messages
- 1,004
- Points
- 235
I tried to find some notes to help me but I couldn't find any. It's hard to explain it comprehensively on here but with the notes and the parts in your hands you'll figure it out. The tricky bit is getting the 1/4 frame in at the same time as getting it lined up with the window. You can do it with the door on a bed so you don't scratch it but I found no restrictions with doing it on the car. Plus once I had the hinges all lined up I didn't want to take the door off again.
OP
OP
Paolo66
Established member
- Joined
- Feb 6, 2013
- Messages
- 1,004
- Points
- 235
Can someone help please? I am putting the cylinder head back together and realise that the intake valves have a seal on them. When I took mine apart everything just fell apart and the seal was disintergrated. Where does the seal locate? Does it go just under the collars? Is it just an o ring and if so what size?
It's nothing special to look at but maybe made of special rubber given the conditions its under....but I doubt it.
They are quite a tight fit over the stem and maybe a bit fatter than you would expect given the size. I stick them on immediately after I've put the valve into the guides and then the springs, collets etc.
I've always put them in but I'm a bit sceptical whether or not they actually make any difference.
the hobbler
Distinguished member
- Joined
- Jul 25, 2012
- Messages
- 4,421
- Points
- 1,112
Hi Damian---welcome to the world of 'a myriad variables'. Is it a '652' engine or the original 500 that is going back in? Some variants have 'proper' valve-guide seals (as against 'O' rings) on just the inlet valves, I have a 650 engine on my work-bench that has valve-guide seals on ALL4 valve-guides! The way to tell is by the shape of the top of the valve-guide---if it is of reduced diameter, then 'proper' valve-guide seals are fitted. If it is of a uniform diameter for the whole length, then 'O' rings. The 'O' rings slip over the valve, above the guide, prior to fitting the springs. As far as I can remember, the 500s only ever had 'O' rings---the 'book of words' (factory parts catalogue) shows a 'O' ring type seal--(Fiat part number:-987099--"Anello paraolio"--X4). Hope this helps.
OP
OP
Paolo66
Established member
- Joined
- Feb 6, 2013
- Messages
- 1,004
- Points
- 235
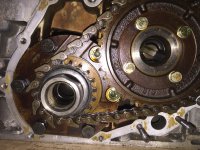
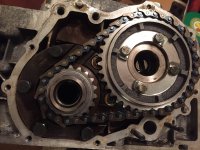
So the original plan a couple of years back was to completely strip, clean and rebuild the engine. However as the engine is the only thing left and Mrs Paolo is putting pressure on to get it on the road I thought I would give it a quick spruce up and stick it in. I mean it was running ok before I started the restoration. I took the head off ages ago so I have rebuilt that. I thought I would drain the oil, clean as much as I could, stick the head on and go driving. When I undid the sump plug rather than the usual gush of oil I got a slight trickle and then nothing. Thats funny I cant remember draining the oil. Ended up taking the timing cover off to find what I think is a loose chain. I've never rebuilt an engine before but common sense tells me it should be tighter than that. There's what seems to be a scoring from the chain inside the timing cover. I've also noticed a bit of side play on the con rods. Theres no up and down movement so the bearings must be a tight fit but if the width of the con rod is say 20mm how wide should the gap be on the crankshaft? I can't find a measurement in the manual. If it's out how do you rectify it? Anyone fancy telling my wife her engine won't be in by this weekend and it's going to cost another fortune to fix it?


I had the same on my 650 engine when rebuilding it so replaced the timing chain and gears. Mine had probably about the same amount of movement. I was quite surprised how slack it was, also it didn't have any tab washers to secure the bolts. Afterwards there was virtually zero movement.
You can see in the pictures below of a before and after. I didn't provide a finger but you can see the slack by how it's hanging on the gears.
You can see in the pictures below of a before and after. I didn't provide a finger but you can see the slack by how it's hanging on the gears.
Attachments
The conrods are meant to have that sideways movement to let them find their own centering.
You could easily fit a new chain and sprockets set cheaply without going any deeper into the engine and it definitely shouldn't have that slack.
But to have that level of wear probably indicates it's done a few miles and that other components might be on the edge.
It's your call, I wouldn't ignore the obvious once seen and when it's fairly easy to fix. But whether you should now strip the engine? It's so easy to remove the engine later if you want to have some summer fun, I would chance it. I'm guessing that you're not planning a round the world tour just now so you can work out any problems without ever being too far from home.
You never explained how the bonnet was sorted.
The car's looking really good now.
the hobbler
Distinguished member
- Joined
- Jul 25, 2012
- Messages
- 4,421
- Points
- 1,112
I tend to agree with Peter--fit new timing chain and sprockets (it should not have that amount of slack) and then use it over the summer. If you want to carry out a more major overhaul, book it in as a 'over the winter' project. Replacing the timing-chain and sprockets is quite easy. The cam-sprocket will only line up with the cam in one position, and the crank sprocket will have a timing mark on one side (the OUTSIDE). With the big crank-shaft nut off, you will find that there is quite a bit of 'end-float'. this will disappear when you do the nut up again (TIGHT). You will find a timing mark on one of the sprockets is 'on' a tooth, and the other sprocket has its timing mark between 2 teeth---you line the mark ON a tooth with the mark BETWEEN the teeth. If your new chain has little oil throwers on it, these go on the OUTSIDE. Don't forget to clean out the centrifugal oil filter. Whilst you're about it, I would also put a new seal in the timing-chain cover, Plus new gasket and filter '0' ring. By the way Damian, there are 2 500s on Mersea Island--West Mersea beach area.
OP
OP
Paolo66
Established member
- Joined
- Feb 6, 2013
- Messages
- 1,004
- Points
- 235
Thanks Tony, Peter and Tom. I knew you 3 would reply and have the answers. I thought the chain should be tighter than that and thinking about the con rods last night I came to the same conclusion. I've decided that I'm going to strip the engine a little further to clean and inspect. I have a gasket kit and will order a timing chain, sprockets and cover seal. Put it all together and enjoy it over the summer. A winter project?
Similar threads
- Replies
- 7
- Views
- 571