Technical Project Paolo

Currently reading:
Technical Project Paolo

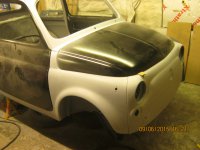
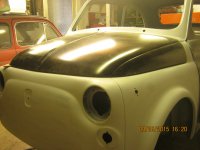
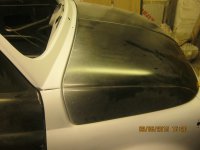
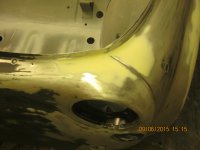
Here's some during and after photos.
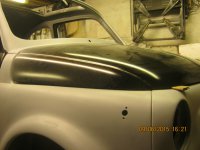
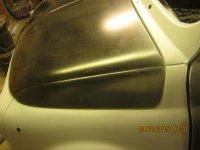
You can see where I welded the top edge together and the skim of filler I applied to deal with the witness marks from the tweaks to the wings & f/panel
 

Attachments

  • IMG_9756.JPG
    IMG_9756.JPG
    1.2 MB · Views: 37
  • IMG_9755.JPG
    IMG_9755.JPG
    1.1 MB · Views: 42
  • IMG_9753.JPG
    IMG_9753.JPG
    1.1 MB · Views: 40
  • IMG_9752.JPG
    IMG_9752.JPG
    1.2 MB · Views: 37
  • IMG_9751.JPG
    IMG_9751.JPG
    1.1 MB · Views: 36
  • IMG_9739.JPG
    IMG_9739.JPG
    1.1 MB · Views: 38
  • IMG_6435.JPG
    IMG_6435.JPG
    2.4 MB · Views: 39
  • IMG_6436.JPG
    IMG_6436.JPG
    2.4 MB · Views: 37
Looking at yours Tony I would say mine is about the same the only difference is that mine isn't even. But where I was trying to get the front lower it would seem I need to get the back higher which should be easier. I need to look back at some old photos and see how he used to be. I cant remember being able to see the front rubber when the bonnet was shut but you can on yours as well

Funny you should say that! I looked at one of your first posts when you got the car and the sides of the bonnet were quite close to the front of the wings originally. I didn't look like an equal gap all the way around.

As I said I think mine sits higher because I have that additional rubber seal but the seal protects the top lip and serves a good purpose, so I am happy with the gap as it is equal all the way round.
 
Putting the bonnet issue to one side at the moment and cracking on with the rest. To move the seats backwards or forwards originally was a real struggle. I used to have to sit on the back seat and kick the seat back with my legs. I've removed the runners from the seats and will get those moving smoothly before refitting them to the seats. Fastened the carpet down with a couple of self tappers and some double sided tape over the wheel arches. Also fitted the centre console. To clean up the metal kickplates over the door rubber I used the tried and trusted method of tin foil and white vinegar. They came up a treat. Also fitted the sunroof which was going grey with the sun. Rubbed in some tyre black cream I had in the garage and its come up like new!
IMG_0261.JPGIMG_0262.JPGIMG_0263.JPGIMG_0265.JPGIMG_0266.JPG
 
Here's my bonnet alignment to make you feel better.....
 

Attachments

  • IMG_0482.JPG
    5 MB · Views: 43
Fitted the interior roof headlining using double sided gorilla tape. Strong stuff so it shouldn't fall off. Bled the brakes. Had a couple of leaks from brake pipe unions but after tightening no problems. Pedal is nice and solid now
 
Been cleaning the gearbox and modifying the oil boots with a viton seal before putting it on the car. Looking at it before I thought a quick scrub and then I would have to end up spraying it with engine enamel. After cleaning and scrubbing I've decided to keep it natural aluminium as it's come up really well. My driveshaft oil boots were slightly leaking and the rubber had gone hard and set. Replaced the oil seals with a softer viton type and then softened the boots by soaking in hot water and then coating in vaseline. The proof will be in the testing but they certainly won't be any worse than they were.
IMG_0277.JPGIMG_0271.JPGIMG_0272.JPGIMG_0273.JPGIMG_0274.JPGIMG_0275.JPG
 
I've replaced two sets and the car hasn't moved.
Even the current set fitted in the autumn are ruined...
I'm going to attack my ill fitting bonnet tomorrow...
It will be back at the body shop for finishing but right now I just want to drive it.
Are you going to cut yours?
 
I've replaced two sets and the car hasn't moved.
Even the current set fitted in the autumn are ruined...
I'm going to attack my ill fitting bonnet tomorrow...
It will be back at the body shop for finishing but right now I just want to drive it.
Are you going to cut yours?


I've got my body work guy coming to look at it this week
 
The adhesive for sticking the window weatherstrip into the door frame.
Its an adhesive which you apply to both the door and the rubber weatherstrip- allow to dry and then bond together.....apart from the end that mates upto the quarterlight. Thats stuck in after the quarterlight is fitted.
Its easily the most horrid job - i walked away so many tines whilst doing the doors to prevent a tantrum
 
Wasn't aware I needed any adhesive. Maybe have to leave that bit for another day then. My doors are completely bare and not on the car so it will probably take me all day to get them hund and all the lock and winders in.
 
Do you have replacement strips?
They fit from just about the door lock - round the frame to the quarterlight.
 
IMO you need new weatherstrip but maybe yours is good enough to reuse.

mine was very tired

now perky and tidy!
 
I used 'new' weatherstrips when I did my resto 3 odd years ago. I have found that on both doors the fabric that is moulded into the actual strip has started to come away where the strip bends around the back of the door frame. Not sure what the fix is, it looks untidy but it's not the end of the world.

Joe R
 
I will probably going to finish my car today just the sill trim to put on. I will have to do the caster camber ect after a few miles.I used Raptor underseal on mine sprayed on with the shell on its side.I also have a 69 mini and the Fiat body is much stronger. If anybody is using Raptor underseal try softening it a little bit with a plasticiser as mine is a little brittle on the edges.The good thing about this system you mix body clour with the underseal and its supposed to last 20 years.
 
Been doing the doors today. Couldnt get a decent shut or fit so had to bite the bullet and remove the hinges and carry out some mods. Had a result as the door now shuts fine and the gap between the door and front wing has closed up. Will have to repaint the hinges but can live with that. Got all the door bits out of the loft to find all the rubbers and trims in a bit of a state so have decided to replace it all. Yet another order in to LvdL. Finish off the doors next weekend once the order arrives then its just the engine to clean up and fit!
IMG_0289.JPGIMG_0290.JPGIMG_0291.JPGIMG_0292.JPG
 
Back
Top