

You are using an out of date browser. It may not display this or other websites correctly.
You should upgrade or use an alternative browser.
You should upgrade or use an alternative browser.
Technical Project Paolo
- Thread starter Paolo66
- Start date
Currently reading:
Technical Project Paolo
")
OP
OP
Paolo66
Established member
- Joined
- Feb 6, 2013
- Messages
- 1,004
- Points
- 235
Another day, another problem! The bonnet. The first problem I have is the little spring catch that stops the bonnet flying open. I have a new bonnet and new front panel. Even if I have the bonnet all the way forward on the hinge the catch is still too far forward for the hole in the bonnet. And then of course if I could get the catch in I would have a big gap line at the back. At the moment I don't know how I'm going to fix it. Time for a beer and a ponder
AndrewHarvey
Established member
- Joined
- Jan 17, 2015
- Messages
- 1,471
- Points
- 290
I have exactly this problem- its back to the bodyshop for my car.,.
OP
OP
Paolo66
Established member
- Joined
- Feb 6, 2013
- Messages
- 1,004
- Points
- 235
I have exactly this problem- its back to the bodyshop for my car.,.
I've got a couple of ideas Andrew. I could of course drill off the bracket that holds the clip and then weld it back in another spot but I dont want to go down that route with a newly resprayed car. More investigation tomorrow
I had a new bonnet and had to trim the lip that folds inside the bonnet area all the way around with a tiny little cutting blade on a Dremel. I had to take off 10mm in places. Otherwise the lip was catching on the other lip on top of the front panel and the wings and pushing it way too forward, it would have scrapped all the paint off.
Fortunately I live not too far from Ricambio so I was allowed by Franco to select which pattern bonnet appeared to have the best spot welds etc... some of them were really ropey. Having seen that they were dodgy I test fitted it before the car was sprayed. I know it isn't a lot of good to you Damian but if it is the same thing causing your problem it wouldn't be too difficult to trim and then make good with some paint afterwards. Did your sprayer give you any of the paint he used after he completed the job?
Fortunately I live not too far from Ricambio so I was allowed by Franco to select which pattern bonnet appeared to have the best spot welds etc... some of them were really ropey. Having seen that they were dodgy I test fitted it before the car was sprayed. I know it isn't a lot of good to you Damian but if it is the same thing causing your problem it wouldn't be too difficult to trim and then make good with some paint afterwards. Did your sprayer give you any of the paint he used after he completed the job?
AndrewHarvey
Established member
- Joined
- Jan 17, 2015
- Messages
- 1,471
- Points
- 290
This explains my poor fitment!
Im not cutting my bonnet to fit though.....the bodyshop should of checked the bonnet closing before paint.....so they can bloomin' well sort it now...
Im not cutting my bonnet to fit though.....the bodyshop should of checked the bonnet closing before paint.....so they can bloomin' well sort it now...
OP
OP
Paolo66
Established member
- Joined
- Feb 6, 2013
- Messages
- 1,004
- Points
- 235
Yes I've got some spare paint. I did quickly check the bonnet before paint but with hindsight I should have spent more time on it. I've got a couple of ideas to try first and if they dont work will have to resort to cutting metal!
Yes I've got some spare paint. I did quickly check the bonnet before paint but with hindsight I should have spent more time on it. I've got a couple of ideas to try first and if they dont work will have to resort to cutting metal!
Sorry to see you have hit these roadblocks. I have a new bonnet and front panel. Seeing these posts i will go to the effort of attaching the release cable and setting it all up before any paint goes on. Another valuable lesson learned from the forum.
It is so critical to the look of the car that it's worth taking ages on the bonnet. I had no choice since the bulkhead under the windscreen and the hinge had to be replaced on Murf. The fit of the bonnet at that point is unavoidably not a good as factory. But it is a measure of the precision of original panels that because of the retention and repair of the original bonnet and front panel, the bonnet adjustment to a good fit was straightforward despite the carnage wrought.
I think maybe the radius of the curve of repro panels is a bit flat?
I think maybe the radius of the curve of repro panels is a bit flat?
I also had to trim a good 2-3mm off the inside lip of the bonnet to make it fit over the lip of the front wings & front panel.
I didn't have too many problems with the bonnet catch though.
One thing I always did as a panel beater was to fit the panels to the car and make sure all locks and catches etc fit before painting. Otherwise the sprayers used to get right cheesed off if they had to paint the panels again after.
Fit it, check it, check it again before going to paint!
OP
OP
Paolo66
Established member
- Joined
- Feb 6, 2013
- Messages
- 1,004
- Points
- 235
I think its worse than I thought. Spring catch was fitted at an angle. Drilled out the pin holding that in which meant is was then not getting in the way and I could have a go at closing the bonnet on the catch. Found a couple of places it was touching the lip so hit them with a hammer but was still touching. Time for more drastic action. Got out the angle grinder and cut away at the bonnet lip as much as I dared but still leaving the strength in the centre bit where the catches go. It still catches in the centre bit and I can't cut away anymore metal as it would seriously weaken the centre section where the catches and rubber goes. I dont know how to move forward now as even buying another bonnet would probably get me the same result. I'm deflated at the moment as I was still on course to finish by Easter but not now. And I still have to tackle the dreaded doors!
Don't be defeated Damian, it's like when an engine won't start...you know it will go eventually.
Logically now, it looks like you are going to have to modify/weld something. If you end up needing the front panel and bonnet refinishing then it's an expense but not the end of the world as each can be done relatively easily..especially the bonnet of course.
So far you have understandably tried to go softly, but if you accept that you are going to have to disfigure things a bit you might be able to figure this out better.
To me it sounds like the front panel has ended up welded on too far forward and maybe the catch mechanism is in the wrong place.. It might also be that the bonnet has been made wrong. Can you explore the possibility of fabricating a new section for either or both of those panels around the offending area, It would be painful to do as you would need to be so careful but you could then bolt up the bonnet exactly where you want it and then weld in the sections to fit.
Another important thing to remember is that the bonnet seal and rubber buffers all work together to make the bonnet sit slightly differently than it might do in the raw state. It's worth including their dimensions in your dry run in fitting the bonnet.
Last edited:
Lets have some photos so we can see if we can come up with a solution?
OP
OP
Paolo66
Established member
- Joined
- Feb 6, 2013
- Messages
- 1,004
- Points
- 235
Will do Sean. Bit difficult to take photos of the areas affected. My plan now is to try the old bonnet. If this fits then the problem is all in the new bonnet. If this struggles to fit then problem is front panel. The bonnet will be easier to fix than the front panel
OP
OP
Paolo66
Established member
- Joined
- Feb 6, 2013
- Messages
- 1,004
- Points
- 235
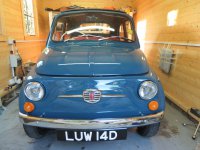
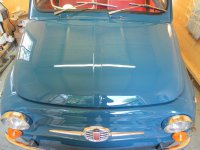
I tried the old bonnet and its slightly better but not how it should be. The new bonnet bottom lip needed lots of bending as it kept hitting the wings. Now though both bonnets have a big gap at the front suggesting the front panel is too low but how can it be as its flush with the wings? Without ripping off the front panel, which I'm not going to do, I don't know what the answer is. So near the end yet so far!


It's a tough one looking at those pictures. I wouldn't say the gap where the latch is, isnt excessive. Are the bonnets bolted on to the rear hinge in these pictures?
I have seen varying gaps on 500's the bonnet tends to sit flatter on one side of a some 500's because of where part of latch is positioned slightly to one side. You see some 500's with a small gap one side and big gap on the other.
I looked back at Sean's thread and his bonnet sits much closer to the wings and the front panel than mine does, probably because knowing Sean he was a stickler to get it just right, it's probably better than it originally left the factory.
Mine by comparison has a bigger gap all the way around but it's equal, I think that is down to the fact that I have that extra rubber seal that sits over the lip on the wings and front panel.
Attachments
Last edited:
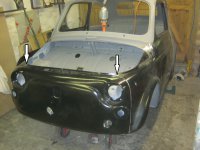
Sadly you are a victim of pattern panels.
The quality of these are not bad but a certain amount of tweeking is required for a perfect fit.
Technically you just butt the wings up to the front panel and weld. Although before I welded mine up I did a trial fit and had the same issue as you. With the main upright joins welded, this will hold the wings together, then with the bonnet in place you can gently lean on the areas pointed in the photo. This will push down the leading edge of the wings and the front panel enough to give you the clearance all round the bonnet.
The bonnet is slightly higher along the front edge anyway, but not quite as much as yours. I would imagine the bonnet wont even catch over the front lock as there is too much of a gap.
You may be able to lean on these points to improve matters. On mine I welded the top lip together. Which is not original but I felt it would be stronger as it would reduce flex and cracking of the joints. I don't think yours was welded so you may have some give.
The danger is that you may cause the seem to split and crack the paint.
But sadly I don't think you have much alternative.
A good panel beater would be able to make the fit better within an hour or 2 plus a bit of painting.
Attachments
OP
OP
Paolo66
Established member
- Joined
- Feb 6, 2013
- Messages
- 1,004
- Points
- 235
Looking at yours Tony I would say mine is about the same the only difference is that mine isn't even. But where I was trying to get the front lower it would seem I need to get the back higher which should be easier. I need to look back at some old photos and see how he used to be. I cant remember being able to see the front rubber when the bonnet was shut but you can on yours as well
OP
OP
Paolo66
Established member
- Joined
- Feb 6, 2013
- Messages
- 1,004
- Points
- 235
A good panel beater would be able to make the fit better within an hour or 2 plus a bit of painting.[/
Do you know any? LOL
Similar threads
- Replies
- 7
- Views
- 872