

You are using an out of date browser. It may not display this or other websites correctly.
You should upgrade or use an alternative browser.
You should upgrade or use an alternative browser.
Technical Project Paolo
- Thread starter Paolo66
- Start date
Currently reading:
Technical Project Paolo


IanEmery
Established member
Molto bene! ") Lavori bella.
Lavori bella.
Lavori bella.
Last edited:
I ended up P clipping the fuel pipe under the rear seat panel. Those bendy clips didn't give me a lot of confidence.
Good idea, which I will nick in the future....nice mod. I welded on new steel strips before painting...an easy job and seems likely to be alright for another forty years. But pipe-clips is a lot more secure and better engineered.
 JAN_5832 by Peter Thompson, on Flickr
Good idea, which I will nick in the future....nice mod.
Wash your mouth out!!!!!!!!!
OP
OP
Paolo66
Established member
- Joined
- Feb 6, 2013
- Messages
- 1,004
- Points
- 235
Electrics all done just a couple of tweeks to do to the front lights. Gonna order some new rear lights as mine are looking tatty and the rubbers dont fit properly. And before someone says it I know the fuses aren't lined up but they will be [emoji12]


Word of warning the new ones aren't much better. I had to cut and glue one rubber. One of my new lamps cracked on screwing it together and ended up buying another one
And before someone says it I know the fuses aren't lined up but they will be
Doesn't matter Damian as you have polished the spade connectors.
- Joined
- May 27, 2010
- Messages
- 417
- Points
- 138
Was so disappointed in the new tail light rubber seals (fit and finish) that I went back to the old ones. Of course the old ones don't quite fit the new lenses.
Put the old seals in hot water. then stretched them around the new lenses and clamped them and then left them. Had to keep the water hot for a while. Eventually came up with a fit that gave me a seal against the body work. Never easy with new and old parts.

Joe R
Put the old seals in hot water. then stretched them around the new lenses and clamped them and then left them. Had to keep the water hot for a while. Eventually came up with a fit that gave me a seal against the body work. Never easy with new and old parts.
Joe R
Rubber hardens with time as a mixture of heat, oxygen and UV radiation degrade the sulphur cross links that make vulcanised rubber soft and pliable.
Whilst you can't reverse this reaction, you can re-soften rubber for a short period of time, sufficient to fit the part.
Soak the rubber part in a bowl containing 25% methyl salicylate (standard liniment), which itself is immersed in an outer bowl of boiling water, for one to two hours. The rubber will emerge 'like new' but over time (~24hrs) will revert to a slightly softer version of what it was previously. The process can be repeated.
It's a good method of softening old rubber parts, particularly old gaskets, when you can't get good replacement parts. Probably wouldn't use it on critical parts like hydraulic components etc. but for body trim bits, it's magic.
I've used this method several times with excellent results. Beware though, it leaves the house smelling of liniment for a little while.
Chris
OP
OP
Paolo66
Established member
- Joined
- Feb 6, 2013
- Messages
- 1,004
- Points
- 235
Electrics are holding up progress at the moment. I bought a new loom and the front part is fine but the rear now needs some modifications. I have wrapped my looms with loom tape to make for a neater job.When I have routed the rear section the wire for the door switch that activates the rear view mirror is coming out near the rear seat! This should be in the front compartment. The + coil wire is also routed down the left hand side of the engine but my coil is on the right hand side closer to the distributor. Will have to re-route this and extend it and then also modify the wires for the alternator conversion.
OP
OP
Paolo66
Established member
- Joined
- Feb 6, 2013
- Messages
- 1,004
- Points
- 235
Paolo is on his wheels, not through choice though. As today has been sunny I thought I would push him out the garage and let him enjoy the sun. When I pushed him back in again the rear wheels on the pallet came off and the car collapsed! Luckily I had all four wheels on so no damage was done. Electrics almost done now just a bit in the engine bay to finish off.


OP
OP
Paolo66
Established member
- Joined
- Feb 6, 2013
- Messages
- 1,004
- Points
- 235
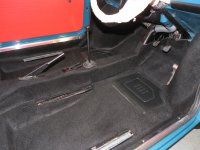
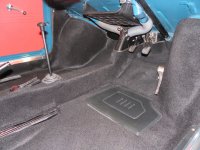
Electrics are finished. Got the original rubber mats out and they are in a bit of a mess. After a bit of deliberation we have decided to go for carpet. So yet another order has gone in to LvdL which includes glass rubbers and 4 new tyres! How is the carpet fixed in place? Any tips for getting the glass in safely? It came out really easy but I've a feeling refitting won't be as straight forward. Started on sound deadening now in preparation for new carpet turning up.
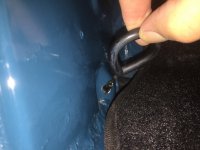
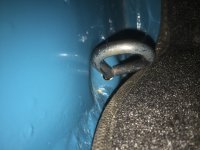
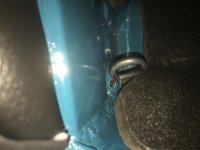
If anyone else has a cable pull bonnet release instead of the lever can you tell me how its attached to the body?
On the end of the cable by the loop there is rubber bit that sits, inside the car, into the hole in the firewall, so when the cable is pulled tight on the latch it just sits in place and doesn't move and prevents the cable itself from rubbing on the bodywork.
OP
OP
Paolo66
Established member
- Joined
- Feb 6, 2013
- Messages
- 1,004
- Points
- 235
On the end of the cable by the loop there is rubber bit that sits, inside the car, into the hole in the firewall, so when the cable is pulled tight on the latch it just sits in place and doesn't move and prevents the cable itself from rubbing on the bodywork.
Thanks Tony. You haven't got a photo have you? That's how I thought it went but it doesn't look right or secure
Thanks Tony. You haven't got a photo have you? That's how I thought it went but it doesn't look right or secure
Sorry for the delay Damian. I was nearly right in my description, the rubber bit on the end of the cable sits inside the bonnet area, so when you pull the release cable it pulls in towards the drirection you are pulling to prevent the bodywork scratching. When it's static and doing nothing it sort of disappears into the bonnet side a bit but is prevented in going anywhere by the loop, so it's not physically fixed at all to the body.
Attachments
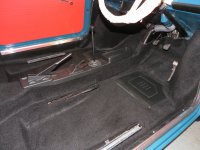
Anyone who has a carpet fitted but hasn't got the L centre console, how did you fit it around handbrake, gearstick etc?
Do you mean the black plastic tray that sits over the tunnel? If so I think you will find it difficult to make it look tidy without fitting one?
Attachments
Similar threads
- Replies
- 7
- Views
- 890