OP
OP
Full version.
[ame]https://youtu.be/mOq3DLzKVp8[/ame]
[ame]https://youtu.be/mOq3DLzKVp8[/ame]


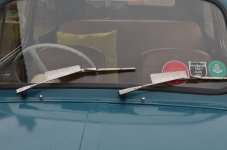
This is a treasured modification and one which I think will address the slightly weak pressure that Fiat 500 wipers apply to the windscreen in most weather conditions.
slippery slope with these mods though My eyes were actually drawn to the cushion on backseat modification. Functional, aesthetically pleasing and something I’m technically able to do. I might give it a go!
That was a great mod but not one I can claim as my own idea,
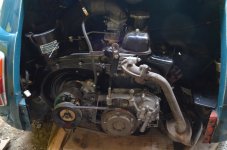
Even Murf has had his wings clipped now that it seems socially unacceptable to do any sort of driving that involves pleasure. As all drives in Murf are pleasurable I have decided to get to the bottom of few issues which require time. (which I have a decent amount of just now), and which take him off the road for a few days.
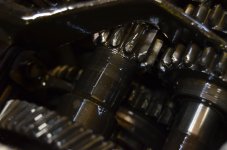
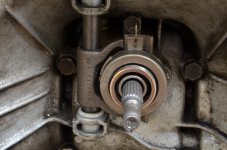
First target was the gearbox. Although I rebuilt it only a bit more than a year ago, I cut corners and didn't replace first gear etc. It was very noisy in first gear but worked well until recently when it started jumping out of gear on a permanent basis.:bang: The only way out of this is to replace the whole set, which I'm not planning to do just now. I have given a spare box a quick once-over and will use that to get me going for now.
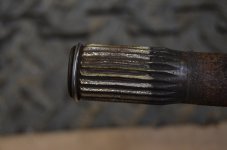
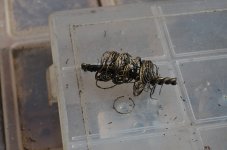
I'm quite surprised at the wear on the driveshaft splines, which have been distorted out of alignment. These were brand new, with matching couplings probably less than 6,000 miles ago...not a great reflection on the quaity of parts. Maybe it's time to have another look at the upgrade options on these?
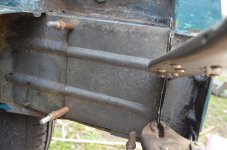
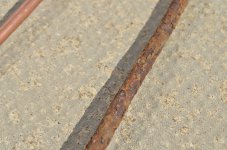
Whilst the engine is out I was able to derust and paint the rusty side-panel I had spotted in the engine bay. I quickly discovered it has some serious corrosion in this harsh location where it has almost as hard a life as the exhaust silencer. When I restored the bodywork 11 years ago, this area was in good condition although the nearside had some necessary repairs; it shouldn't be too hard to fix.
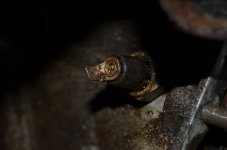
For a long time the engine has had had an annoying oil leak...more of a dribble really. It's one that has been hard to locate but close inspection shows at least once source of the contamination. It's the top of the oil-pressure sender which is rotating and rocking a little inside the metal part....at least there's an straightforward fix there!
It's not easy keeping one of these things meandering on the road permanently!
....................................
It's not easy keeping one of these things meandering on the road permanently!
I think you need too look at the Duo 500 technique... Two 500s, that is drive one while fixing the other...
that will mean zero down time...
also you could be naughty and paint them both the same colour and fit the same plates... then no one would know...
), repainted the rocker-cover and starter-motor (after inspecting the brushes) and re-glued one of the gearbox rubbers onto its backing. But the main job remaining is to repair the rusty panel in the engine-bay photographed previously. Once I opened it up and cleared way the worst of the rust I was surprised just how good the inner panels are. None of these have ever been replaced before and it's good to see what a tight and precise fit it all is...no sealant used at the factory or necessary. I've made new pieces to fit and re-primed the interior before welding. I also had to remake the removed section of the exhaust-shielding shelf and it's bracket; these had no integrity left once I had removed the paint and rust. You may notice that my new steel is pre-patinated....I had to dip it in my acid-tank to remove the rust from it lying about so long. I can't get any more at this time and the next thing is that I expect to run out of welding gas and wire.:bang: I don’t know if you remember I ‘P’ clipped my pipe to the underside of the rear seats as I didn’t have a lot of faith in those little pinch clips that hold it in place.Is that fuel pipe the one that runs through the centre tunnel, then under the rear seats?
I don’t know if you remember I ‘P’ clipped my pipe to the underside of the rear seats as I didn’t have a lot of faith in those little pinch clips that hold it in place.
About time we had a Murf update.
Joe R
Obviously a full report will need to be made...Murf's third engine going onto his third gearbox.Thank you for that. I never thought of that simple solution with the carb.... I'm onto it. [emoji106][emoji16]As expected you did a good job with that engine
If you wanted to reinstate the fuel return pipe you could just fit a different carb top cover for the moment, might help wit fuel cooling.
As expected you did a good job with that engine
If you wanted to reinstate the fuel return pipe you could just fit a different carb top cover for the moment, might help wit fuel cooling.
As I'm chasing some of the same fuel heating issues, I'm curious of a couple things:
1) Does the 28 IMB cover fit on a 26 IMB carb?
2) If so... anyone have a spare 28 cover they'd part with? or can they recommend the best source for a 28 carb? I see ones ranging from $90 to $400 - what's the quality spread like on these "new" ones?